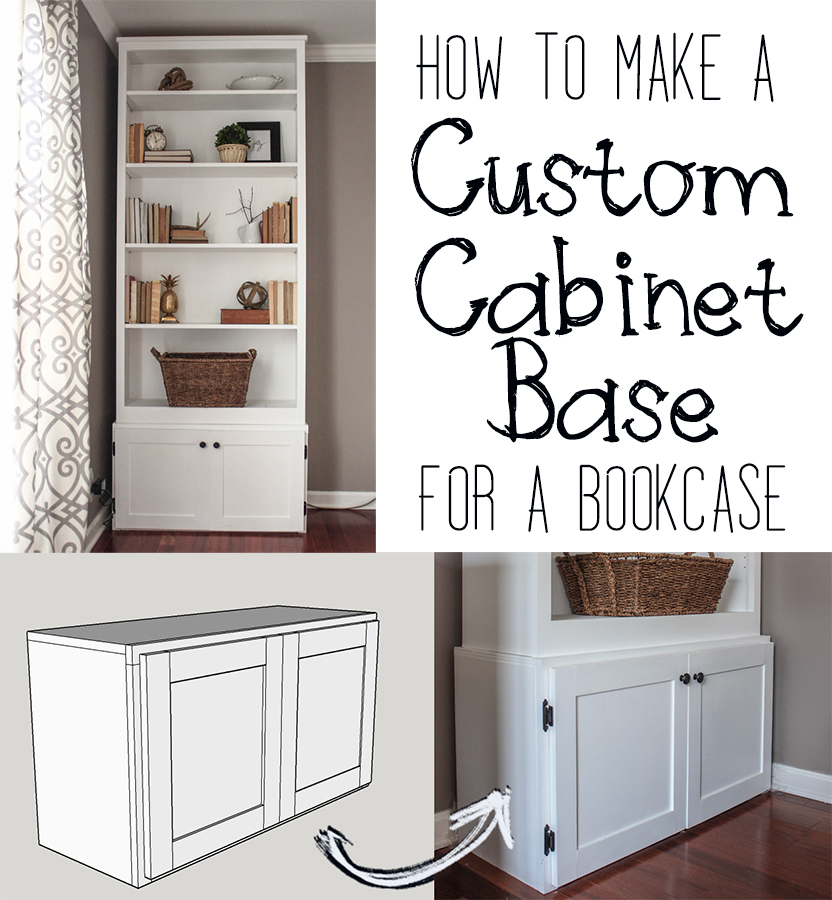
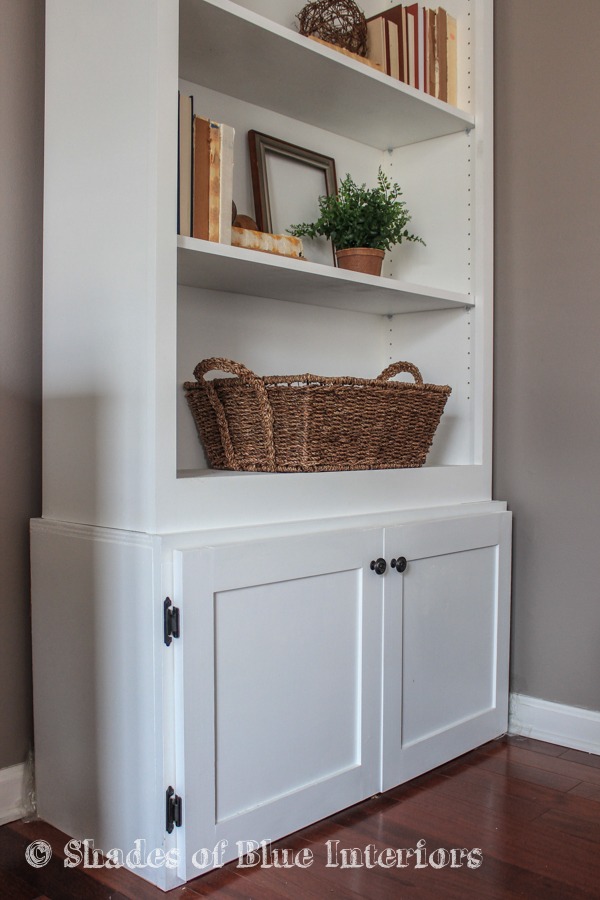
A few months ago I received a couple of PureBond Hardwood Plywood bookcase/bookshelf kits (no longer available but similar is HERE) to review and put together. The bookcase units were a breeze to assemble, required no tools (except a screw-driver for only 3 screws) and are the sturdiest bookcases I’ve seen for the quality and price point. I will be giving more information on them in a future post, but suffice to say I was thrilled to have a couple of bookcases for my living room! I had been wanting to build some custom built-ins in my living room for awhile, and these were a great start. Only problem? They are only 6 feet tall and I have 8 foot ceilings! My solution?
Build some cabinet bases.
I used a combination of plans from Ana White. The actual body is an adaptation from her mom-plex kitchen cabinet base plans, if I remember correctly, and the doors are from her tutorial on Shaker-style cabinet doors.
Bruno (my husband) and I built these months ago using and I just barely figured out how to use Google Sketch up to give you some diagrams.
First of all, the measurements for this plan was designed for bookcases that have the following dimensions:
12″ depth x 35″ width x 72″ height
(although if you have a bookcase that is shorter, but the base measurements match, then you don’t have to change anything).
The measurements of the finished cabinet base are: 13″ depth x 36″ width x 20″ height
If your bookcase is a different size than mine were, make sure you add at least 1 inch to the width and depth. This will give you a 1/2″ lip on both sides and the front, making it sturdier.
Tools Needed:
measuring tape
pencil
square
safety glasses
hearing protection
Circular saw or Miter saw <– this is the one I got from the contest I won and it is my most FAVORITE tool EVERRRRR!
1/4 drill bit (to pre-drill hardware holes)
1/16 drill bit (to pre-drill hinge holes)
clamps
*Examine plywood and lumber for imperfections, ensuring they are straight, before purchasing*
Supplies Needed (for 1 base unit):
1 sheet of 4′ x 8′ — 3/4″ PureBond Hardwood Plywood** (the smaller size sold is not enough for 1 cabinet base, but this large sheet is enough to make 2)
1 sheet of 2′ x 4′– 1/2″ PureBond Hardwood Plywood
1 sheet of 2′ x 4′ — 1/4″ plywood
1 — 8 foot length 1 x 2 poplar board (paint grade)
1– 4 foot length 1 x 3 poplar boards
34, 1 1/4″ pockethole screws
8, 1″ pockethole screws
wood glue
4 face-mount overlay hinges (they are sold in a pair, so 2 packages)
2 knobs
White semi-gloss latex acrylic paint/primer (I used Behr Premium Plus in bright white)
wood filler (I only use THIS one because of the super smooth finish)
120 grit sandpaper
tack nails to attach back panel (optional)
**– I LOVE PureBond Hardwood Plywood because they are made formaldehyde-free in North America, and in comparison to plywood sold at Lowe’s I’ve found they splinter less, especially on the thinner sheets. That is why I chose to use it when constructing the base cabinet unit as well! (P.S. PureBond Hardwood Plywood is exclusively sold at Home Depot)
Cut List:
1 — 3/4″ plywood @ 36″ x 13″ (top)
1 — 3/4″ plywood @ 34 1/2″ x 13″ (bottom)
2 — 3/4″ plywood @ 18 1/2″ x 13″ (sides)
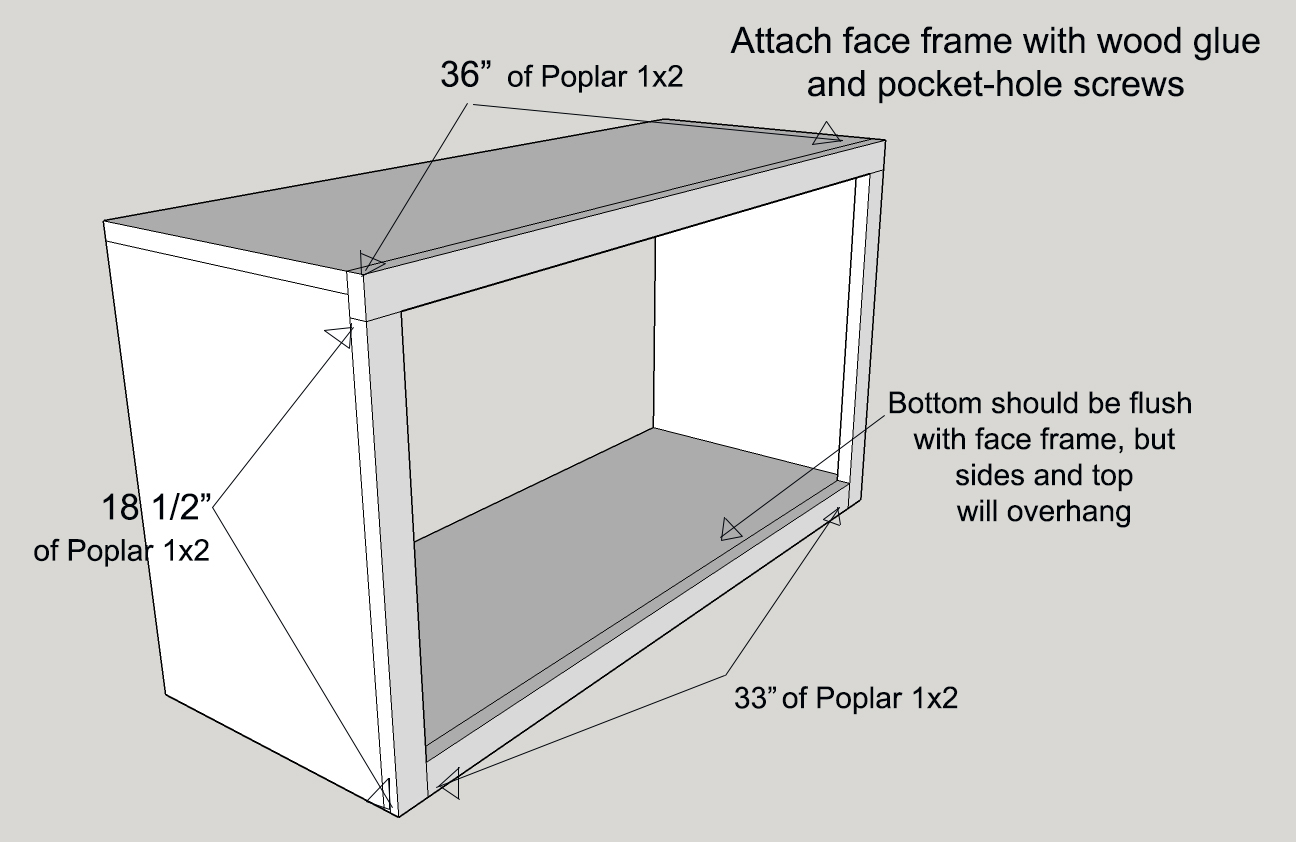
1 — 1 x2 @ 36″ (top of face frame)
1 — 1 x2 @ 33″ (bottom of face frame)
2 — 1 x2 @ 18 1/2″ (sides of face frame)
4 — 1 x3 @ 18 1/2″ (sides of door frame)
4 — 1 x3 @ 12 1/4″ (top and bottom of door frame)
2 — 1/2″ plywood @ 12 1/4″ x 13 7/8″ (door panel)
1 — 1/4″ plywood @ 36″ x 20″ (optional back panel)
Things I Don’t Mention Below in the Steps But You MUST Remember:
*Measure twice, cut once*
*Always use a square to ensure a proper and secure build*
*Always glue surfaces you are joining together before you use a screw. This will ensure a stronger, more secure hold*
Step 1- Attach Top and Bottom to Sides
Cut 3/4″ plywood to specified lengths and widths (I had HD do the cuts for me, which made it easier, but if you do this at home here is a tip to prevent splintering: Use blue painters tape to tape the line that you will be cutting. Draw the line on top of the tape, and cut over the tape using a circular saw or miter saw. Once cut it made, just remove tape and admire the lack of splinters! — I learned this tip from Shanty-2-Chic and their video tutorial on this tip HERE.)
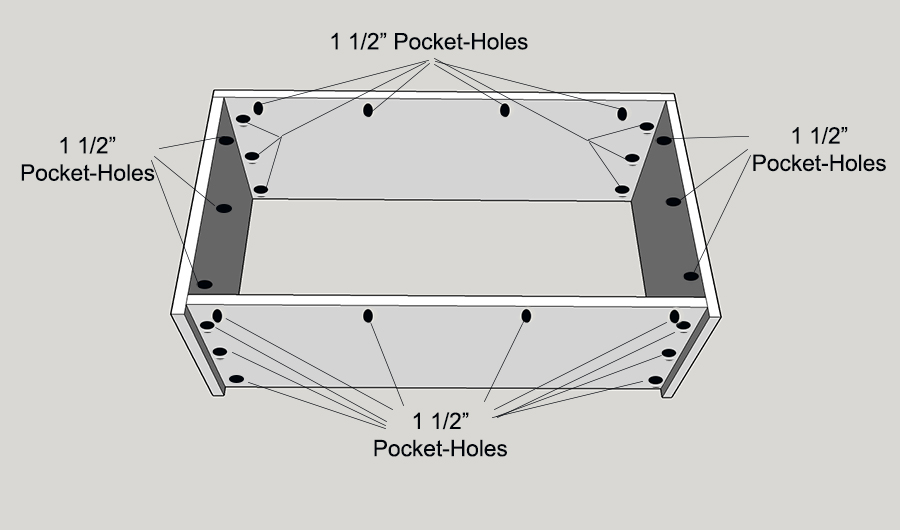
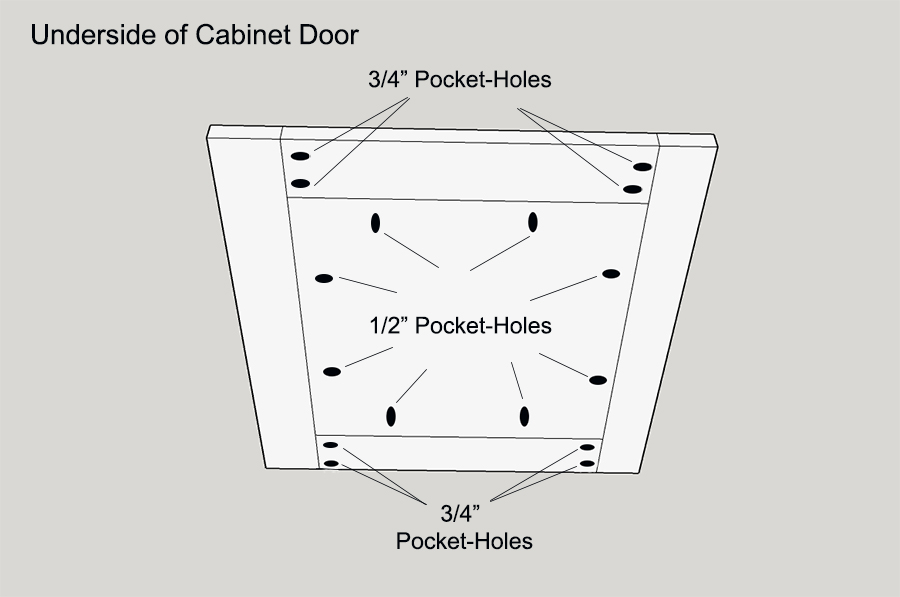
Using a Kreg Jig, drill 3/4″ pocket-holes on the top (underside) bottom (underside) and sides (inner, top and inner, front– closest to where face frame attaches).
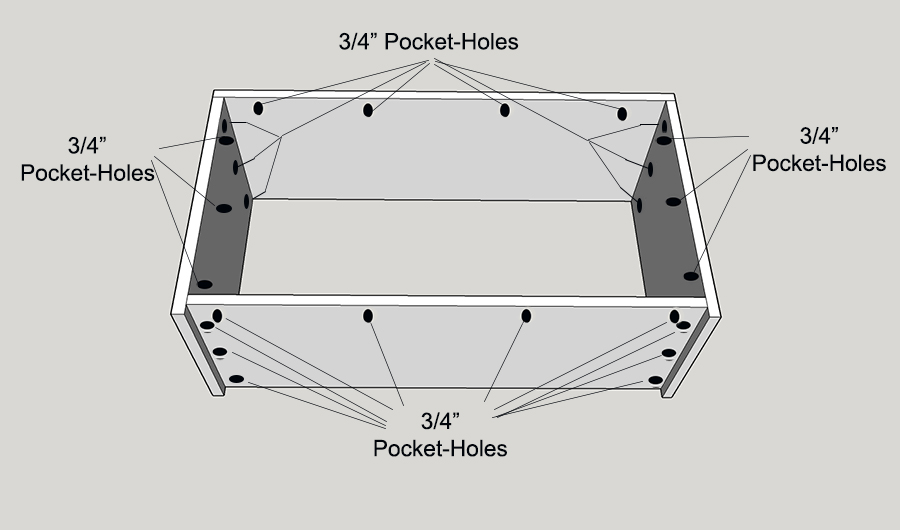
Using 1 1/4″ pocket-hole screws, first attach the bottom board making sure there is a 3/4″ rise. Because the pocket-hole screws are on the underside of the bottom board, I use scrap wood, stacked to the correct height (17″), put the bottom board down, underside up, and side boards in place to firmly secure together using the screws. Put the top board down on the ground and place the sides on top (unit will be upside down), so that pocket-holes are accessible. Attach 1 1/4″ pocket-hole screws.
Step 2- Attach Face Frame
Cut the 1×2 poplar board in the specified lengths. Attach top frame piece first using clamps (if you have a size big enough, if not you can always have a helper hold them in place). Work slowly, listening to make sure wood doesn’t split at the edges. Don’t over-tighten. Next attach side face frame pieces, and lastly, flip the unit upside down and attach the bottom piece, making sure it is flush with the bottom plywood board.
Step 3- Build Cabinet Doors
Cut specified lengths of the 1×3 board and the 1/2″ plywood.
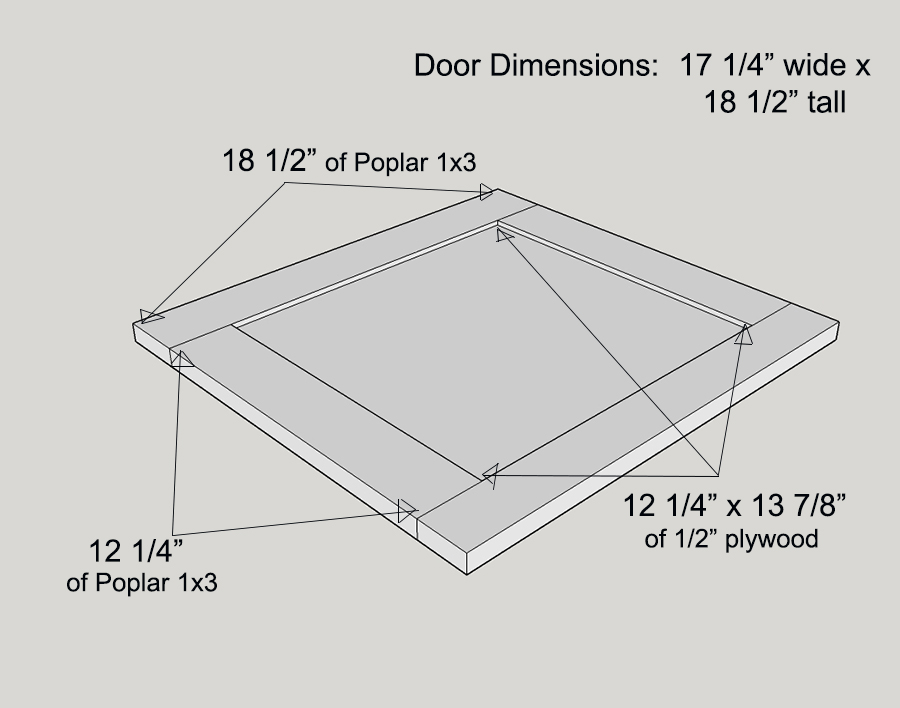
Using 1″ pocket-hole screws, attach the center panel flush with the shorter 1×3’s. You will need to use 1/4″ plywood scrap or something similar to place underneath the panel, so when you attach the sides, you get that 1/4″ lip on the front.
Then, one side at at time, attach the longer 1×3 sides to the center panel. Work slowly here also. Don’t over tighten or you could split the wood, since it is so close to the edges. Not the joinery between the 1×3’s uses 1 1/4″ pocket-hole screws, and the joinery between the center panel and the door frame uses 1″ pocket-hole screws.
If your center panel is cut too large you will have gaps on one side. It is best to err on the side of cutting it slightly smaller than the what seems mathematically correct (hence the height being 13 7/8″). If you have any small gaps or cracks, fill with wood filler, let dry and sand smooth.
Step 4- Sand and Paint
Sand the entire base cabinet and doors smooth with 120 grit sandpaper. No need to spend forever on it, just get a nice smooth surface, ready to paint. Wipe clean with cloth.
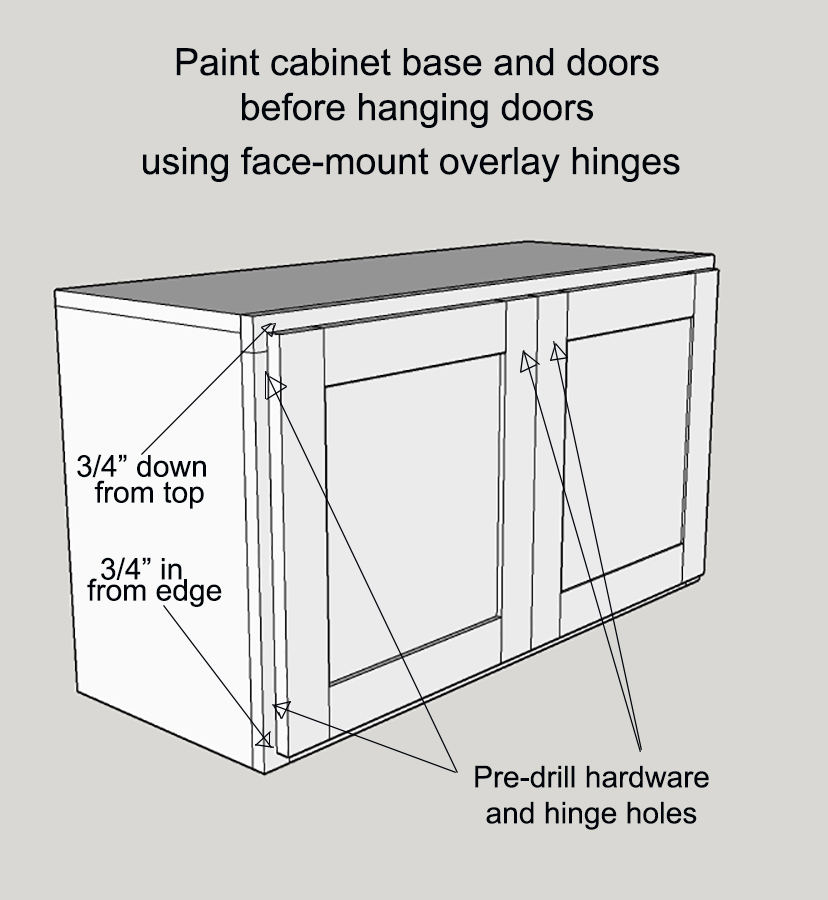
Paint 2 good coats on the entire cabinet base unit, including inside and doors. Let dry 24 hours from last coat before attaching hinges and hardware. Latex paint needs a good 24 hours cure time before coming in firm contact with another painted surface, otherwise it will stick.
Step 5- Hang Cabinet Doors
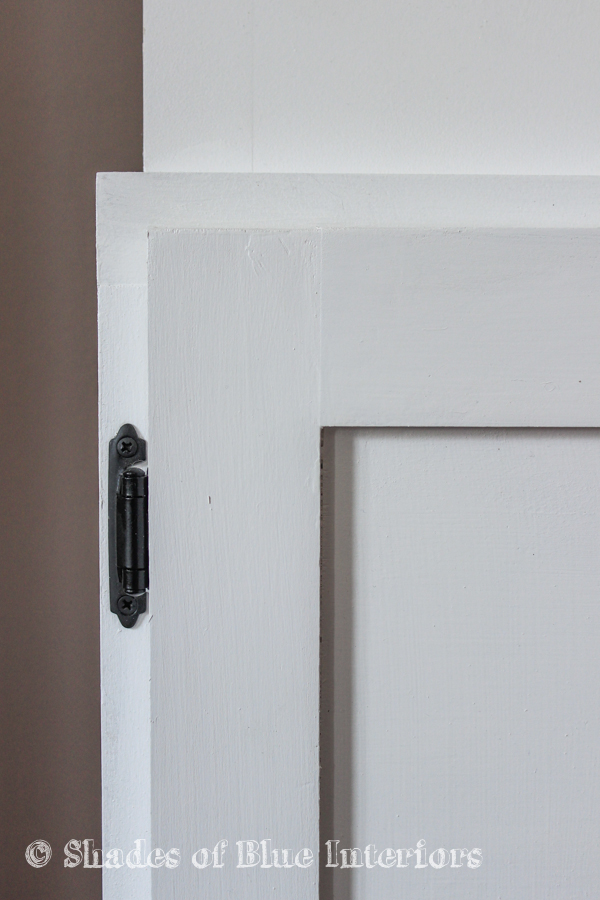
To hang the doors, center them on the face frame, 3/4″ from the top and 3/4″ from the sides. Then, measure the spacing for the hinges (how far apart you want them). Mark where the screw-holes will be. Using a 1/16 drill bit, mark off with tape on the bit to make sure you don’t go too deep, and pre-drill holes inside the cabinet doors, and on the face frame. While you have the drill bits out, go ahead and pre-drill a hole for the door knobs, using a 1/4 or larger drill bit. Attach doors. Note, the doors should have a tight fit, which will keep them closed.
I chose oil-rubbed bronze hinges and spray painted some old knobs I had lying around to match.
At this point you can choose to attach the 1/4 plywood using tack nails or you can leave it open to accommodate any hidden electronics that need the space for wires to escape.
And here is the finished product!
I got a super smooth finish using the HomeRight FinishMax paint sprayer, which I will talk about more in another post, but I would never paint a huge tall bookcase without that paint sprayer! It goes so fast, and the results and smooth and even!
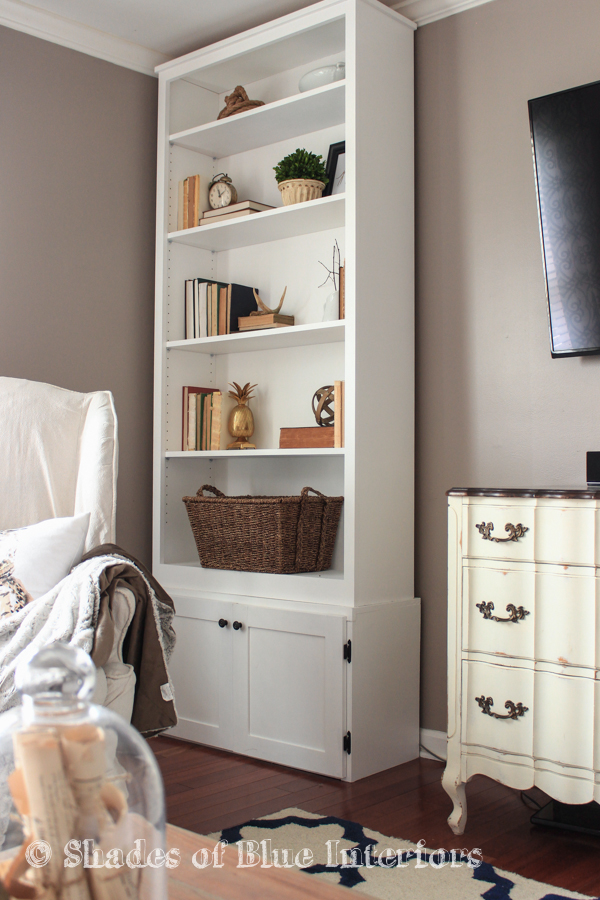
IMPORTANT! Once you place your bookcase on top of the cabinet base, use a couple screws to attach the bookcase to the wall in the studs (hide the screws behind removable shelves), so as to prevent tipping or falling.
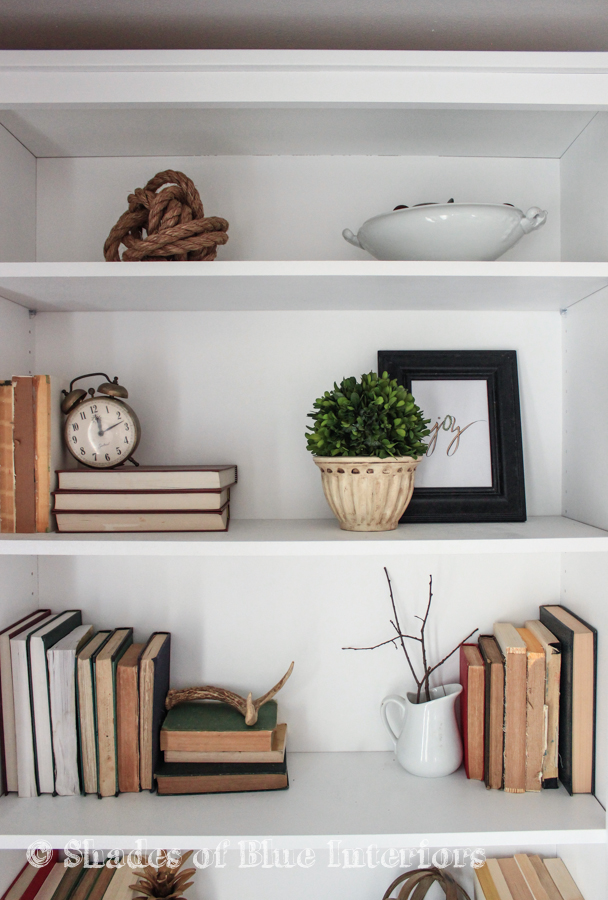
Now the fun part… styling!
Note: This post contains an affiliate link for Kreg Tools. It does not cost you anything. If you choose to purchase a anything from Kreg Tools I get a small percentage as referral compensation. The bookcases were provided to me by PureBond, but the opinions expressed here are my own.
What a great idea, Rachel! And the building plans look great 🙂
Oh, wow! They look amazing! I’m sharing today. x
These plans are fabulous! I’ve been looking for a way to add closed storage to the bottoms of our bookcases and was so excited when I saw this post. Thank you for sharing it!
Love this option! Had to feature it today on Ana-White.com!
Ana you are awesome. Thank you SO much!!
Could ikea billy bookcases work? Do you have any other similar suggestions? Are yours wood?
Yes IKEA bookcases work! Mine are plywood but where I got them doesn’t sell them anymore
Hi Rachel
I just wanted to thank you for your cabinet base plans. Many plans I’ve searched on the internet are confusing or omit full directions. Your directions were very easy to visualize & follow. I made the cabinet base but added a lot to the plans as this was a very special gift to my granddaughter. My daughter wanted a bookcase to match a bedroom set for my granddaughter. I work a lot with wood making all sorts of projects & I have to say this is my best ever project & probably the most challenging. Thank you, Marlene
I would love to share with you my completed project picture but I can not figure out how to insert the pictures. LOL, I can deal with tools but the computer is a different challenge for me!
Iam having a hard time understanding how to make the doors, this is my very first project. Maybe you can help me my base cabinets are 48 inches long/wide. I want 2 doors but don’t know how to proceed about doing that, also for the doors is the 1/4 panel cut to size then 1×3 moulding attached to top of panel. Please help me
Also do you have plan for bookcase for these base cabinets
I really like the classic looking design of those cabinets you have. I was thinking of installing something similar into my kitchen for our dishes and everything. We’ll have to look into what our options are and hire a cabinet maker that can give us some plan ideas.
What kind of wood did you use for this project
It was plywood— Purebond brand (so it’s nicer quality) and I believe it was poplar.
Is there a way to download this plan and print it out? I love this plan and would like to build it, but can’t get it printed out.
I’m sorry, this plan I didn’t create a printable version.