This post is sponsored by The Home Depot.
I’m so excited to share with you this cement tray project I did over the weekend! I was worried it wasn’t going to turn out as I envisioned but I’m happy to say it did!! My creative spin on the concrete tray as I announced last week, is this DIY Concrete Tray with Removable Coasters!

To make your own concrete tray at the DIH Workshop at our local Home Depot this Thursday evening, CLICK HERE.

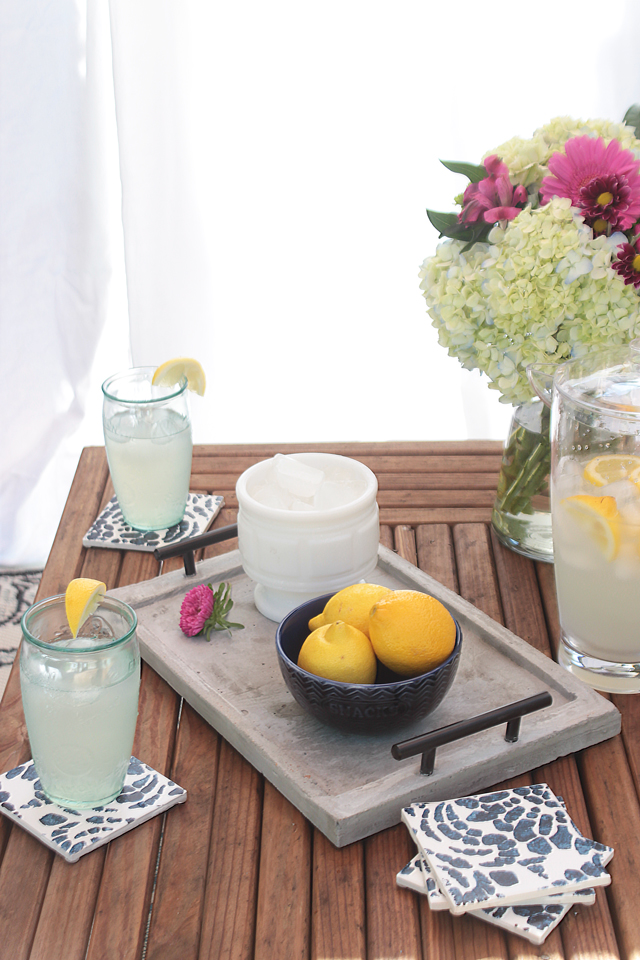
When I started thinking about what I would use a concrete serving tray for, I was like, why not have it serve a dual purpose? Instead of just serving drinks or food, how about it has some pretty tile inserts that are REMOVABLE and can be coasters?! That way it could be used outside OR inside!

I’m going to walk you through the tutorial for how I made my version, but if you are nervous about working with concrete, just register for the workshop at your local Home Depot, by clicking HERE and the professionals there will be there for every step of this project!
Supplies:
1- 3/4″ plywood (the cheap stuff) @ 2’x2′ (cut down to 17″ x 11 1/2″)
1- 1×2 @ 8′ (cut to 2 @ 17″ and 2 @ 10″)
1- 1/2″ plywood @ 2’x2′ (cut down to 2 @ 8 3/4″ x 13″)
2- scrap pieces of wood (could be 1×2 or 1×3 or 1×4, cut to 2 @ 14″)
Measuring tape
14 – 1 1/2″ wood screws
6- 3/4″ nails, 18 gauge
Plastic drop cloth
Tape
2- 4″ long drawer pulls (I got the Liberty Black Cabinet Bar Pull)
1- 10 lb bucket of quick-setting concrete
1 – small mixing bucket
1- trowel
Sandpaper (120 grit)
6- 4″x4″ white tiles
Navy blue acrylic or spray paint (suitable for tile)
Stencil
Outdoor Satin Clear Topcoat
22 Rubber bumpers (4 for each tile coaster and 6 for cement tray)
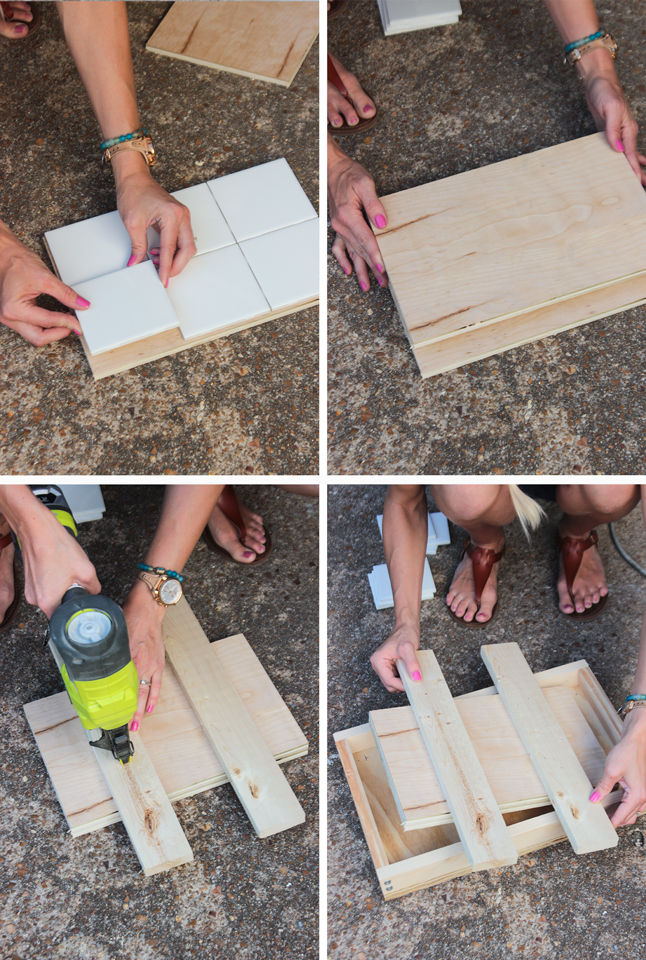
Step 1: Build the Frame
Clamp the short 1x2s between the long 1x2s so the edges are flush. Pre-drill holes in each side and attach together using the wood screws. Do not use glue. Place the 3/4″ plywood top top of the 1×2 outside frame, and pre-drill holes on all 4 sides, then attach using the wood screws.

Step 2: Build Mold for Tile Inset
Make sure your 1/2″ plywood is the right size for your tiles by placing all 6 tiles on top of the plywood, close together or touching. Stack both 1/2″ plywood pieces on top of each other. Place the scrap wood (1x3s are used here) across the long side of the stacked pieces, and nail them into place. This will allow the ‘mold’ for the tiles to sit into the concrete without sinking in, too far, as the 1×3 cross pieces will sit on the edge of the concrete tray frame.
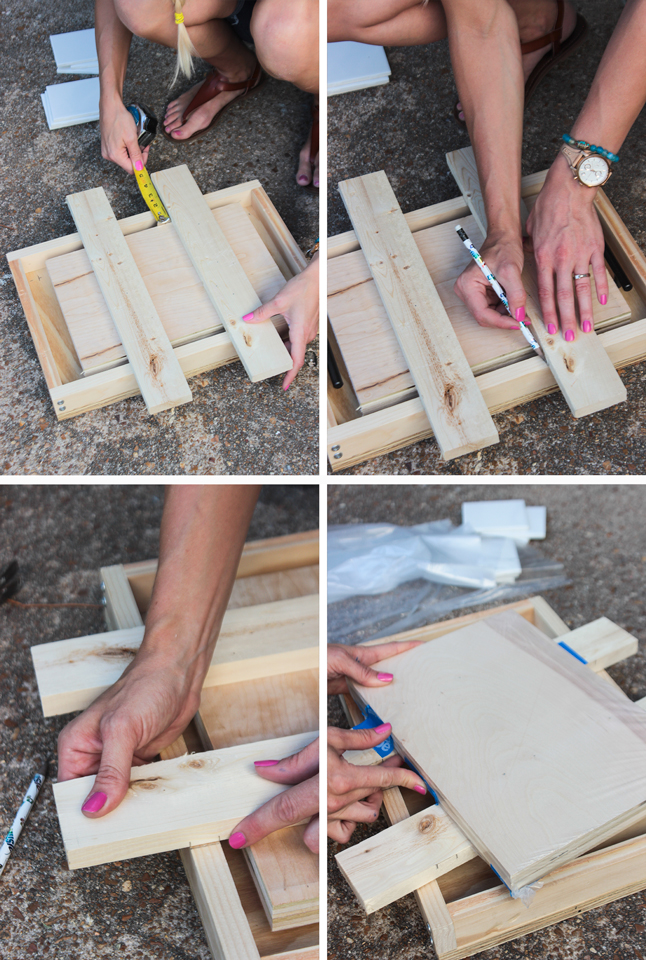
Step 3: Measure and Mark Placement of Tile Mold
In order to ensure proper placement of the tile mold, place it on top of the concrete tray frame and measure all 4 sides so there there is an even distance. Then mark that placement both on the cement tray frame and the 1×3 cross pieces (all 4 overlapping sides). On the underside of the tile mold (the part that will be touching the concrete) tape on a small cutout of the plastic drop cloth. This will allow the tile mold to easily remove from the concrete once it is dried.
Step 4: Mix and Pour Concrete
Mix about 2 1/2-3 cups of powder concrete with water (add a little at a time until the consistency is like cake batter– a little more liquid than normal so it can smooth around the tile mold) in a mixing container and pour into your concrete tray frame. The concrete should go up the sides of the frame about 1″. Smooth out the concrete with a trowel and immediately place your tile mold into place, lining it up with the marks you made. You may have to wiggle it a bit to get the tile mold to push all the way down. Hold firmly onto the tile mold cross pieces, pick up the entire frame and tap it down a few times to get the concrete to settle around the tile mold. You may have to shake it back and forth a little and use your fingers or the trowel to get the concrete to move around a little around the tole mold, but tap it on the ground to get things to settle and smooth on the top.
Place the screws into the drawer pulls so that about 1/2″ of the screw is sticking out. Push the handles into the concrete on either end of the tray (making sure the placement is even on both sides) and tape into place (so they don’t fall over while the concrete dries). Let the concrete dry for a few hours.
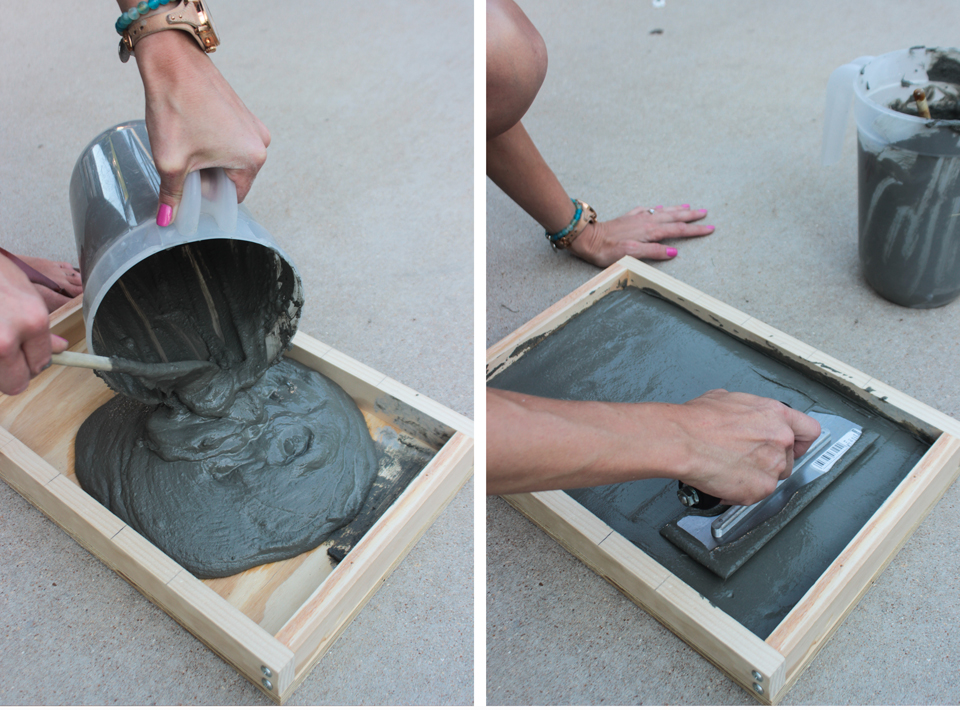
Once the concrete is dry, remove tile mold, and the screws on all the sides of the frame. The wood should easily fall away from the sides and bottom of the concrete. Smooth out any rough edges with the sandpaper (I used my orbital sander). If any bubbles or holes appeared under the tile mold, just mix up a very small amount of extra concrete, fill in those small holes and let it dry for an hour.
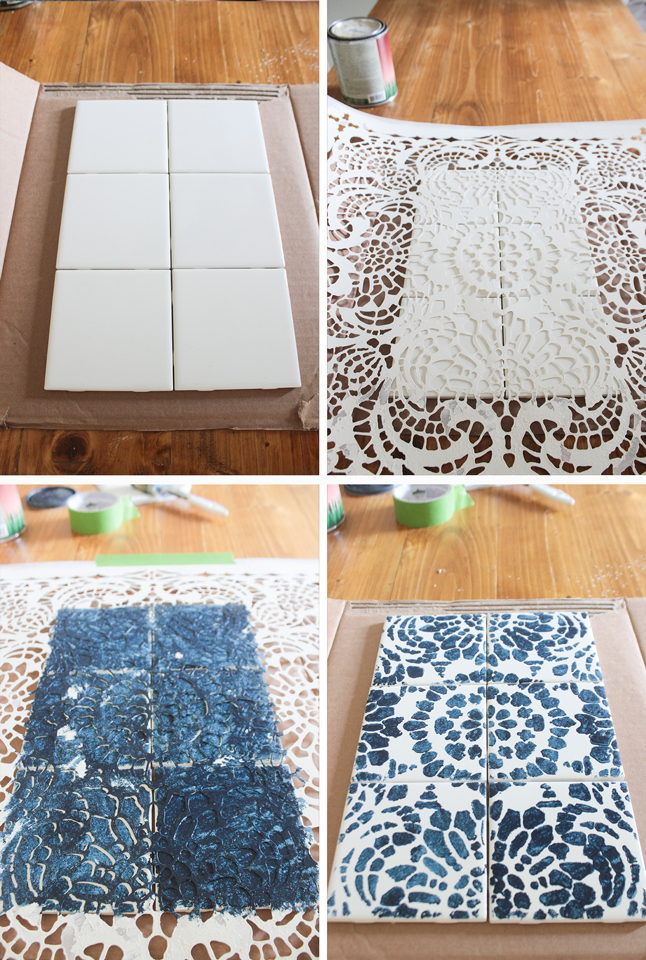
Step 5: Stencil Tiles
While the concrete is drying, place the tiles on a scrap piece of paper, drop cloth or cardboard. Tape a stencil of your choice on top of the tiles. Using spray paint or a firm bristle brush, paint over the stencil with navy acrylic paint that sticks to tile or spray paint that sticks to tile. Let dry completely and spray with 2-3 coats of clear satin outdoor topcoat.
 Step 6: Add Bumpers
Add rubber bumpers to the bottom of the cement tray and the tiles, then place the tiles into the cement tray inset!

I’m IN LOVE with how this turned out!
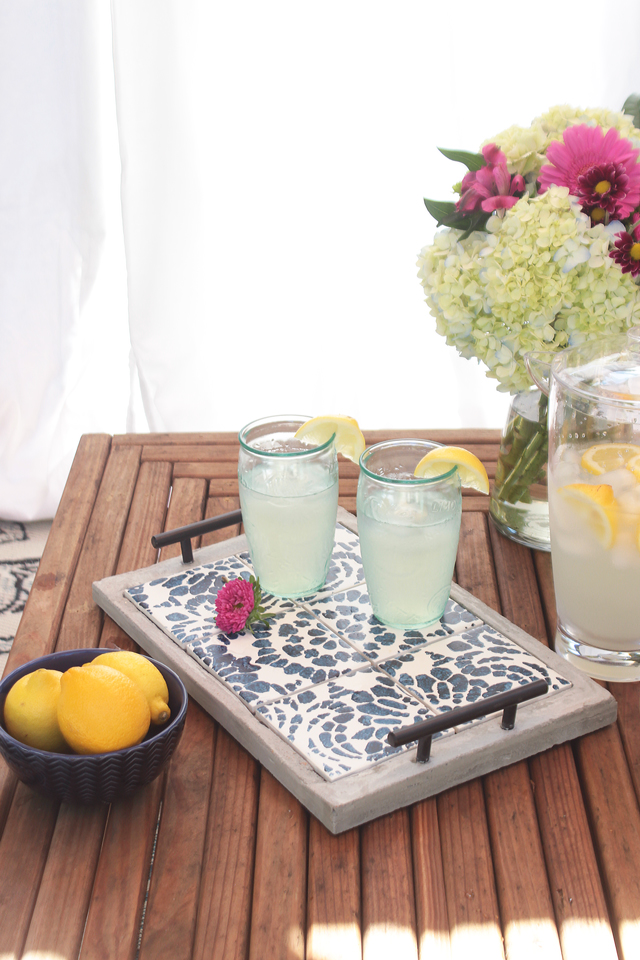
I love how the tray looks without the coasters and especially with. The tiles mimic the look of Portuguese tiles that I saw all over in Brazil– in fact the word for tile is azulejo and azul means blue– so this is my way of incorporating a little of our trip into my home decor.


The Home Depot offers Workshops at all of their locations for do-it-yourselfers of all ages and experience levels. There are three types of Workshops offered: Do-It-Yourself (DIY), Do-It-Herself (DIH) and Kids. The workshop to build this cement tray is the DIH workshop.
Customers can learn how to build décor projects, how to make easy home repairs and how to operate tools through demonstrations and step-by-step instructions. Visit http://workshops.homedepot.com to learn more.
Ready to build your own? This Thursday, June 15th, 6:30pm – 8pm!!
CLICK HERE TO REGISTER!
Have you recently attended an in-store Workshop at The Home Depot? If so, The Home Depot would love to hear your thoughts! Feel free to complete the survey here to share your experience.
Make sure to check out all the creative versions of this DIY Cement Tray from these other awesome bloggers:
*I acknowledge that The Home Depot is partnering with me to participate in this Workshops Program. As a part of the Program, I am receiving compensation in the form of products and services, for the purpose of promoting The Home Depot. All expressed opinions and experiences are my own words. This post complies with the Word Of Mouth Marketing Association (WOMMA) Ethics Code and applicable Federal Trade Commission guidelines.
Rachel I love this idea! Thank you so much for the inspiration and great tutorial. May I please ask when the stencil come form?
Paige
It’s the Esperanza Lace tile stencil from royal design stencils. I got it a couple years ago when I stenciled my daughter’s room.
This is so beautiful and how smart you were too make it so that it can be used to hold the coasters and still be used as a try! I love the blue and white tiles 🙂
Love how you made it dual purpose. The coasters are a great idea.
This is fabulous!! The tile inserts make it even more beautiful!
I really liked the “plain” concrete tray, but the coasters take it to a new level! I also am interested in where you got the stencil for the project.
It’s the Esperanza Lace tile stencil from royal design stencils. I got it a couple years ago when I stenciled my daughter’s room.
I love, love, love this idea, and you did and excellent job in making the tray and the coasters. Lovely! I hope to make one this summer, thanks to you.
What a great idea! Love you made an area for tile.I
Lee
wineandcouture.com
The first one is such incredible information. I love how it is explain it leaves such an amazing effect. I want to say thanks for telling us about DIY concrete tray removable coasters.