This post is sponsored by The Home Depot.
Today I’m going to share with you how I build a cute holiday dollhouse shelf using just 2 boards. This is a simple project that can be completed in a couple hours and can be enjoyed by kids and adults alike! The dollhouse shelf would make a great gift around the holidays and is very space conscious. If you want to build something like this, make sure to attend the Home Depot DIY Workshop this Saturday where they will demonstrate the Holiday Tree Shelf (which has similar construction and same materials).
Last year my brother gave my daughter a build-it-yourself dollhouse kit, with the expectation that I would build her the house and we could have fun decorating it together. I love the idea, honestly, but it was a large task, and I’m embarrassed to say I still haven’t finished putting it together! However, we have been slowly buying bits of furniture here and there, but they have been mostly un-used since the dollhouse wasn’t ready.
Well, when Home Depot asked me to create my own version of their holiday tree shelf for the DIY Workshop it wasn’t long before I came up with this DIY Holiday Dollhouse Shelf!
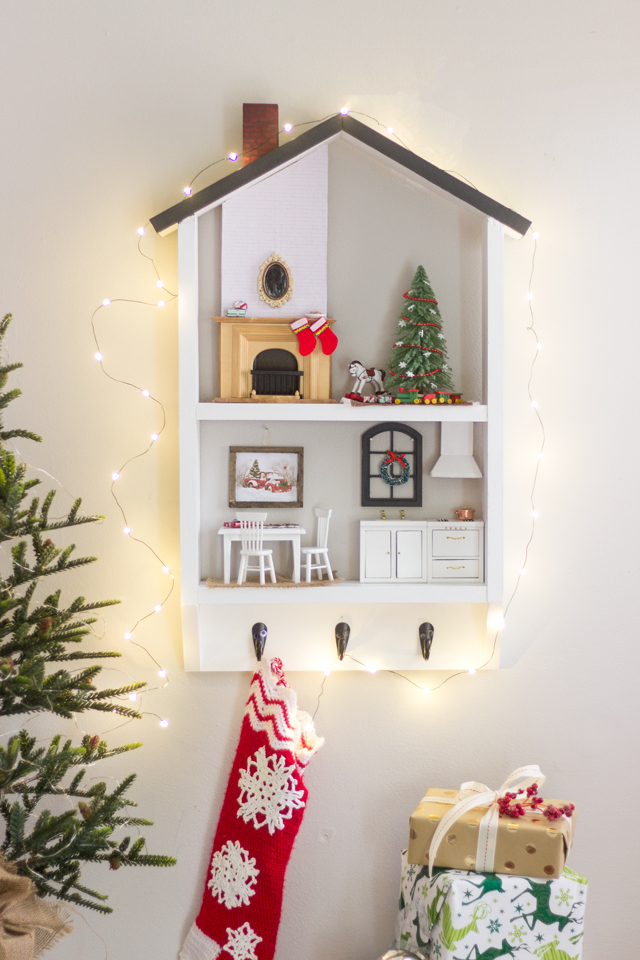
Both the DIY Workshop Holiday Tree Shelf and this Holiday Dollhouse Shelf use just 1x4s and are the same width. Mine is a bit taller, but I love that it can be used not just during the holidays! Once you take the tree down, you can fit some furniture in there and you have a space-conscious option to a larger dollhouse!

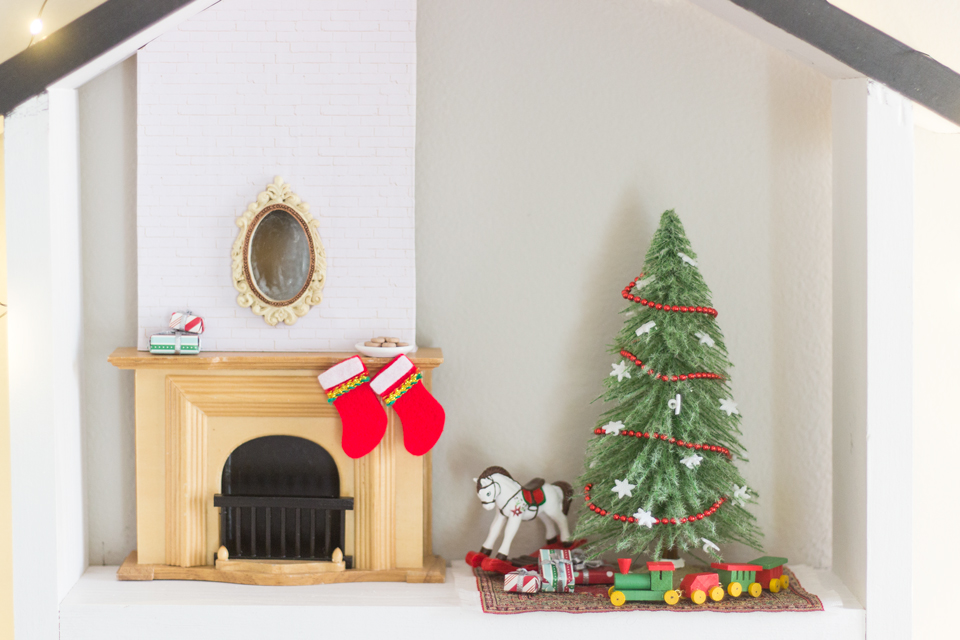
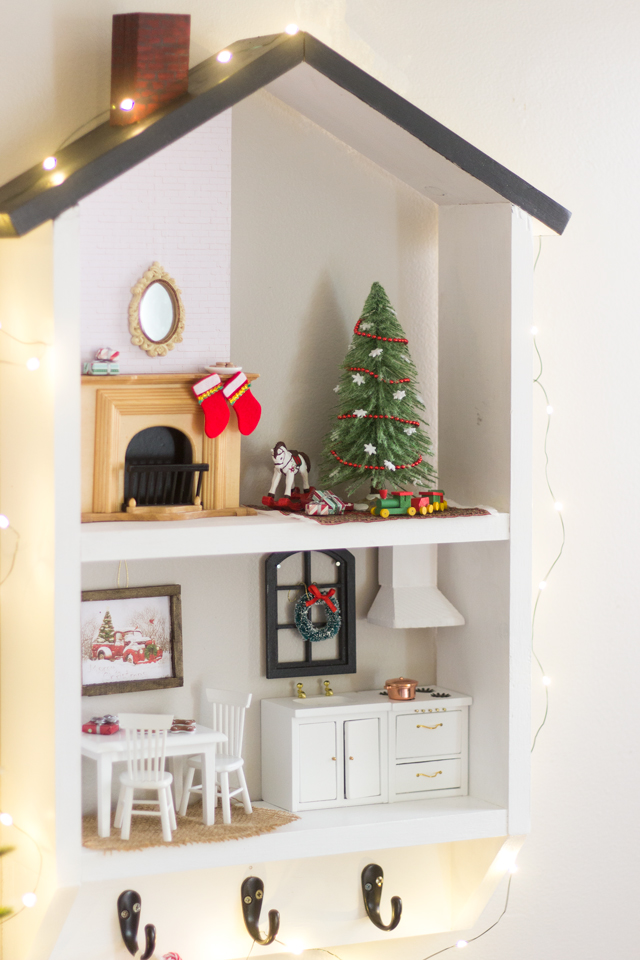
I used the fireplace mantel and the kitchen furniture that I already had, and just added on to them a bit with some scrap wood. The fireplace got a tall chimney all the way up to the ceiling and I wrapped it in scrapbook paper that had white painted bricks on it.
The kitchen got a little scrap wood oven range that makes me jealous I don’t have one in my house! haha
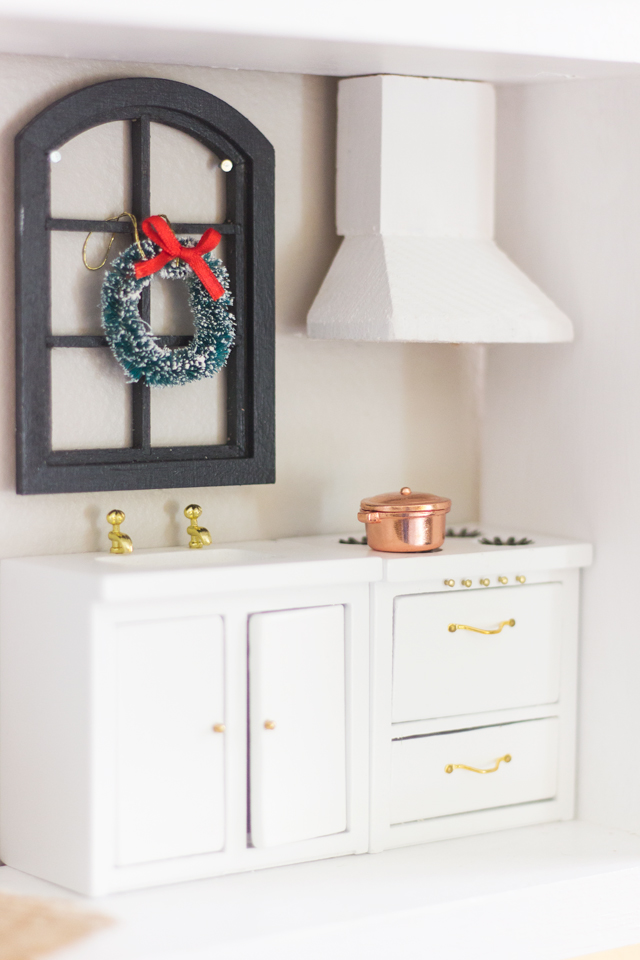
I also built a little wooden frame around this Christmas scene printed out.
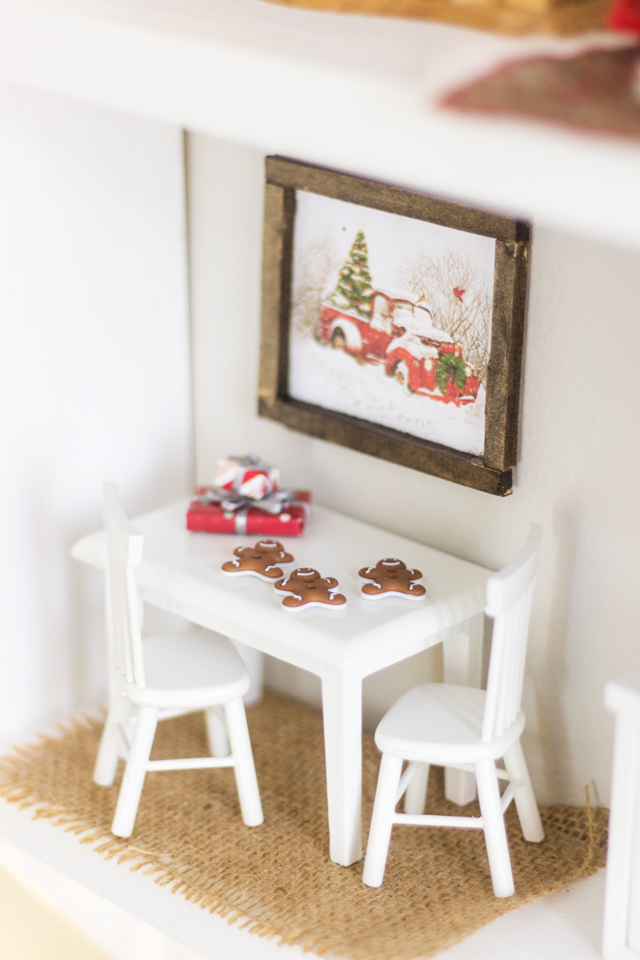

Overall I’m pretty smitten. I even caught me husband playing with the copper pans that he found in the oven (yes those doors actually open).

So you want to see how I made it?
DIY Holiday Dollhouse Shelf
Shopping list:
2- 1×4 @ 6′ common pine board
1 package black single robe hooks
3- 2″ wood screws
50- 2″ 18 gauge brad nails
5- 1 1/4″ 18 gauge brad nails
1 package saw tooth picture hanging hooks
Tools Needed:
Sliding Compound Miter Saw
Brad Nailer
Cordless drill
Measuring tape
Sandpaper
Safety goggles
Clamps
Cut List:
2- 1×4 @ 10″ (long side) with 30 degree bevel angle on one end (roof)
2- 1×4 @ 18″ (long side) with 30 degree bevel angle on one end (sides)
2- 1×4 @ 13 1/2″ (bottom and shelf)
1- 1×4 @ 15″ (hook plate)
2- 1×4 @ 3.5″ (long side) cut at 40 degree miter angle
1- 1×4 cut in half (so ~1 3/4″ wide each) and 2 1/2″ long, then both cut at 30 degree miter angle
Step 1: Assemble Bottom Shelf
Nail bottom shelf between two sides so that the bottom shelf is flush and perpendicular with the corners. Drive 3- 2″ nails in on each end.
Step 2: Attach Hook Plate
Place the hook plate sitting flat along one edge of the bottom shelf, then drive in 2- 2″ nails from the other side of the bottom shelf down into the hook plate, just to hold it into place. Lift up the shelf unit, and pre-drill holes for the screws to go in alongside where the nails were driven in, so the wood doesn’t split. Secure the hook plate using screws and the drill.
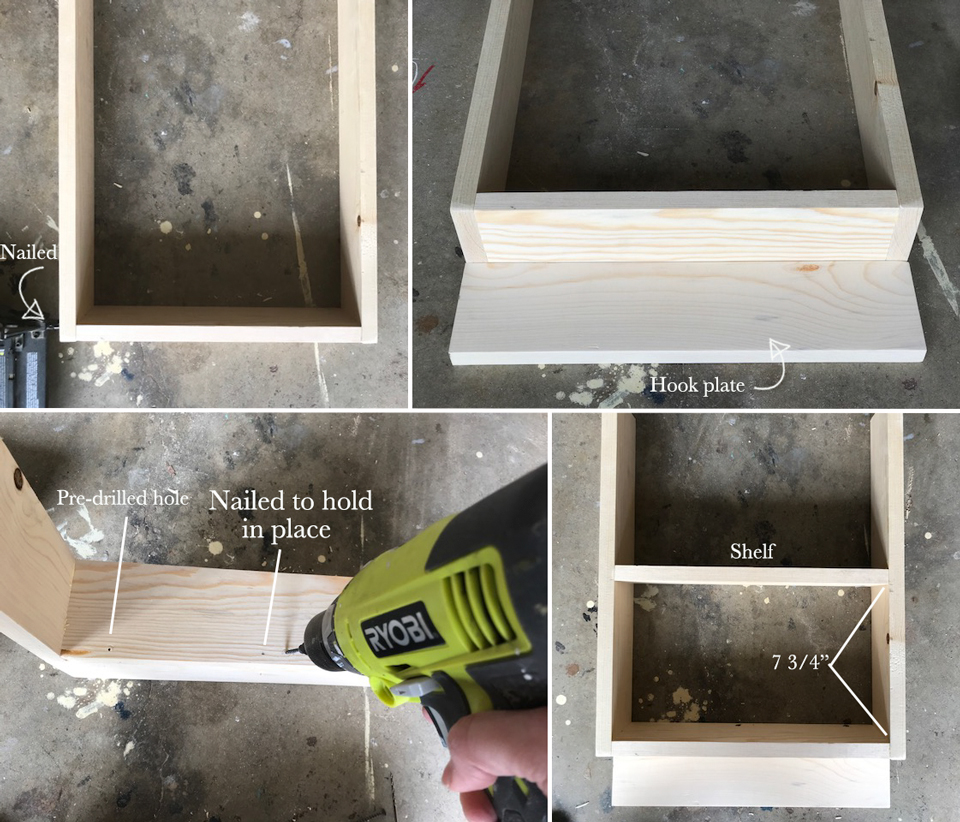
Step 3: Attach Middle Shelf
Measure and mark 7 3/4″ up from the bottom shelf on both sides of the side boards. This is where the bottom of the middle shelf will hit. Place middle shelf on the marks and drive 2″ nails in from the sides (3 for each end).
Step 4: Attach Roof
Place the roof pieces of wood together so the angles join at the peak center, and the other ends of the roof overhang the sides by 1″. Nail the roof pieces into the sides first, then nail together the peak.
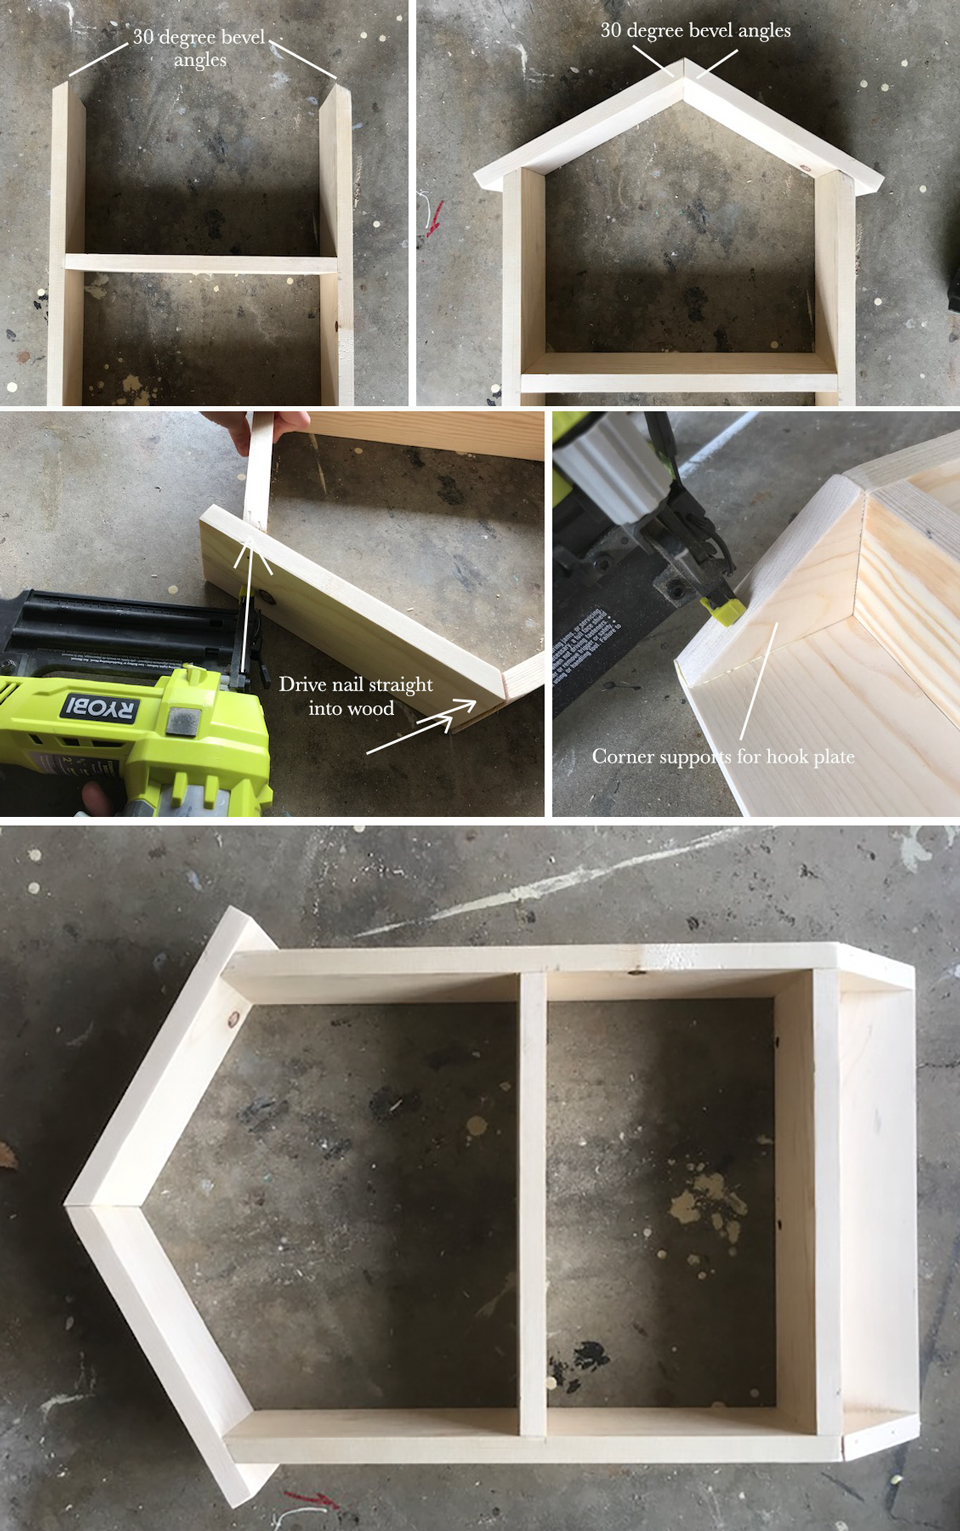
Step 5: Attach Corner Supports
Place corner supports along either end of the hook plate and nail them into place using 1 1/4″ nails at an angle.
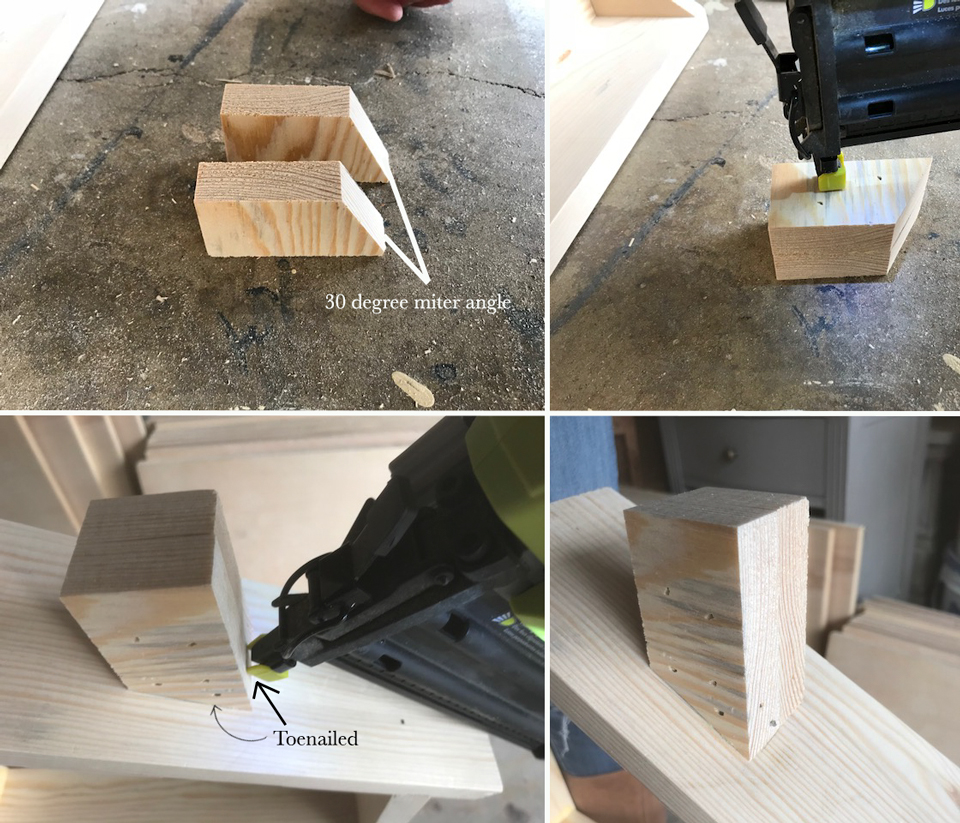
Step 6: Build Chimney
Place both pieces of chimney wood together and nail together using the 1 1/4″ nails. Attach to the roof by measuring desired placement and toenailing them into place with 1 1/4″ nails on 2-3 sides (avoid nails on the front of the chimney).
Step 6: Sand, Paint, Attach Hooks
Sand edges and corners well with sandpaper and paint desired colors. Once hook plate has been painted, attach 3 hooks spaced evenly apart. Also attach picture hanger hooks on the back of the middle shelf, where the shelf meets the sides, so one of the provided nails drives into the side and one drives into the shelf on each end of the shelf.
And that is it! From there you can have fun with some scrap wood like I did, and add on some features that can attach to the dollhouse shelf, but doesn’t require attaching to the wall, once mounted. This makes it easier to remove the shelf to transport it or move it around, without making a bunch of holes in the wall.


I hope you enjoyed this project!
Remember to register to reserve your spot for this DIY Workshop at your local Home Depot happening this Saturday! They will be demonstrating the Holiday Tree Shelf, but the materials are basically the same so you can easily build this version. Here are the details:
This Saturday, November 18th, 10:00-11:30 AM!

The Home Depot offers Workshops at all of their locations for do-it-yourselfers of all ages and experience levels. There are three types of Workshops offered: Do-It-Yourself (DIY), Do-It-Herself (DIH) and Kids. The workshop to build the Holiday Tree Shelf is this month’s DIY Workshop.
Customers can learn how to build décor projects, how to make easy home repairs and how to operate tools through demonstrations and step-by-step instructions. Visit http://workshops.homedepot.com to learn more.
If you have previously attended any workshop at The Home Depot and would like to provide feedback, please feel free to use this form. Your experience and response helps The Home Depot make the improvements you want to see.
Make sure to check out all the creative versions of this Holiday Tree Shelf here:
DIY Huntress
The Turquoise Home
Inspiration for Moms
Shades of Blue Interiors
Domestically Speaking
A Pumpkin and a Princess
Junque Cottage
The Creative Mom
Make It Love It
My Repurposed Life
*I acknowledge that The Home Depot is partnering with me to participate in this Workshops Program. As a part of the Program, I am receiving compensation in the form of products and services, for the purpose of promoting The Home Depot. All expressed opinions and experiences are my own words. This post complies with the Word Of Mouth Marketing Association (WOMMA) Ethics Code and applicable Federal Trade Commission guidelines.
I saw yours on your IG stories, it’s so stinking cute! Love this idea!
Rachel,
What an adorable spin you put on the holiday tree shelf! The dollhouse idea is perfect! I love it!
gail
Love it! So cute!!
I saw this on Instagram this morning and was thrilled! I’m sharing it with my readers on Facebook today. What a great dollhouse!
Wonderful design..Thanks for sharing!
Beautiful! I simply love this project. This weekend we are so busy from 8-8 both Saturday and Sunday this weekend, or I would have signed my son up to do this cute project. Thanks for sharing.
This is adorable!! Thanks for sharing!
OMG!!! What a great idea it was! I have tried to make a dollhouse shelf for my bedroom. But it was very hard to me. Following your ideas, I have made one and it is just wonderful!!! Thanks for your post!!!