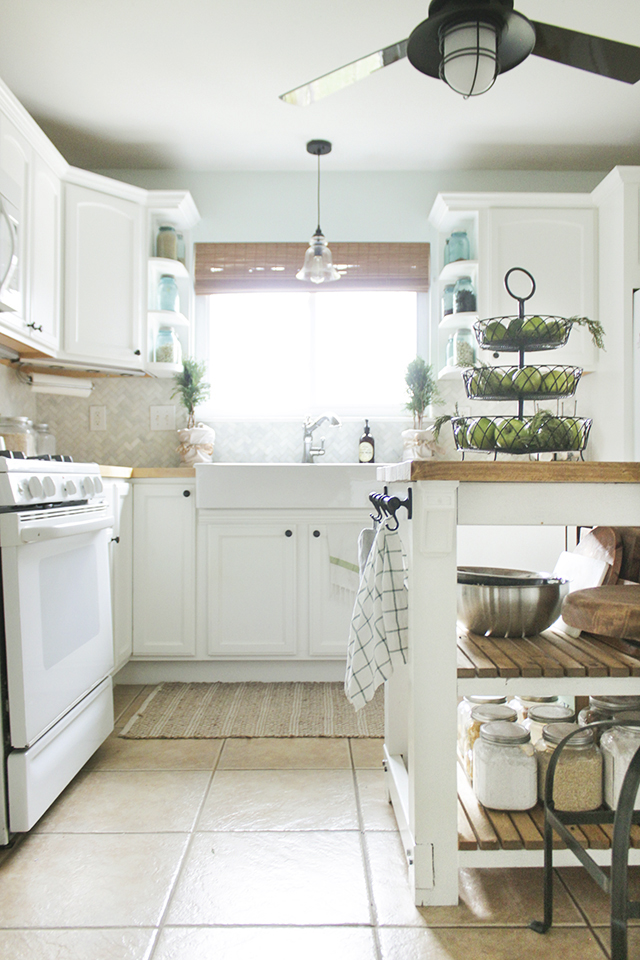
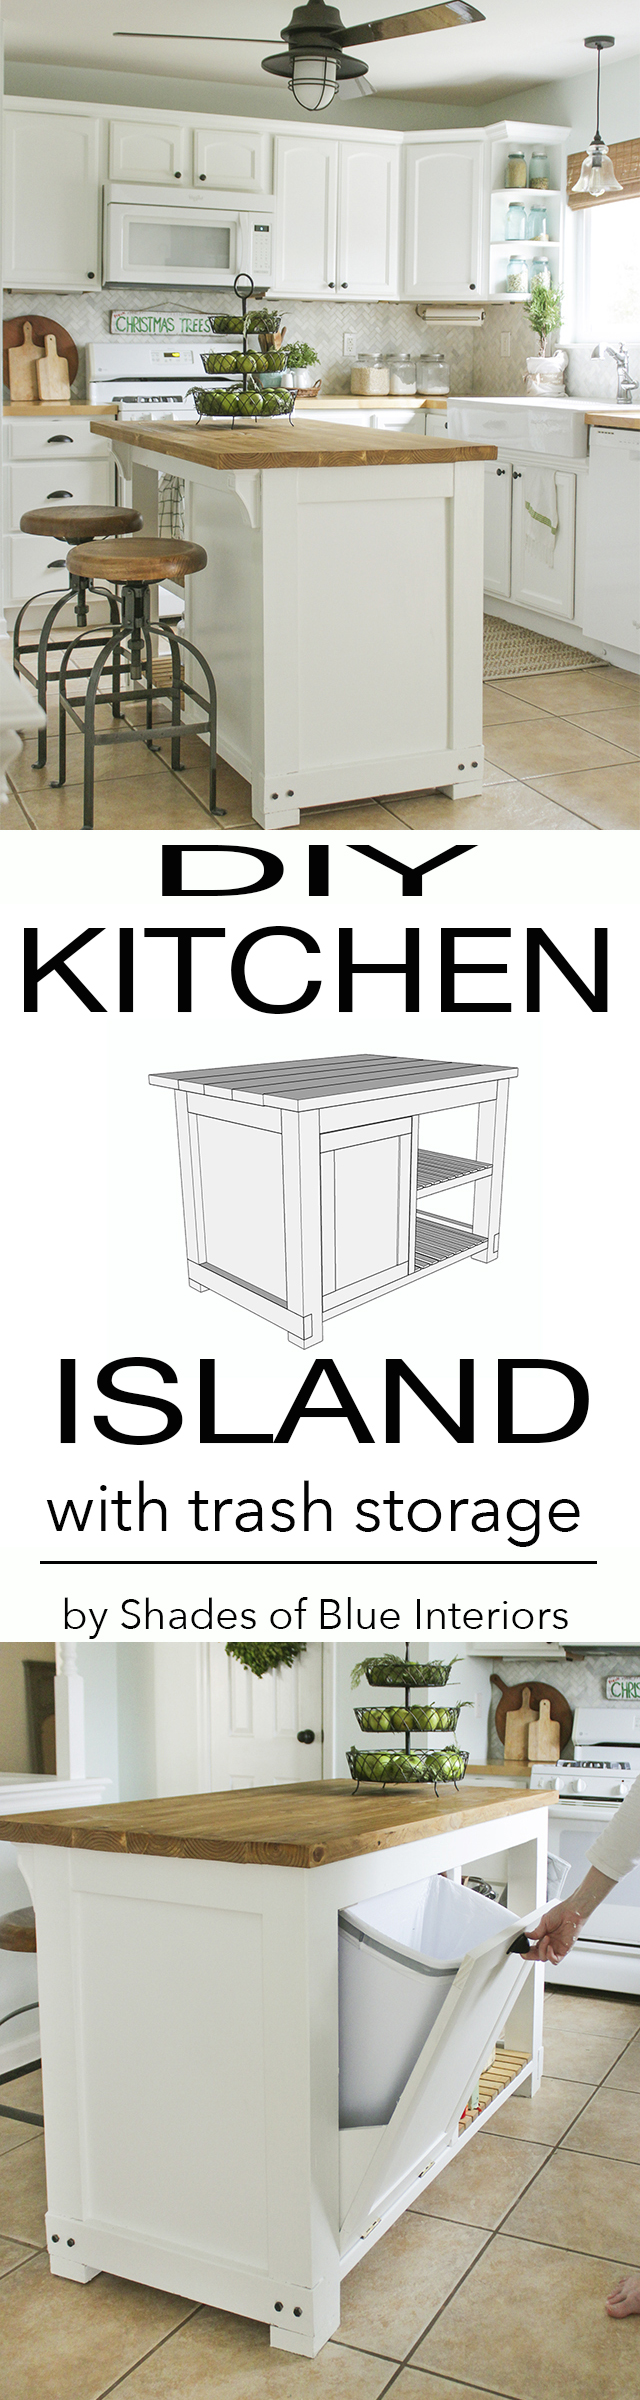
Hello 2016! I excited to start the new year by sharing with you the FREE build plans for this DIY Kitchen Island with Trash Storage! Right before Thanksgiving I built this island and it has made the biggest difference in the functionality of our kitchen. The kids eat breakfast here every morning, there is almost always a couple people sitting while I prep for meals at it, and one of my absolute favorite aspects is it hides our trash!

DOWNLOAD FREE BUILD PLANS HERE
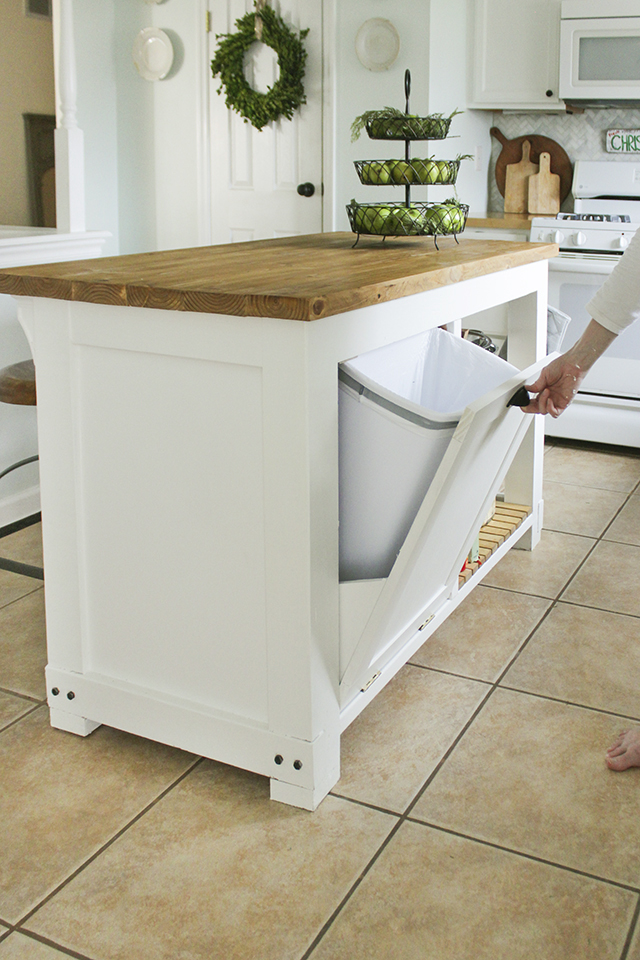
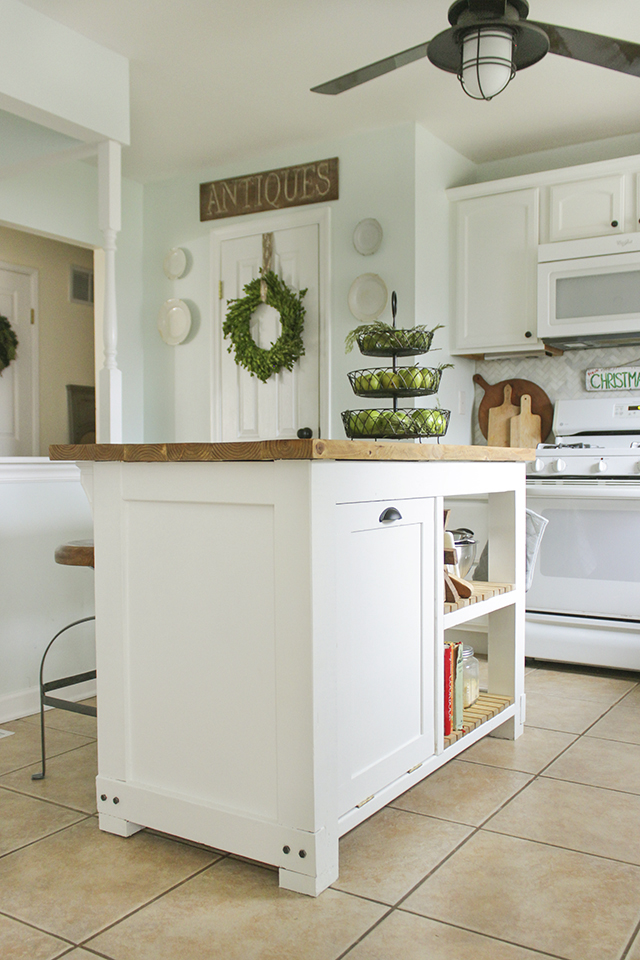
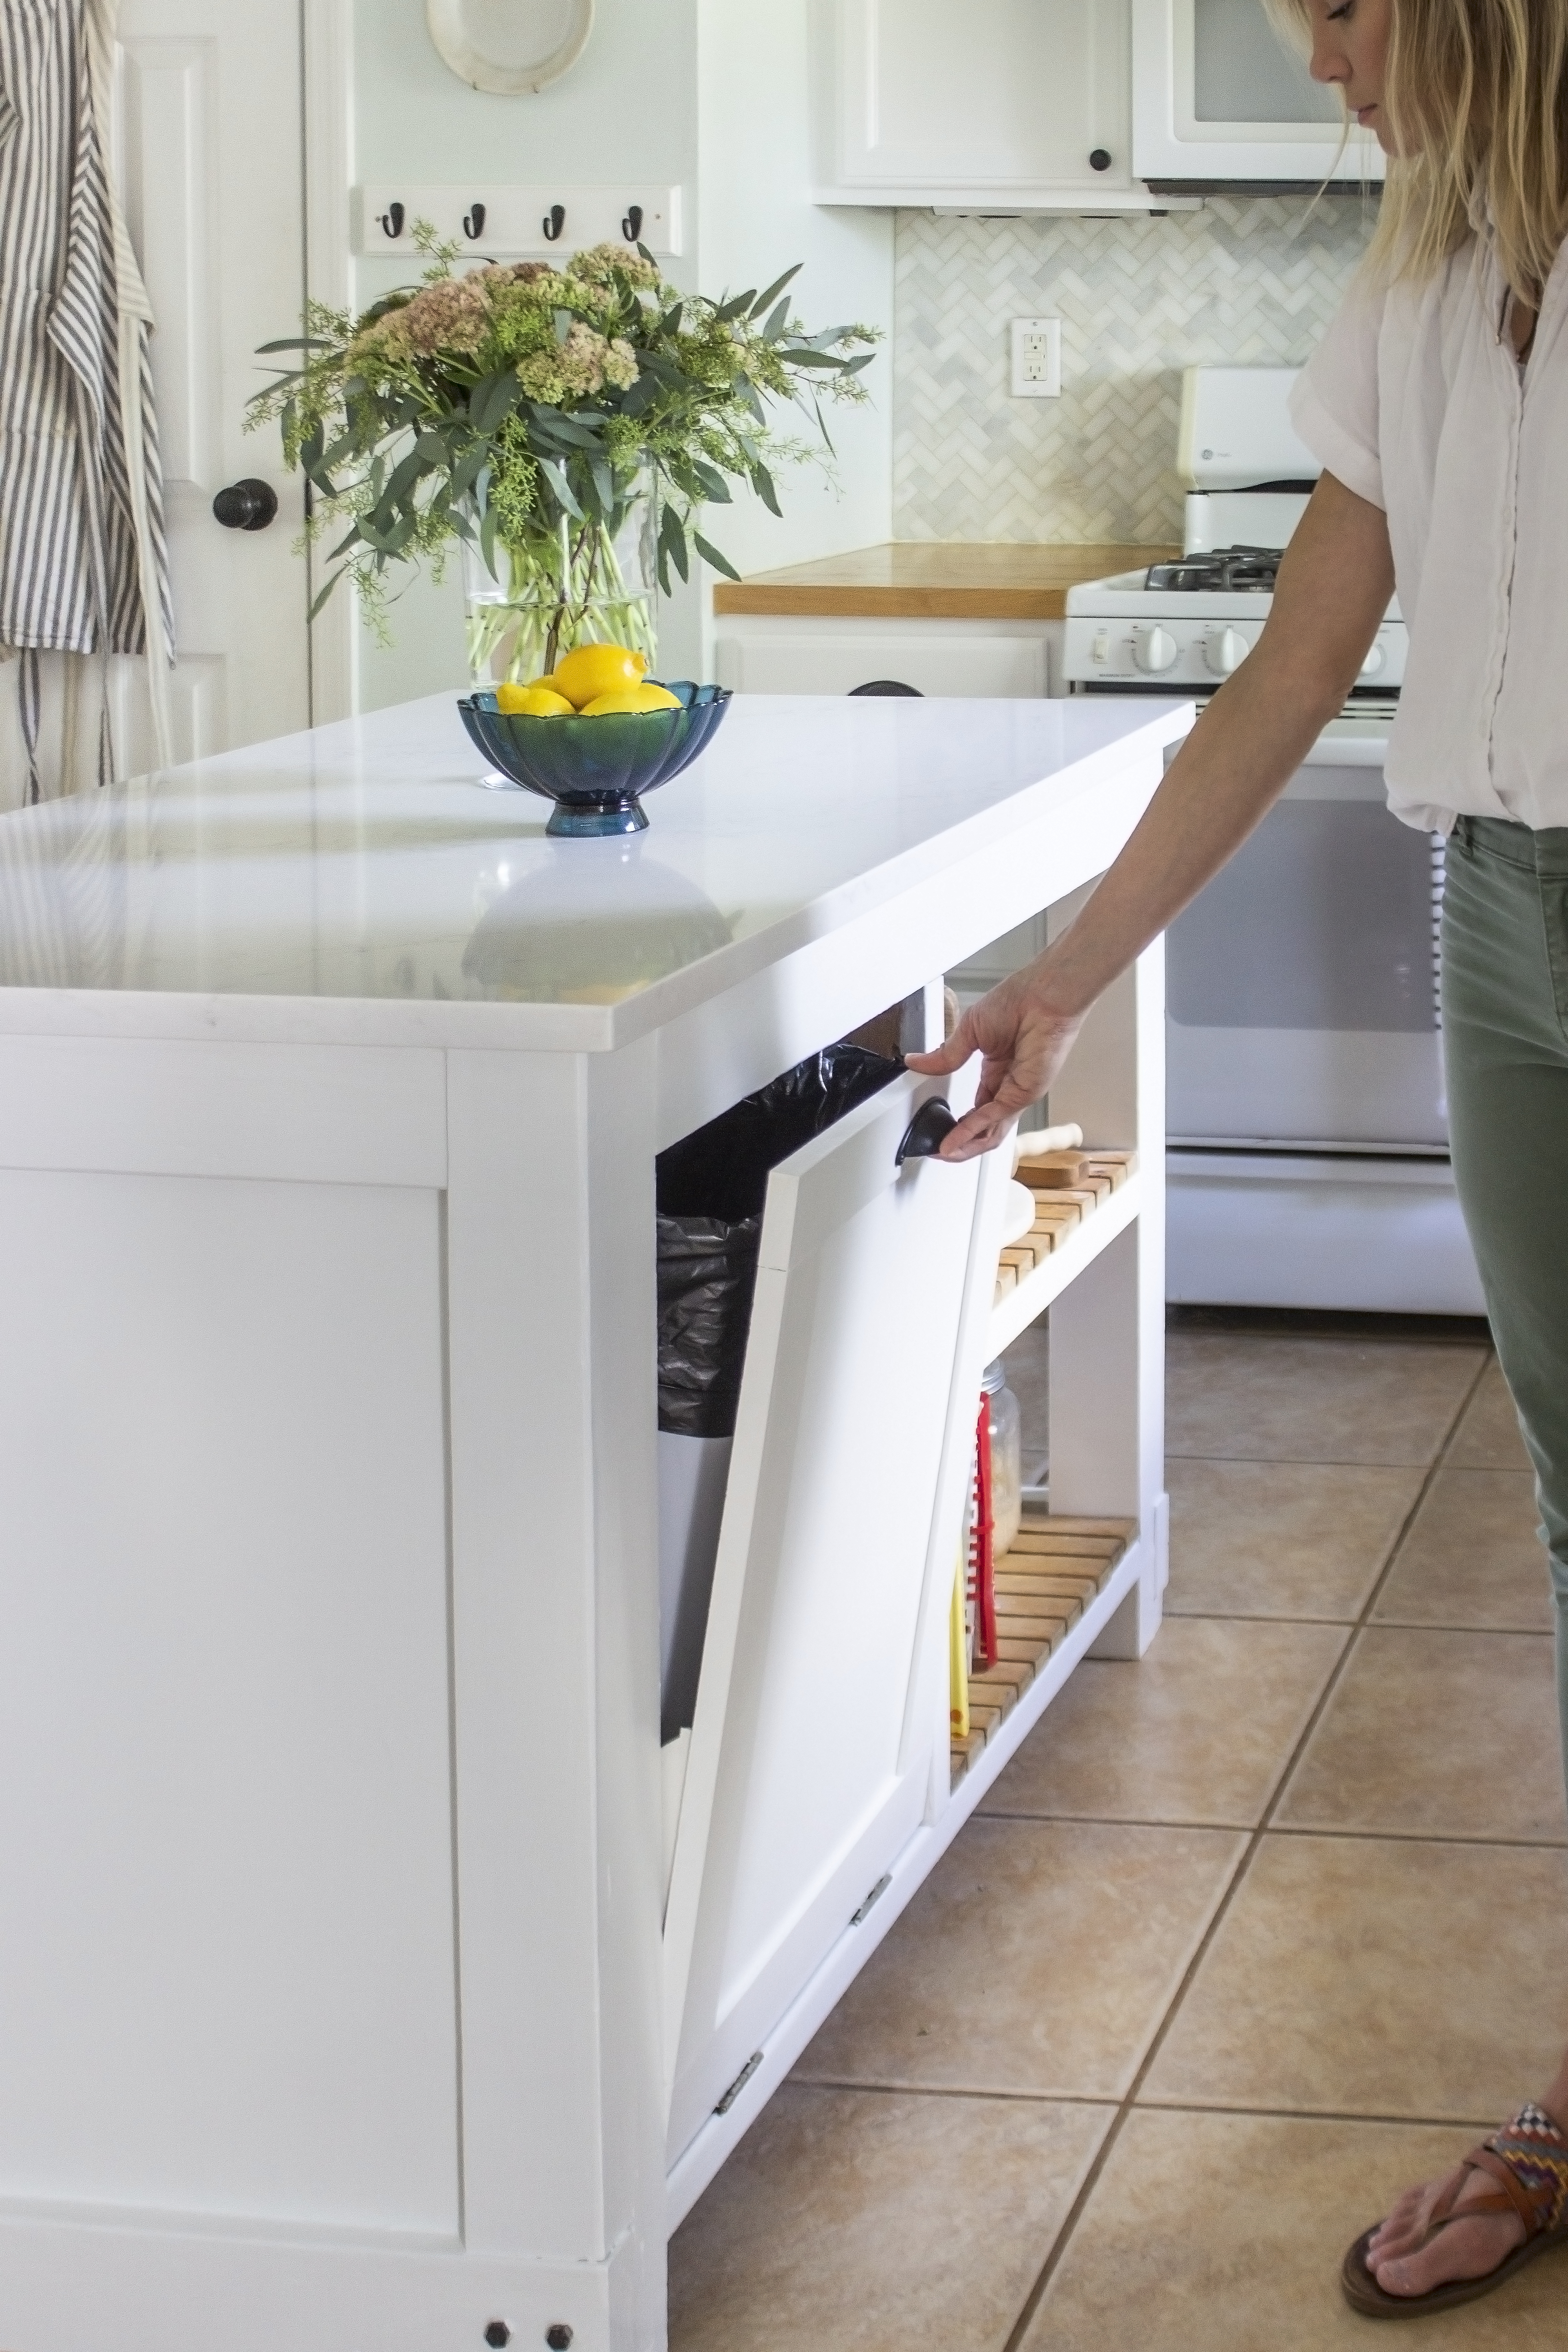
One of the mandatory design features I created was the pull-out trash storage. I chose a trash can size that would make the back lip of the trash can hit the top of the opening so I don’t actually need a chain (to keep it from opening too far). Because of the large space inside, the bag is still easy to remove and the can is also easy to remove if I need to clean the inside. Previously, our trash was sitting against a wall and not only was it unsightly, it created wasted space around it. This is a million times better!!
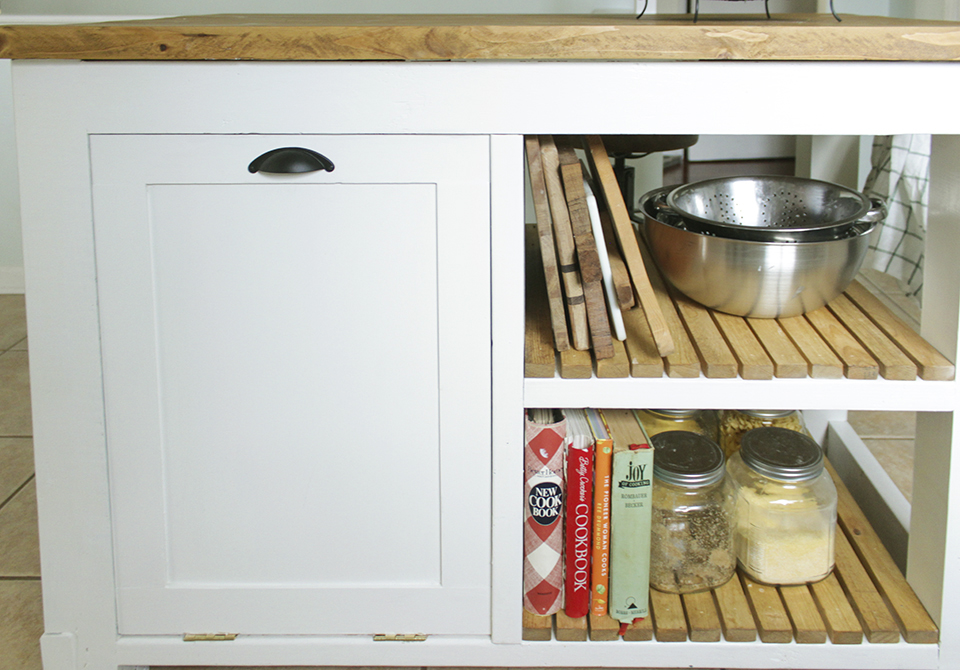
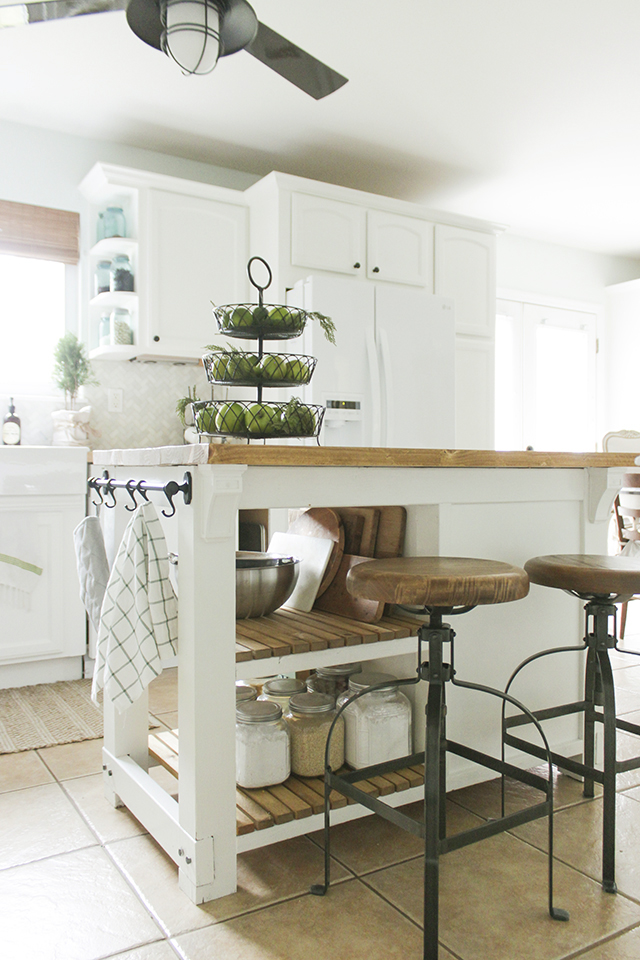
On the other side of the island I put some wooden slats on a couple shelves to hold baking supplies: bowls, cutting boards, cookbooks, and some canisters with dry goods. If you notice, instead of going with the brass pulls as were in my kitchen makeover design plans, I opted for these Flat Black Cup Pulls from D. Lawless hardware.
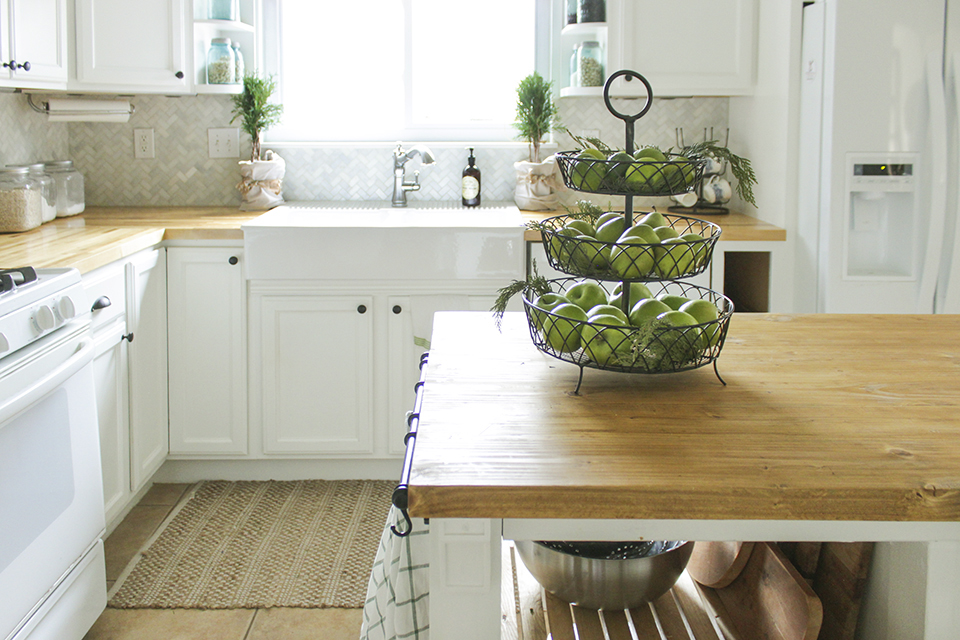
As you can see, I carried the black knobs and pulls throughout the rest of the kitchen as well. It is a classic look and when we eventually sell this house, it will have a wider appeal.
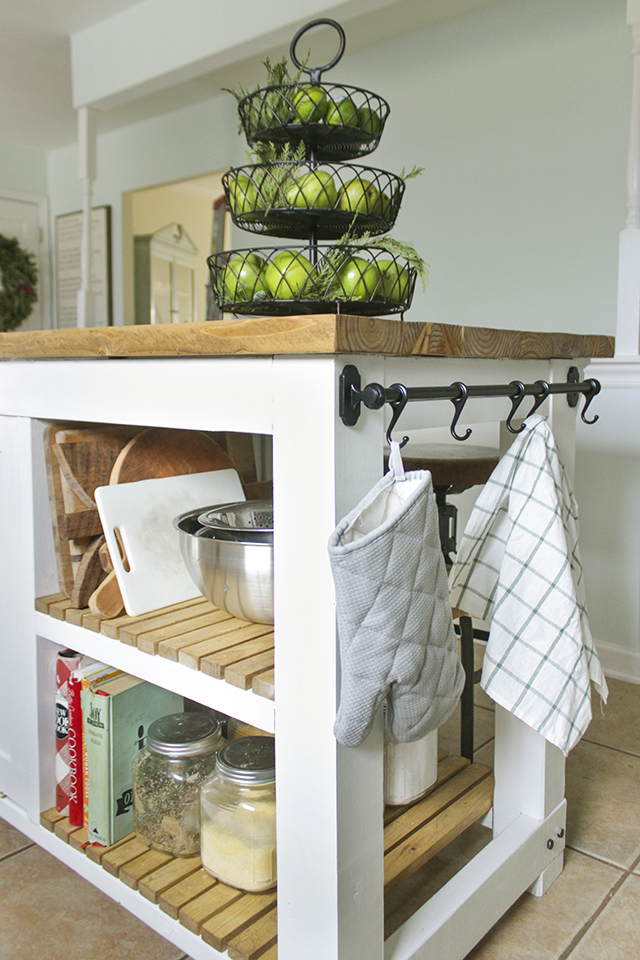
To add some interesting details to the island, I put some black bolts on the legs, and added an Ikea Fintorp Rail with hooks so I could hang hot pads and kitchen towels.
The all-white cabinets and appliances with some contrasting black fixtures and hardware, paired with the natural wood counters, all epitomize farmhouse style, which is my favorite especially for a kitchen.
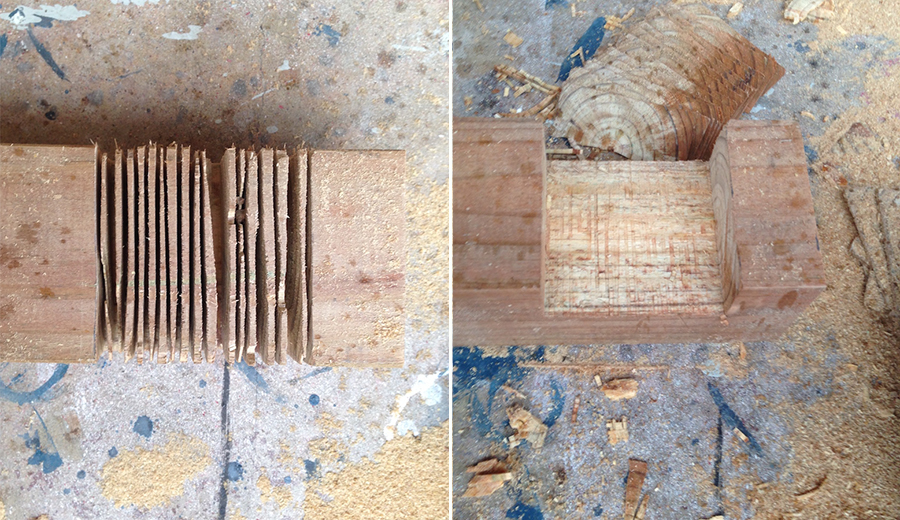
In my inspiration pictures of island, I fell in love with the rustic, hand-built look of the notched out legs, so I incorporated that in my island as well, using lag bolts to add a little more attention to them.
Notching out legs is way easier than I thought it would be and is just a matter of adjusting the depth on your circular saw! Here is a short video I created to show how fun it is to pop out all the wood slices you create:
After that it is just a matter of using a chisel to smooth things out:
I thought about using bead-board or shiplap for the boxed inset portion of the island that surround the trash storage, but my mom pointed out that cleaning that up when something spills would get tricky. So I left it the plain, smooth painted plywood to see if I would change my mind after awhile, and I have to say, after almost two months like this, and having to wipe up drips and marks, I much prefer a smooth surface.
The top pine boards were stained with Special Walnut by Minwax and sealed with Waterlox original. I only gave a it a couple coats thought because I wanted it to still look and feel like wood. I painted the base with 2 coats of Benjamin Moore White Dove in Semi-Gloss (for easy wipe-ability).
Even for small kitchens I think a moveable island is one of the best features you can add. It increases counters space, storage, and makes entire space more social.
So what do you think?
UPDATE: Here is what the island looks like now, since we switched out the top for quartz:
To find out why we switched from Butcher Block to Quartz, go to this post.
Source list:
Cup pulls and Knobs from D.Lawless hardware
Corbels on Island from Osborne Wood
Cassidy Kitchen Faucet from Delta Faucet
*Some products used in my kitchen makeover were given to me in exchange for mention in some of my posts. These were products that I personally selected and were not solicited to me. All opinions are my own but their links given above are for your convenience and as a way of promoting brands I believe in and partner with.
How much space did you leave between your island and counter?
Just measured… From the island to the dishwasher/counter is 41″, on the side by the oven there is 35″ and the side that has the stools it is 38″ to the half wall (stairwell).
It looks so good, Rachel! I had no idea notching was that easy, I always imagined it was way more complicated than that.
Right?! Now I’m like… What else can I notch? I love how it gives it a custom, almost vintage look but is totally not hard to do.
Very classy! I love the pine top and the idea of hiding the trash can. It looks fantastic 🙂
Loving the island! We’ve lived in our house for over 2 yrs with a dance floor in our kitchen. Think this is the style I’ve been looking for to fill the space. Any idea if the trash compartment can be modified to a regular cabinet with pull out shelves? I need somewhere to stash all my coffee making equipment! Thanks.
You can also use a dado blade in your table saw or possibly in a sliding miter saw. Overlap the cuts a little bit, and then it will take only about 3 or 4 passes, with a finished, smooth, bottom relief.
Finally an island my wife is in love with!
This looks so pretty and functional! I’ve only just found your blog through Pinterest, so I’m off to check out your other posts. Love your kitchen x
Can you give me a rough estimate of what this cost you for the island? I know it will very but just an idea.
I would guess between $100-$120.
Currently making this and I love your plans!! Only thing I will add is the middle support that goes in above the center divider needed to be 21″ instead of 17″. I don’t know where we went wrong or if it was a miscalculation but everything else went smoothly!
Heather, you are right!! Thank you for catching this! I just now was able to go back and look and saw that I have overlooked the fact the 2x4s were rotated the other direction. That’s what I get for sketching up plans after I build haha! Thanks for letting me know– I’ve made the changes in the plans!
It’s fixed in the cuts, but not the plans. Threwe me off, but we’re making it work. Glad I read the comments! We’re also converting it to a trash drawer instead of a hinged trash compartment and extending the width another foot. So glad I found this. We needed a quick and easy build because we are moving in a month,
Very nice way to hide your trash can. I am sharing this on Pinterest.
Could you make one and sell to me?
Love it! It has everything we need, especially the trash pull. Can you tell me if the trash stays open once you let go? It looks like it would shut and that won’t work for me… Takes two hands to scape a plate clean 🙂
When the can is heavy (half full) it wants to close automatically, but I just sorta push my knee against the side to keep it open. I’m sure you could attach different hinges to keep it open, but I just used flat hinges so I work with what I got! 😉
Me again. Very excited to say my husband has started making this island……but after step 1 we already have a question for you. We made cuts per step 1 which says make cuts at 3″ and 6 1/2″. However in the next step, the diagram shows the the cut should have started only 1 1/2″ from the bottom of the 4×4, not 3″ like stated in step 1. Please help! This is our first time following a set of plans and not sure if we’ve already ruined our 4×4’s.
Leslie, Sorry I’ve been on vacation and didn’t see this until now. Hopefully you figured this out, but if not, thank you for the comment. You caught an minor error and I’ve fixed it. It isn’t a big deal to have the notches at 3″ up from the bottom instead of 1 1/2″. They posts aren’t ruined.
Can you tell me what the dimensions are when it’s constructed? I want to see if it will fit before I start.
Dimensions are in the build plans! First pic shows all height, width, depth.
I LOVE the island! I just have a question, I’ve been meaning to try and figure out and I’ve asked quite a few people who have made counter tops with more than one piece of wood, meaning several pieces that come together to make one counter top, I’ve never gotten a response either 🙁 Ugh am I even making sense here? lol Sorry… Instead of one giant piece of counter top, the pieces of wood are fit together, how did you fit them together? are they flush so that 0 crumbs can get in there? The island we have now (store bought) has an end piece that can stay up or go down and when staying up everything gets stuck in there, spices seasonings it’s so gross. I want to make the island top and new counter tops all over like your island top but worry that eventually spice granules/dust will get in between. Sorry I just blabber on I just can’t seem to get it all out easily. How does it all work
Lisa, yes on the top of the island, all the planks are completely flush, there are no little grooves or cracks that crumbs get stuck in. The way around this is to take the standard 2x6s (which I used) that have little rounded edges, and rip them down on both sides about 1/2″ or less… this makes the edges sharp but when you join them together they are completely flush. Then for the exposed edges that would get bumped against or leaned against, I sanded those down a bit to more more rounded so they didn’t cut or hurt anyone. I also use wood filler for any areas that weren’t 100% perfectly flush but almost… and it filled in everything so when I gave it the top coat, it was completely smooth and flat. Hope that answers your question.
LOve the build and plans.. Question what type of plywood did you use?
I typically use purebond plywood (it’s the more expensive stuff at Home Depot) unless I paint it, then if I don’t have leftovers of the nice stuff I’ll use the cheap stuff (subfloor plywood).
Where did you get the decorative wood piece that is right under the top on the side where the bar stools are at? Love the plans!!
Rachel can you make one for me and sell to me. I just bought a house it would look great?
Rachel – I wanted to double check that you have updated the DIY Plans? My daughter would like her dad to make this and he likes to go by exact plans. It look amazing – you did a great job!
Absolutely love the pull out trash bin on the island. What a great idea! I will certainly have to borrow that one on future kitchen makeovers I install. Thanks so much for sharing 🙂
Hi, this looks fantastic, sorry for being ignorant but can you repost the build plans? I cant find them anywhere in the above, perhaps I am missing something. Thanks!
How much would you charge to make me the exact same island? I cannot find any island I like with a trash bin, and everyone I have asked, request an exuberant amount to build this kind of island.
Sorry, I don’t do custom work for clients. I highly recommend either trying to build it yourself (its not as hard as it seems), or hiring someone… even if it seems expensive you have to consider time and materials– it has to be worth it to them– most carpenters would be able to follow these plans and build you one.
I’m not seeing the plan anywhere either.. can someone point me in the right direction? I looked over this post a few times to make sure I wasn’t missing it but can’t seem to find it. SOS 🙁
Right below the first picture where it says, “Download free plans here” click on that and it will open a google doc that you can see the step by step digital build plans.
Just starting to build this island and its going great! One thing I would like to point out is that the 8ft 2×6 can not be cut twice at 50”. 8ft is 96”. So when doing this you will either need to buy longer 2x6s, or buy 2 more 2x6s at 8ft, or make your island 2” smaller so that 48” 2x6s have an inch overhang on each side.
What size trash can did you use? I am going to use it to store dog food. Thanks!
Hello. A little late to the game, but have a question. How would I make this countertop a little wider and more deep. I’d love more space for people to eat. I’d be gratified any input!
Hi Rachel,
I’m in the middle of this build but I’m having a little trouble with the planked top, it’s not clear in the instructions how it’s attached. Did you screw it down from the top? Or from the legs right below?
Screwed in from the top, countersunk screws and filled in holes with wood filler.
Thank you! I appreciate the quick response!
Hey there! I am looking to build this island and instead of doing a tilt out do a pull out with two cans, one for trash and one for recycling. Can anyone tell me what the inside cabinet depth, height and width are? I’m trying to figure out if a certain pull out system will work before I order it.
Great project! Like some others, I was wondering what size trash can you used?
Building this currently, in step 2 it says to attach the vertical divider making sure it attaches 20¾ from one end and 18¾ from other other end. Is this the distance between the 2 4X4 posts?
Can you just make a Youtube video 😭😭 I love to see it being built.
We are in the middle of the build and the build design plans will no longer open. Is anyone else having this issue??
Can anyone send me a copy of the plans? The plans will no longer open for us. Thank you!!
Here’s the link: https://docs.google.com/document/d/1NVfJp-bUWsp7T-BMS1aNAYI_DA-mTvGVz-nOosRrD-E
Can anyone tell me the interior dimensions of the trash cabinet? Height, width and depth? I would like to know if a double can pull out will fit instead of doing the tilt out.
Am I crazy? How do you cut the 2×4’s. I cant get all cuts to fit on 4 8ft beams.
We need 6 2×6 boards to make 6 50inch cuts, correct? If so.. it’s wrong in the buy list because it says 4 but that only makes 4 cuts.
Love LOVE LOVE what you did on your island. What color paint is on your cupboards
Would you mind telling me where you found that towel rod with the hooks? Unable to find it
It’s from ikea.
Nice kitchen storage designs… Such beautiful ideas you surprised me . I love it and thanks for posting.
NEC says a kitchen island must have at least one electrical outlet. I assume this exempt because it’s “moveable” (i.e. considered a piece of furniture, rather than an actual island counterspace)?
Correct!
Are the hex lag screws solely for decoration? I don’t see them mentioned in the plans after the material list.
Yes, only for decoration.
This is amazing. I have had this saved for almost 18 months and finally, today, completed the project. I made some adjustments, but your instructions are spot on and boy is this gorgeous. Thank you thank you thank you from the Avery’s in the north country of New York.
Adjustments
-Included two compartments that we made into drawers. One for trash and one for compost (with additional room).
-With the previous adjustment was made it almost a full foot longer.
-We used butcherblock on the top (which was 2/3 of the total cost). It was a little stressful with the butcherblock, as it was expensive and super heavy, but wanted something with a bit more pop. Similar to why you all went to quartz. I have a feeling in a few years we will move to quartz – or totally change our kitchen to butcher block.
Thank you!
I attached my instagram to see the final outcome.
I know I’m very late to this post but I am trying to figure out the cuts for the 4 – 2x4x8s and I cannot figure it out for the life of me. Help please! What exact cuts did you use on each 8ft board to fit all of the cuts needed?
Great plans just curious where did you get the garbage can from for the right size??
Target!
Hi, it took several years, but I finally finished the island. Thank you so much for the plans! It is perfect for our small kitchen.
If I can post pictures, I will show you the finished product. Very nice!
Yes, email them to me, I’d love to see! shadesofblueinteriors@gmail.com
If I can post pictures, I will show you the finished product. Very nice!
It’s perfect and exactly what I’m looking for…would you make one for us? 🙂
This is a great idea for a kitchen island with trash storage! I love the shades of blue color scheme.