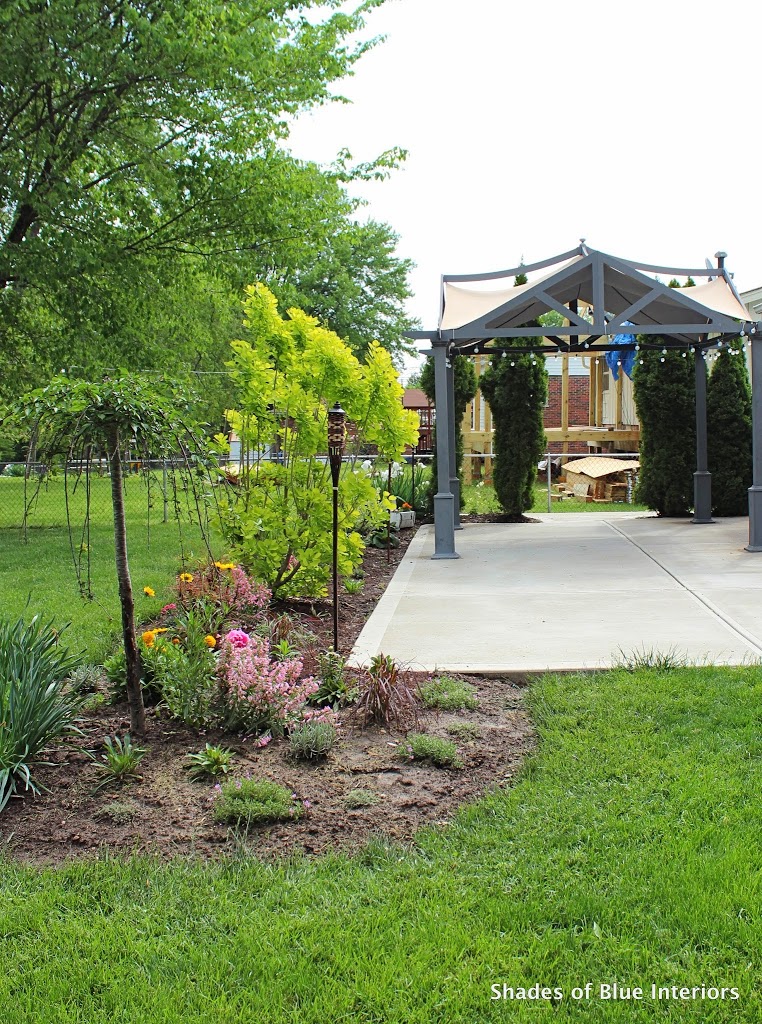
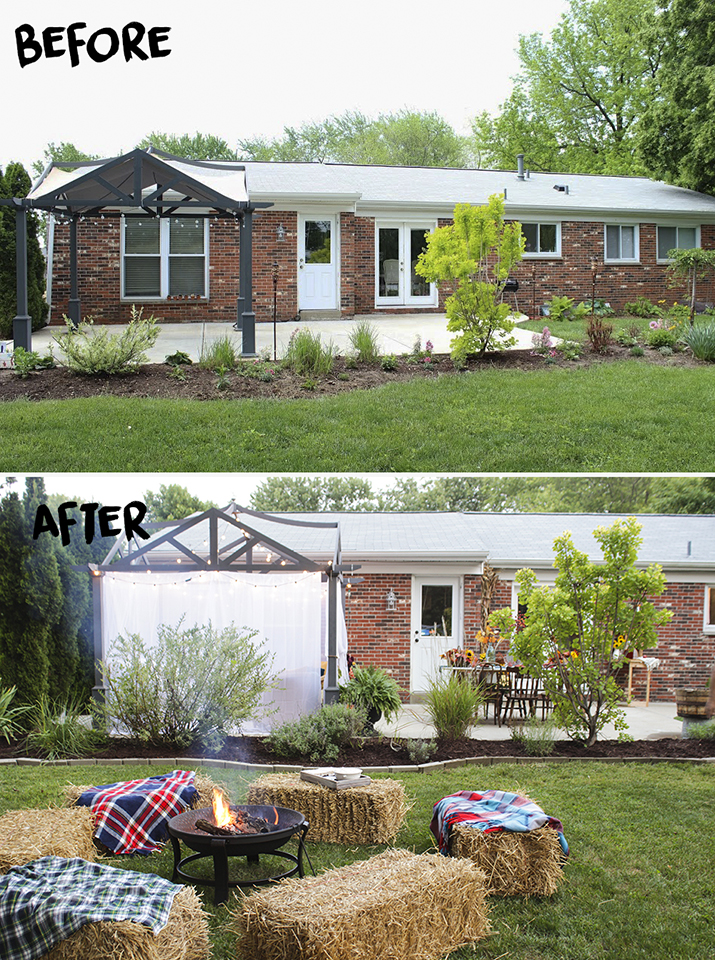
I am beyond excited to finally share all the pictures from the back patio makeover I did a couple weeks ago! I was invited by The Home Depot to participate in their Halloween & Harvest Style Challenge with the assignment to makeover an outdoor space. Well, for those of you who have been following along for awhile, you will know I have had plans to give my back patio a facelift for awhile now…. Last year I showed my plans for the space HERE. Then I got some perennials, things started to grow and I showed progress HERE. As you all know, most makeovers take time and money. For the past year and a half I haven’t had much of either, so this space was put lower on the priority list. Here is where things left off Spring of 2014:
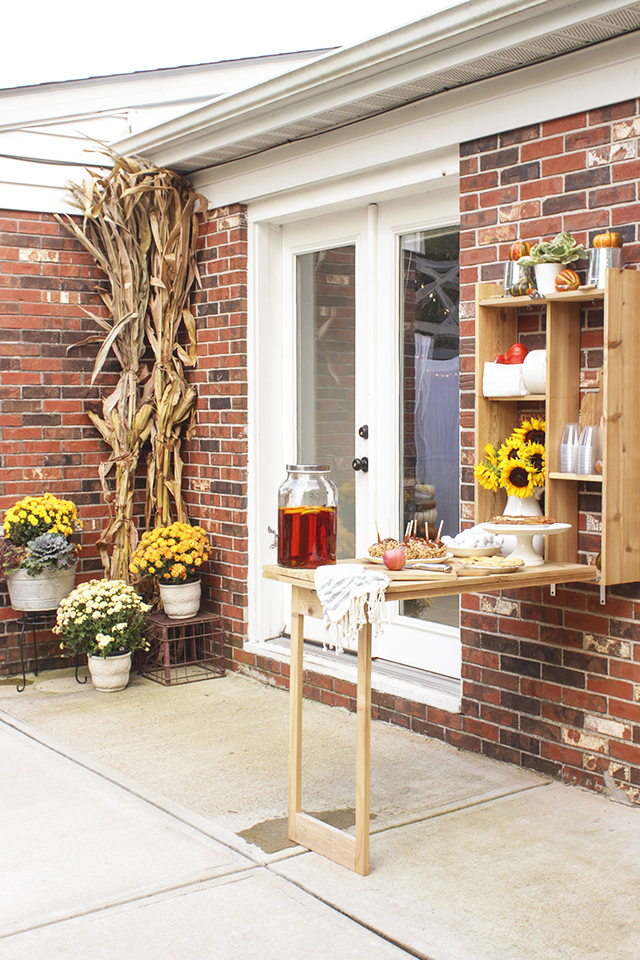
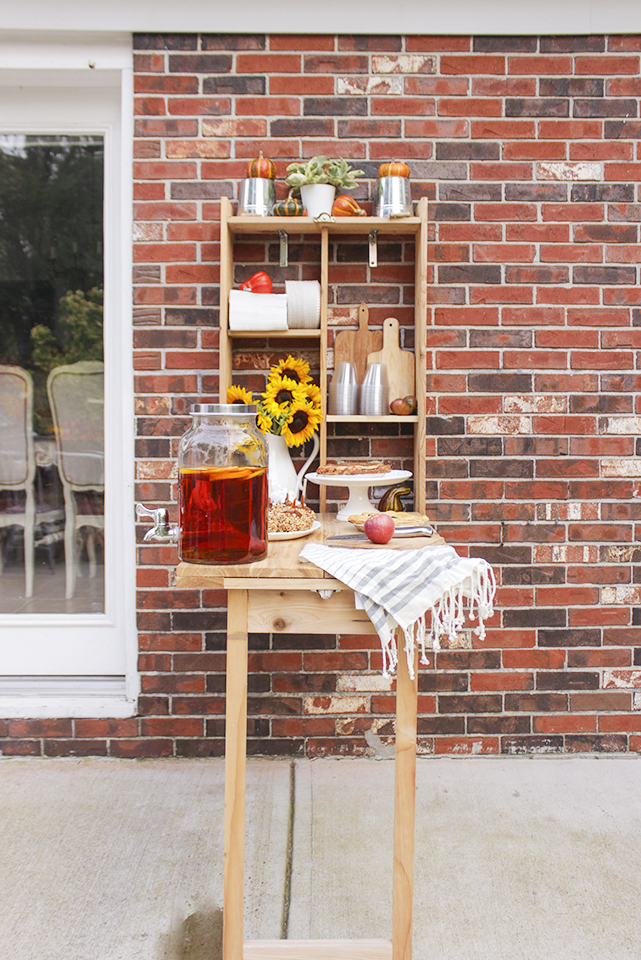
Earlier this year I built an outdoor murphy bar and shared the tutorial HERE, but still that left the rest of the space unfinished.
You can imagine my delight when a few weeks ago I received a HD gift card and an excuse to FINISH the patio makeover!!
Here is a video showing the state of affairs the night before I started building, and the description of my plan– I still hadn’t fully decided on all the placement details, but everything came together once the tables were in place.
My patio reveal on The Home Depot Apron Blog
And since I had so many pictures besides what I shared on The Home Depot blog, here are the rest…
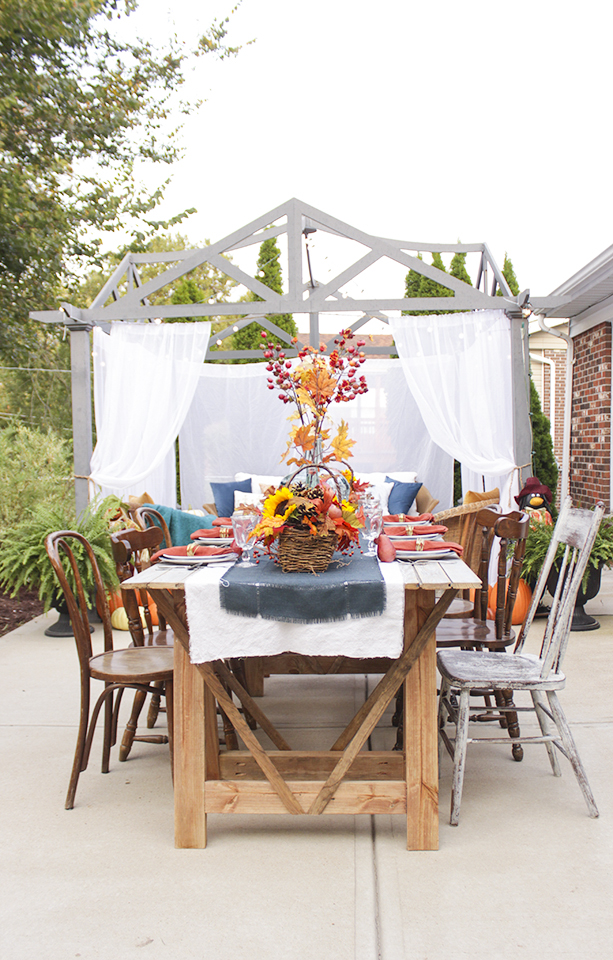
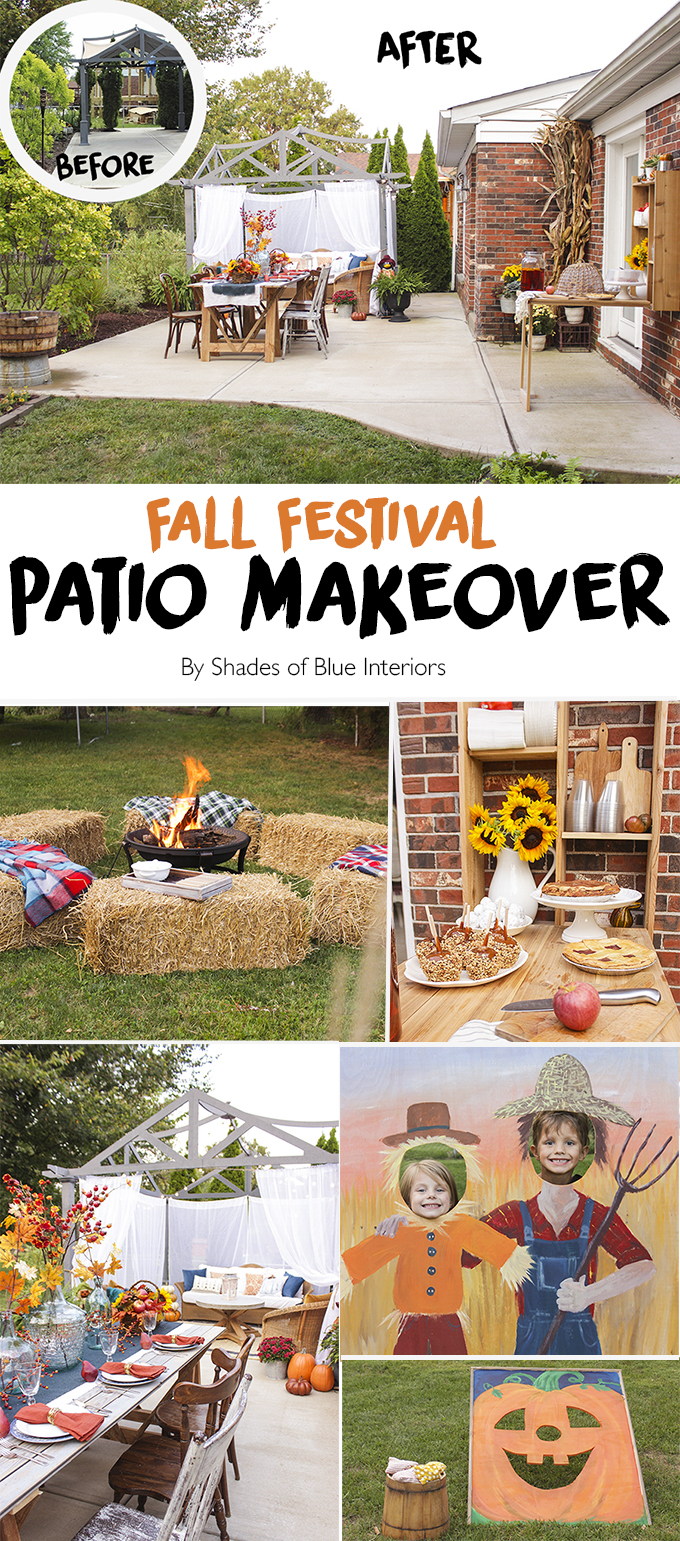
As I described in my post on their blog, it was important to me to create several usable spaces– a dining area, a seating area, a serving station, a fire pit with s’mores, and a place for games.
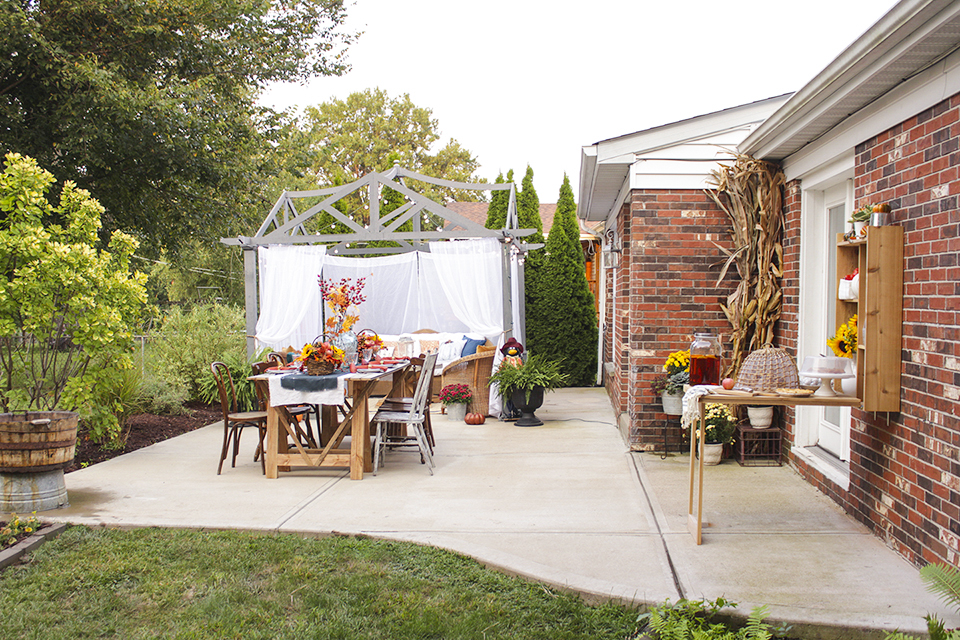
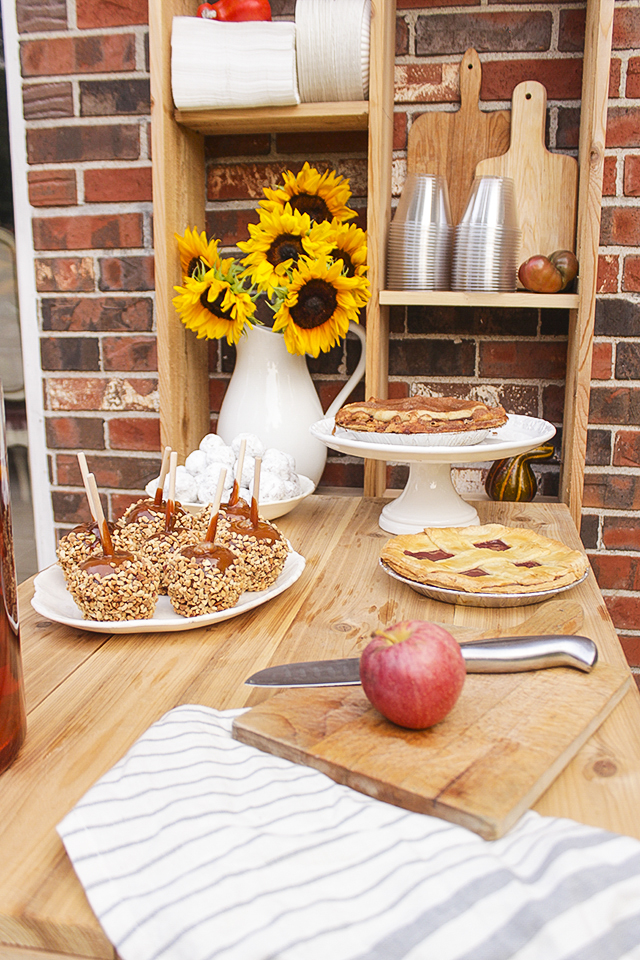
These doors are our patio doors that come off the dining room. I filled the serving station with all sorts of fall treats like powdered donuts, apple pies, caramel apples, and apple cider. The murphy bar shelves I filled with disposable plates, napkins, cups, and some fresh sunflowers. (My children started filling their cups and making little messes below the drink dispenser at this point.)
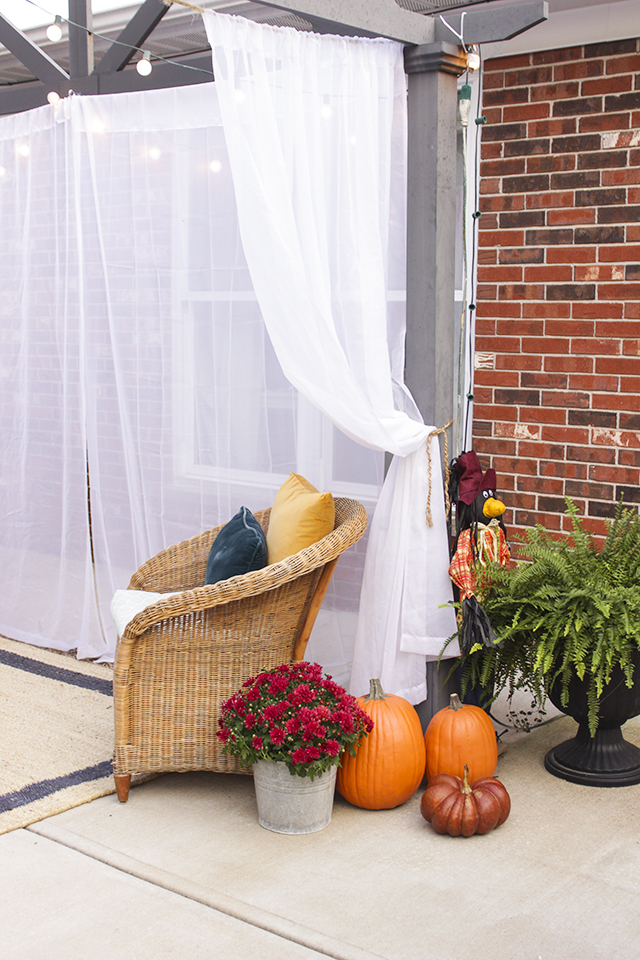
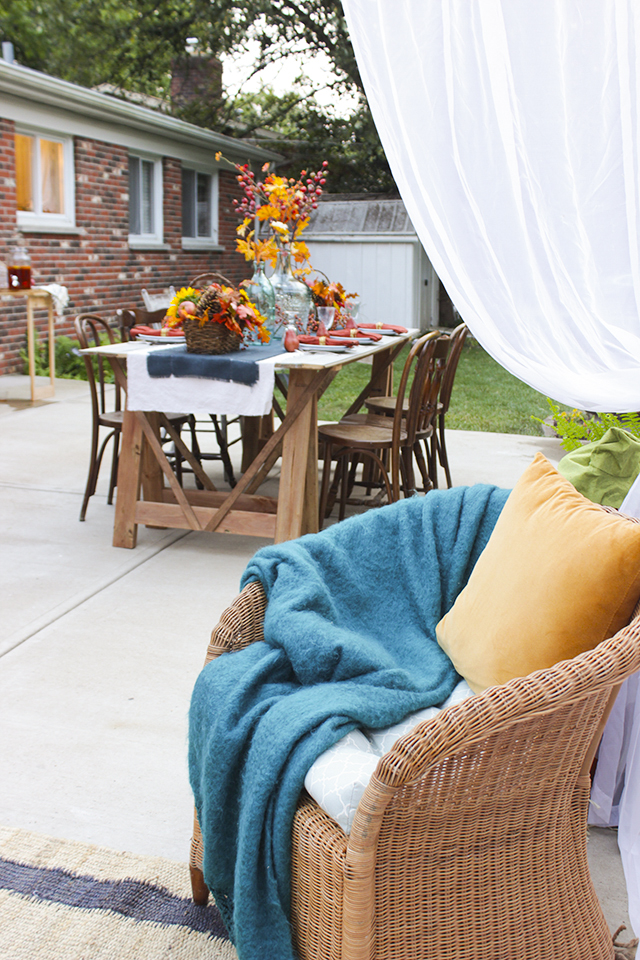
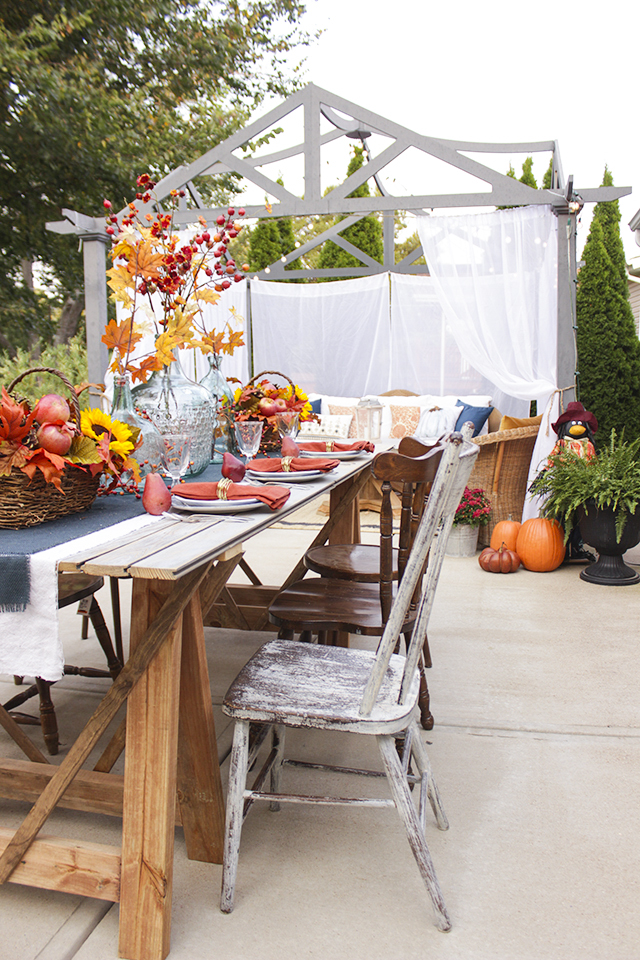
The pergola came with our house, which I loved, but it really needed some things to make it used more…. with some added seating, lots of pillows, some sheer curtains, and cafe lights, it now is a cozy place to relax.
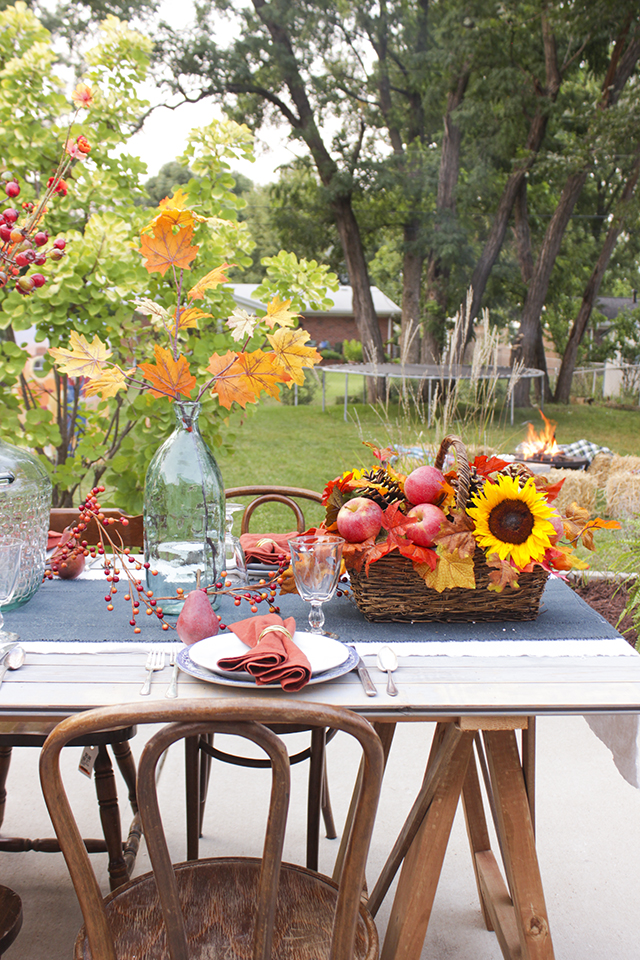
One of the tables I built, was this cement-topped one. The base is almost identical to the trestle end table I shared earlier this year, but I made it obviously larger. The cement top was a new experience for me. I will share all about it in another post, but I ran into some problems when the first bag of cement didn’t have enough portland cement in it, so I couldn’t smooth out the rocks on the edge. The second bag was normal and smoothed over fine! When I took off the form, I found a rougher, layered-looking edge, which I ended up liking! It reminds me of those live-edge wooden tables, so I kept it as is.
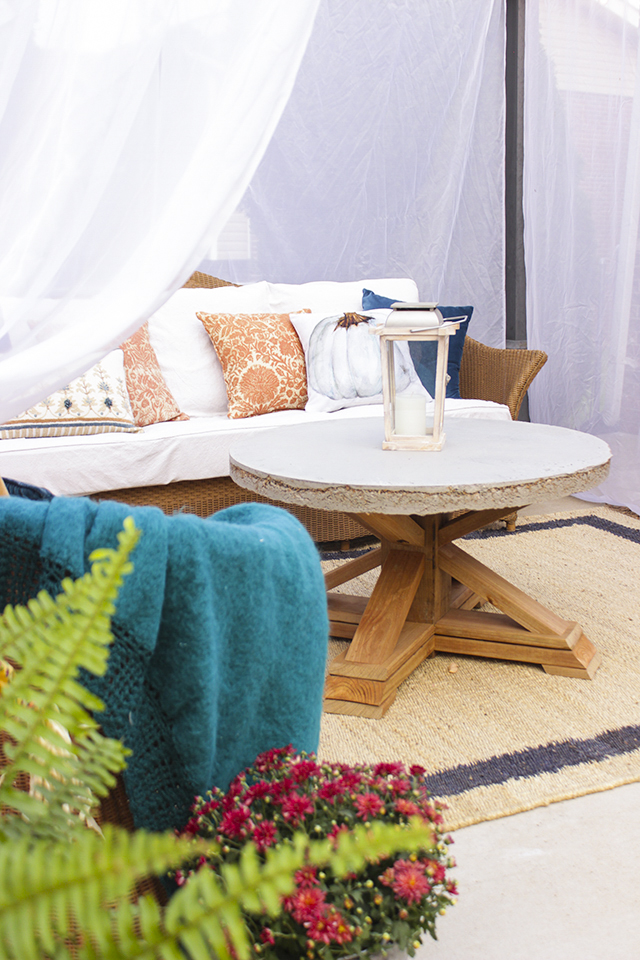
The rug and pillows are from World Market– except for the pumpkin one. That is from Craftberry Bush’s shop!
The other thing I built was this sawhorse-leg table. My inspiration was an image I found of actual vintage sawhorse legs being use with a table top. I was recently gifted some old deck wood from a reader/friend, so I used them to make the top of this table. Both tables cost me less than $100 in materials.
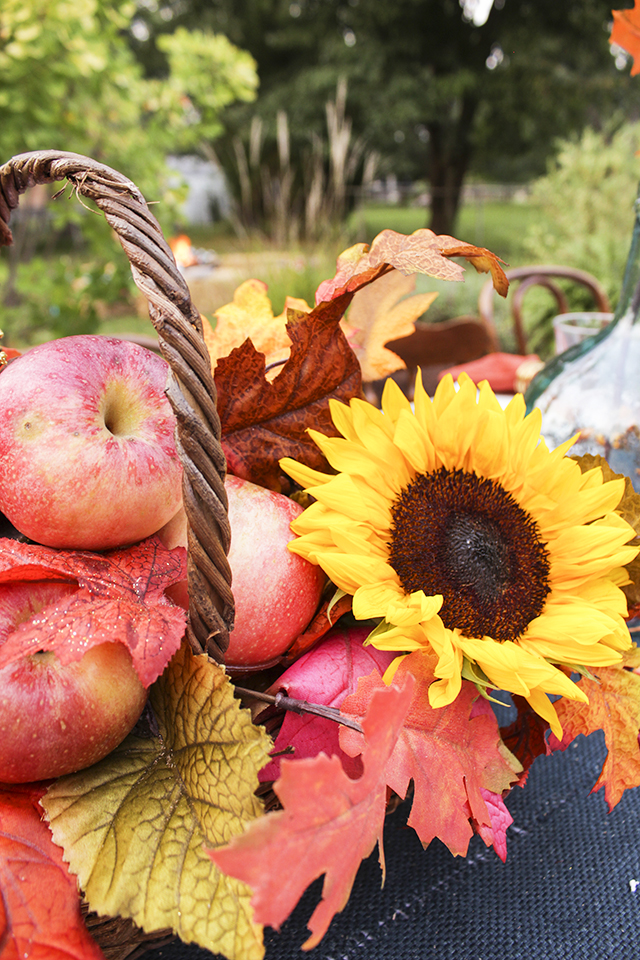
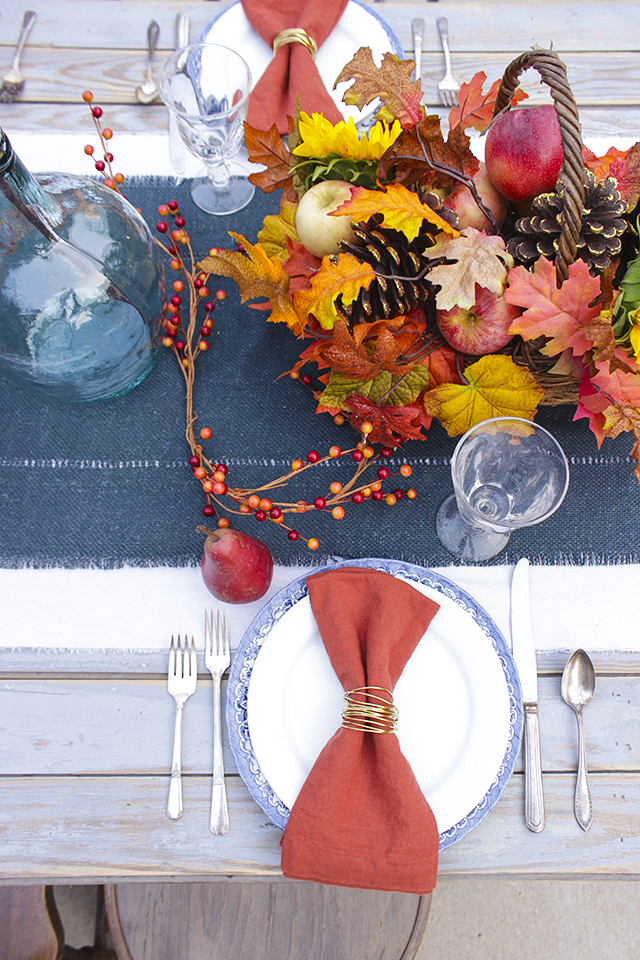
The tablescape I created with layered runners (drop cloth one and a teal one from World Market), some rust-colored linen napkins (also WM), vintage dishes and silverware, some blue vases, faux branches, and baskets on either end filled with apples, sunflowers, pinecones, and faux leaves.
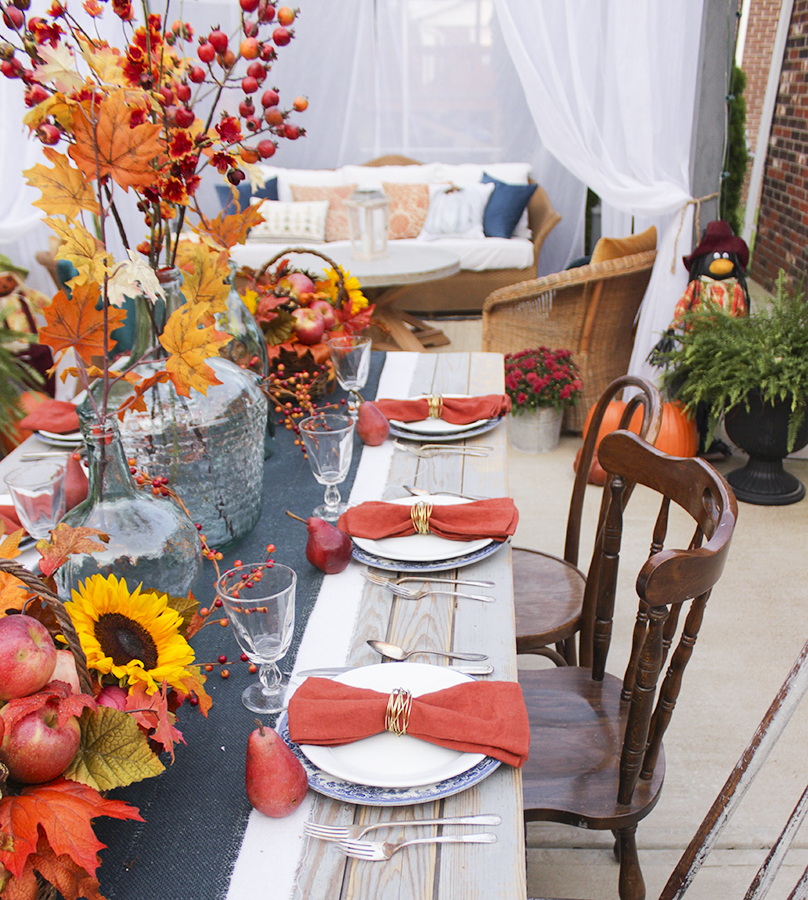
The blue vases were HomeGoods finds from awhile ago, and all the faux branches are from Hobby Lobby.

The napkin rings I made and you can find the tutorial HERE.
I have a chair hoarding problem, so finding some mismatched chairs to put around the table consisted of me going to the basement is grabbing them. 🙂
Ok, I’m slightly obsessed with the table, can you tell? haha… but this shot you can see the fire pit in the background!
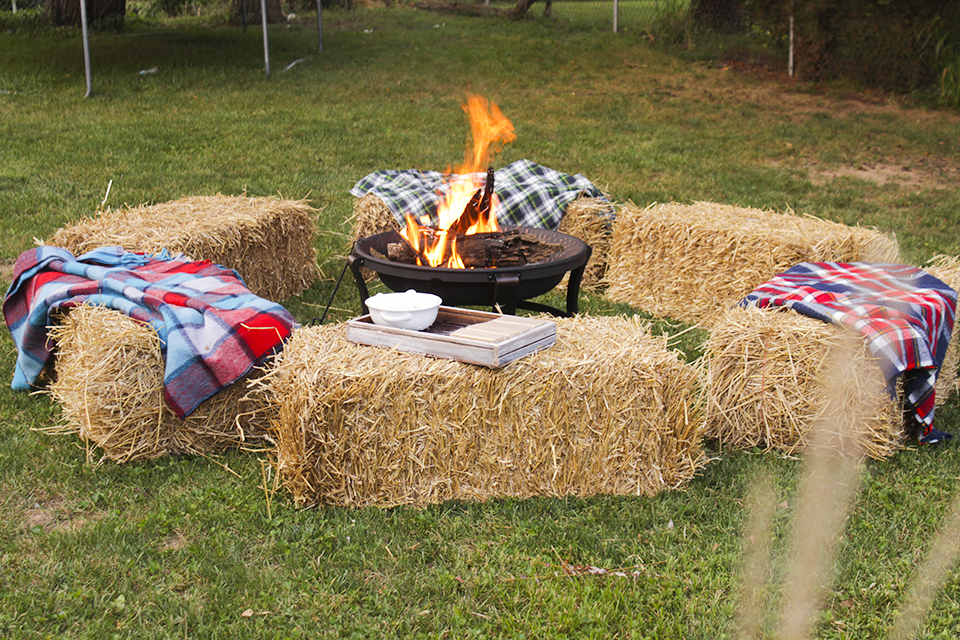
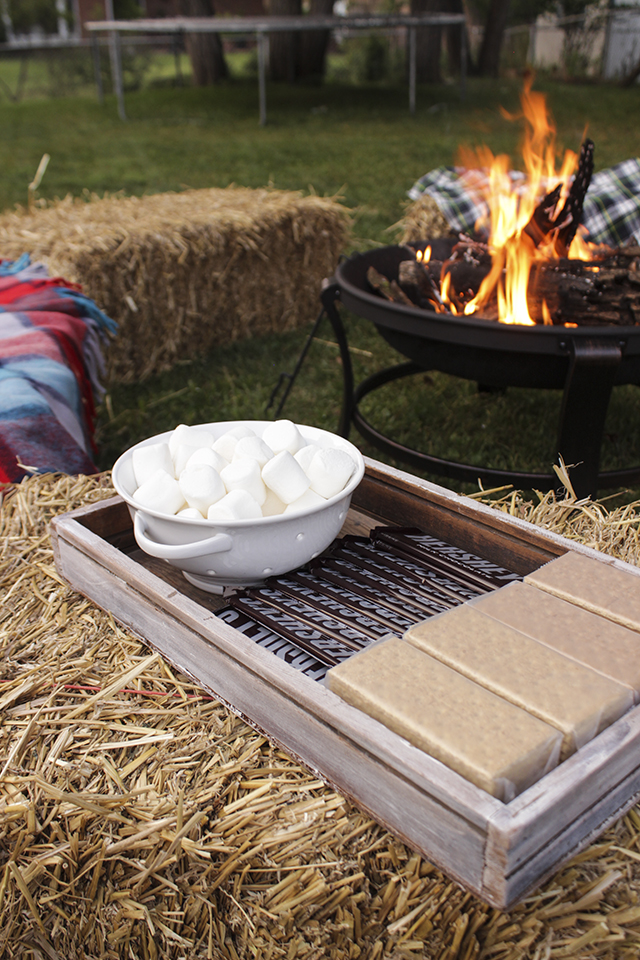
This fire pit area was the easiest thing to create. I got some hay bales (they were only $5 a piece at a farm and garden supply store), some thrifted wool blankets, and a tray filled with all the s’mores ingredients. We had some friends over the following night after I took these pics, and we spent the most time around the fire. I pulled out some more blankets to sit on, kids were running around playing all the games, and we sat around here eating and talking. It was so gratifying to use and enjoy the space I worked so hard to create.
At first, I wasn’t sure where I would put a couple games, but as I was setting things up, it just seemed natural to put them in the yard.
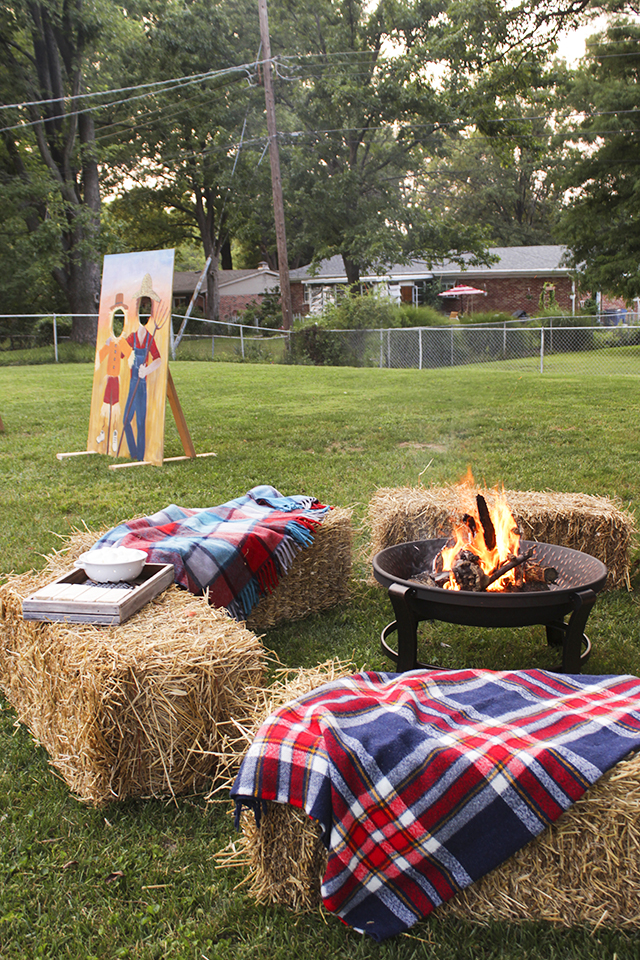
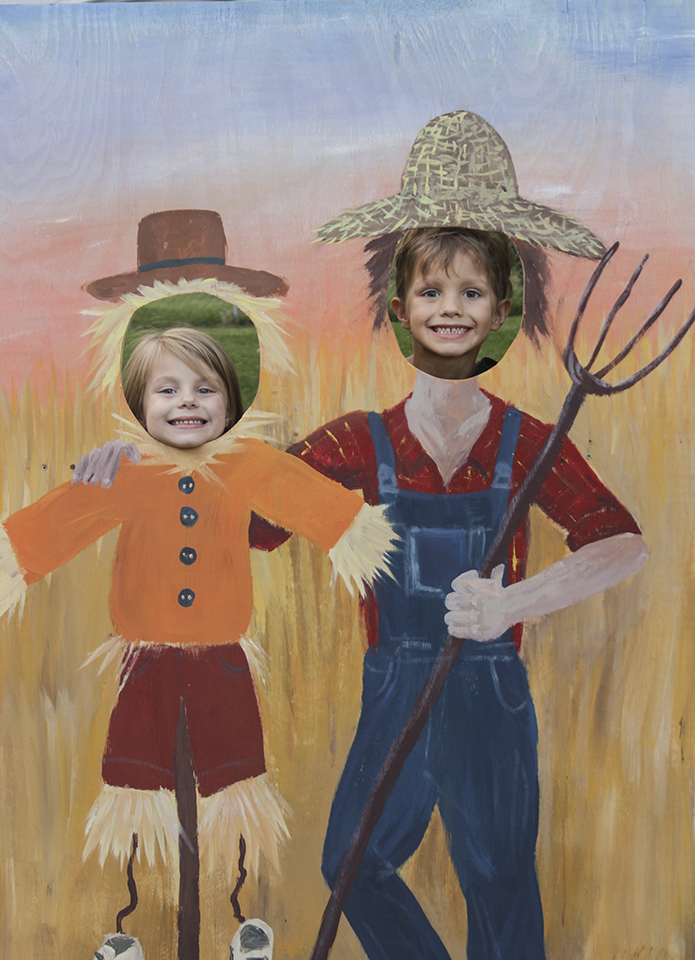
I painted this fall scene (with some finishing touches from my mom) for a face-in-the-hole picture board. The kids love it and the older kids were also using this to throw bean-bags into!
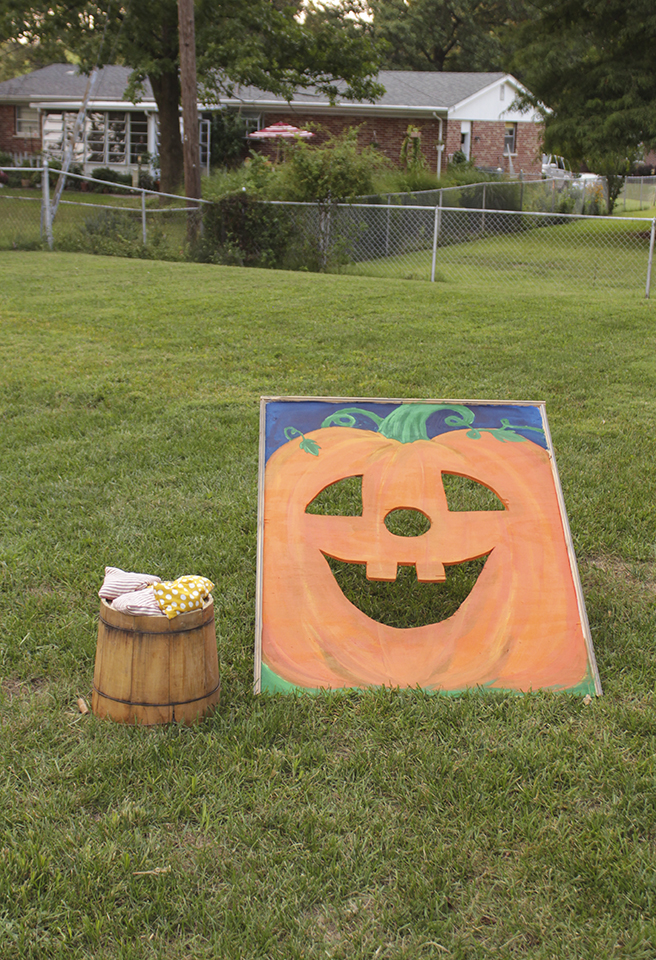
I also made and painted this pumpkin corn-hole game. This was a big hit and the bean bags were made with some scrap fabric I had.
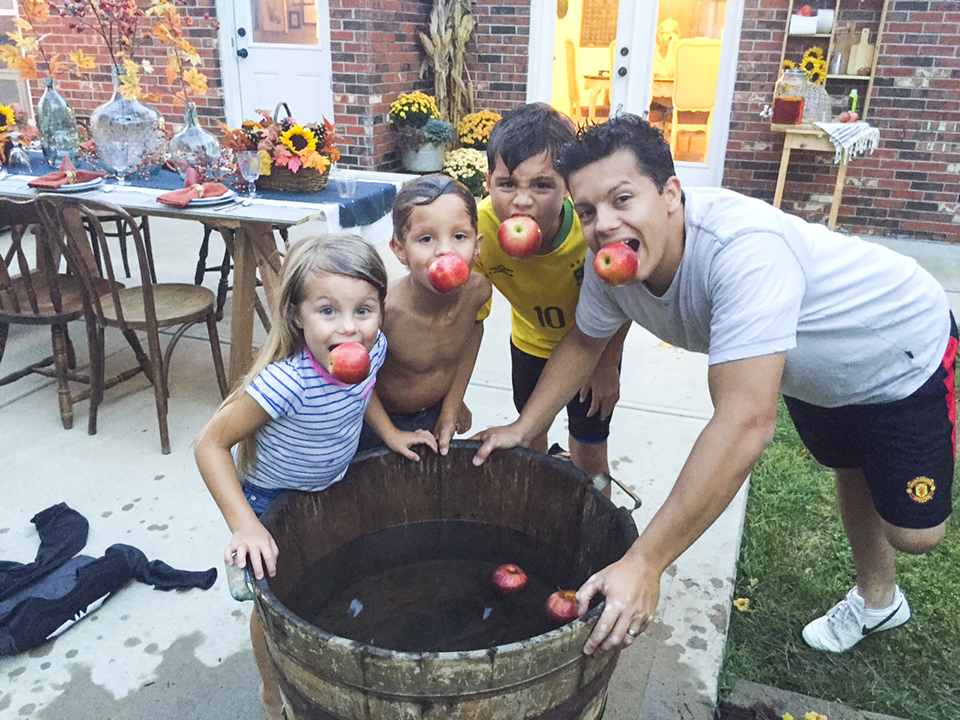
The third game was bobbing for apples in a big wooden tub, but the only pic I got of it is on Home Depot’s blog. Bobbing for apples was a HUGE hit and my kids played with it on more than one occasion. Even my husband, Bruno, joined in the fun! This pic was taken just a couple hours after I finished taking all the pics.
We all are pumped for the actual fall festival we will be having in a couple weeks with some friends. I’ll take a few more pics then because I will be adding more games and it is always fun to see the space in action!
Here is a before an after for ya!
And just in case you wanna pin this:
you never cease to amaze me! so talented- it looks so inviting!
You are sooooo amazing. What a huge transformation. Wow, that table! I think you’re going to have your own furniture line soon 😉
Popping over from your Fall Home Tour. Such a great outdoor space and the tables you made are awesome. Beautifully decorated for Fall and harvest as well. You are very creative.
That is very cute! But I have a major problem with the straw bales. They are flammable and are not safe to have around a fire pit at all.
Alycia, thank you for your concern. It actually is safe because the fire pit is small (only about 2 feet across) and the bales are 4-5 feet from the fire. We have had several marshamallow roasts around here this fall and it has been perfectly fine– no sparks flying or anything that is concerning. If the fire pit or fire was raging then yes, you would be right, the bales would be at risk for a spark that could catch them aflame. We also don’t leave the fire unattended, so there is always someone managing how big the fire gets so it doesn’t even come close to risking catching anything on fire. I grew up in Alaska and would go camping almost every weekend in the summer so I am very familiar with safe fire practices.
Love what you did to your Patio! I really like the pergola! I have a brick patio and I have no idea how you can secure a pergola on top. Is yours anchored to the ground? Love , love, love it!
So cute! Where did you get the bales of straw? I ‘ll be having an engagement I Do BBQ soon and wanted some for outdoor seating and ambience.
I went to a local farm supply store, but I’ve seen them at Home Depot as well! They are often sold to protect lawns from excess moisture or from getting muddy in new growth areas.