A couple weeks ago we picked up another empire dresser from a craigslist ad. There were two actually, but one was in really bad shape, so I passed on it (you are shocked I know! ;)).
This was the one I DID take home, however:
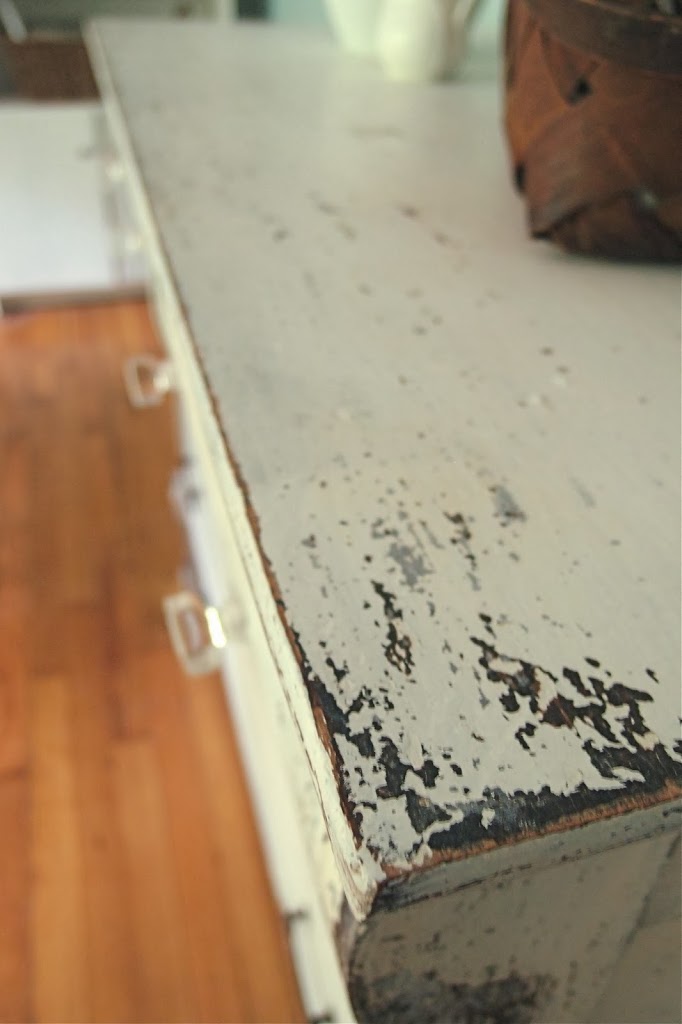
I know this isn’t a complete “before” but it’s all I got. So, let’s look carefully at this, shall we? The top pull was obviously replaced recently, because it is a shinier brass (almost silverish) and doesn’t match the style at all. So I knew I was going to replace the top hardware. Also, notice the chipping already happening with the finish. This was curious to me, because I’d never seen a wood finish chip, the same way paint does. So I put on a little stripper to see what would happen. Not much. Turns out the finish was a type of paper and my gel stripper turned kinda liquid-y and it came off a little, but not much. I did notice, however, solid oak beneath it, no veneer. The papery finish was supposed to look like quarter-sawn oak, which is more expensive. First time I’d seen a faux-quarter sawn finish over solid oak! So weird.
Anyhow, that got my wheels turning. Lately, I’ve been trying to try new or different techniques and finishes. Besides enjoying the challenge, I like to show clients some versatility. So when I saw the papery finish chipping, I knew I wanted to try a chippy paint finish.
So naturally, I bought some milk paint.
Miss Mustard Seed Milk Paint in Ironstone, because all the cool kids are using it. 😉
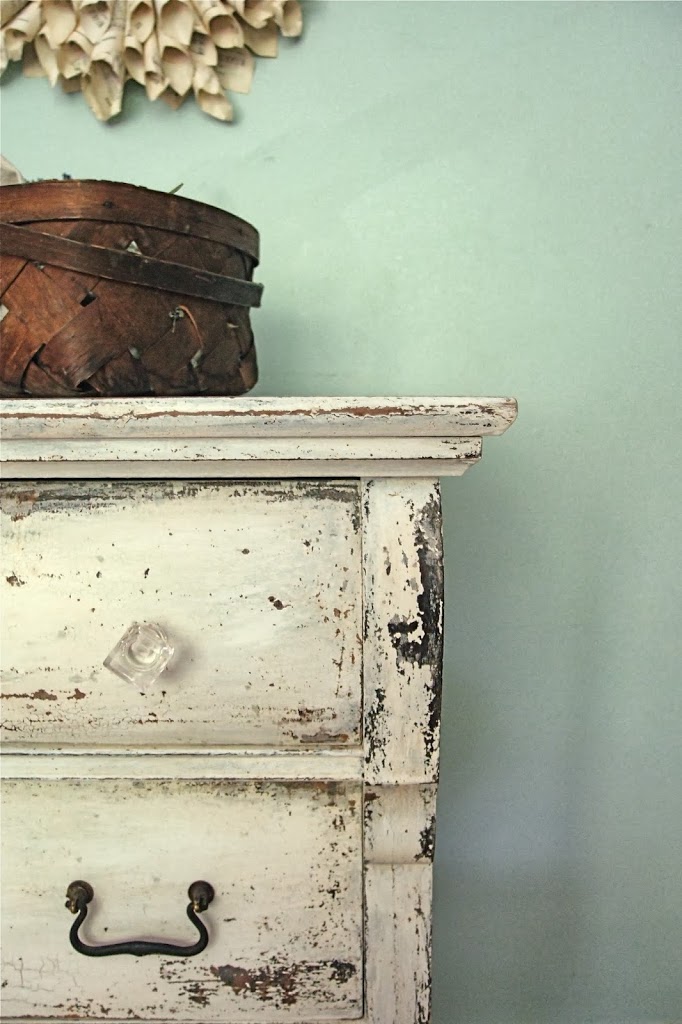
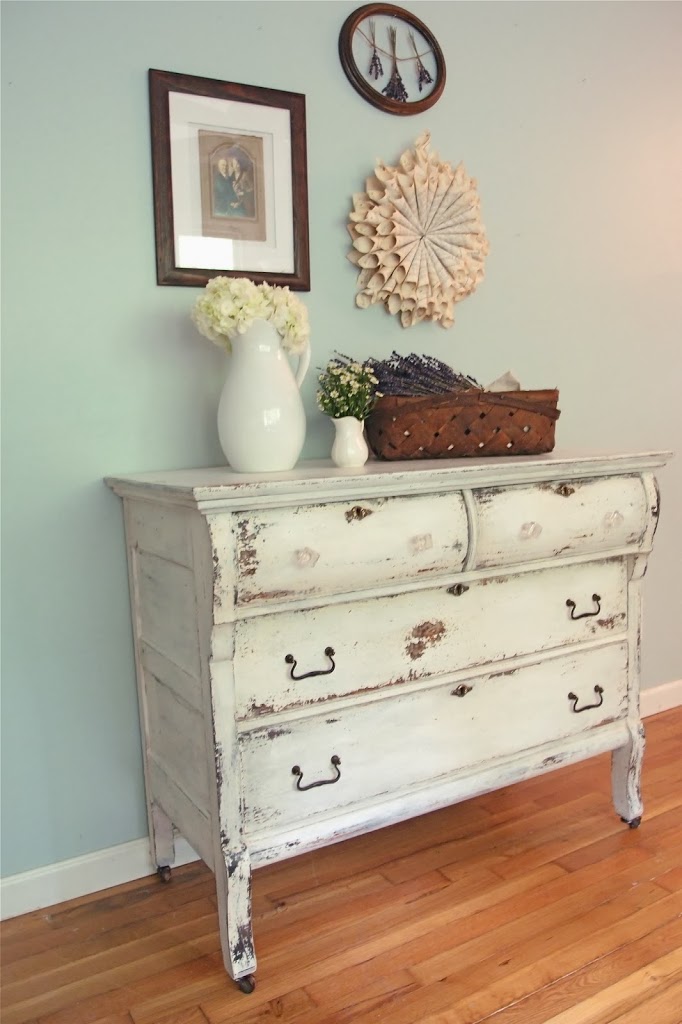
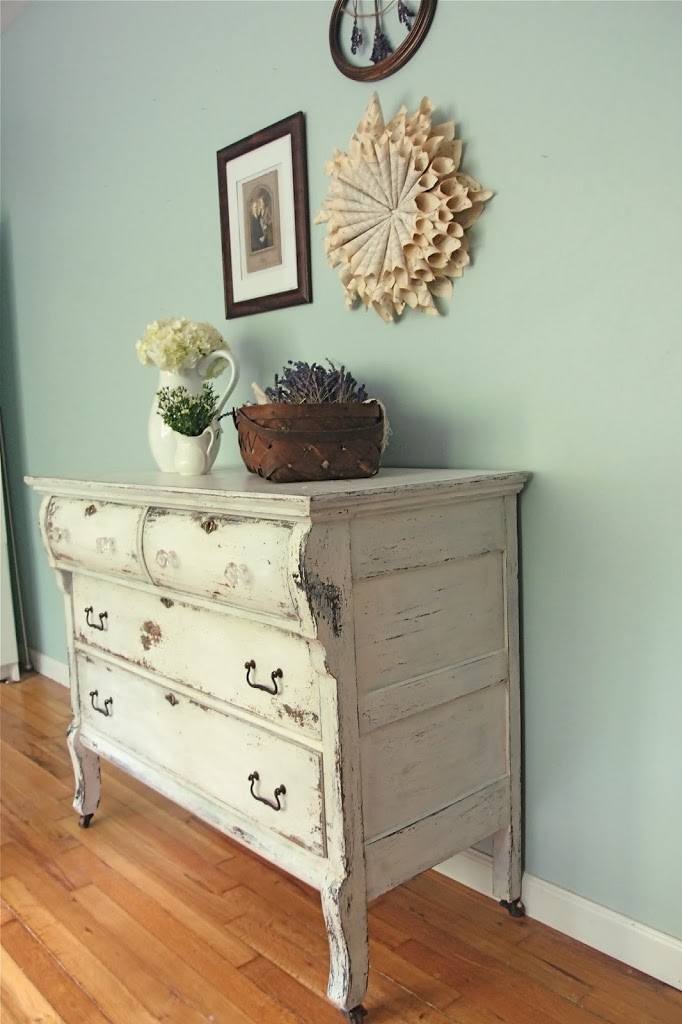
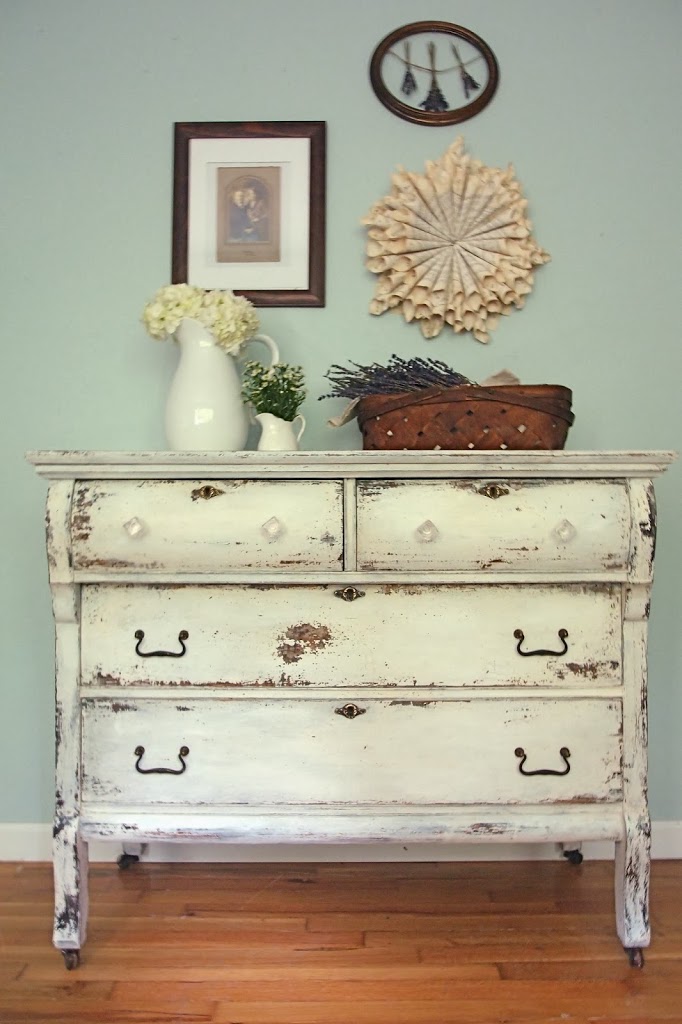
And here is the result:

I was actually worried with the papery finish that was already there, that the milk paint would adhere really well even without a bonding agent. So I bought some Hemp Oil to act as a resist.
I brushed on a little Hemp Oil on edges and areas that were already chipping a little. Then I mixed up a 1:1 ratio of the milk paint powder and water. It ended up a little waterier than they recommend for light colors, but that was okay, I was happy with the color variations that occurred.
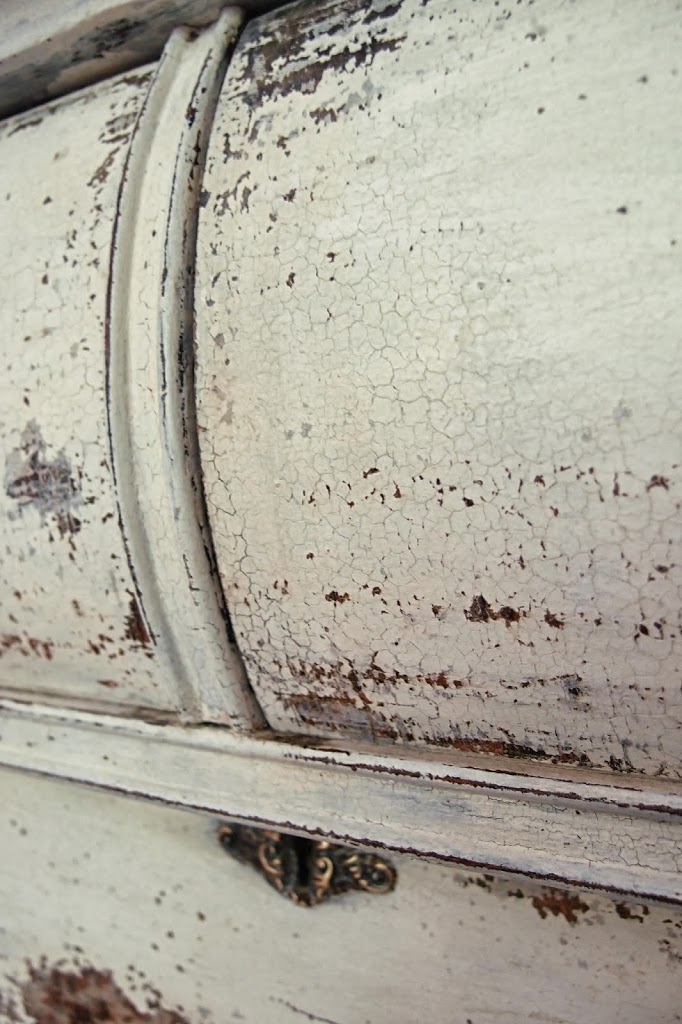
After I applied the first and second coat, the paint wasn’t chipping or flaking a lot but was crackling like CRAZY!I didn’t use a hair dryer, I swear!

I also noticed quite a bit of a yellow stain seeping through. It was looking beastly overall. But I had faith it would still turn out, so I applied a little clear wax on the areas that had the worst of the staining, and then put on another coat.
I also noticed that the super white pigments settle to the bottom easily, so when I was about out of paint, I smashed up those pigments and brushed them on the areas that were still a little yellow.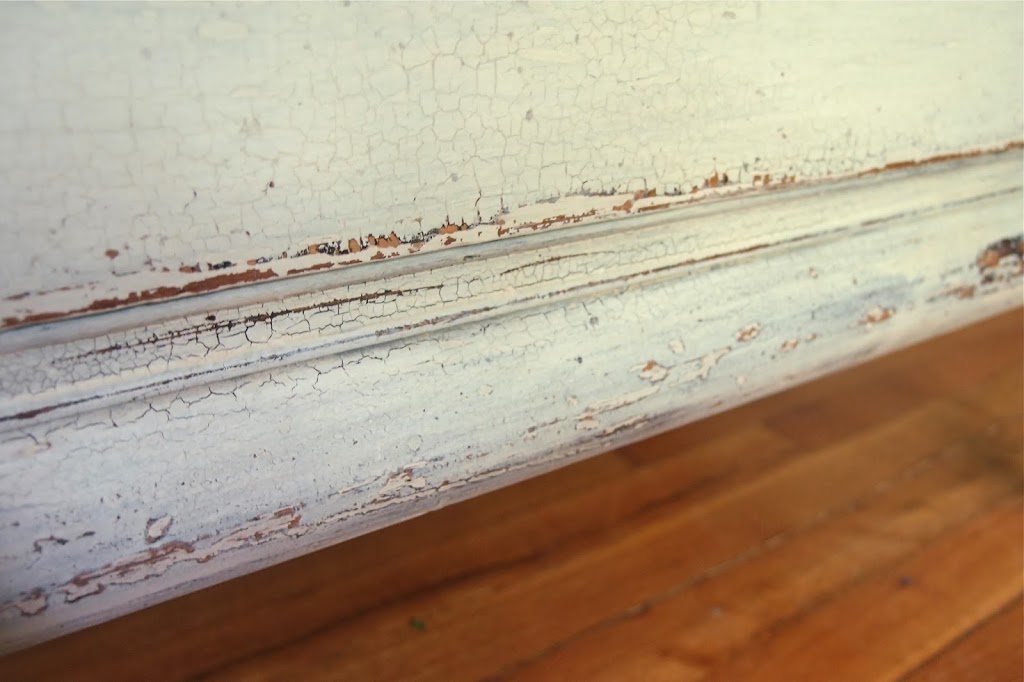
Once all the coats were dry, it still felt cool to the touch, so I left for a couple hours and let the chipping magic happen.


I came back with a metal spatula and got to scraping.
My husband was skeptical of how the milk paint finish would turn out at this point, because it was not smooth once dry. Maybe it was my fault because I stirred it up with a stir stick and not the fancy frother? I don’t know, but it was a little bumpy or gritty to the feel. Once I got to scraping, however, it got quite smooth very fast. After all the loose paint was scraped off, I got my 220 grit sanding sponge and quickly went over the entire thing. It now is SO smooth, both my husband and I agree it is a smoother finish than we typically achieve with Chalk Paint. And it is SO much more interesting, visually. Have you ever seen such crackling?
I was unsure, at first, about that big chippy spot in the middle of the drawer. It seemed so unnatural to me and I seriously contemplated using bonding agent to paint a couple layers on that spot. But it really did happen naturally, and I figured it would be obvious if I tried to cover it up. So I let it be, even if it did make me twitchy for a couple days. I have control issues, can you tell? 😉
I forgot to mention, before I started painting, I replaced the drawer bottoms, glued and clamped the drawers secure, and filled the holes from the drawer pulls on the top 2 drawers. (Are you still with me?) Then I measured and drilled 2 new holes, further apart, because I had imagined from the beginning some pretty glass knobs.

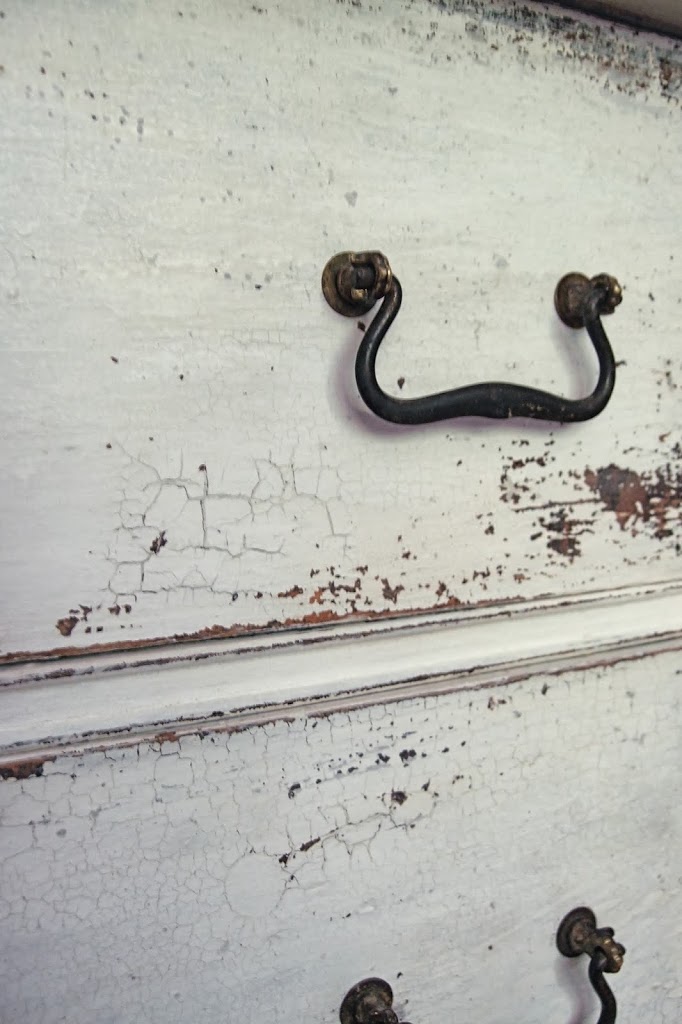
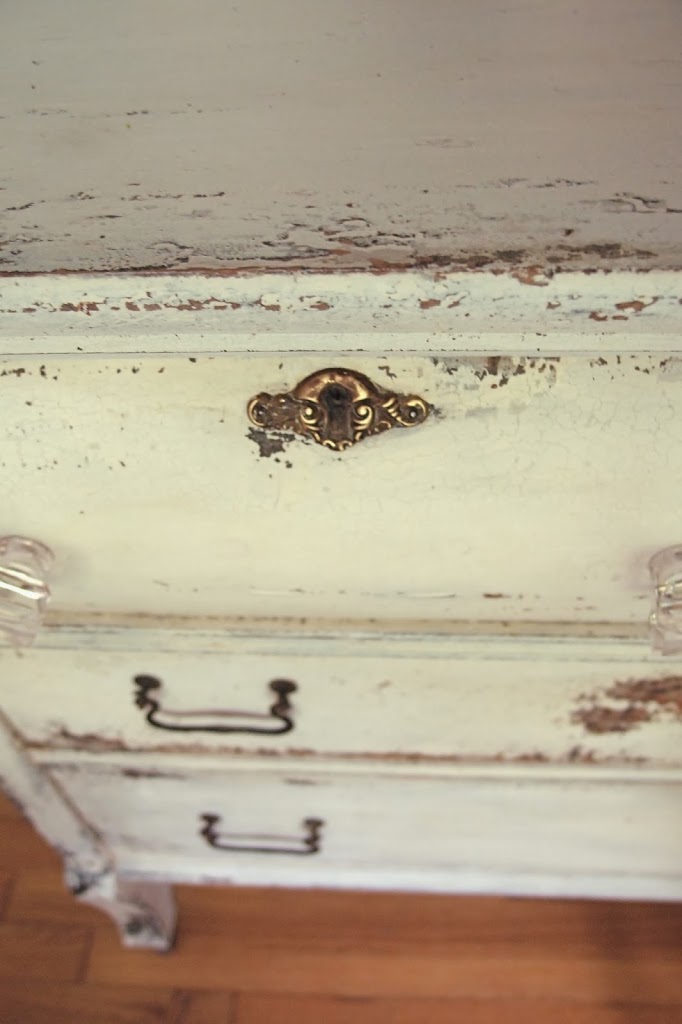
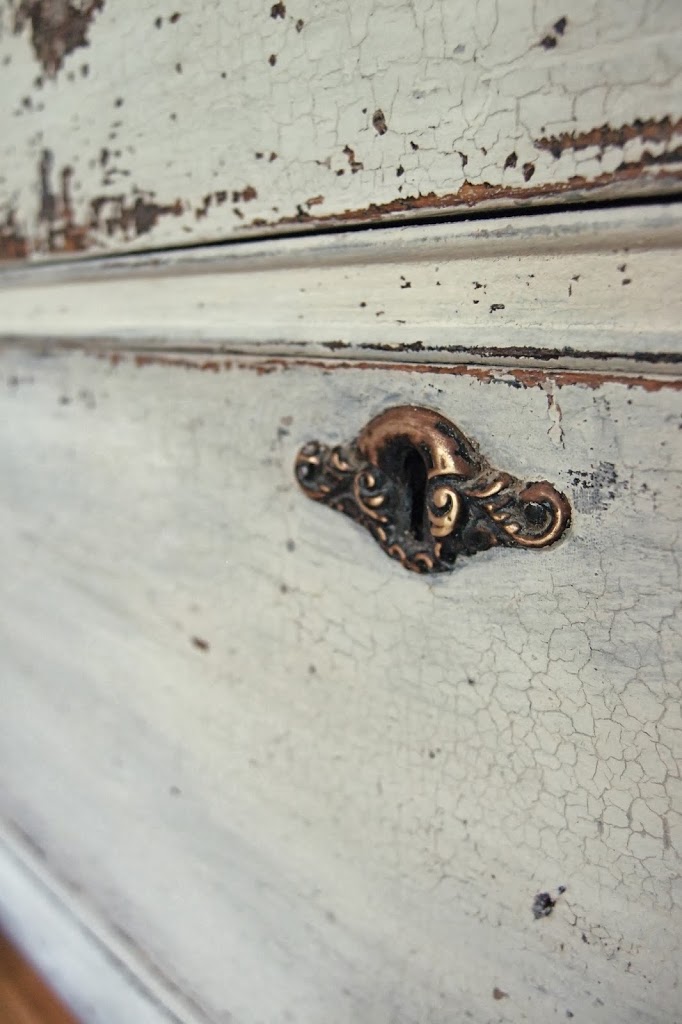
Probably my favorite parts of this dresser are the keyholes (love those fancy escutcheons!)…
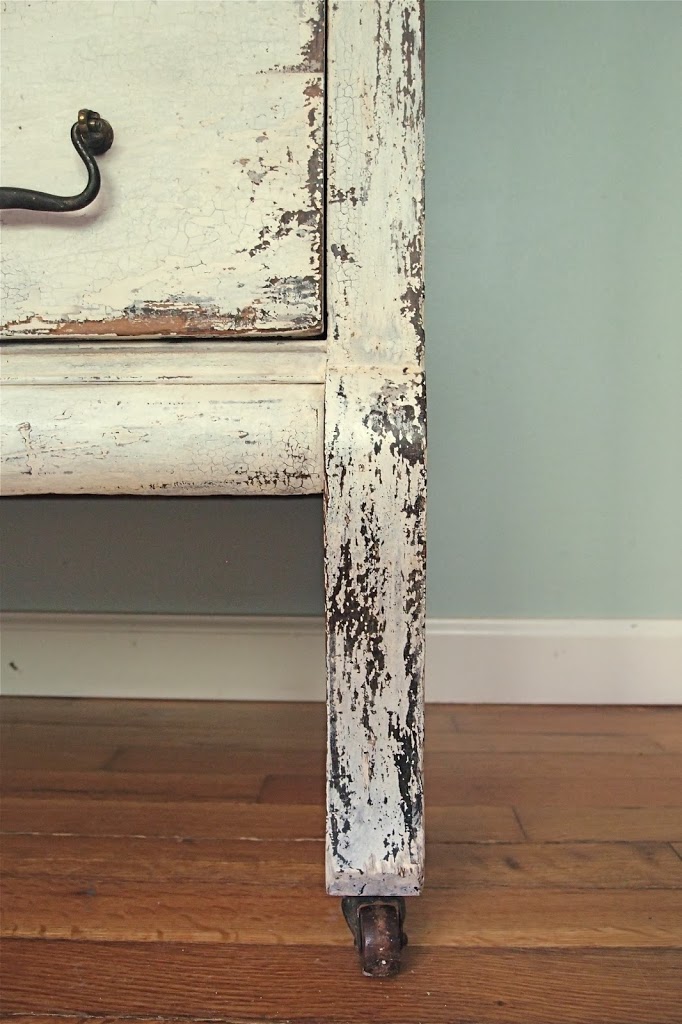
…And the wooden casters!
And here she is again, in all her chippy-crackly glory!
I love your pics and all of the detail shots. I can’t get enough of detail pictures!! I so get the twitching for a couple of days and I am the same way!!! I have to remind myself to let some things go….haha! The dresser turned out great 🙂
beautiful work! the crackling is quite amazing on this piece. thanks for sharing all the work details… i always find those helpful. i have yet to try MMS milk paint. love seeing all the projects out there using it.
Rachel, it looks fabulous! I haven’t tried Milk Paint yet…I’m reluctant because I don’t really understand it. With all that chipping, after sanding, it was completely smooth to the touch? Does the customer have to worry about any future flaking?
On another note, your photography is so beautiful! I love the close up shots!
Robin
Robin, yes after sanding it was completely smooth to the touch. There isn’t future flaking for two reasons: 1st, you have scraped off all possible places that would come off with a metal spatula. And then the sanding sponge smooths out those areas that chipped. 2nd, the wax seals off future chipping. Because milk paint is porous, it kinda becomes one with the wax, and the wax fills in areas that are chipping and crackled, so you get a continuous smooth surface instead of bumpy chippy areas and the already smooth non-chippy areas. Does that make sense? You should definitely try it. I would say try it on a smaller piece if you are nervous and you will learn a lot about how it works. Thanks for the love Robin!
Oh, Rachel, so pretty! I really love how this came out and I love the crackling and different colors and how it pulled away on the drawers. Love, love, love it. I found out from my friend, Nancy, that that crackling is called Crazing. Ha! I just painted a piece in Grainsack and had it happen all over it and then the dreaded bleed through but it is all sorted now. Had to resort to clear shellac and bonding agent. Will share on my blog soon. x
I am almost speechless…OMG…it turned out BEAUTIFUL! The crackling detail and chipping is amazing on this piece. This has convinced me to try MMS milk paint for sure. Now I just to find something to paint, lol.
oops…just “need” to find…I forgot to type that word
It looks fantastic! I found the same grittiness with the paint but once I go over it with some steel wool it smooths right out and feels silky smooth!
Beautiful piece of furniture and more beautiful restoration job. Love the reveal!
The crackling on this is amazing! What a beautiful piece of furniture to have in your home!
I love this! I recently tried milk paint one a huge hutch we bought off craigslist. We didn’t notice some of the flaws of the piece until we brought it home. After debating whether or not to keep it, I remembered how milk paint naturally chips and creates an awesome weathered look. I gotta say milk paint is not like anything I’ve ever painted with, but I love it! It’s smooth and the natural distressing is interesting! Thanks for sharing!
LOVE this piece…..this is an awesome painted finish……..!!!!!!!!!!!!!!!!!!!!
I so enjoyed this post about the finer details of achieving a chippy paint finish. I quite like that distressed spot in the middle – it looks as if for years someone leaned a knee there to put away clothes in the top drawer.
Oh my heavens…. this is such an inviting dresser… You did a fabulous redo and wonderful write-up. Thank you for sharing!
I wish it could be more solvent-free oil that gives a defensive water-safe surface. Well, it appears that it can be used on new wood that is exposed, stained Milk-painted or to resuscitate old wood finish which stands be its purpose that one thing what matters most…
CAndHHardware.com
This turned out beautiful!
Wow, what a fabulous makeover! I love how you took this great dresser from just “ho-hum” to true chippy-glorious-vintage-shabby-loveliness! It truly looks its age now 🙂 Great job! I’ve been DYING to jump on the MMS milk paint wagon, but don’t have a great piece yet to paint with it…soon I hope 🙂
Cindy @ Diy beautify
LOVE everything about this one! Great job, Rachel. Thanks for sharing at Silver Pennies Sundays! x
The crackling is perfection! I also love the caster feet- I’m a sucker for those. Well done!
Wonderful! So vintage and natural!
I had the same thing happen to a piece that I did with ironstone. I do think it was the veneer or finish underneath that caused it, but I loved it. I had used shellac so I didn’t have bleedthrough so I wondered if that was it. I can’t replicate it now though. Hope this link works. https://www.facebook.com/media/set/?set=a.533918270013285.1073741843.207367629335019&type=1&stream_ref=10
I love it…thanks for all the pictures!
Hello Rachel,
I’m a new reader, and really enjoy your blog. Interesting you added a coat of hemp oil, and then finished painting it. Do you recommend using bonding agent, if it’s a glossy piece (and/or if you want less chippy-ness)? I’ve already sanded my piece, but am still getting too much chippy-ness.
Also, I’m hesitating on getting bonding agent. I definitely want less chippy-ness, though not necessarily no chippy-ness. I already have hemp oil and can perhaps try that first? Great idea, and had not heard that tip before. I’ve heard to use hemp oil AFTER, but not during/in the middle of the project!
Thank you so much,
-Annie
I think a bonding agent can really control choppiness. The more you add the less chippy it will be. The hemp oil in this case allowed more chipping to happen, but also caused crazing which I thought was so cool.