As promised last friday when I revealed my little girl’s room makeover, I’m sharing with you a VERY simple build to create a “dresser” of sorts for small spaces! This roll-away trundle storage is very inexpensive for materials, and is perfect for small spaces… allowing just as much storage as a standard 4-5 drawer chest of drawers, but in a compartment that easily rolls under the bed.
This plan is very similar to Ana White’s trundle storage plan, except I used 1/2″ plywood (cheaper and I already had it on hand) instead of 3/4″ plywood and I choose to use supports underneath for added weight strength, AND I added storage dividers. The dimensions of the inside of this roll-away trundle storage, with the divider removed is 74″ x 38″, which would fit a standard size twin mattress snugly.

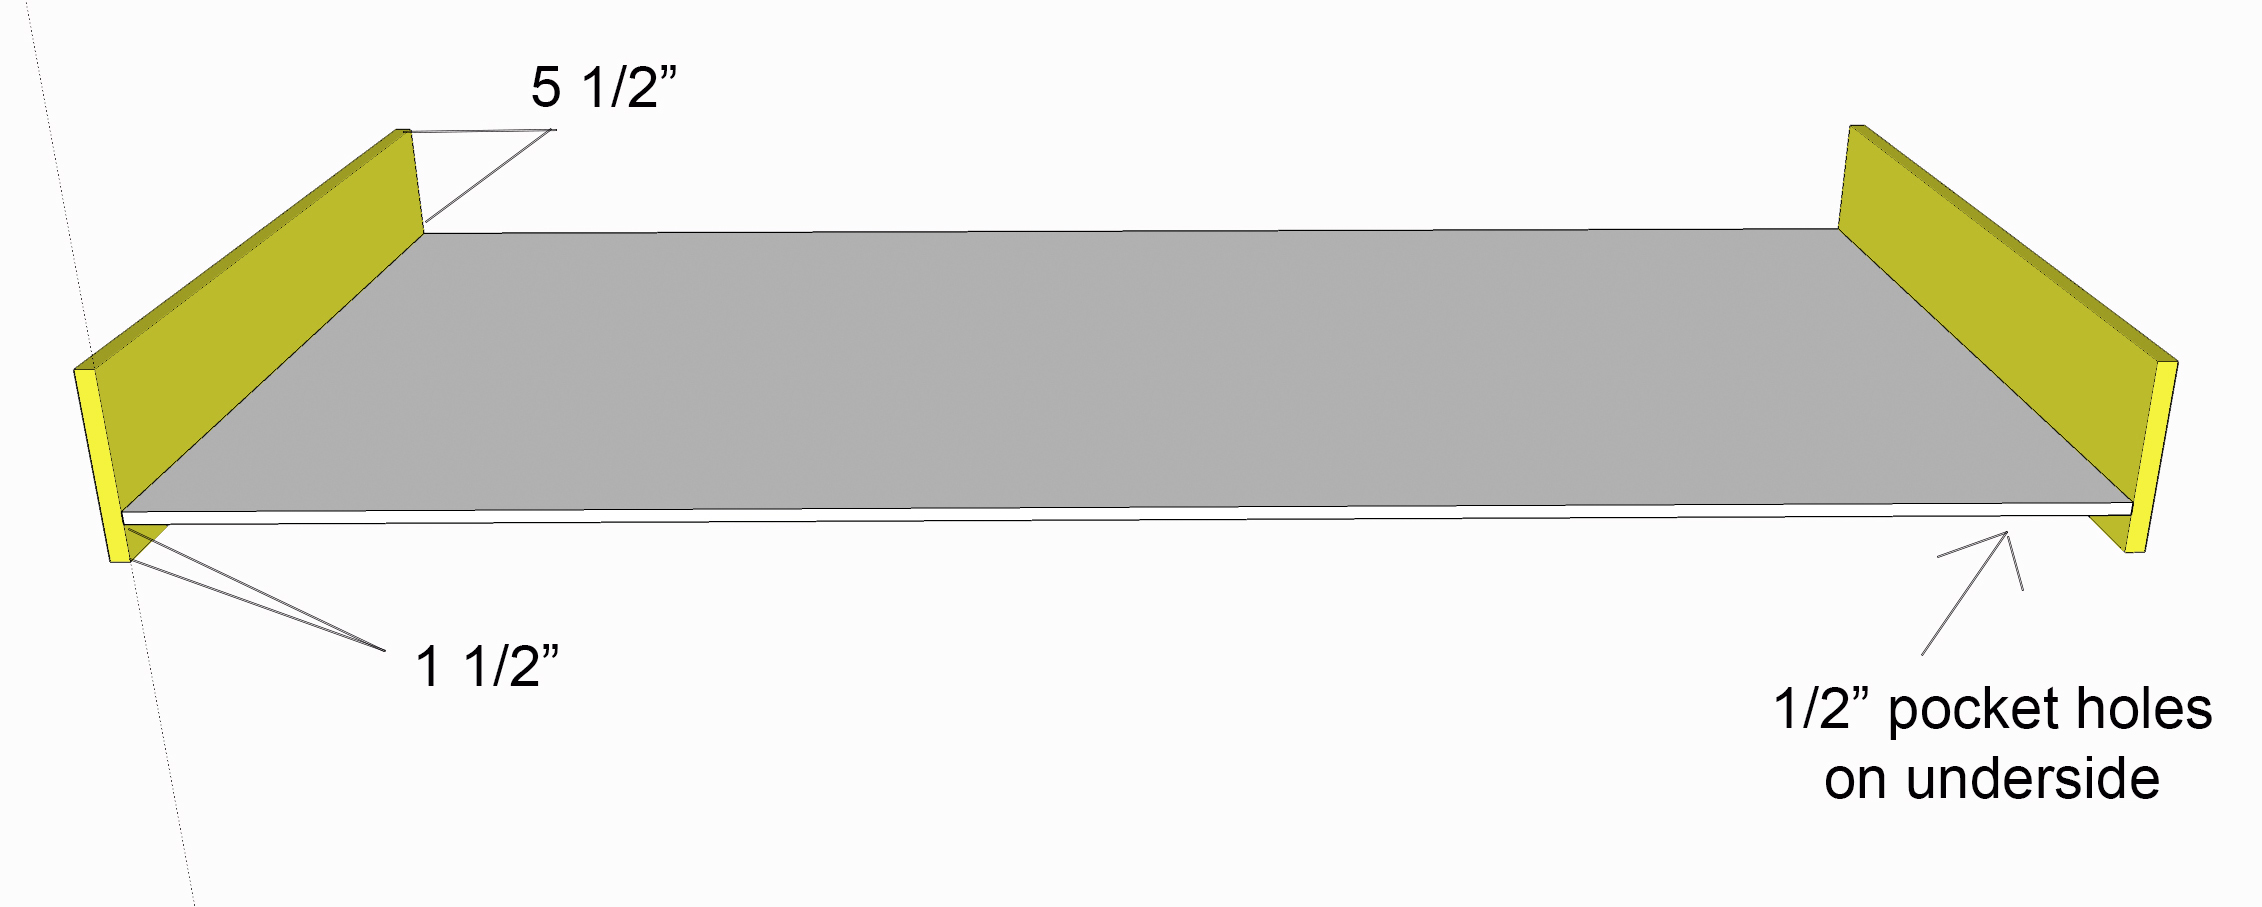
Outside Dimensions: 75 1/2” long x 39 1/2” wide x 7 3/4” tall (including wheels)
Free Downloadable Plan :
Roll-Away Storage Trundle
**Please note that I used 1×8 boards because that is what I had easily on-hand. If you have clearance under your bed for a wider board, you may use 1×10 boards, with same cut measurements. You may also choose to use 1×6 boards as dividers instead of 1x4s.
Tools Needed:
Circular saw
Electrical drill/driver
1/16” drill bit
Measuring tape
Safety glasses
Hearing protection
Wood glue
Shopping List:
3 – 1×8 x 8’
3 – 1×4 x 8’
1 4’x8’ sheet of ½ Purebond plywood
1 ¼” pocket hole screws
6 – 2” swivel plate soft rubber caster wheels
4 – 2 ½” double wide corner braces
24 – #8 ½” screws
2 – drawer pulls
sandpaper
paint or stain of choice
Cut List:
2 – 1×8 @ 75 ½” (long sides)
2 – 1×8 @ 38” (short sides)
1 – ½” plywood @ 74” x 38” (bottom)
3 – 1×4 @ 38” (bottom supports)
1 – 1×4 @ 37 ⅞” (half divider)
2 – 1×4 @ 36 ½” (quarter dividers)
2 – 1×4 @ 18 ¼” (eighth dividers)
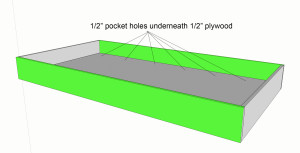
Above pictured is what this step will look like once you have attached the sides and flipped it over, so the top is facing up. However, since you will need to drill pocket holes and attach them from the underside, note the following steps, working from the underside to start with.
Step 1: Attach Short Sides
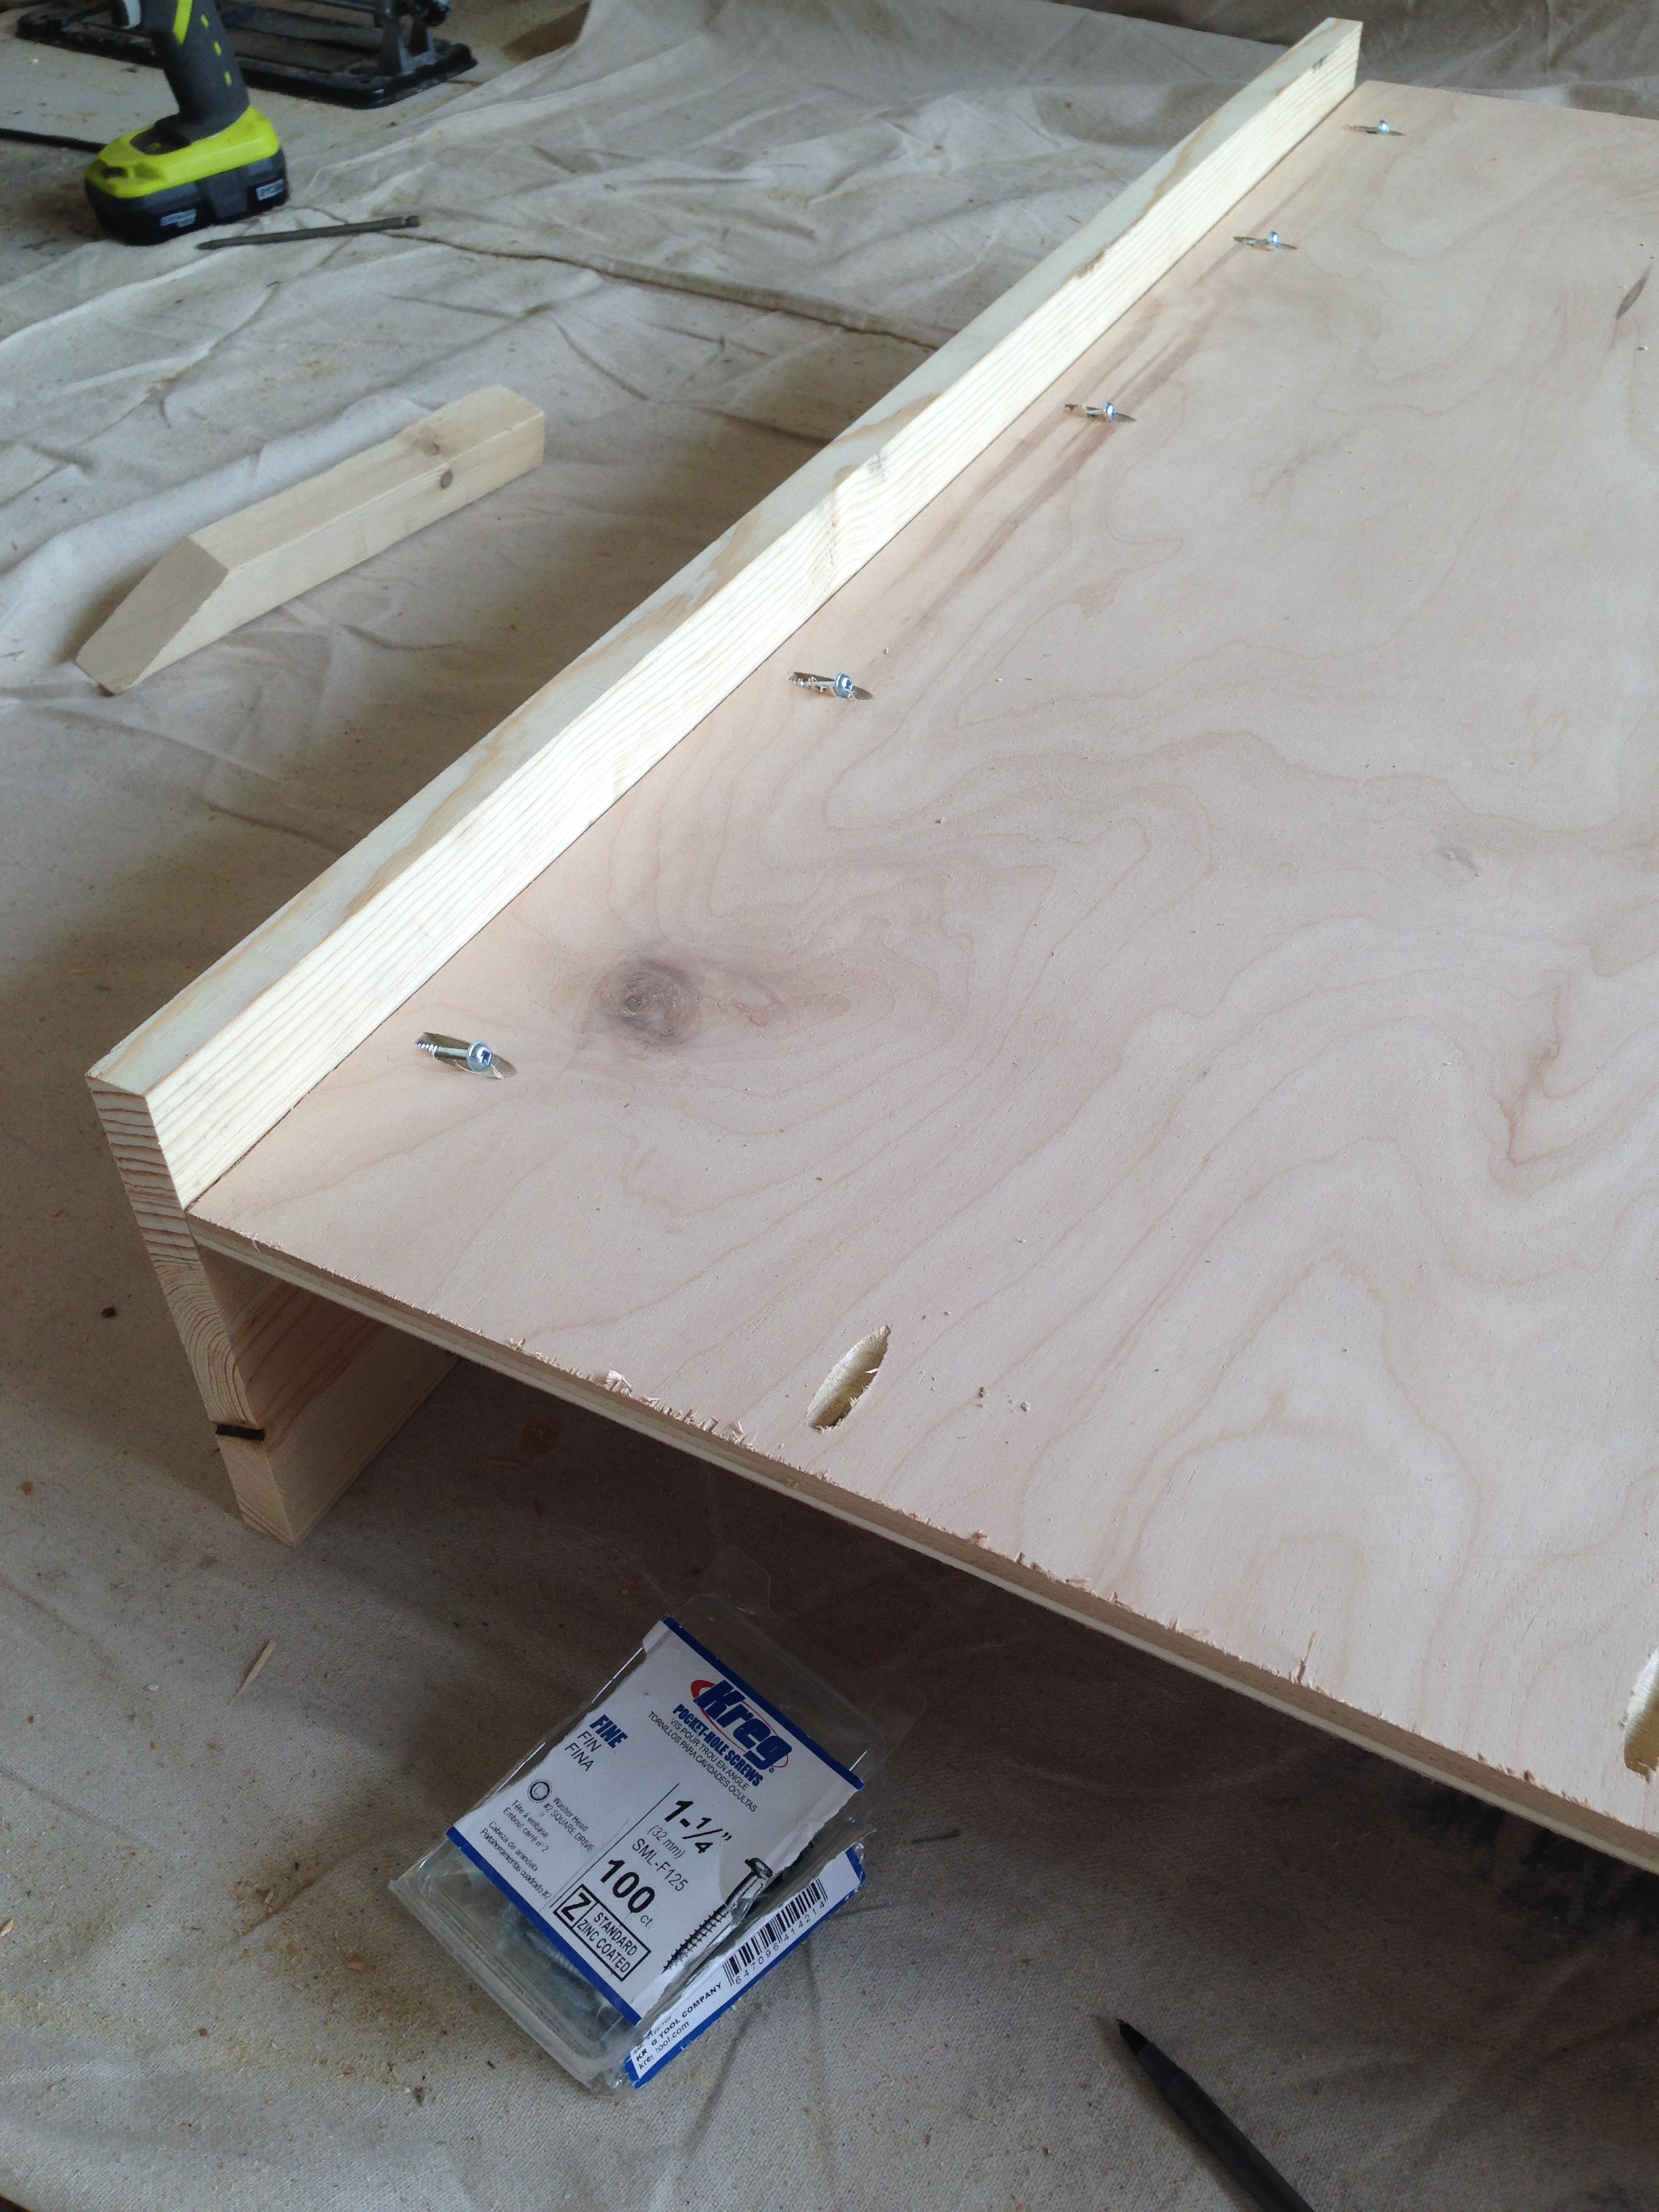
Drill 1/2″ pocket holes along entire perimeter of 1/2″ plywood (about 4-5 evenly spaced on short sides and 8-9 on long sides). Elevate 1/2″ plywood by 5 1/2″ (pocket holes facing up) using scrap wood, making sure to elevate on both sides and in the middle. Use wood glue and 1 1/4″ pocket hole screws to attach short 1×8 sides to plywood, allowing a 1 1/2″ gap where the wheels will be attached later.
Step 2: Attach Long Sides
Using wood glue and 1 1 /4″ pocket hole screws, attach long side of plywood to long 1×8 boards with the same rise measurements in step 1. 1×8 boards won’t be attached to each other in this step, so if they don’t look perfect at this step don’t worry.
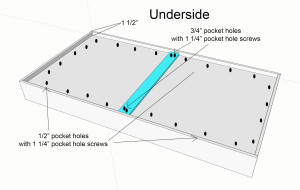
Step 3: Attach Center Support Board
Place one of the 38″ long 1×4 support boards across the mid-mark of the plywood, as pictured above. If needed, trim the board so it fits snugly. Drill 2- 3/4″ pocket holes on either end of board, and attach across the mid-mark (35 1/4″ space on either side of the 1×4 support board) of the plywood using 1 1/4″ pocket hole screws and wood glue.
Step 4: Attach Additional Support Boards
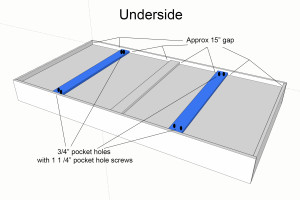
Using the length same measurement as the center support board, drill 3/4″ pocket holes on both sides of the 2 additional support 1x4s and attach them, evenly spaced on either side of the center support. There will be about a 15″-15.5″ space between each board.
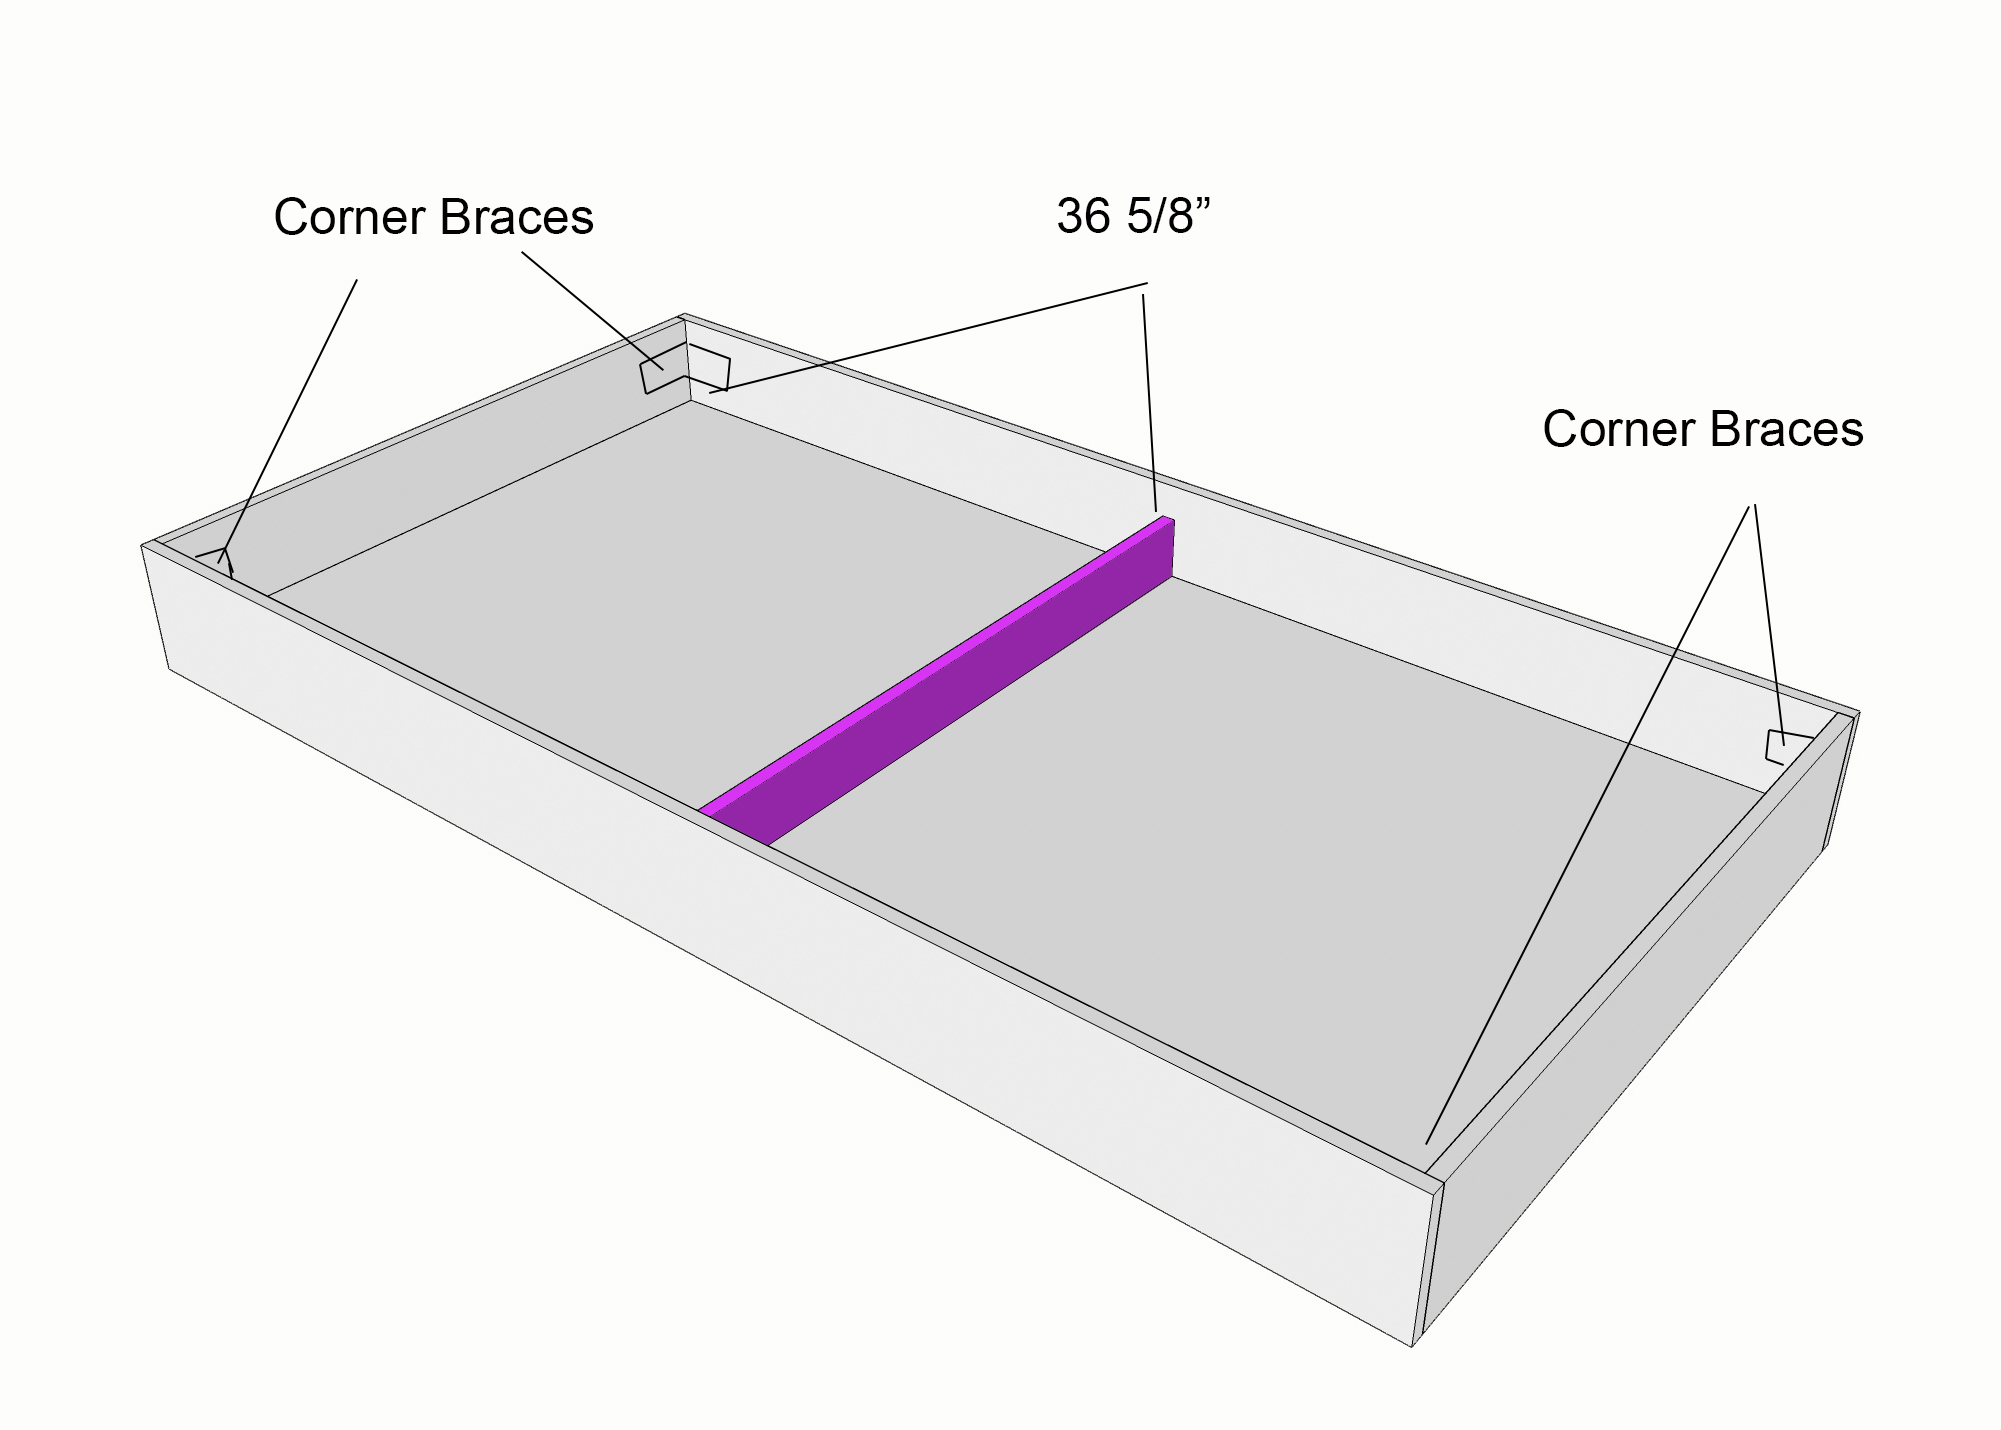
Step 5: Attach Corner Braces
Turn the trundle over, so now you will be working on it facing up, with pocket holes facing down. Using 1/16″ drill bit, pre drill holes for corner braces and secure into all 4 corners using 1/2″ screws. Dry-fit the half divider. Because you want this to be easily removed, cut it about 1/8″ shorter than the actual width of the trundle. Trim more as necessary and measure center mark (37″) on both long sides. Allowing for the width of a 3/4″ thick 1/4″ board, would mean the space on each side would be 36 5/8″.
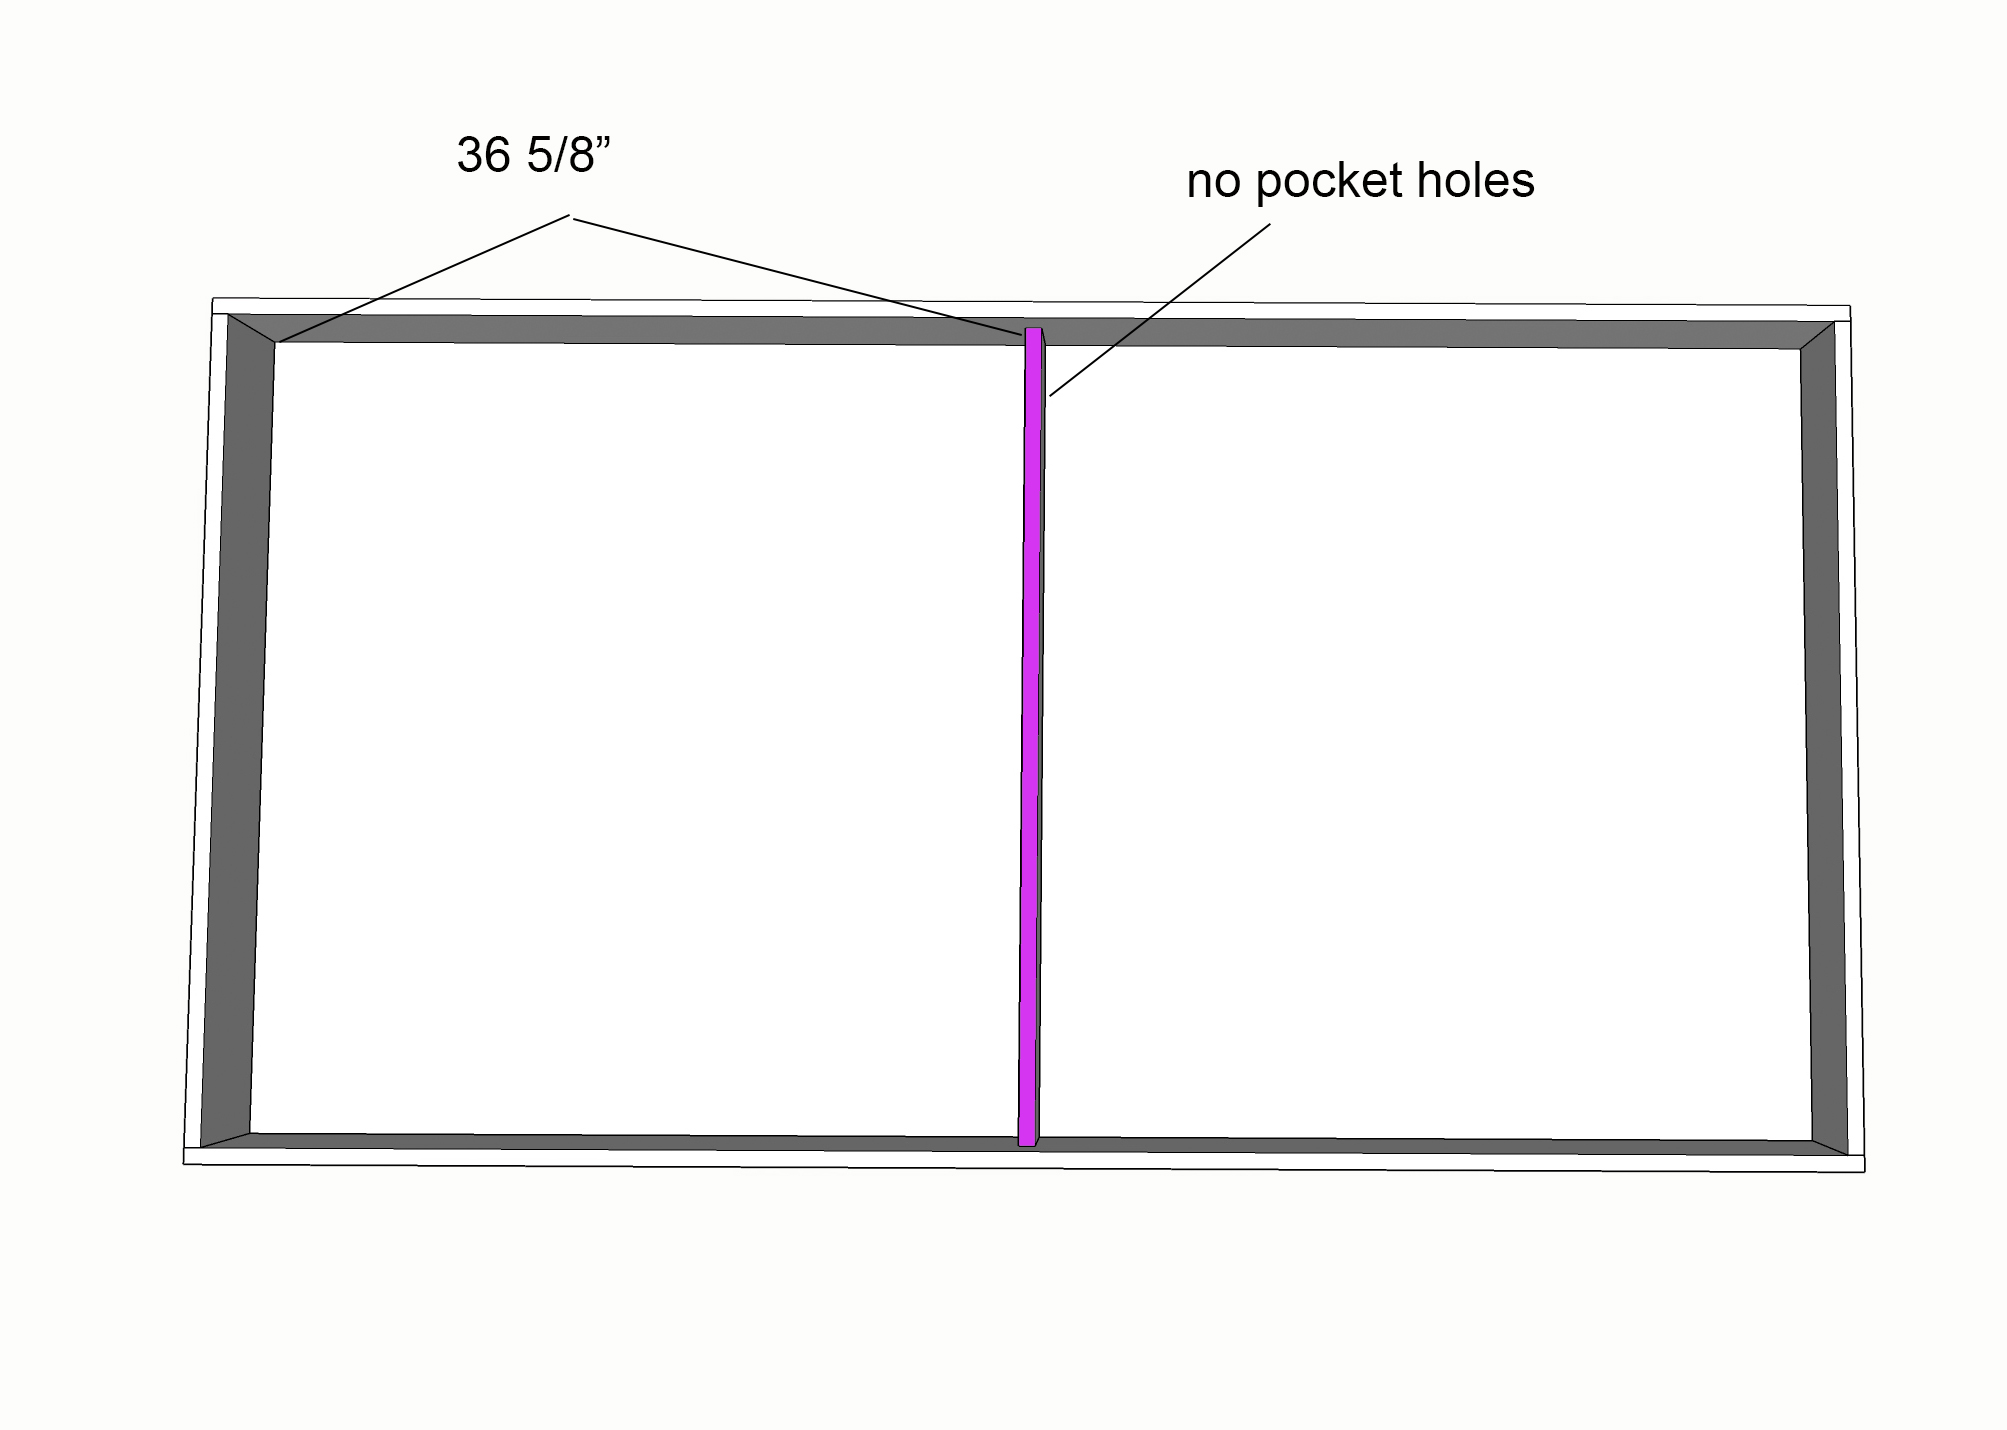
Step 6: Position Half Divider
Place 1×4 half divider in the center of the trundle, keeping it lined up with the mark you made on both sides of the trundle. Because the dividers aren’t really holding any weight and you want it easily removed, this piece does not need pocket holes or to be attached to the inside of the trundle. The quarter dividers that WILL be attached to the sides of the trundle with screws, will keep the half divider centered.
Step 7: Drill Pocket Holes in Quarter and Eighth Dividers
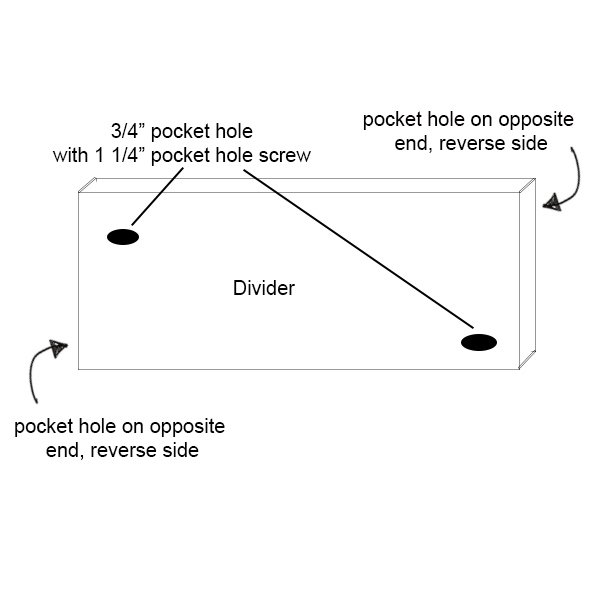
To keep quarter and eighth dividers in place securely, you will need to screw them into the inside walls of the trundle. On each board, drill 1 – 3/4 pocket hole on one width-end of one side. Then on the opposite side, drill a pocket hole on the other width-end. Repeat for the other length-end of the board. Do this same process for all 3 remaining dividers.
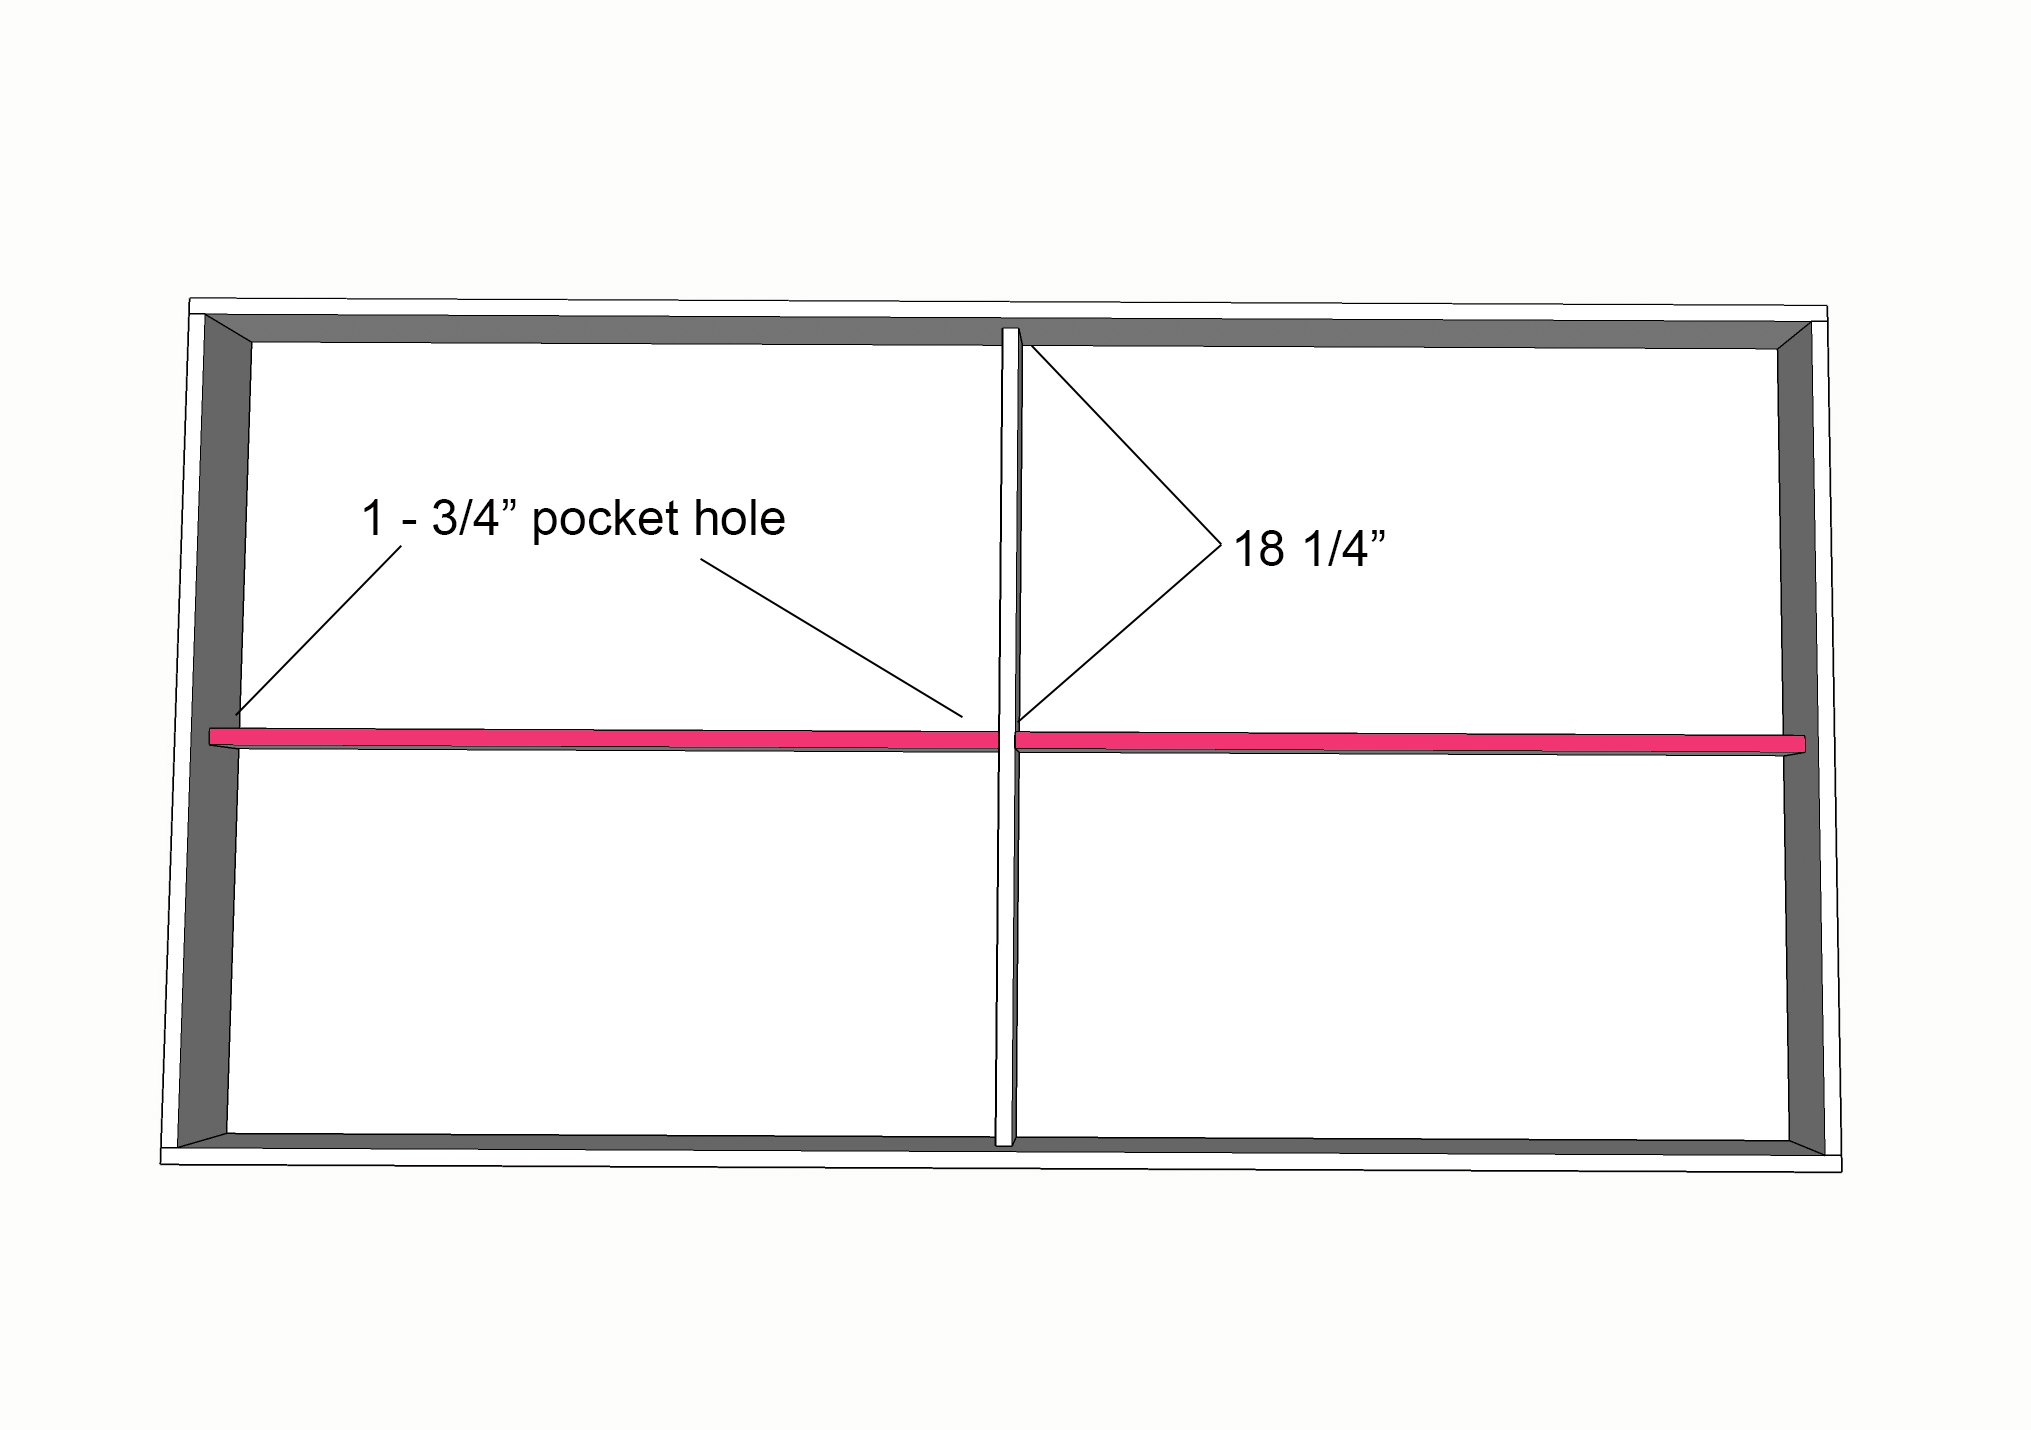
Step 8: Attach Quarter & Eighth Dividers
Using ONLY 1 1/4″ pocket holes (no wood glue) attach quarter dividers at center mark of half divider and on short side of trundle side (18 1/4″ space). Repeat for eighth dividers, centering them on the quarter dividers and long side of the trundle (17″ space).

Step 9: Attach Caster Wheels and Hardware
Turn the trundle upside down, pre-drill and attach all 6 wheels — one in each corner and 1 on either side of the center. Make sure to not attach center wheels on top of 1×4, so the wheels are all the same height when flipped back over. Pre-drill and attach pulls on the long side of the trundle, closest to the eighth dividers.
Sand edges and corners smooth from splinters, and finish with paint or stain of choice.
I asked Kaila, my daughter, what color she wanted the “dresser” to be and she replied without hesitation, “Hot pink!” Since it would be covered by a bed skirt, I was happy to paint it the color she wanted. If I didn’t have a bed skirt, I probably would have painted it white! haha 🙂
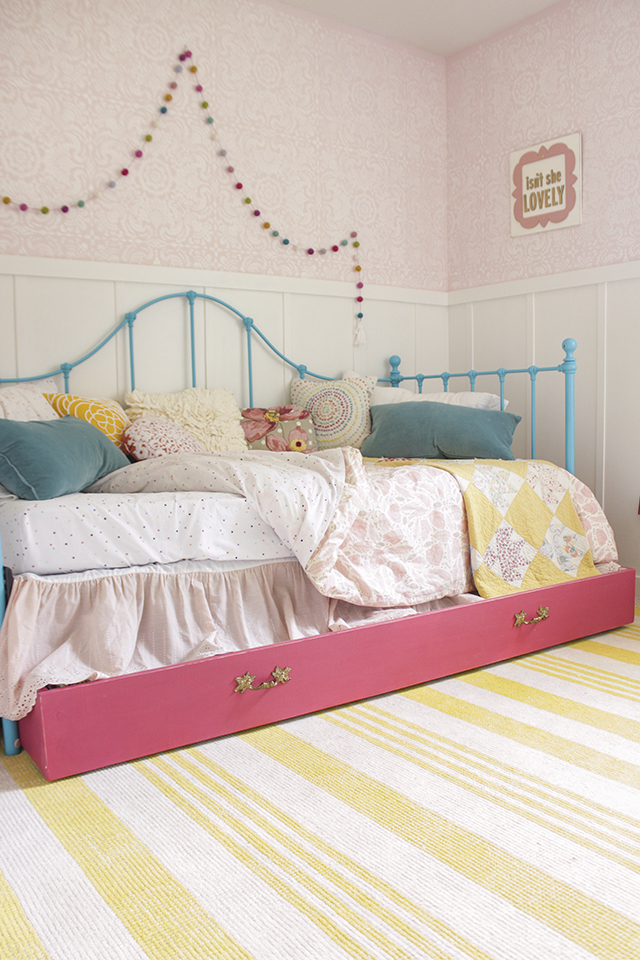
The nice thing about the rug here, is that it stops the trundle from rolling out too far! The wheels stop right on the edge of the rug that is just under the bed.
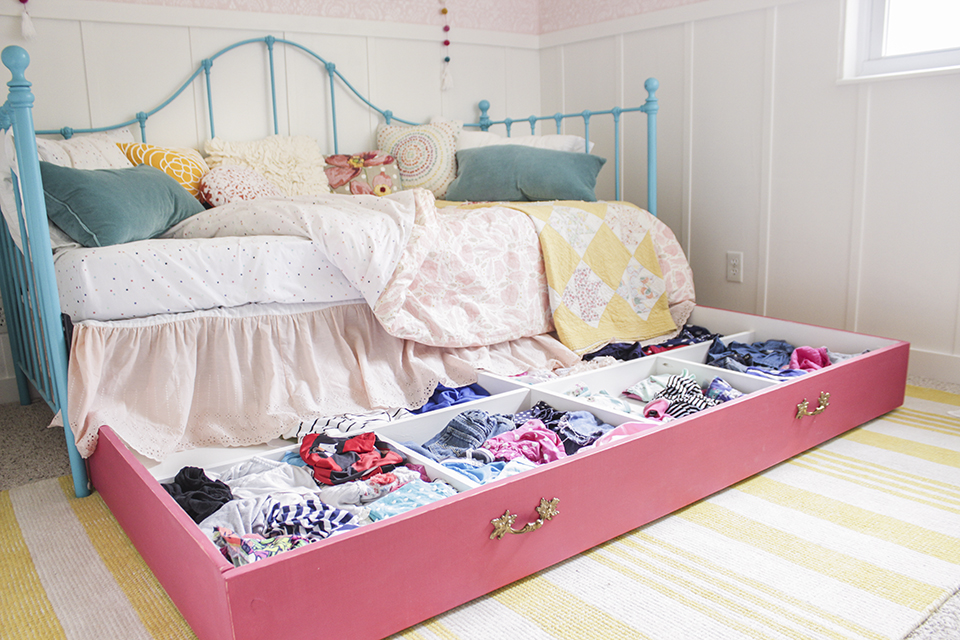
I was shocked with just how much space there is in this trundle. It fits several layers of clothes in each compartment and the back two that are holding dresses and jackets too warm for summer, have lots more space to hold more! I need to organize her closet, and I could easily hang up all the dresses there (which is what I should do), offering even more room in this roll-away storage trundle.

Now my boys are jealous and want one of these for their room! All in good time… 🙂
This is such a simple build, it would be perfect for a first-timer, especially if you have HD or Lowes cut the plywood and wood boards for you!
Let me know what you think of this idea for storage in a small bedroom… is it something you would use?
Hey! I want to try this!
What kind of circular saw do you have? We only have a kreg jig and power drill but nothing else so I want to know what to get!
Also, approximately how much would it cost to buy all this wood?
When you purchase plywood from Home Depot or Lowes, generally they will make two cuts free for you from the sheet. That way they make good square cut of base sheet. For cutting the 1×8 or 1×10, jigsaw, also named a sabre saw can be purchased for less than $50. Use a framing square (looks like a triangle) on the 1×8 and 1×10 to act as a straight edge guide first to draw the line you want cut, then offsetting the framing square to act as a guide to run the sabre saw along to make a perfectly straight cut. I bet total cost of materials is about $100.