As promised, today I’m sharing how to install drawer slides on a vintage dresser. This is a great way to give an old dresser new life, especially if you plan on using it a lot and have been frustrated with sticky or sagging drawers.
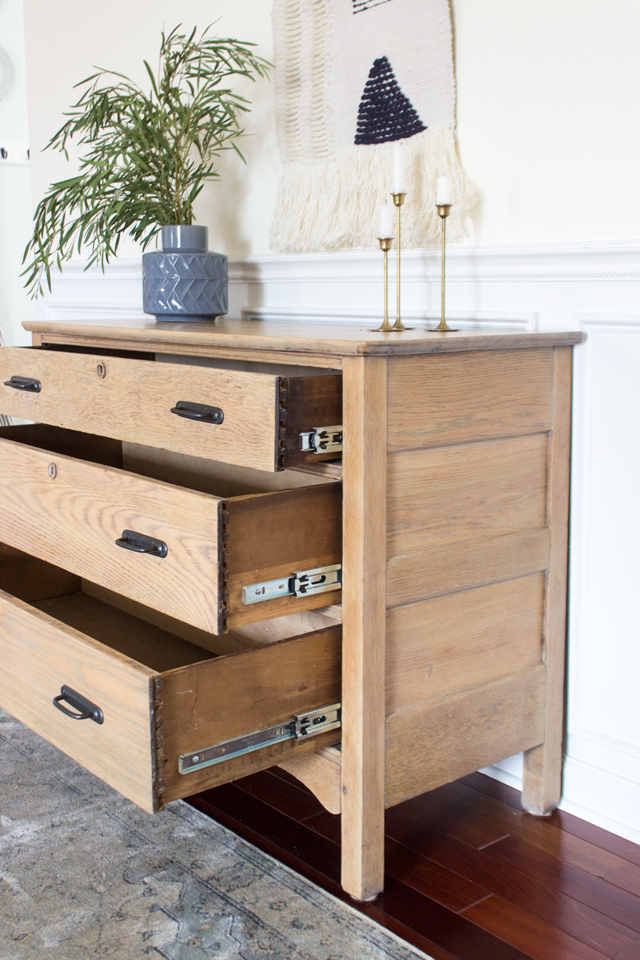
To see this finished dresser and stain details go HERE.
Back a few years ago when I used to refinish dressers and sell them, the most common complaint I used to hear from people regarding old, antique, or vintage dressers were the drawers. Because most of them had wood drawer slides, over time and with different environments, the wood would wear down. This caused them to not slide smoothly, stick, sag when you pulled them out all the way, and were overall a pain if you used them a lot. Most people who fell in love with an older piece accepted this as the ‘character’ of older dressers. I tend to agree. But for those who love the look of vintage dressers but love the functionality of new dressers, this tutorial will help you achieve that!
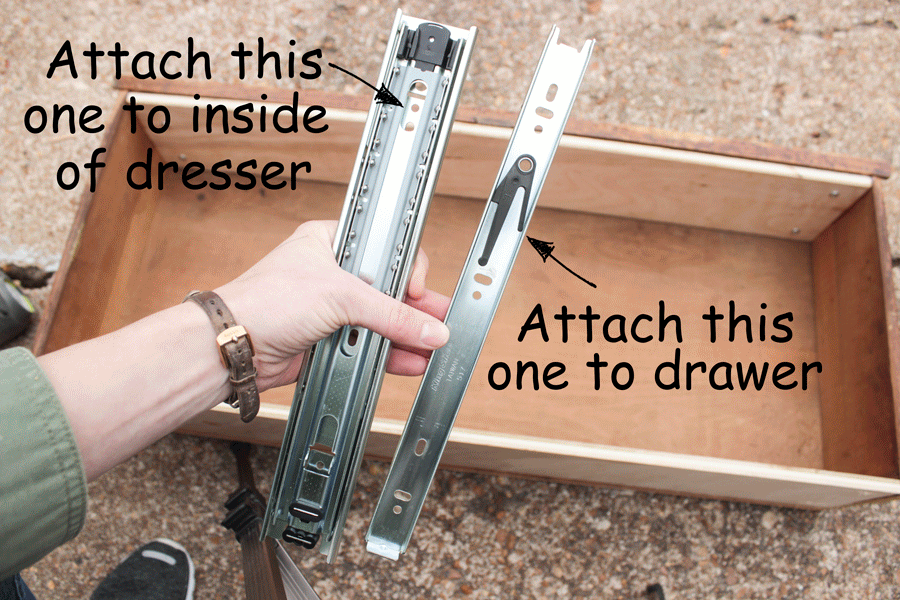
In my opinion the best type of drawer slide to install and use is metal ball-bearing drawer slides. They are more durable and easier to install, making their higher price point well-worth it.

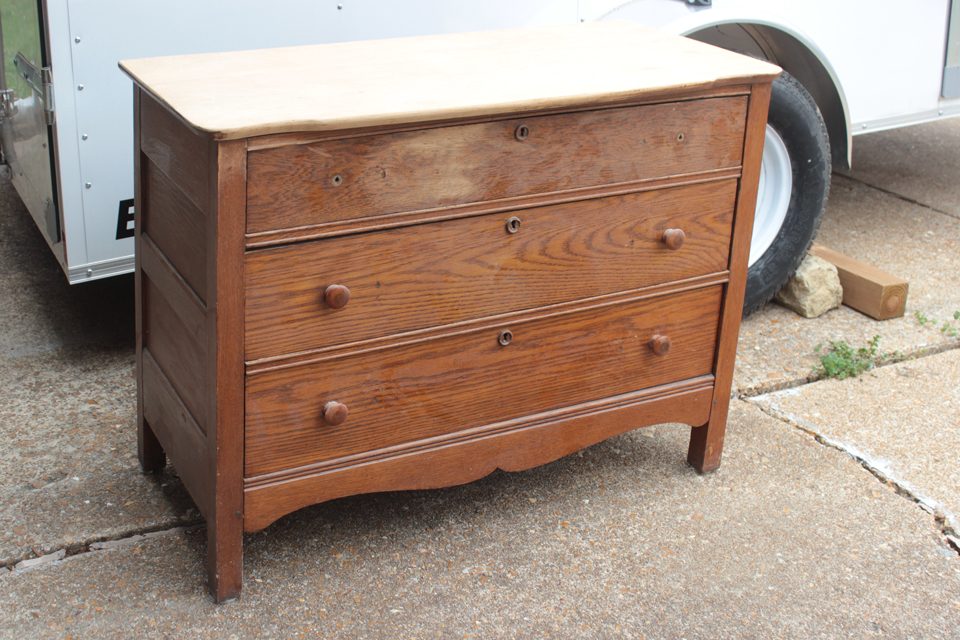
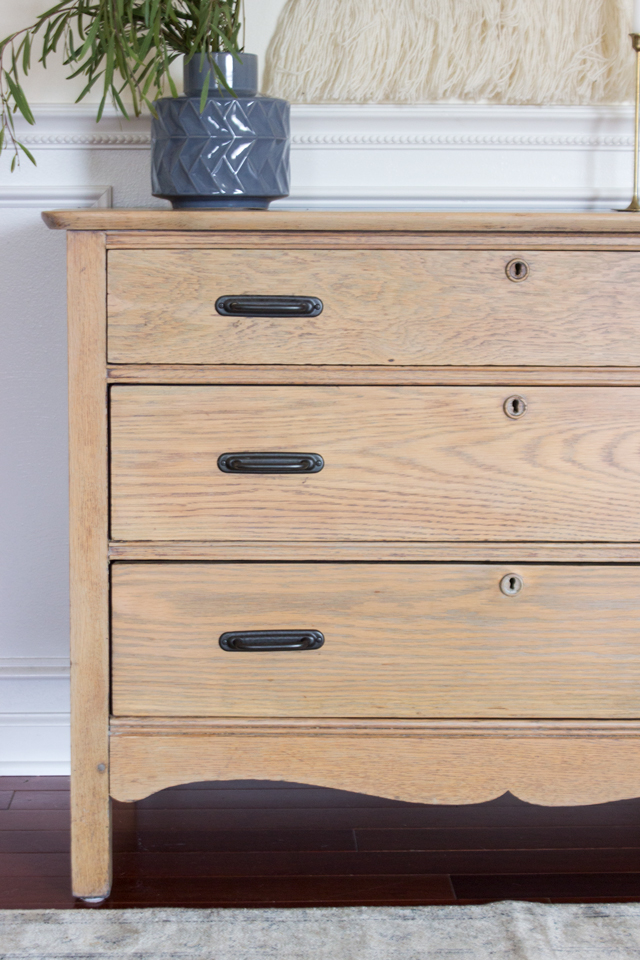
As you may remember from my previous post, this was the dresser as she started out:
Tools You Will Need:
Chisel
Mallet
Circular saw
Measuring tape
Pocket hole jig
Hammer (or cordless brad nailer)
Cordless drill
Level
1/16″ Drill bit
Wood clamps
Supplies You Will Need:
-1/2″ plywood (I used a 1/4 sheet for all 3 drawers that is 2′ x 4′)
1″ pocket hole screws (8 for each drawer)
1″ nails
2×4 scrap to cut wood shims
-Ball-bearing metal drawer slides (buy the length as the depth of the drawers– 12″ long ones are found at WoodCraft and Amazon)
-1×3 boards cut to drawer depth (I used about 6′ on this dresser)
-1″ wood screws (for attaching to drawer face)
-1 1/2″ wood screws (for attaching 1x3s to side of dresser)
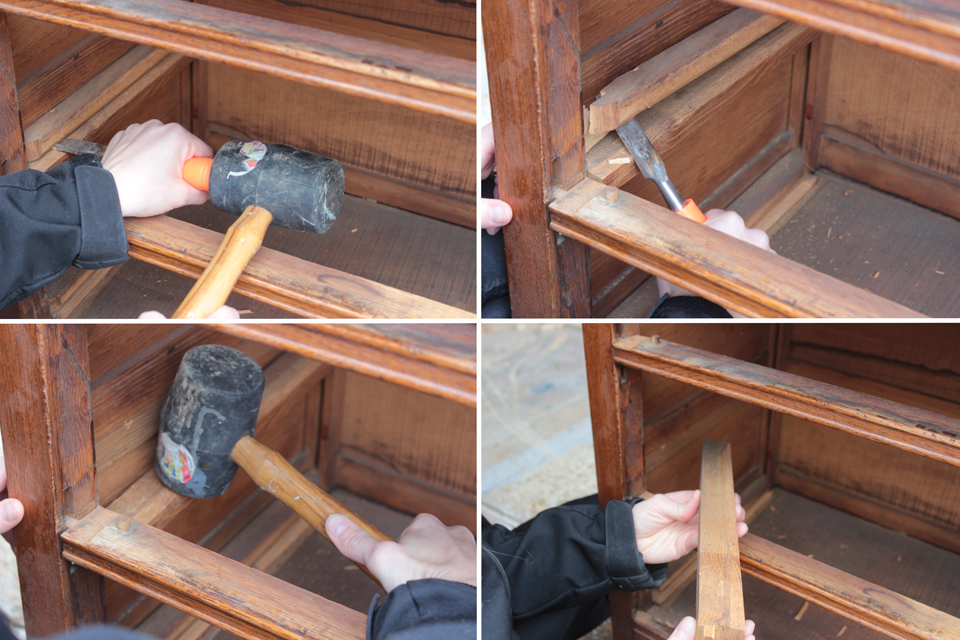
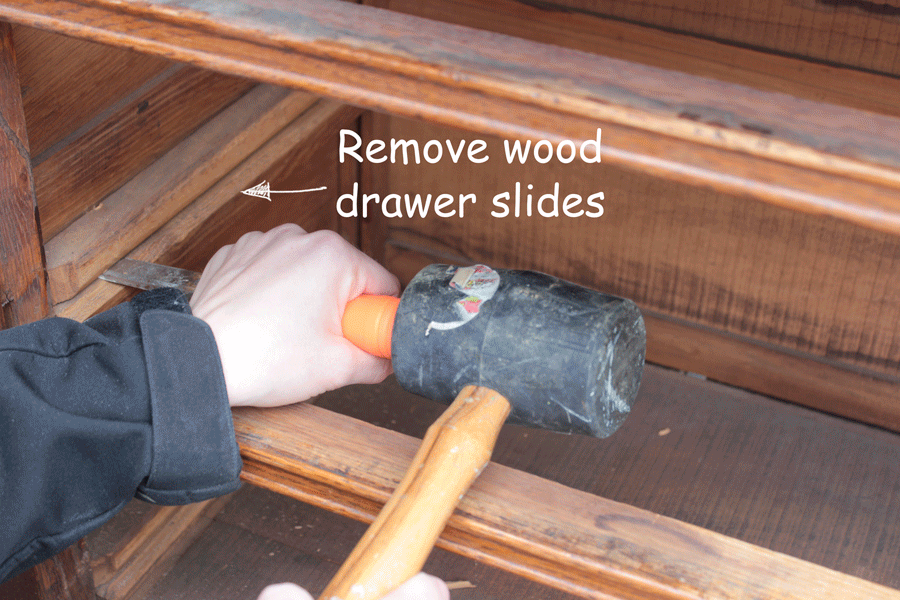
Step 1: Remove Old Drawer Slides
Using a chisel and mallet remove the old wooden drawer slides from the inside of the dresser.
Click thumbnail below to see larger picture collage
Or see animated GIF below:
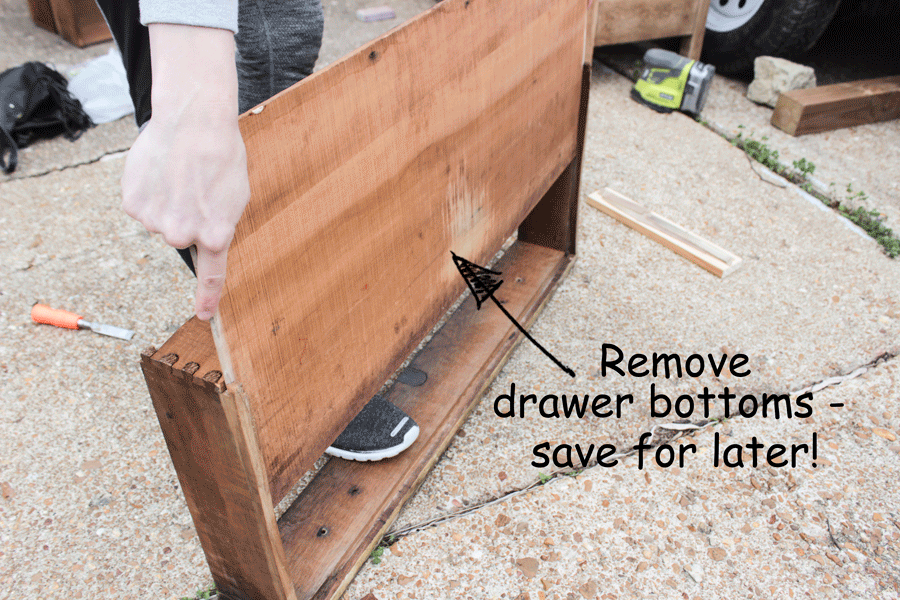
Step 2: Dismantle Old Drawers
Slide out the drawer bottom (may have to remove nails with a hammer) and if it’s in good shape, save it to reuse. Use a circular saw to cut off the sides from the drawer face. Pry apart the sides from the back. Cut off tenons from drawer sides and discard the drawer back.
Click thumbnail below to see larger picture collage
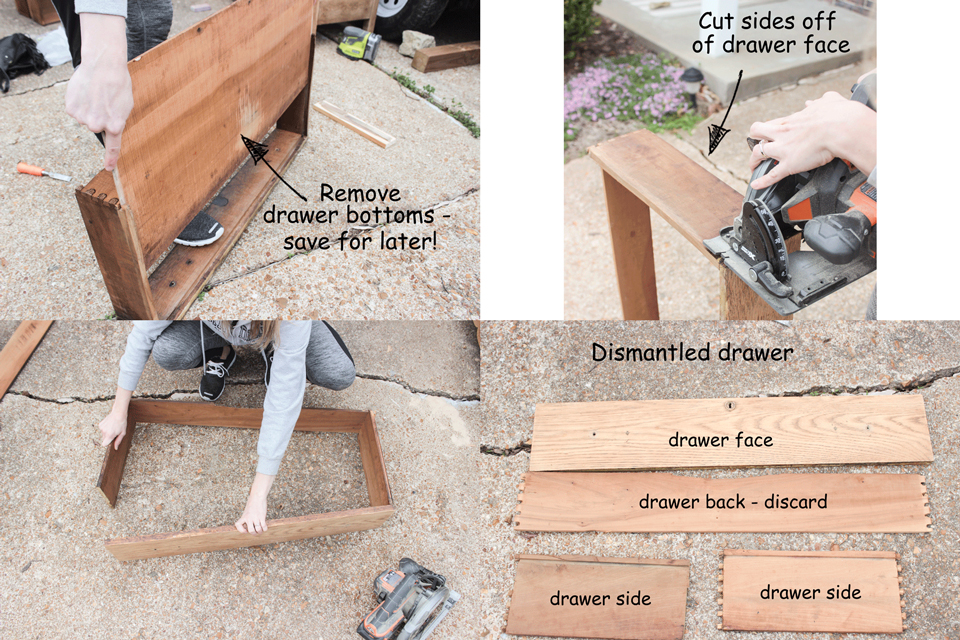
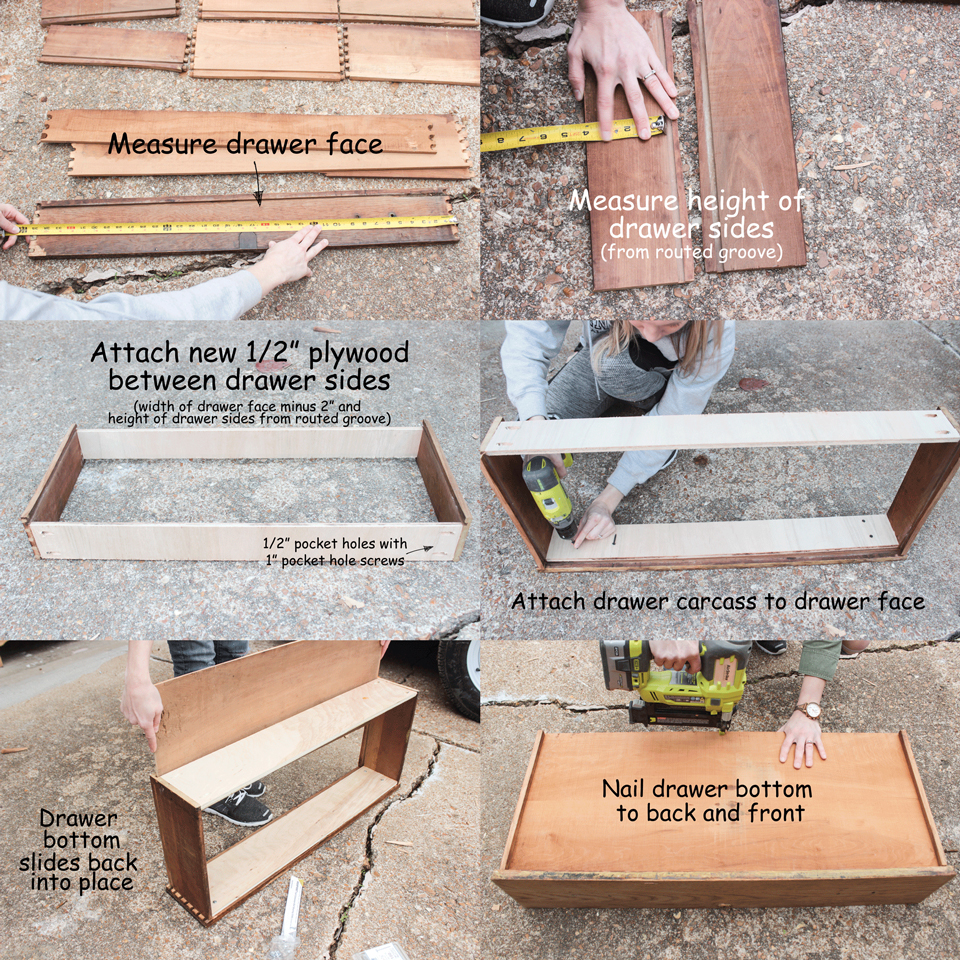
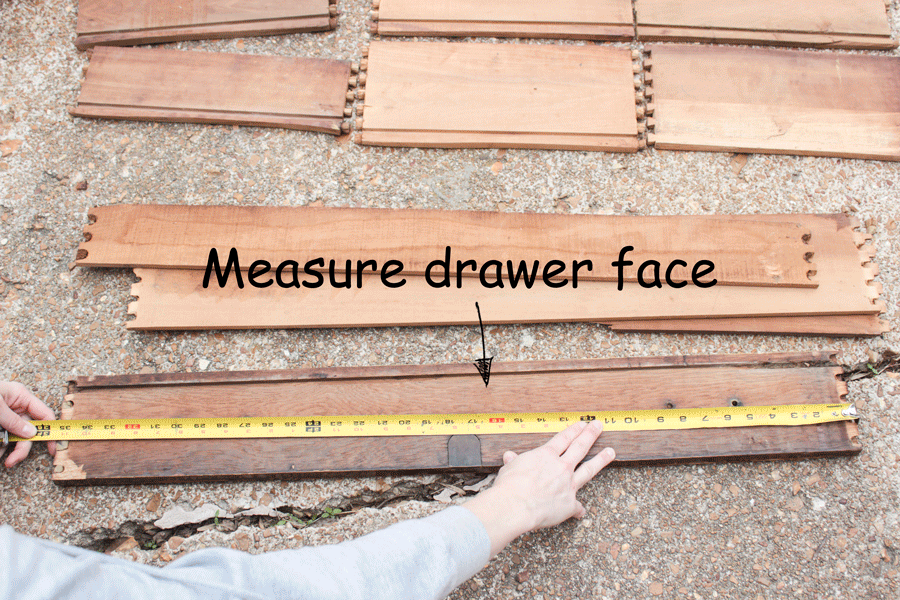
Step 3: Re-build Drawers
Measure the length of the drawer face and the height of the drawer sides from the routed groove. Cut the 1/2″ plywood to that same height and 2″ less than the length of the drawer face. The reason why you want the length different is because the metal drawer slides require 1/2″ clearance on either side of the drawer carcass. You also will be attaching the new 1/2″ plywood between the two drawer sides (which are 1/2″ thick), so you have to subtract their thickness as well from the total length of the plywood front and back (hence 2″). Drill 2- 1/2″ pocket holes on either end of the plywood pieces and attach them to the drawer sides using 1″ pocket hole screws. Pre-drill and screw into place the new plywood drawer front into the back of the drawer face. Slide the drawer bottom back into place (into the routed grooves on the side pieces) and nail into the front and back using 1″ nails.
Click thumbnail below to see larger picture collage
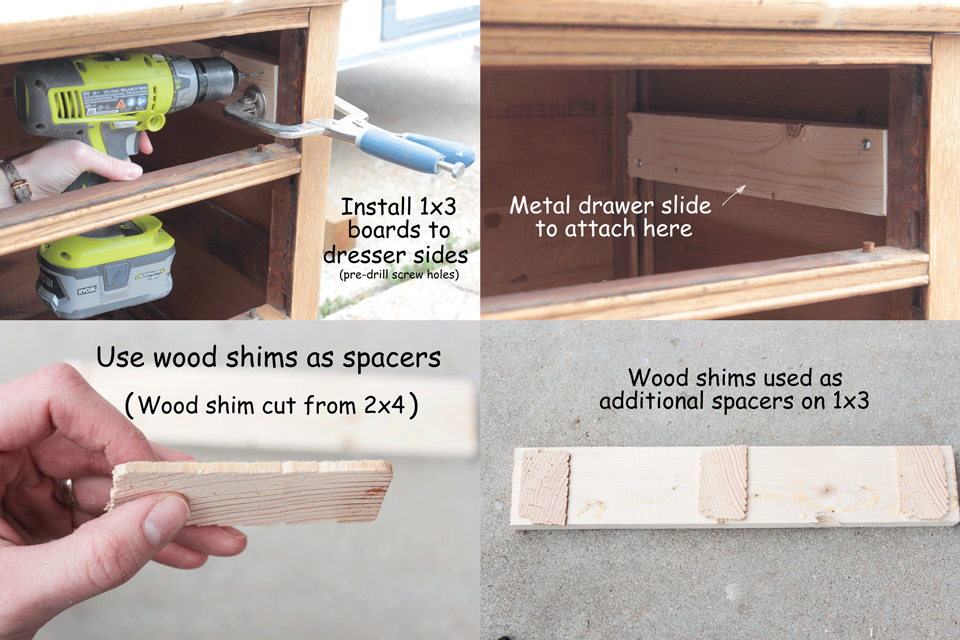
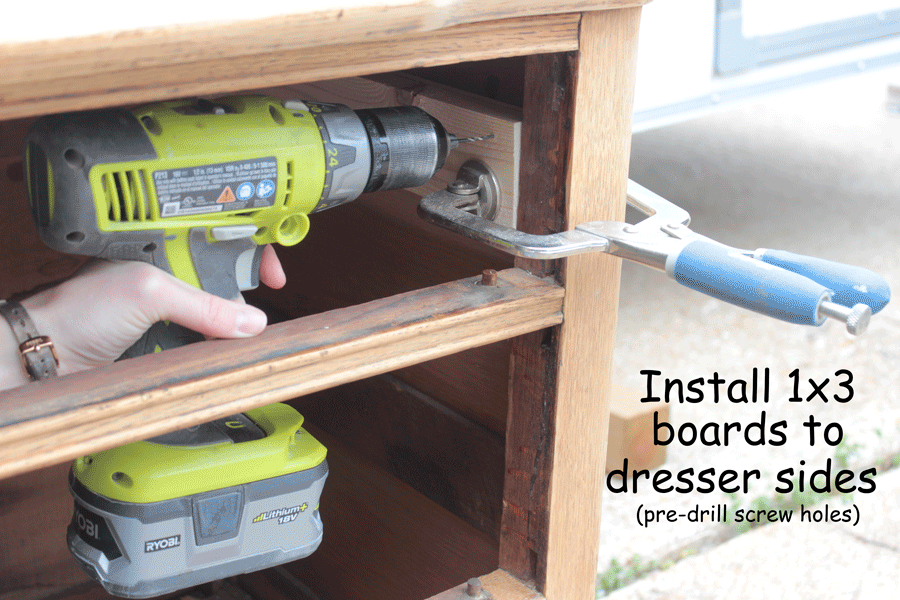
Step 4: Attach Drawer Slide Spacers
Using a clamp and a level, position the 1×3 boards on the inside sides of the dresser for each drawer opening. Attach them using 1 1/2″ wood screws into (pre-drilled holes– important to always pre-drill holes into old wood so it doesn’t split).
You may need to use some wood shims (from scrap 2×4) to get the board to be the right thickness. The clearance on each side of the drawer can only be 1/2″ for the metal drawer slides to fit and work properly. So, you need the wood on each side to be the right thickness so the attached metal slide sticks out far enough. The 1×3 is 3/4″ thick so wood shims can add an additional 1/16″ or 1/8″ or 1/4″ thickness depending on what you need. I attached the 1x3s first, installed the metal glides on the drawer and inside and then measured to see how thick I needed my wood shims to be (I used 1/8″) on each side and added accordingly.
Click thumbnail below to see larger picture collage
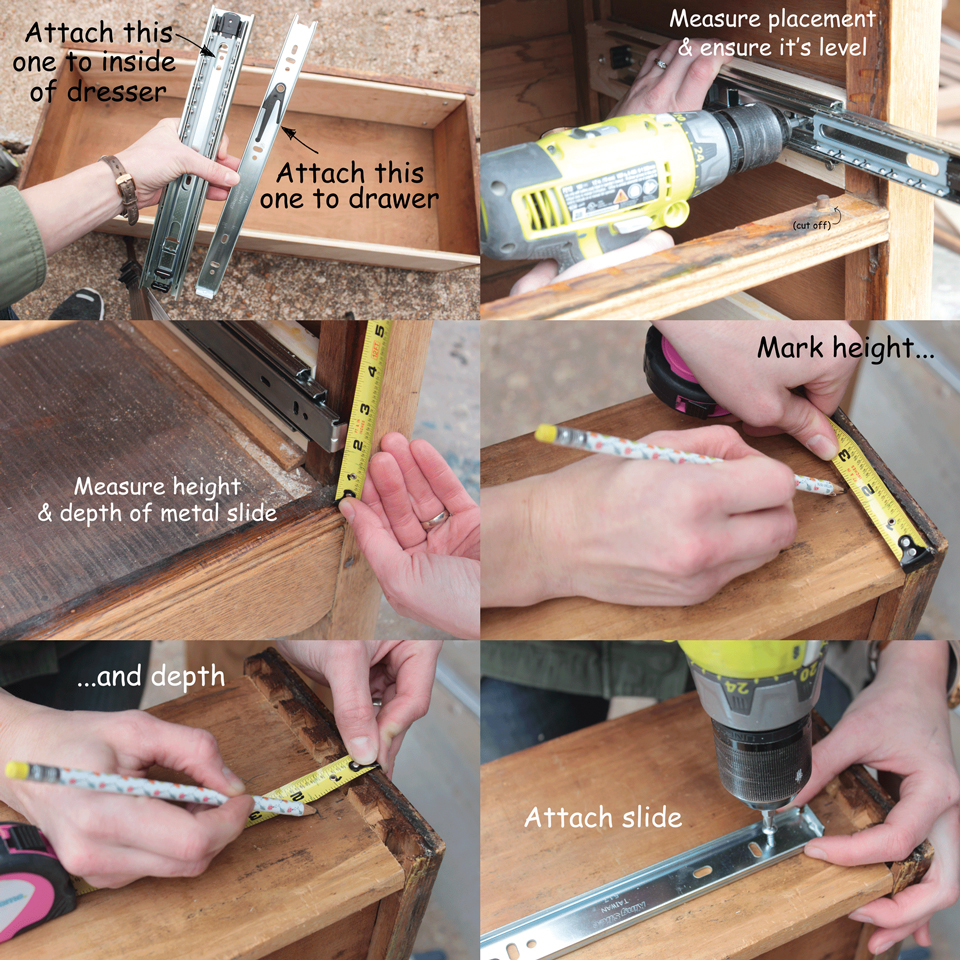
Step 5: Install Drawer Slides
Measure and mark level the position of the slide that goes on the inside of the dresser. Attach with the provided screws. Slide into place the part of the slide that goes on the actual drawer. Mark the height and depth of that part of the slide from the opening and make corresponding marks on the outside of each drawer side. Attach the part of the slide that goes on the drawer and test fit it into the drawer opening. It is normal to have to make some adjustments. The slides need to be level and straight (on both the outside of the drawer and the inside of the dresser and they both have to be positioned the same depth on both sides in order for the drawers to slide in and out smoothly.
Click thumbnail below to see larger picture collage
If you would like to know how to strip wood finishes, you can check out
my tutorial on how to refinish a wood dining table here!
To see this completed dresser along with the products and method I used to stain it, go to
my post on this vintage dresser with a modern makeover!
If you liked this tutorial, be sure to share it!

Great tutorial however I found that the new format of multiple pics – jumping from one pic to the next was way too fast. It made me dizzy and did not provide enough time to read the instructions. At first I thought that there was something wrong with your site.
Hi Nancy! Thanks for your feedback. I will consider adding a pic collage as well. All of the instructions that are on the pictures in the the animated GIFs are in the written instructions above each image. So, the images just provide a reference for what it looks like. I have found that lots of pic collages can make details hard to see or read a text on them, hence my desire to create these animated GIFs. I’m sorry if it didn’t appeal to you and again, thanks for the feedback.
Rachel, it’s not that the GIF doesn’t appeal. I think it’s a great idea, and would work well.
It’s just that currently, you’ve got the rotation set to go waaaaaaaay too fast.
For somebody who hasn’t seen this project before, doesn’t know what’s going on, and doesn’t know how to do this, there’s just no time to process what they’re even seeing.
It’s just this blur of “Wait I was still trying to make sense of that!” which is very frustrating.
Hey Ishtar! I have them currently set to 2 seconds… would 5 seconds be better? Much longer than that and I worry that people might not stick around long enough to see the pictures rotate…. let me know what you think!
Such a cool idea, Rachel! Have to agree the gif is waaaay too fast! 5-7 seconds minimum for each photo in series. Also, would you consider text on collage as well? It is frustrating to have to scroll back and forth read description…then look at photo, repeat. Again, you are so clever!
I changed the GIFs to 6 seconds between each picture… thanks for your input.
I found the GIFs very effective at 6 seconds. I still watched each GIF about 3 times to better understand the text, but that’s fine. It gave me time to think about each step and understand how it related to the larger project. Very nicely done. This is one of the best illustrated DIY projects I’ve seen, and I’ve seen quite a few.
The pictures kept flipping around. I couldn’t figure out how to stop the text so I could read it. Looks like a tute I could use on a dresser I have with sagging drawers (reminds me of my kids when they were learning to walk — lol). I don’t know anything about timing your info but please fix it or it’s useless.
I changed the GIFs to 6 seconds between each picture… thanks for your input and I hope that helps things.
This tutorial was exactly what I was looking for- Thankyou so much!
Fantastic tutorial, thank you!
Good tutorial and very inspiring for me. I had been living for 8 years with a huge oak 9 foot dresser with wooden slides and I got sick of the way the wood would rub together and create sawdust all over my clothes. A dresser is something most people use every day so over time it got quite annoying.
I went though the process a little differently in that I installed all the ball bearing drawer slides into the inside frame of the dresser, and when I had all the width measurements just right I was confident enough to rebuild the drawers. This avoided having to use shims.
The tolerances are very tight and I worked in millimeters, which is something I rarely do. I had a pin nail gun from a recent vinyl molding job and it made reassembly of the drawers quite easy. Now I have a super sturdy functional dresser and will probably refinish it next year.
Thanks for a great post! I secretly included the phrase “wood would” in my comment because I enjoyed reading it in the article so much.
My Dresser have a wood guide on the bottom. Can I remove it and install the metal side glides?
Clever solution to a common problem.However, l personally don’t like to see the metal sliders when the drawers are pulled out.The modern metal finish clashes with the vintage furniture itself.Would it not be better to have the sliders placed discreetly under the drawers ?
Honestly I haven’t seen any other type of drawer slide besides side mount ones, available at hardware stores. So if it bothered you that much you could special order one online for sure. The ball-bearing side mount metal ones are the most durable and longest lasting of what is easily available at stores, but it is personal preference if you wanted to create someone that was mounted underneath.
I found that the glides under the drawers will not hold the weight of the drawer if it is heavy, like an oak drawer, with the clothes in the drawer. I have replaced the glides under my heavy oak dresser twice.
I think that EVERYTHING (EVERYTHING!!!!) about this post is FANTASTIC!!!! Thank you so so much for taking the time to post pictures along the way to share with others; I can’t imagine how much extra time that added to the completion of this project! Which turned out BEAUTIFULLY! And your detailed instructions are just as fantastic!
I have an old dresser with wooden rollers at the back of each drawer and broken ropes inside the dresser. I can’t find any information about this type of dresser. I’m curious what the ropes and rollers are. Any thoughts?
My guess is that your dresser was hand-made and they used an unconventional method for drawer glides using the rollers and ropes. I’ve never seen that or heard of it. If the cords/ropes are broken, I’m not sure there is a way to repair the original method of the drawer glide. If there are wooden drawer glides in addition to these rollers and ropes, I think the ropes could have been someone’s method to prevent the drawers from coming all the way out– kind of like a vintage drawer-stop. The rollers were probably to make it easier to slide in and out.
Thank you for very informative solution to an annoying problem!
A suggestion for anyone who thinks metal drawer slides not astetically pleasing I would recommend spray painting the metal before installing to blend in with your drawers. You could also paint the side of the drawer and match the colour of slide. Chalk paint can paint over any surface without much preparation.
How much did it cost to redo all the drawers ?
The cost of the slides was about $15 a set. The plywood for the drawer insides cost about $45 for a full sheet.
Great video. Pictures worth a thousand words. My concern is getting both slides properly placed. My cabinet drawers have a top track and there is a plastic piece that attaches to drawer with plastic rollers that run on the track. They don’t even make those rollers anymore. Boo! These drawers are pressed board I think, ouch. They may not take disassembling. Thank again for this! You make it look easy. :/
Why do you have to dismantle the drawers?
Because you have to allow for the width of the drawer glides– 1/2″ is needed on either side and the original drawers don’t allow that much clearance.
Was it necessary to reduce the width of the drawer bottom?
I have two oak dressers from the mid-1800s, and have the “sawdust” problem the gentleman above mentioned. The idea I’ve been considering is replacing the soft wood they used for the runners for oak or other hard wood that could stand up to every day use better. These also have thin wood in the bottom of the drawers, which I am considering replacing with something more sturdy.
It seems like people who love antique furniture would want to keep it as true to it’s original design as possible while still having them be functional.
Hi Ellen. I love antique furniture but I also see the need for functionality when the original antique design no longer works for the purpose I need. You are welcome to keep the original design and try to replace the wood with harder wood and re-create how it was originally constructed—- that is a much more difficult and skilled process. I think you can love and appreciate antiques and see value in both methods, depending on the use and needs.
Going thru this post and after about the 3rd or 4th popup, I just went to the next one. Good information, but unfortunately the additional popups were just too annoying.
Hello! Ads are the way I am able to provide my readers with valuable content at no cost to them. If I didn’t have ads, then I wouldn’t be able to devote my time, money, and energy to creating content. This is my job, not a hobby.. Visiting my blog, reading tutorials, and learning from my posts costs you, the reader, nothing.
Hi Rachel, this is amazing! Did you need to get down the drawer bottoms to fit in the now skinnier drawers? I missed seeing a reference to that. Thank you!
Yes, I mentioned that in the tutorial– You have to cut them down after you make the drawer carcass (sides) smaller).
Hello,
I have searched online everywhere for guides/slides similar to those on our bedroom dresser and cabinet. I just to repair one set of guides. My problem is that the drawers have the grooves and the guides are male and made of cheap plastic. It looks like they have screws and have been stapled into the sides of the cabinet. The bottom two drawers are quite large and they are the ones that need the replacements. I’m not sure what I need to fix this. Any help would be appreciated, and, as I’m not a carpenter, this would need to be a simple job.
Check Rockler?
Is there a different slider that doesn’t require taking drawers apart? Mine are made with a rounded tongue and groove that’s I just love, and no way do I want to attempt to dismantle. I was thinking about a center slide that has a wheel in the back of drawer? Or the wooden slide kind?
Yeah, Rockler sells wood drawer slides that are center mount.
Hi there, I love the way you refinished this drawer. Would you mind sharing how you finished the exterior? Ty!
Yes, the post about it is here: https://www.shadesofblueinteriors.com/vintage-dresser-gets-modern-makeover/
Excellent tutorial video!! I am inspired to try this with my vintage chest of drawers, which is quite large with 5 deep heavy drawers. Can I ask approximately how long it took you to complete this project? And approximately what the total cost was to do this? , not including the refinishing of the wood. Thanks. I will be looking for more of your videos. Very well done, and thank you for sharing this with us.
After searching high and low on how to replace the old wooden slides to an antique dresser, I stumbled upon your post. At first, like others, I was turned off by the animated gifs, but after they “clicked” in my head, I was ok to follow them.!! So, reader error on that one, LOL. Thank you so much for this tutorial b/c it has helped me with my problem. I started the rebuild last night and I am going by your instructions and they are working to a T! I greatly appreciate your time and effort and willingness to provide this free content-I just ignore the pop up ads b/c I understand that is how you are able to provide free content. Thank you again for this valuable information!!! Happy Building.
This is pure genius!! Thank you!!!
Rachel,
Any info on this particular dresser? Brand? Year made? I just purchased one exactly like this and have no info on the origin of it. Thanks
I don’t know exactly the maker but it is considered a early American Oak Dresser from the 1920s.