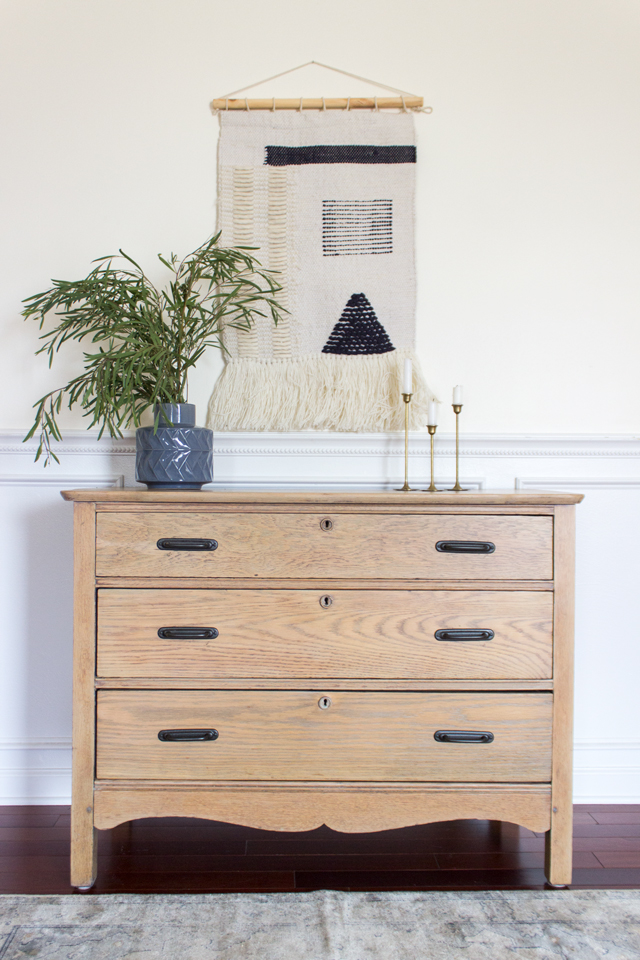
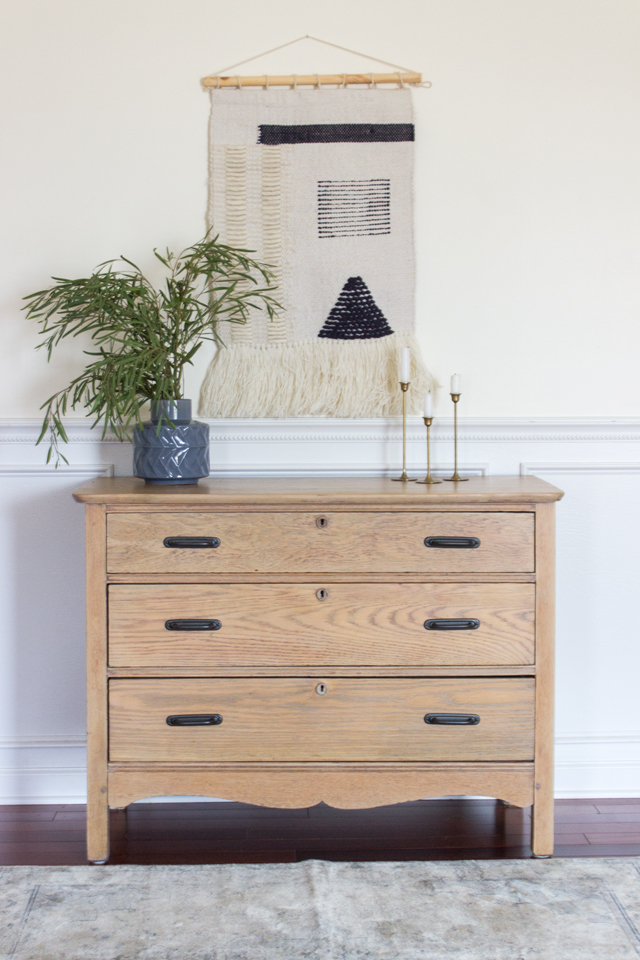
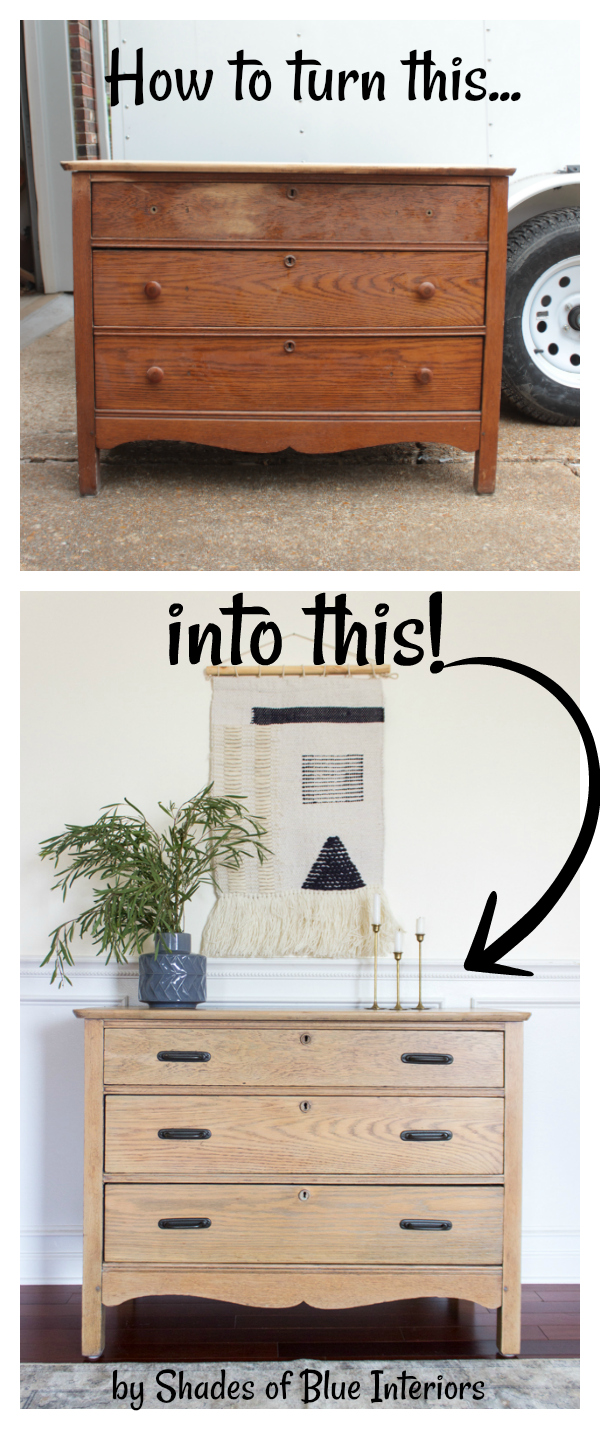
Today I’m sharing how I gave a vintage dresser a modern makeover by stripping it and using a combination of stains and new hardware to achieve a light oak finish.
It’s been over a month since my last post but January hit hard ya’ll. I’m notoriously unmotivated in January but usually find ways (through blog commitments) to keep myself going. This year I’ve been working on some projects for an upcoming photoshoot with BHG Flea Market Style happing in a couple weeks, which means I can’t share any of that on my blog. Additionally, we had lots of family come in town for a special religious event that my oldest son had, and some of them stayed a little longer which was so much fun! It was a couple weeks were my family took priority over everything else and I chose to be present and push work to the side. I think it was a much needed respite because I’ve been quite productive this past weekend, ticking several things off my to-do list.
One of those things was this vintage dresser belonging to a friend of mine. It had been tucked away in my garage for months and months, awaiting me to finish her and return her home. I had done most of this dresser rehab last March before I went to Brazil but somehow got the stain wrong on the bottom drawer and by the time I was ready to tackle it again I had forgotten the stain combo! Well, my friend recently got a job in Barcelona, Spain and is moving this week, so I had to get my butt in gear so she could take the dresser with her!
Here is what the dresser looked like before I started the modern makeover:

And here is what she looks like now:
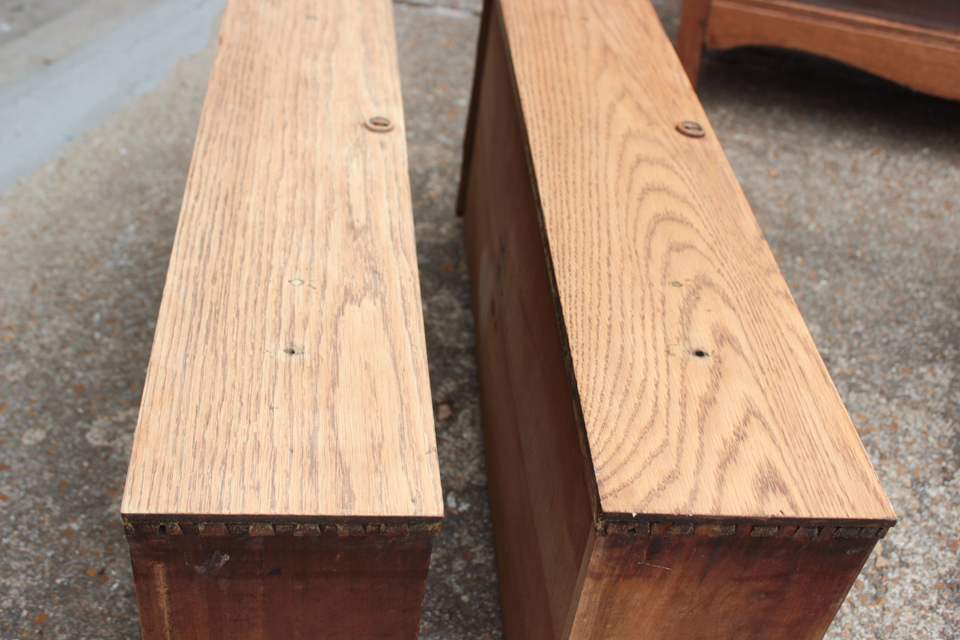
I had already started sanding the top when I remembered I should take a before pic, but you get the idea of how orange the old finish had turned over the years.
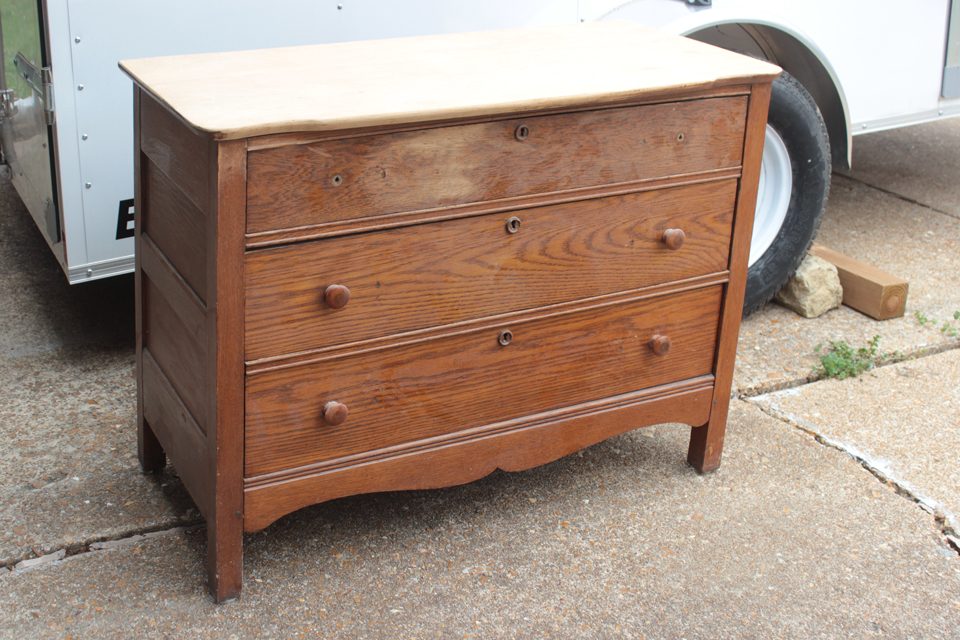
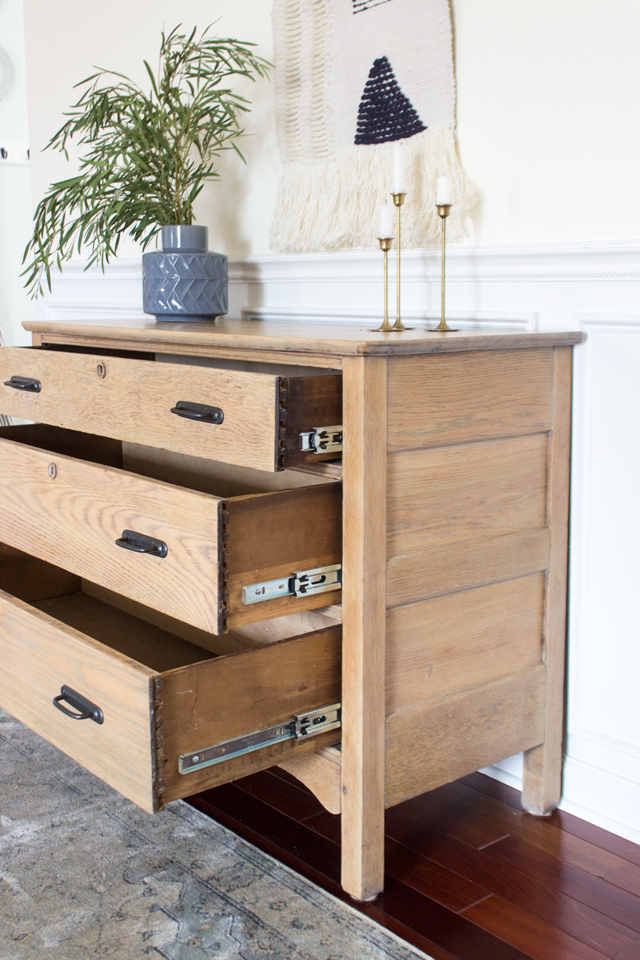
My friend wanted a lighter, modern stain, and since the drawers weren’t gliding easily and she plans on using this a lot, she wanted metal ball-bearing drawer slides put in.
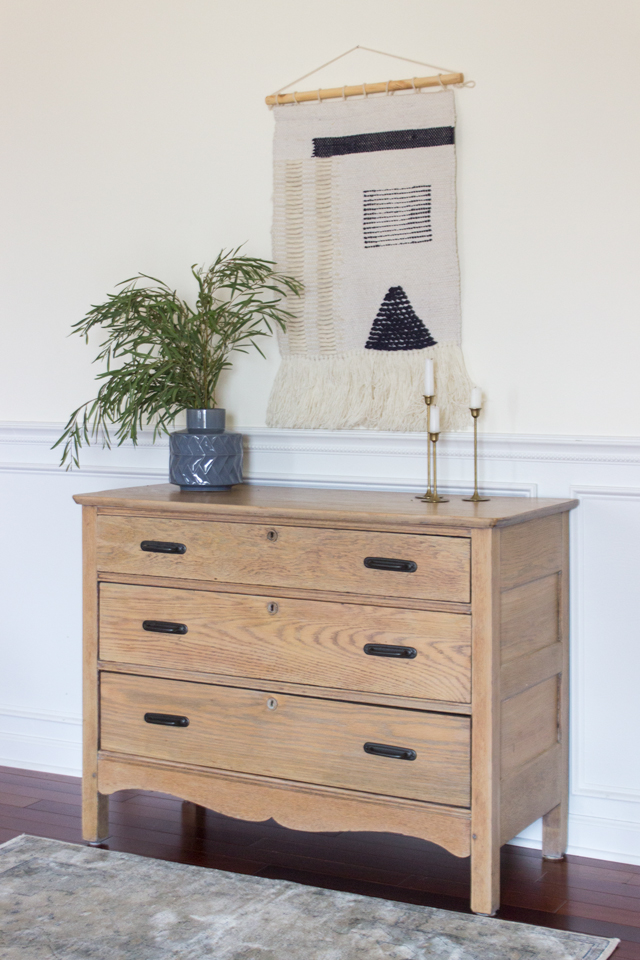
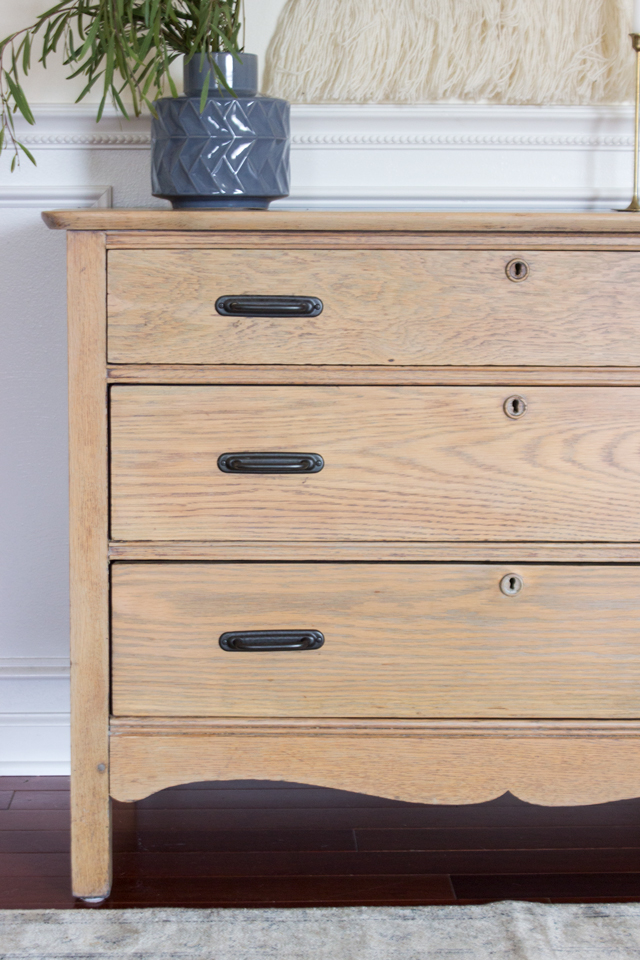
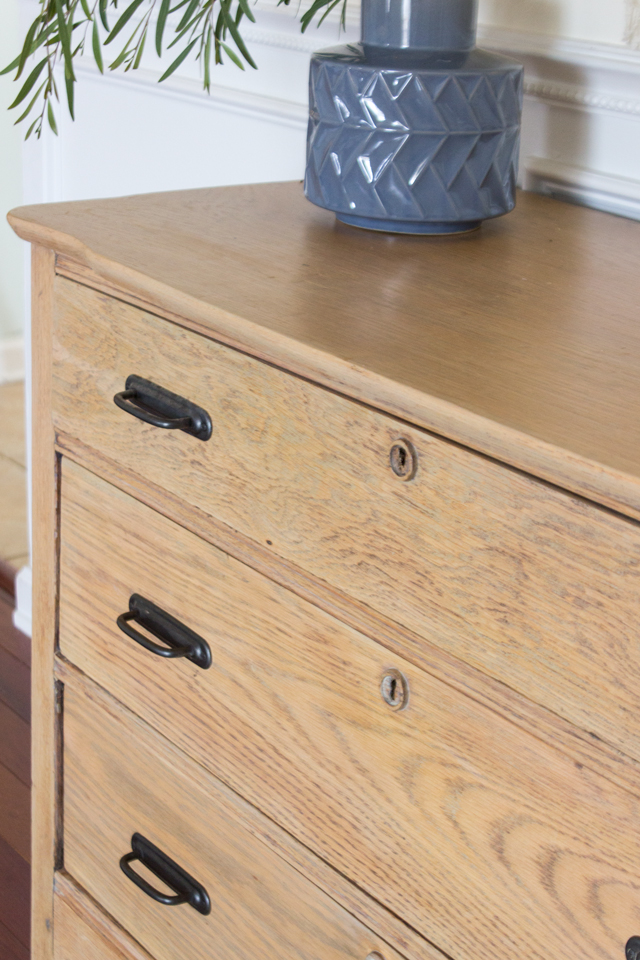
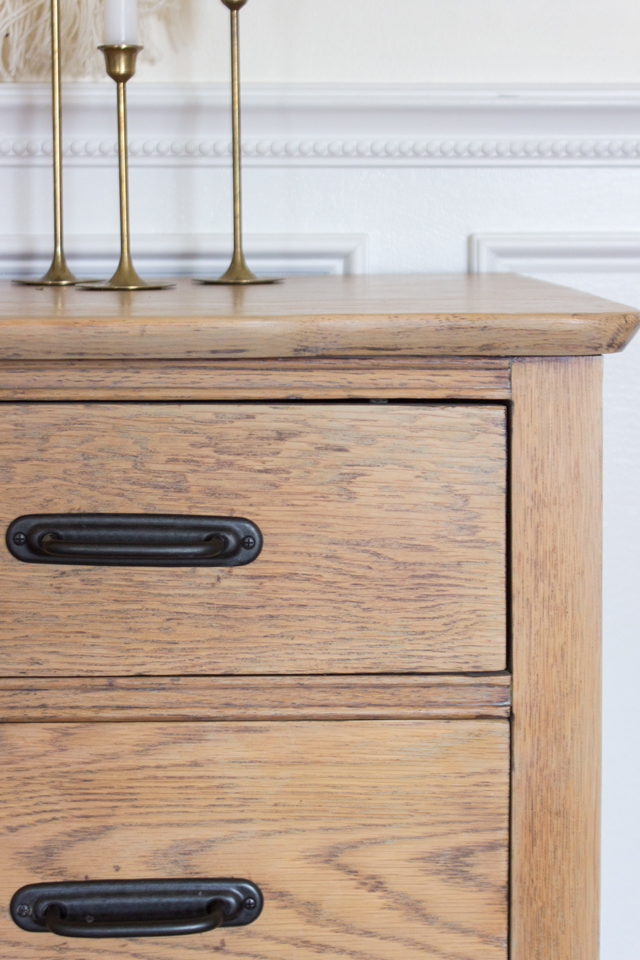
I absolutely LOVE this finish and how different this dresser looks now!
So this is the run-down of what I used to achieve this stain:
Prep-
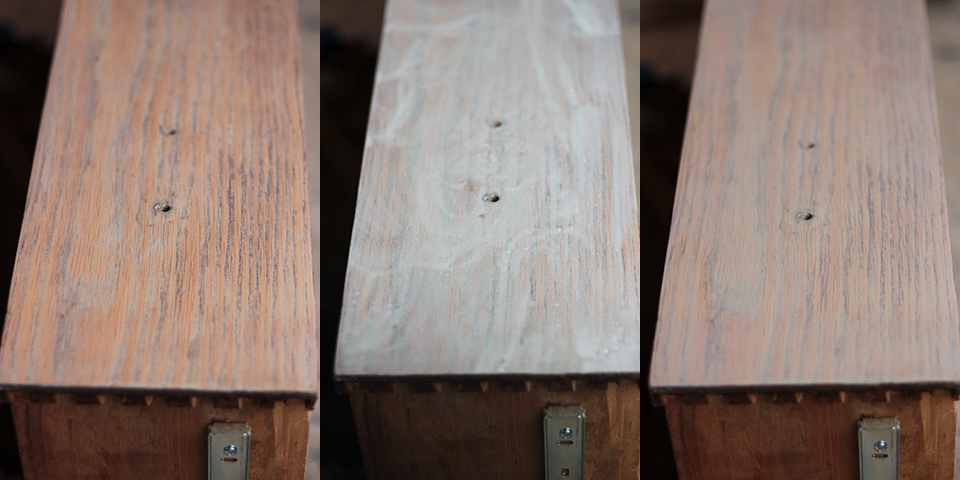
Strip using a stripper (I use Citrustrip) and thoroughly clean the stripper off using mineral spirits. Let dry completely and sand with 120 grit, then 220 grit sandpaper to remove anything remaining. Wood should be much lighter colored with the darker part of the grain striations still visible.
Below, the left is sanded with darker grain visible. The right side drawer is just cleaned with mineral spirits and not sanded yet.
If you have sanded to the point you cannot see a the visibly much darker part of the wood grain (like what I did to the top of the dresser), then do the following: Wipe Minwax Dark Walnut stain over the surface, and immediately following, apply Minwax wood conditioner. Rub out as much of the Dark Walnut stain as possible. What will happen is the darker striations will pick up the dark walnut stain and the lighter parts of the wood will come ‘cleaner’ the more you scrub with the wood conditioner. Let it dry completely for several hours.
Below is what it looks like when you sand to the point that the dark grain striations are not as visible and will therefore need to be darkened as described above. P.S. There were significant scratches and gauges in the wood so that is why I sanded the top so much… it was intentional. : )

1- Wipe on a small amount of Verathane’s Sunbleached and immediately wipe off as much as possible.
This stain is very opaque and dries fast so you can always use a little wood conditioner to wipe off areas you think have too much. You want to lighten the finish and add a little gray into the grain.
2- Wipe on Minwax Picked Oak, let sit for a minute and gently wipe off excess.
Let the stain dry completely (24 hours).
3- Apply 2 light coats of Minwax Polycrylic water-based top coat.
The reason I used a water-based top coat is because it yellows less than oil-based top coats and I wanted to minimize the yellow-tone in the wood. The good thing about it though, is it adds a warmth to the wood that something like clear furniture wax (as a top coat) wouldn’t be able to achieve. And trust me, don’t worry about the top coat adhering properly. If you have wiped off excess and let it absorb into the wood completely and it’s 100% dry, the water-based top coat will have no problem adhering properly to the wood. I’ve done this on several pieces of my furniture and never had any issues.
For the pulls, my friend picked them out and they couldn’t be better in my opinion. They are from TARGET of all places!

If you happen to have an old dresser with drawer that stick, then maybe you are interest in installing metal drawer slides!
I was able to retrofit ball-bearing drawer slides into this vintage dresser that originally had wood drawer slides, and the tutorial is found HERE.
What do you think? Do you like this modern makeover of a vintage classic dresser?
Go to my tutorial HERE to see how I installed metal drawer slides!
SOURCES & PRODUCTS USED (affiliate links used):
Wall Hanging (similar here)
So beautiful ! ♥️
Would it be okay to do this same process on unfinished pine dressers for a similar finish? ….And I have seen awesome drawers pulls/knobs at target too! Really surprised me!
You will definitely get a bit different result because the undertones of pine are different than oak. Oak has a lot more yellow typically (and sometimes even pink). However, I think this combination would be pretty with a pine dresser as well! I would test it out on pine scrap would first to make sure you like the finished result before tackling the entire dresser.
Okay! Thanks so much for your advice! ♥️
Great transformation of the dresser ! Thanks for sharing. P.S. Where is the rug from? I like that it has taupe and gray and is neutral, not too patterned.
HomeGoods!
I have the exact piece of furniture sitting in my living room, and I’m so glad to know the drawers can be made to work more easily! You did an amazing job of changing the look and feel of a commonly found antique chest of drawers.
That piece is gorgeous!! I’m glad you took time off to enjoy your family and spend quality time with them, it all goes by to fast. You won’t have any regrets.
Thank you so much for sharing, especially the tips with using multiple stains. I have refinished several wood pieces and selecting the right stain for each project is a challenge for me. I am def going to give the combo you selected a try. The dresser is beautiful!!!
Much improved! Love the lighter color.
Looks amazing. Any tips for removing finish and sanding a piece that has grooves? I got to that part and gave up.
This is a really beautiful transformation. Really lovely.
Stunning
Looks Swedish!!!!! Wow!!!!
Love your makeover! I’m so glad you stained and did not paint it. I am very tired of the painted and distressed look. Love the new hardware – pulls. Looks great.
Wow what a lovely transformation…..great job and a delightfully beautiful piece of furniture.
Great that you could install those drawer sliders…..makes for a much easier draw opening
and closing.
Enjoy…..
Lovely. Thank you for sharing the process.
Beautiful piece! You managed to keep the original look and wonderful wood grain and still bring it into the 21st century! Very impressive!
Hi there! I have the same orange/honey wood on my shiplap walls and I am looking for ways to tone it down without sanding (because the walls are two-stories – ugh!). Do you think I could use a chalk paint (watered down to a wash) and then dark wax? I want to ensure the wood grain still shows through.
Hmmmm… hard to say. I think most of that orangey look is most likely the clear coat that has aged and turned orange over time, therefore the only way to get rid of it will be to sand it down. White washing it will make the walls looks pink and then dark wax will just make it look muddy– trust me I’ve tried different ways to get rid of the orange look of pine without sanding and there unfortunately isn’t one.
Us that a matte or a semi-gloss Minwax top coat?
Matte or satin.
Matte or satin top coat?
matte, if its available.
Love the finished product! I have an old oak dresser which is similar and was wondering how to give it a more modern look. It is missing the key holes, do you know where I might find some replacements?
I have a tall dresser that matches this dresser. Do you (or your friend) know any more info about it? The back says John M Smyth but everything else is too faded to read. Any info you can share would be much appreciated. Thank you.
Not sure– the dresser is in Spain now. This style of dresser is not unique– I’ve seen it many times.
Looks so beautiful! Were the new pulls single screw in back? Did you just line them up or have To fill in holes and create two more per pull?
I drilled extra holes and the center hole is just covered by the backplate of the new pulls– I didn’t bother filling the hole in since it wouldn’t be visible.
I love the transformation. I don’t understand how putting on a dark walnut stain helped lighten the wood or why you would use that. Didn’t darken it after putting that on?
I explained in the post. You can go read it again– its so the grain striations would soak it up.
Did you not use a wood conditioner before staining?
Hi! This looks amazing! I’ve never used a stripper before (I bought what you recommended). How long did you leave the stripper on? Did you use a blade or knife to scrape off anything before you put on the mineral spirits?
I left it on for several hours. I’ve even left it on overnight (covered in plastic wrap) if there were thick layers to remove. I use a plastic spatula to remove the stripper and wipe as much as possible up with a rag or paper towels (metal spatulas can scratch or gauge the wood easily).
I want to avoid any liquid strippers and finish. What would you suggest as far as sanding the old stain off? & Possibly sealing with beeswax?
I would suggest patience and doing a lot of work by hand in small, hard to reach areas. Beeswax isn’t a long-lasting sealant, but if you don’t mind re-applying after time, then go for it!
Absolutely good job well done.
I love this! I have an entire 9 piece bedroom set in that original oak finish. I would love to redo it like this. I am not confident I could do it as well. It looks beautiful. Love the drawer slide idea!
Did you apply a wood conditioner before any staining? I heard it helps blotchy areas. Really would appreciate a reply. Thanks.
Most cheap woods I use wood conditioner. It helps the stain absorb more evenly. It’s not as necessary with expensive woods like oak, walnut, cherry, etc.
Hi Rachel! Is the stain oil and water based? I love how beautifully it turned out!
Oil based stain!
Hi could I use this same process on oak? If not can you recommend one or have a video of one?
This is fabulous work I love it!! Going to do this on some of my pieces
Do you think I could do this on my Orange/blonde oak trim?
Absolutely. I’d test out a small area first though!
Hello! Great project! I’m in love with these drawer pulls and would love to redo my dresser at home the same. I know it’s been a few years but is there any way you have the link or know the name/brand of these pulls? I’m looking all over and can’t find them anywhere
Check out Rejuvenation.com– the Perles or Sommerville pulls with a rounded corner backplate.