
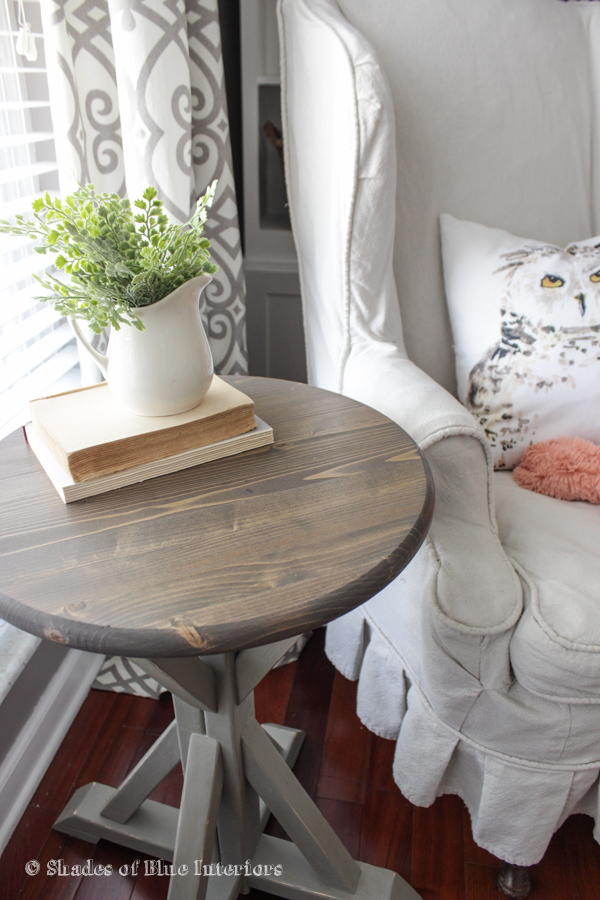
I gave a sneak peek of this little table last week during my Spring Home Mini Tour, and today I’m showing you how I built this little table for ONLY $10 and a couple hours!

I am not joking. I double checked my math to make sure I hadn’t forgotten something, but seriously… $10! You may spend more than that because the 1x4s don’t come in 1′ lengths (which is all you need), but that leaves you with enough to do a couple more tables! This project would be perfect to make a pair of them… costs would stay right around $10, rather than $15 and extra wood.
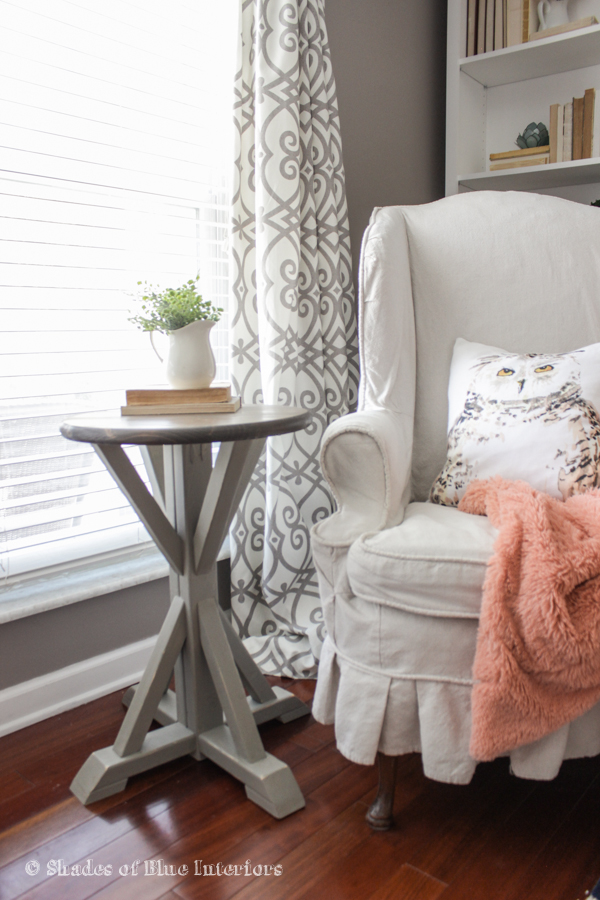
I was inspired by some trestle end tables I saw on Wayfair, but didn’t want to pay the price they had listed. It looked simple enough in design, so I drew up what I wanted and got to work!
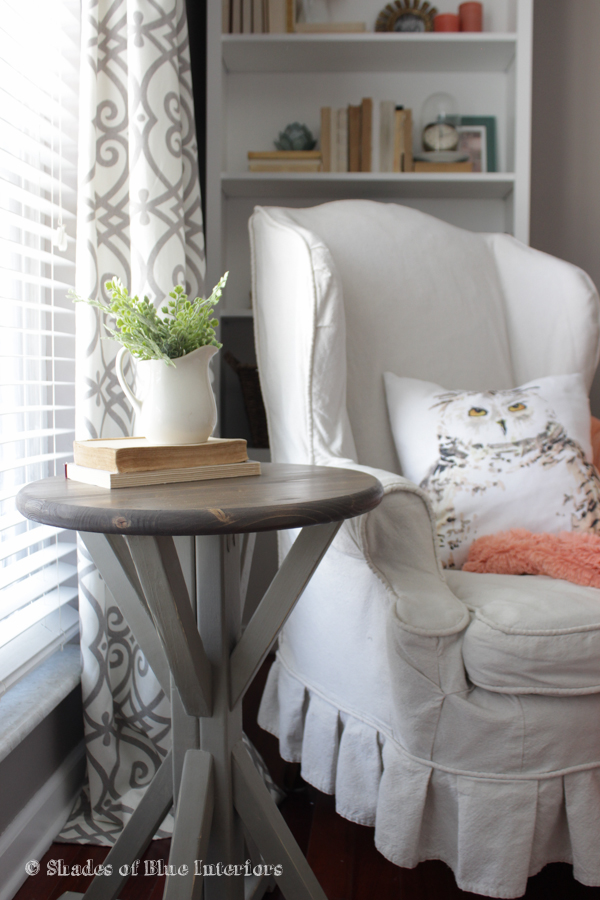
After a about a couple hours (which mostly took so long because I was over-thinking the angle cuts), I had this table built and waiting to be painted/stained. The base is ASCP French Linen, and the top is a combo stain of Dark Walnut and Classic Gray. I topped the stain with wipe-on poly once it was dry.
Tool List:
(affiliate links are what I use)
Protractor/Swanson Speedlite Square
Compound miter saw (I have THIS one)
Brad nailer (I have THIS one)
Supplies List:
1- 2×2 @ 8 ft. long
1- 2×3 @ 8 ft. long
1- 1×4 @ 6 ft. long
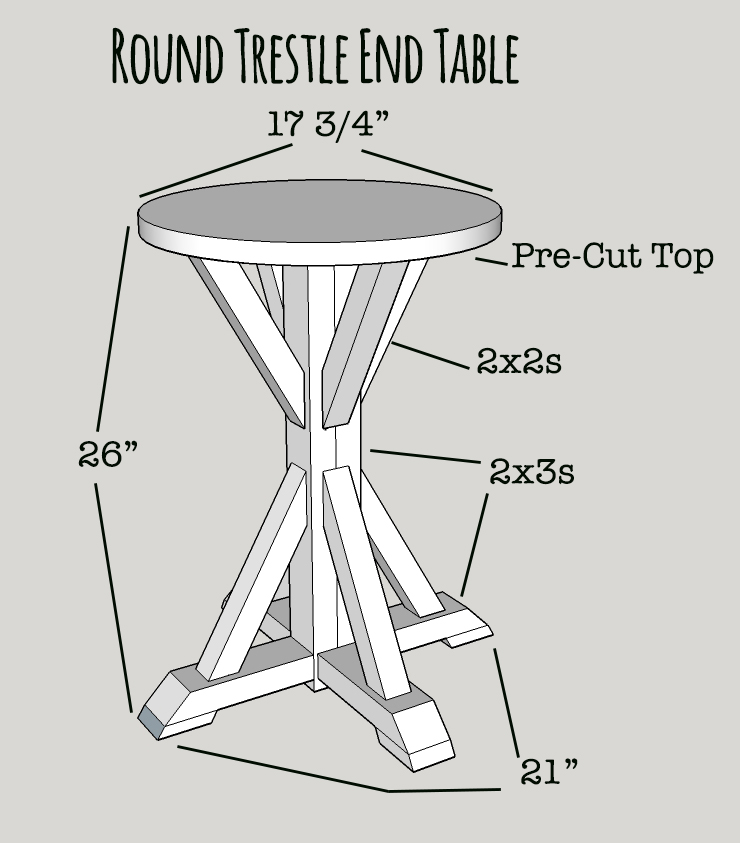
1- edge-glued round table top, 17 3/4″ diameter (buy this at Home Depot, it’s only $5)
24- 1 1/4″ 18 gauge nails
4 wood pockethole plugs
wood glue
wood filler
150/220 sandpaper
Stain/Paint of choice & top coat of choice
Cut List:
4- 1X4 select pine @ 3″ long and 2.5″ wide (rip cut after you cut the lengths), angle cut on both sides to 30 degrees (angles facing same direction)– (for the feet)
2- 2×3 @ 25″ (base)
4- 2×3 @ 8 3/4″ and angle cut at 45 degrees (legs)
8- 2×2 @ 1′ and angles cut at 60 degrees and 30 degrees (support braces)
NOTE: Make sure to measure twice, cut once, always glue before screwing or nailing something together, and use equipment carefully.
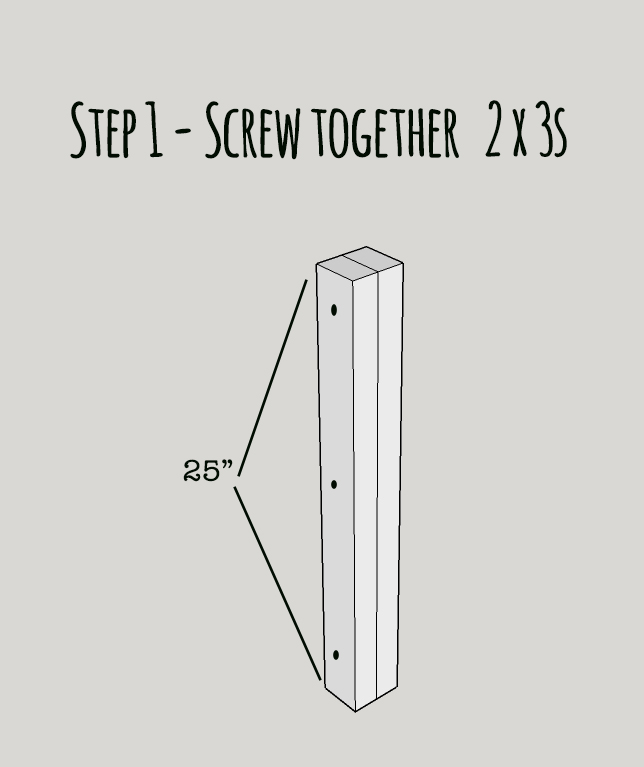
Step 1-
Screw 2- 1″ pocketholes on both 25″ boards, same end (top). These will be used later when the top is attached. Then glue and screw together the 25″ – 2x3s using clamps and exterior course screws, driving the screws in extra so they create a small hole which can be filled in with wood filler later.
Step 2-
Build legs by cutting 2x3s, 8 3/4″ long with a 45 degree angle. On the opposite side of the angle cut, screw 1 1/2″ pocketholes (2 per leg) on the underside. Attach the select pine feet (which were previously 1x4s, rip cut down to 2.5″) to the bottom side of the leg, with glue and 1 1/4″ nails. Using 2 1/2″ pockethole screws, glue and attach leg onto base with a 3/4″ rise.

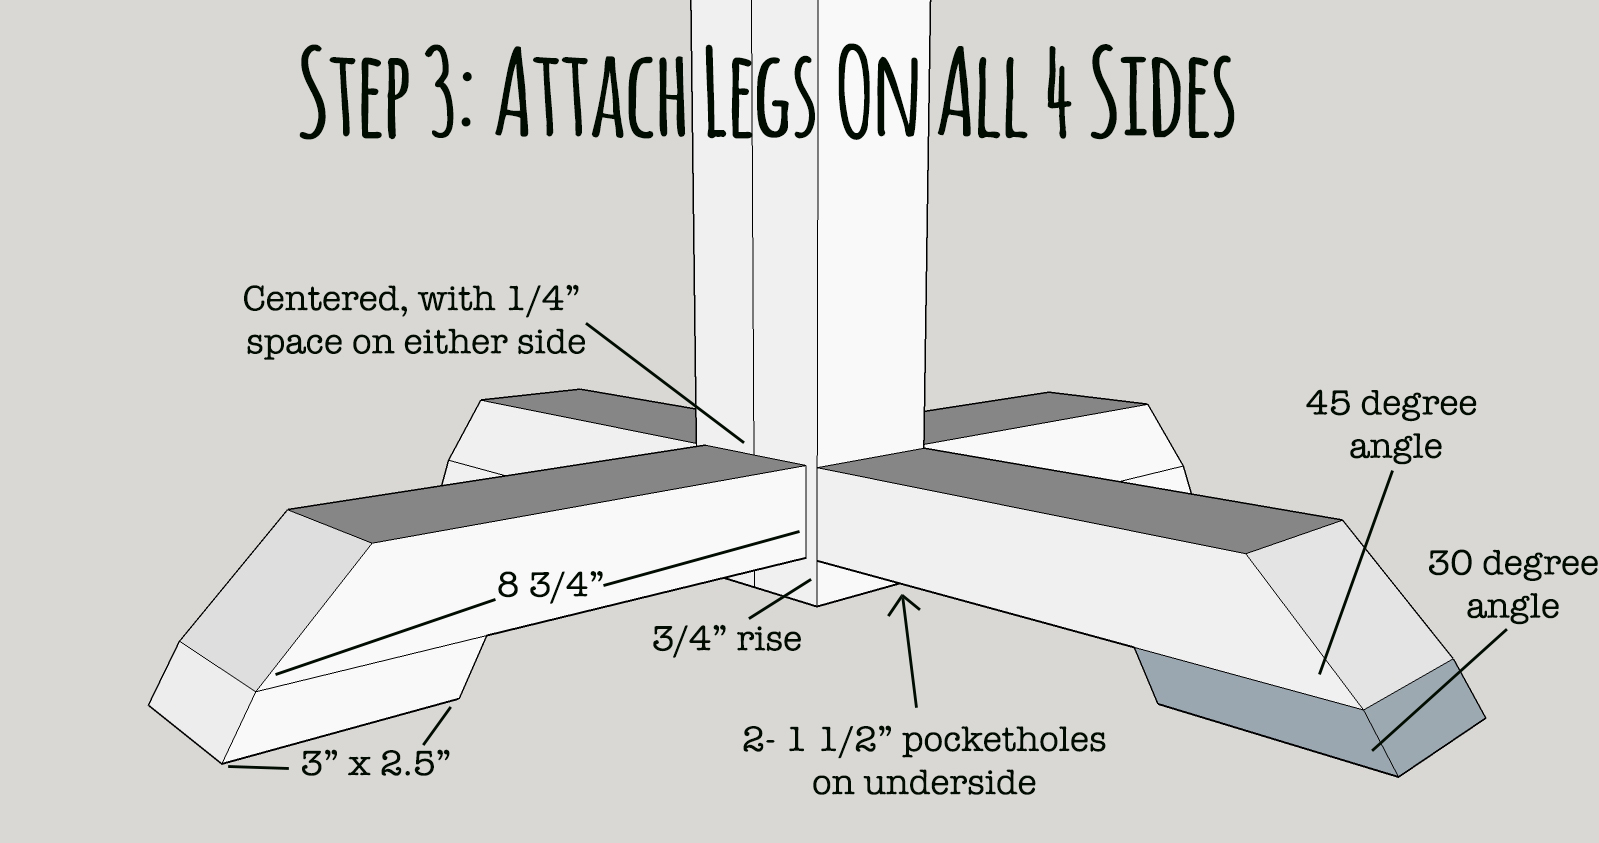
Step 3-
Attach remaining legs onto base following same steps as above, and centering the 2×3 leg on all 4 sides. The side of the base that is wider will have a 1/4″ space on either side of the leg. MAKE SURE you are precise in your attaching the legs to base, at EXACTLY 3/4″ rise. If it is higher, the base will touch the ground and the table will rock and be uneven. If one leg is off, then table will still rock slightly. Go slow, get it right.
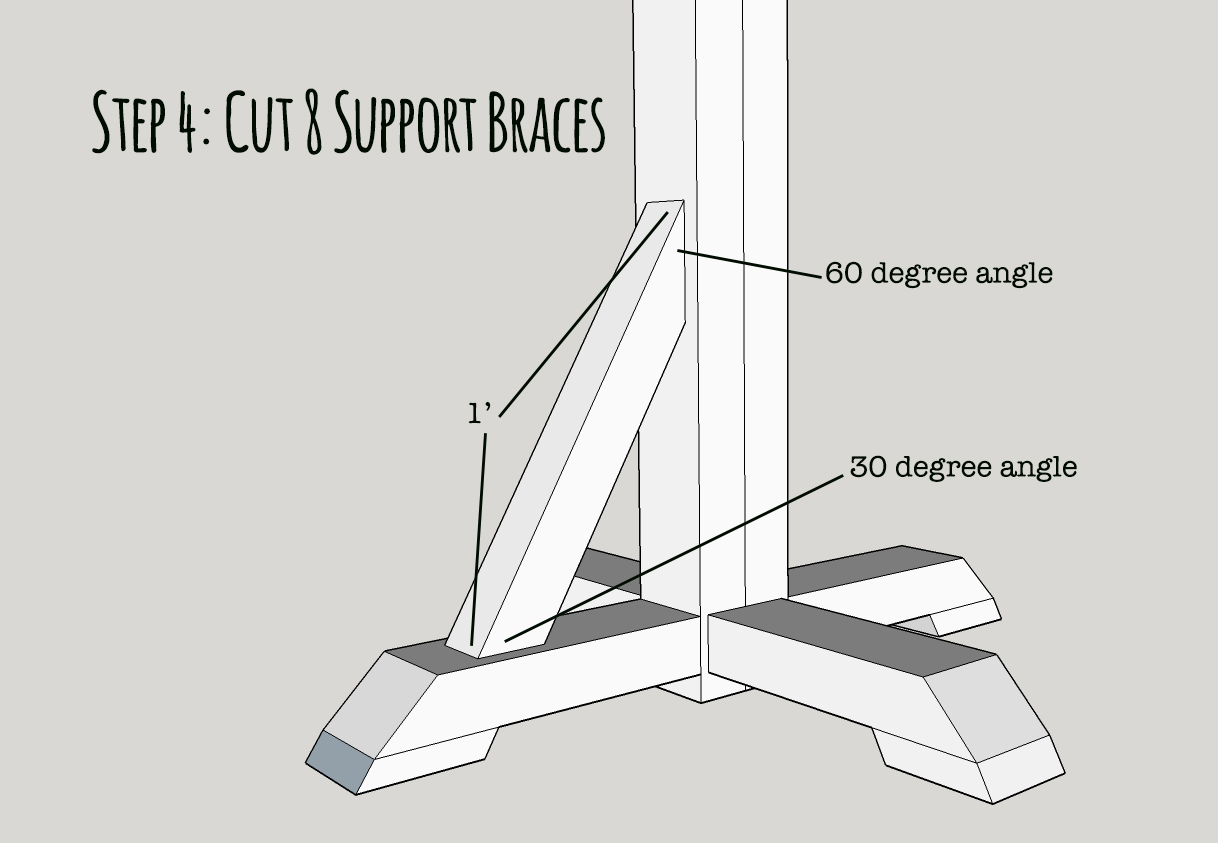
Step 4-
Carefully cut and fit all support braces. They are 1 foot in length, and situate approx 6 inches from base on the leg. To cut a 60 degree angle on a miter saw that doesn’t cut more than 50 degrees, use a protractor or Speedlite Square to draw the 60 degree angle. Clamp the piece to your miter saw at the angle you want it, then make the cut.
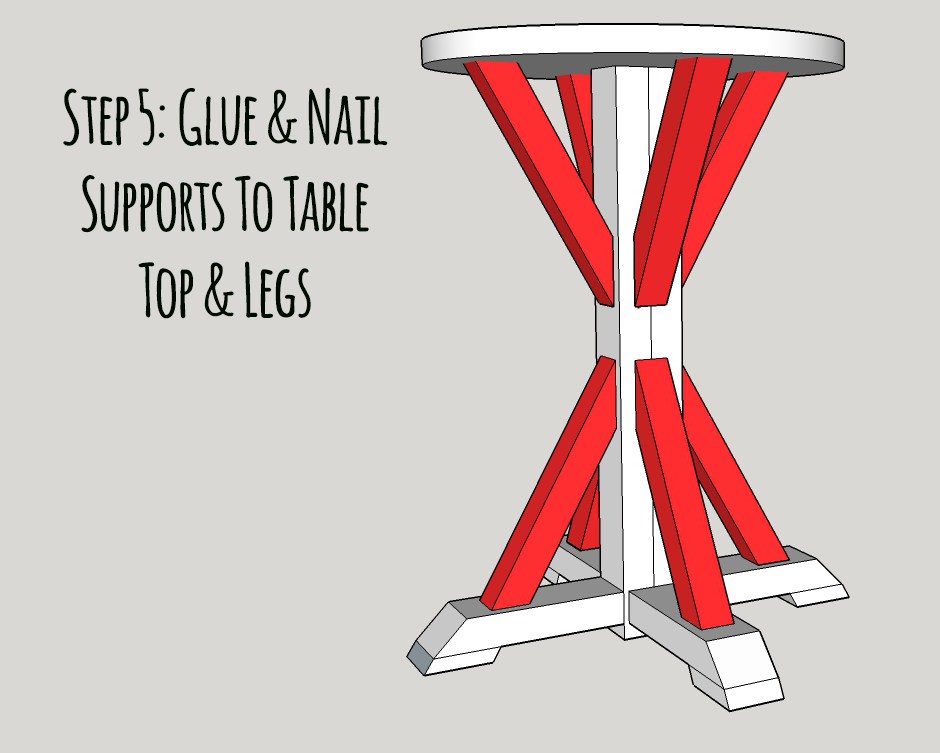
Step 5- Attach table top to the base top using 1 1/2″ pocket hole screws. Using wood plugs to fill holes on both sides. Glue and nail (using 1 1/4″ nails) supports onto legs and to underside of table top. Use wood filler and wood plugs to fill up any screw holes, nail holes, gaps, etc.
Step 6- Once wood filler and glue is dry, sand top, base and legs smooth with 150/220 sandpaper using an orbital palm sander. Finish with your choice of stain/paint. If using stain, I recommend using a wood conditioner before applying stain. Use a poly top coat to protect from nicks/scratches and let dry 24 hours before using.
NOTE: This post has an affiliate link for the Kreg Jig Pockethole System. I get a small percentage as compensation if you click the provided link and decide to purchase something. They do not pay me to use their tools or to say this, but I honestly couldn’t build anything without it and I big puffy heart love it.
So AWESOME! Pinning and sharing. Can’t wait to try some of this plans you’re sharing! x
I love this, Rachel! Such great lines, and I can not believe it only cost $10! Amazing.
thanks for your share this article. it’s helpful.
Lovely little tables and love the price! Would you be willing to share the brand and paint color on your walls and where did you find those curtains?
Hi Salli! The wall color is Valspar Redstone Dakota Sandstone and the curtains I made from fabric at Joann’s! The fabric is by Jacqueline Smith Home for Trend (that’s what it says on the panel), and they are no-sew curtains, which I love! I did a tutorial here: https://www.shadesofblueinteriors.com/no-sew-tutorial-lined-curtains/
Salli, just a quick update the exact name of the fabric pattern is Jacqueline Smith Gatework Pattern in Dove Gray.
Nice post. What did you use for your 3D renderings?
Google sketch up! It is free and there are lots of online tutorials on how to use it for woodworking!
Love it!! With the stain did you layer or mix the two before applying? And also, how many layers of each or what was the mixing ratio? Really love the color and style!
I layered stains. I first put on dark walnut, let it soak, wiped off excess, then wiped on the gray, and wiped off. I didn’t repeat any layers or anything– If you are worried about it, I would recommend getting some scrap pine to practice on.
Rachel – did you use 2×4 and cut them down to3″
No, 2x3s are available in the lumber section of Home Depot and Lowe’s.
How big of a top do you think you could put on this? I need something a little bigger… like 2 ft. round. In your opinion would this base hold it? Thanks!
Yes I think that size would work great!
I know this is like six years old, but I had so much fun making this. Thank you for sharing!