I am SO excited to share with you my FIRST EVER DESIGN and FREE PLANS for this awesome little design! Here it is:
Small X End Table

 Affiliate links are used in this post.
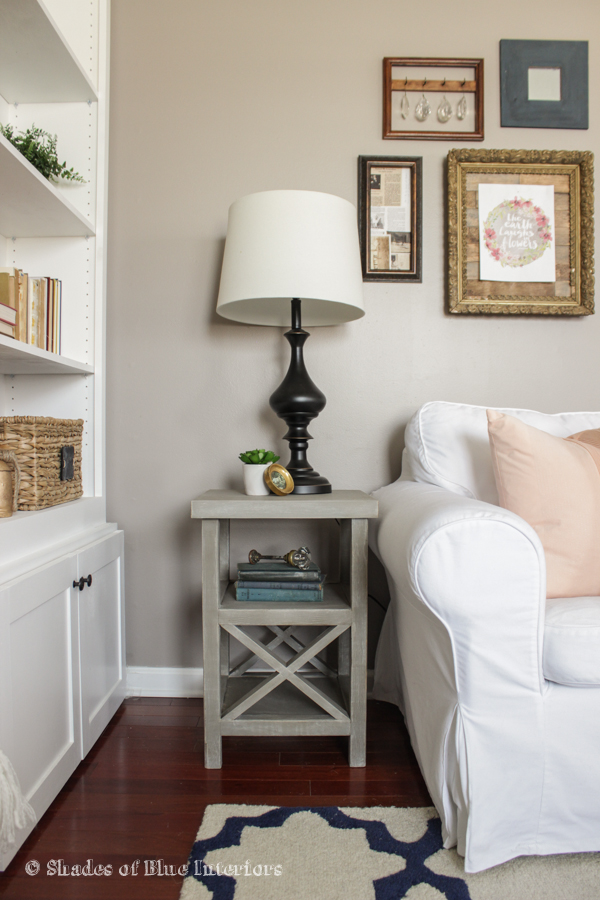
My living room isn’t huge, but I recently bought a couple lamps that I wanted to go on either side of my sofa. I already had an end table for one side, but this little spot in between the bookcases and the sofa wouldn’t fit a normal sized end table. I shopped around and most everything I found was too big! Until I went to Target and found a little skinny gray end table with double Xs… only it was $60. So I thought it about for awhile and came up with some plans that would give me a similar look and size, for only about $20 OR less in materials ( less if you have extra 1/2″ plywood laying around or use a less expensive option like MDF!)!! How awesome is that?!
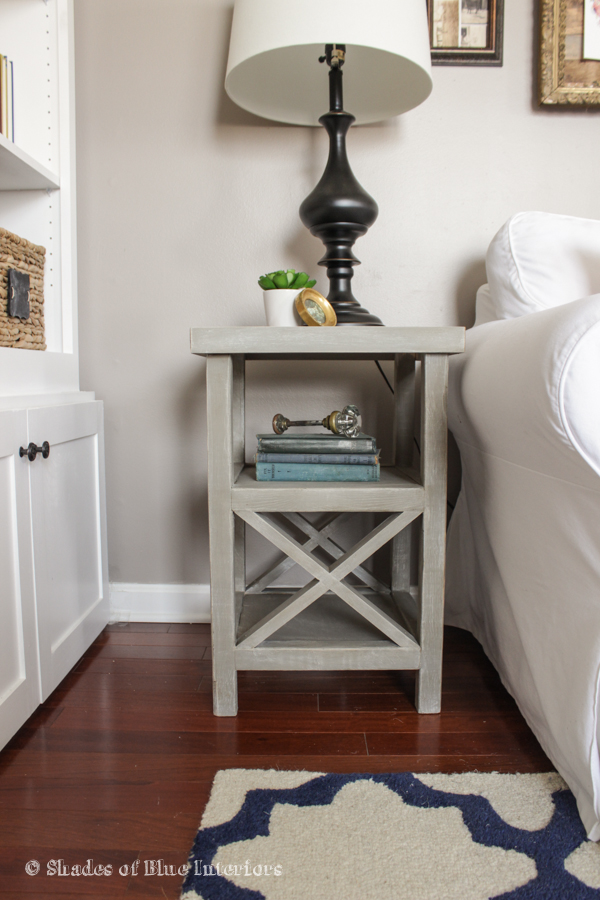
I was able to build this little table in a couple hours on a Saturday night! By the following Monday, I had already sanded, filled holes, and painted this little beauty! The finish is the same I did on the Restoration Hardware-inspired end table I did a couple weeks ago: French Linen Chalk Paint, dry brush (video tutorial HERE) with a light gray, then clear and dark wax.

This table fits perfect, has room for a bit of storage, and looks stylish! I’m so stinkin proud of it, you have no idea!
Ok, so are you ready for the plans?
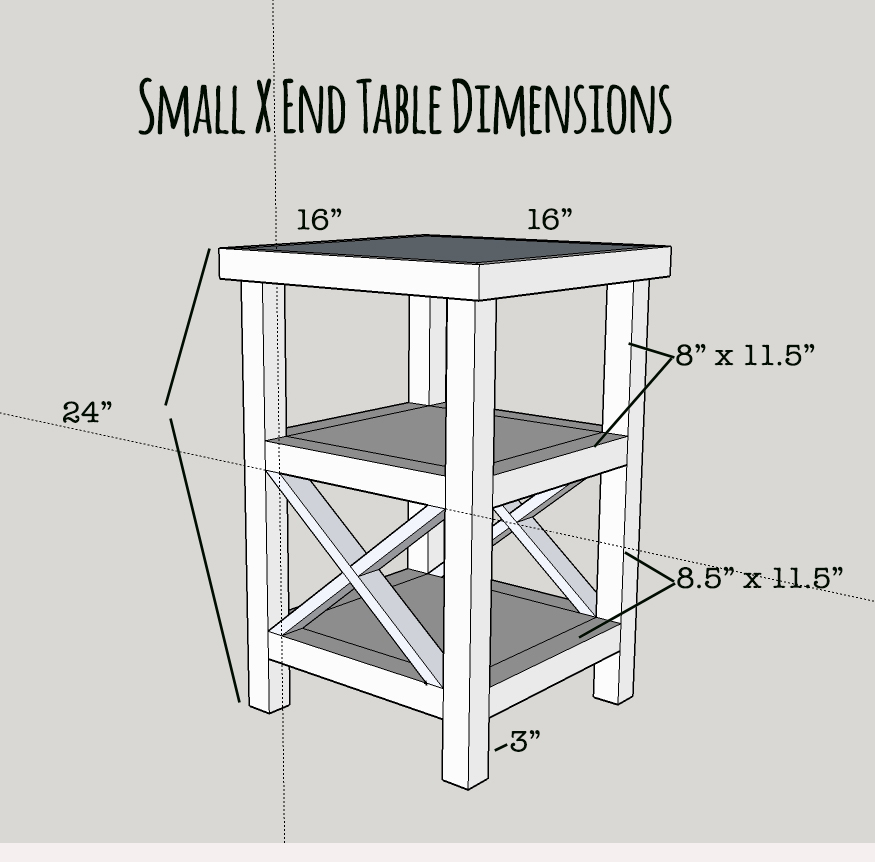
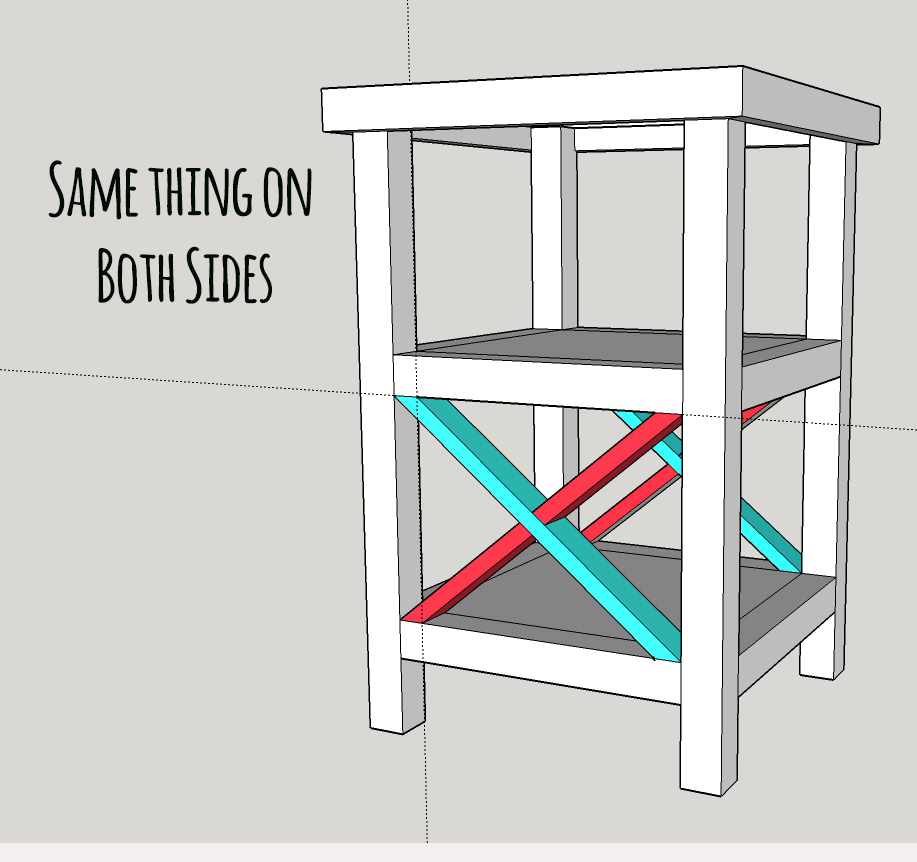
Dimensions for table are 16″ wide x 16″ deep x 24″ tall
Shelves have about 8″ clearance for both top and bottom.
Tools Needed:
(affiliate links below are products that I use)
Brad Nailer (I used my Ryobi Airstrike Brad Nailer and I LOOOOVE it. Amazing the power that thing delivers without a compressor!)
Supplies Needed:
2 – 8′ lengths of 2×2 (for legs and side supports)
2 – 8′ lengths of 1×2 select pine (for Xs and mitered edges around table top)
1 – 2′ x 4′ sheet of 1/2″ plywood (for top and shelves)
16 – 1″ pockethole screws
36 – 18-gauge x 1 1/4″ brad nails
paint of desired color or stain and top coat
Cut List:
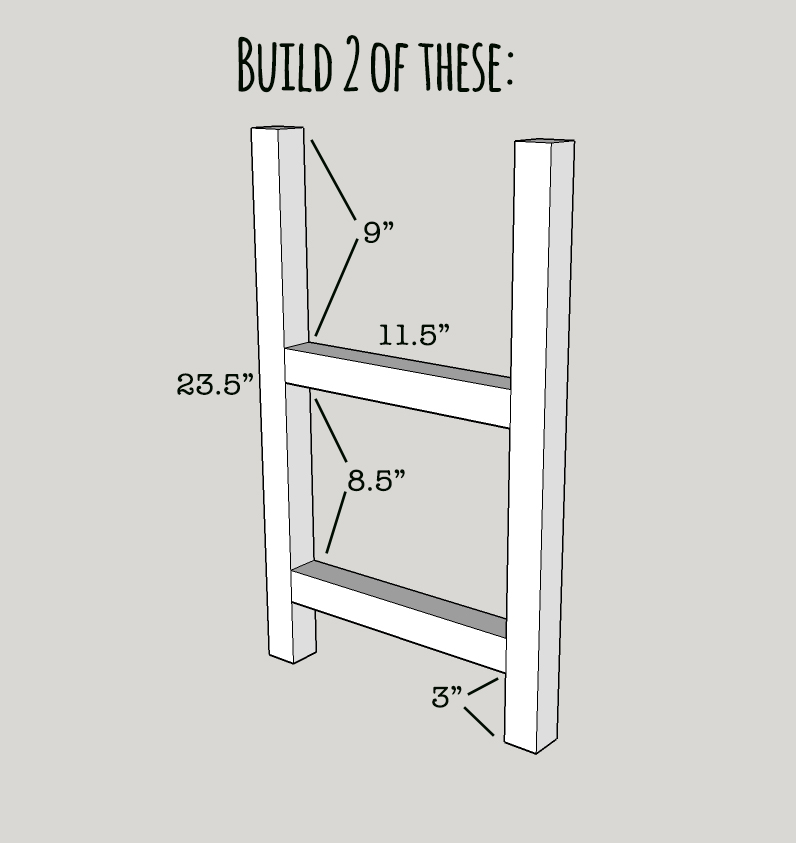
4 – 2×2 @ 23.5″ (legs)
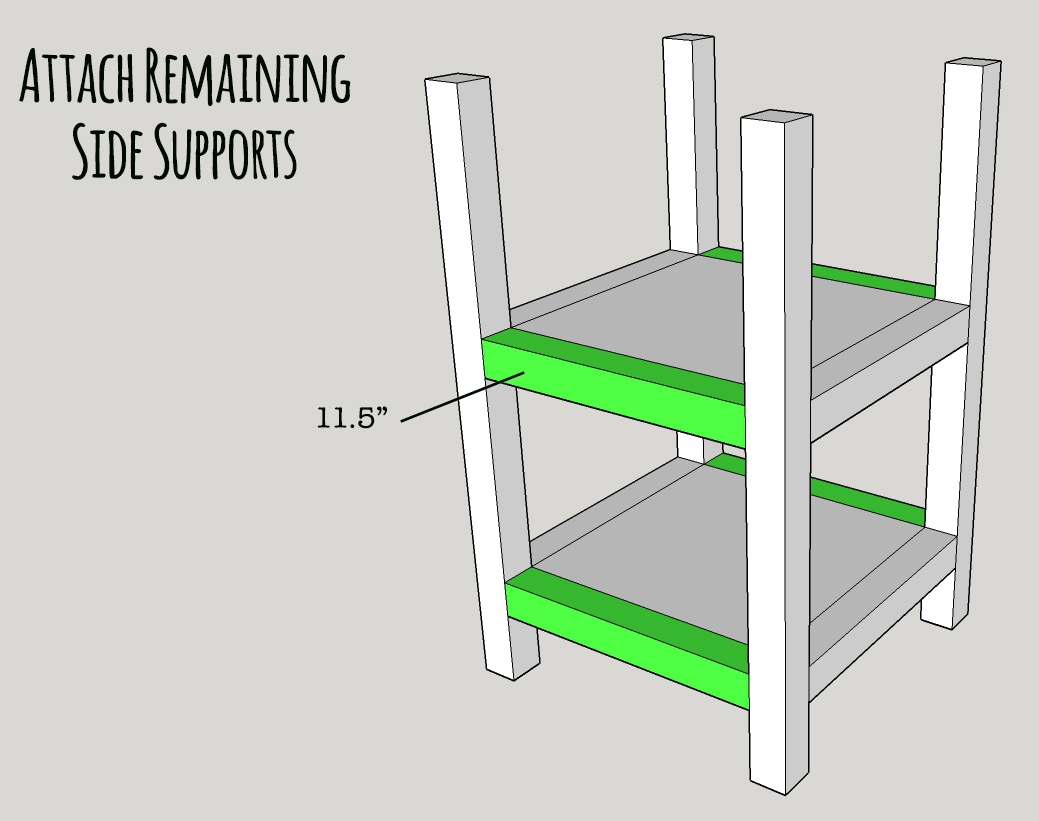
8 – 2×2 @ 11.5″ (side supports)
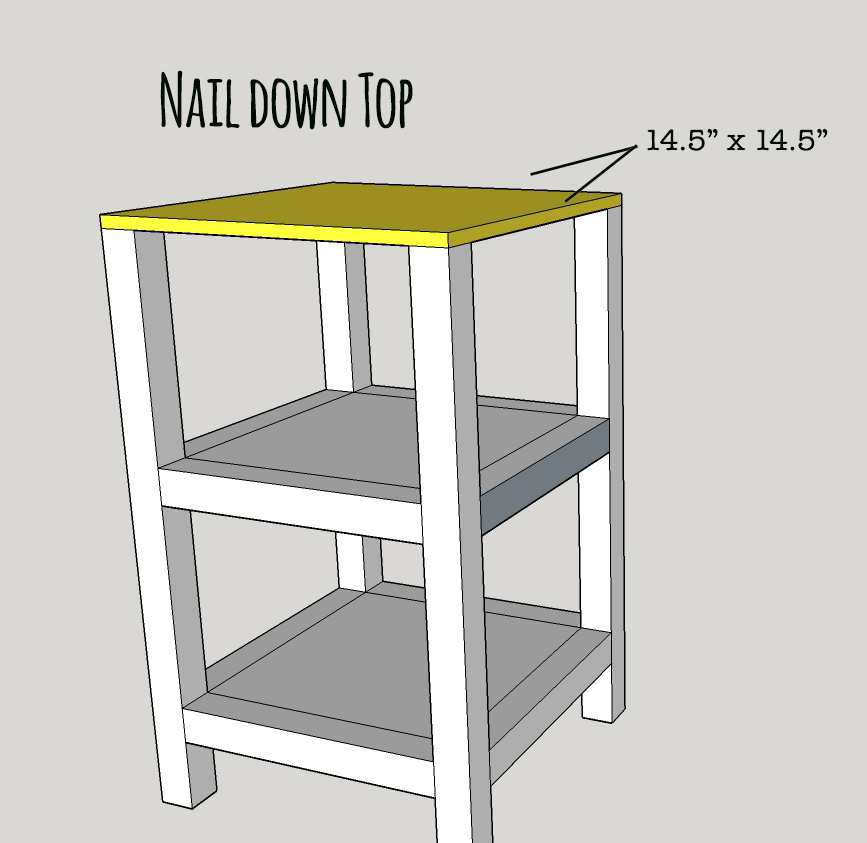
14.5″ x 14.5″ square of 1/2″ plywood (top)
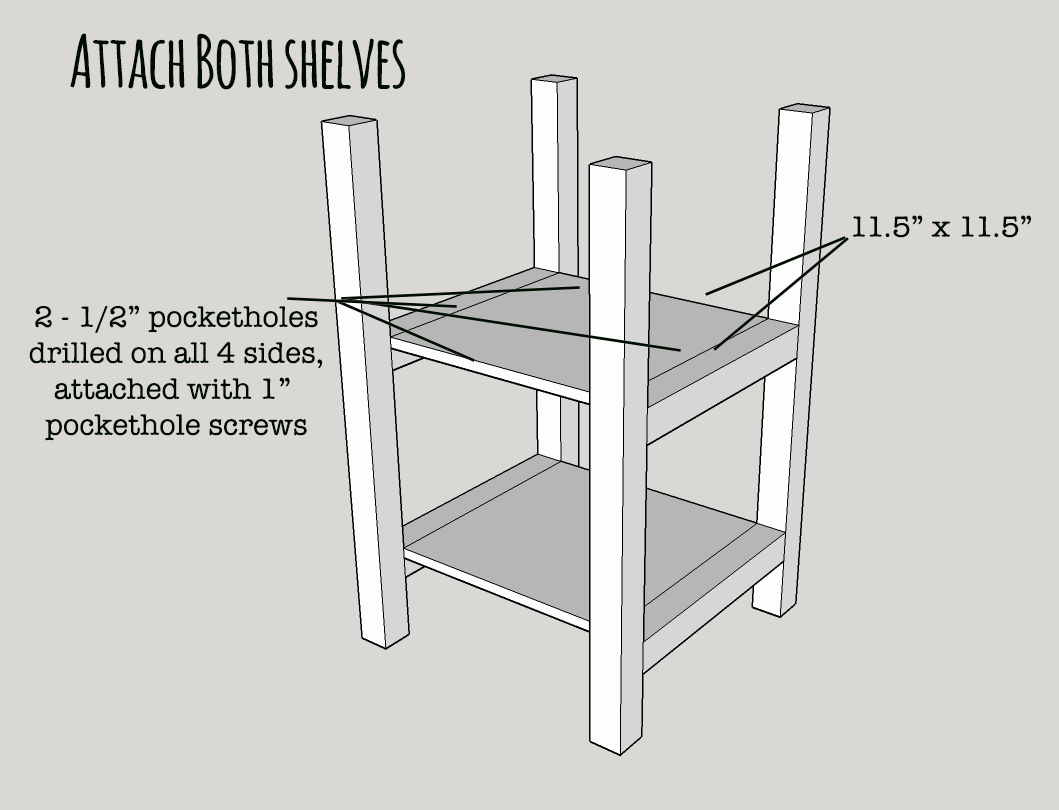
2 – 11.5″ x 11.5″ square of 1/2″ plywood (shelves)
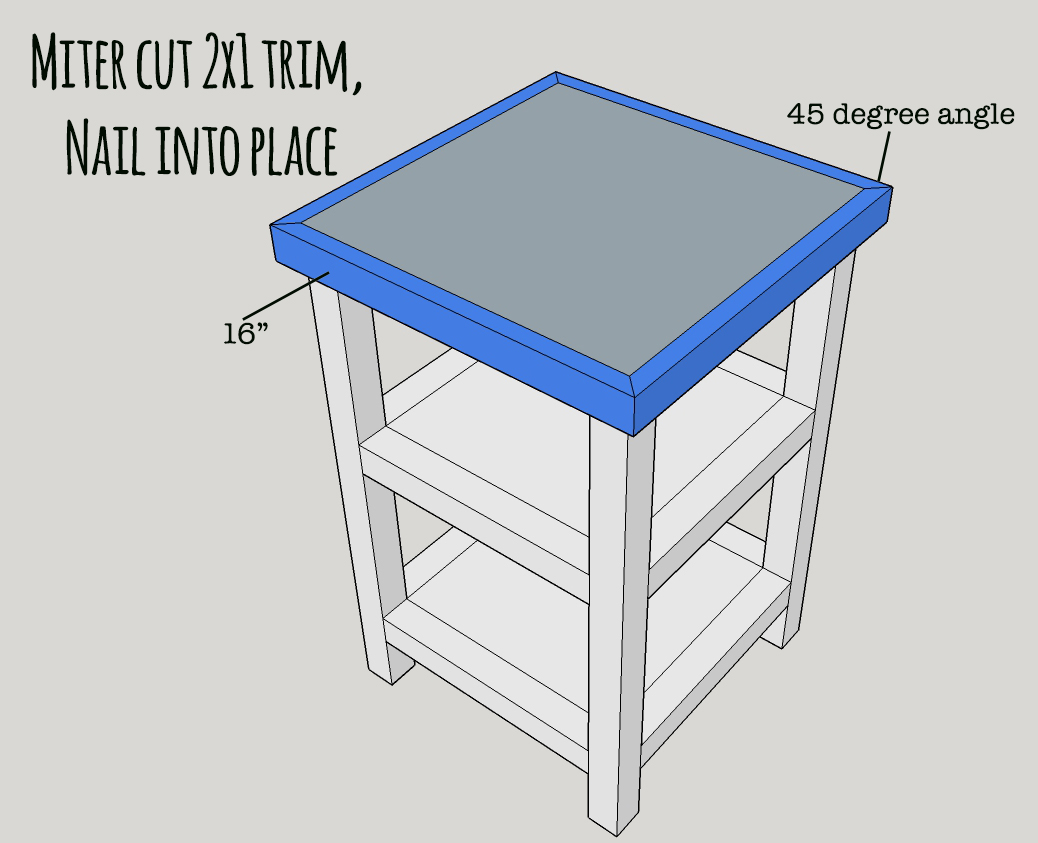
4 – 2×1 Select Pine board @ 16″, miter cut on both ends, 45 degrees
4 – 2×1 Select Pine board @ ~15″ (for decorative X on both sides) cut at 50 degrees on ends that meet with shelves, and 10 degrees off center where they intersect) (see below)
NOTE: Always use wood glue before screwing or nailing any pieces of wood together. Also, clamping before gluing and screwing pieces into place really ensures a tighter, straighter fit, so always think of ways to maneuver your project so clamps can be utilized when possible.
Step 1:
Drill 1 1/2″ pocketholes on either end of 2×2 shelf supports (11.5″ long boards). Using 2 1/2″ pockethole screws, glue and attach supports to legs. Do this for both sides separately.
Step 2:
Drill two 1/2″ pocketholes on all 4 sides of each shelf. Using 1″ pockethole screws, glue and attach plywood to shelf supports. Reduce clutch speed on your drill so you don’t split wood or go in too far. You will also want to make sure that the plywood is not 100% flush with the side supports, to ensure the pockethole screws don’t emerge. I moved mine down about 1/8″.
Step 3:
Attach remaining side supports. These are attached last, in case you need to cut a sliver off an end to get them to fit snugly without causing too much stress on already-screwed joints.
Step 4:
Glue and nail down top plywood to 4 legs. About 2 nails per leg will do.
Step 5:
Miter cut the Select Pine trim to 45 degree angles and attach 3 sides first. Cut last side a bit longer (about 1/4 inch) and test to see if it fits, shaving off a little at a time until you get a perfect fit. Outside line (longest side) is 16″. Glue and nail into place.
Step 6:
Cut and attach decorative X supports. The long support is about 13.25″ long from one mitered side to the other, but cut longer and test to get a snug fit, shaving off a bit until you get the right length. The end the attaches to the end table frame (in the corners) is 50 degree angle. Where they two intersect, is 10″ off center. Glue and nail into place.

Repeat the process for both sides.
Step 7:
Fill all nail holes with wood filler, let dry. Sand entire piece smooth with 150 and 220 grit sandpaper using an orbital sander. Finish with either stain or paint to your preference!
Whew! These plans have taken me too long to write up, so I hope someone out there enjoys them! Please let me know if you use them and build a little end table! I would love to see it!
**This post contains an affiliate links
Beautiful! Sending this to my husband as we just got him his father’s day gift early (power tools from Ryobi!!!)!!!! x
For the decorative x supports, did you leave only one intact and cut the other so it would fit the gap on either side, or notch each one out and fit them “Lincoln log” style?
First option… I cut one out and left it in tact and the other I cut in two pieces fitting around the intact one, the. Used wood filler to fill in gaps.
When I built mine, I put in notches. It worked out quite well. I did it by putting both in half way and drawing the cut line that way and then cutting the notches with my circular saw.
Love these! What color did you use for the paint/stain and what did you do for the finish.
I found my answer, but what is clear and dark wax?
Amber, to answer that I’m going to refer you to some videos I did explaining what they are and how to use them. Clear wax:
http://youtu.be/kQmSQktzmHo
Dark wax: http://youtu.be/HN7zIQE9QYM
I love this design and can’t wait to try it – thank you for posting! You had said you’ll need (4) 2×2’s but I only see the need for two of them. 8 feet worth for the legs, 8 feet worth for the side supports. Am I counting wrong? Just wanna confirm before I go shopping. Thank you!
You are right! How funny I didn’t catch that sooner! I fixed it now, and I double checked the other supplies to make sure I wasn’t over-estimating!
Love this! I can’t wait to make a larger version of this for our living room!
I mentioned your post on my blog, by the way! 🙂
http://www.kelliebearden.blogspot.com
Cannot wait to make this! Only thing is having a hard time visualizing where exactly the pocket holes and screws go??
Can anyone give a little more description 🙂
Thanks
I’m having the same issue. Where are the pocket holes vs. nails on the top? Where are you putting pocket holes vs. nails on each of the shelf tops?
Step two attaching the shelf to the supports with the 1″ pocket hole screws is what I’m confused about. Do they get attached from the bottom up at an angle into the sides?
Not sure what is confusing…. In the directions I explained that you drill 1/2″ pocket holes on the shelf sides then attach them to the supports with 1″ pocket hole screws. So yes, it is from the underside… But you have to have a pocket hole jig to make this work. They are only $30 for the basic simple one at HD or Lowes.
Wow this was so much more difficult and smaller than it seemed. Many times I found myself staring at the directions or reading them aloud thinking, “what does she want me to do? huh?”
Pretty finished product you have, but I’m not sure I’ll finish this.
Sorry you felt that way Amy. I just built another one this week too. Yours is the first negative feedback I’ve had on this table and I’ve had a handful of people email me personally telling me how happy they were with this build. Not sure what was so difficult about it or what was confusing– I really try to make the instructions as clear as possible since I’m a beginner builder myself. Again, sorry you had a hard time. Maybe your feedback could be a little more specific on what was confusing?
How does 14.5″x14.5″ with 1″ siding (on each side) on the top equal 16″x16″ Wouldn’t that be 16.5″ by 16.5″? I’m confused by your dimensions.
Dan, if you are familiar with any lumber, then you know that a 1×2 isn’t actually actually 1 inch thick. They are 3/4″ thick, so 14.5 + .75 + .75 = 16. 2x2s are actually 1.5″x1.5″ also.
That is very misleading with the 2X2’s I ripped my own 2X2’s because that is the dimensions in the cut list and when I started putting it together I then found out the top was too short. I had used hard oak to make it and glued board for the shelves instead of plywood.
Jeff, it isn’t actually “very misleading” at all. Under my supplies list, which is what you buy at the store, I very clearly said you would need 2x2s, which if you ask any store associate in a lumber store, home improvement store, or even online, they will direct you to 2x2s which are actually 1.5”x1.5”. This is common knowledge even for people who don’t build furniture. Additionally, every step of the way I have dimensions of every piece, so if you had done some elementary math prior to verify dimensions of the pieces (if there was any confusion) then you would have seen that I meant 2x2s bought at the store, not ripped down. If i ever require wood to be ripped down from what is available at a store, then I always clearly explain that in my instructions.
Finished one by is 3/4 of an inch. So, the addition of the 3/4 on each side equals the dimension mentioned.
Thanks so much for these awesome plans- they are exactly what I was looking for, are so solid and will last for years! For others who want to build them, the one problem we ran into was that the 1/2″ plywood was too shallow for the pocket screws (they would come through the other side of the plywood at an angle, and we followed the right specs for the Kreg pocket screw joining system), and used 3/4″ plywood instead. Great tables, highly recommend!
Photos on http://www.washingtonlincoln.com. Thanks again!
Sorry you weren’t able to get the 1/2 ply to work… 1/2″ ply is a bit tricky and takes some getting used to when doing pocket holes… I’ve made a few of these tables using 1/2″ but I can totally see what you mean about 3/4″– it would be much easier!! Great job with your tables– they look AMAZING! And thanks for the feedback!
Hi Rachel
I just wanted to say how much I love the look of this little table. I’ve been madly looking for some bedside tables for a rental property that I’m kitting out. It’s a case of ‘champagne taste and beer money’ so I think that a couple of these will work beautifully. Thanks SO much for the free plans, I can’t wait to get started.
Warm wishes
Judi in the UK
I am starting building some furniture and I came across your pretty end table, love it!! I need to get myself a Kreg Jig and give a try!
I would love to invite you share this with us at our Sweet Inspiration party, which is live every Friday on my blog.
Have a wonderful week!
Hi, I was hoping you had instructions on how to apply the finish on this piece using the annie Sloan paint and wax. Thanks!
I’m in the middle of building this table right now (about to attach the table top), and I just had to take a break to say thank you for taking the time to share your plans with us!!! I Loved the design when I first saw it, but I love it even more now! It’s so sturdy and attractive even in a half built state. Your plans are straight forward and easy to follow for relative beginners like myself. I only planned to make one, but I think I’ll be making a few of these beauties.
Thank you so much April! That means a lot– I really appreciate your feedback.
Hi there,… made them this past week and painted them concrete grey. Made them rectangular in shape and they turned out great! Thank you!
Hello, I’m in the process of building this side table and I am having a hard time with making sure its level. I am at the step where I screw the side supports (Step 3) If you could offer some tips on making this level I would appreciate it. Thank you
Clamp before you screw. Line it up, clamp into position, and attach screws.
Thank you so much. Got it figured out. Onto the X braces now. So excited for this finished product.
I am stuck on step 6. Where do you put nails in the decorative X’s?
Having trouble not splitting wood in step two attaching the shelves to the bases 🙁 Any other tips?
Followed these plans and made 2 adorable tables
I’m attaching the shelf sides to the legs but there isn’t enough room for my drill to drill the pocket screws in. Any tips? Appreciate your help!
There are many brands of 90 degrees angled screw bit holders which you can mount on a drill.
Price about 10 dollars I guess. Or use a normal screw driver or a ratchet with a screw bit holder.
When holes are drilled for the screws you do not need much power to get the screws in.
I actually had to use vice grips on the end of the Kreg (long) bit. A little extra work, but didn’t have to spend more money on extra tools. ?
Can the 2×2’s be from kiln dried 2×4’s (then ripped to size with table saw)? Or regular ferring strip 2×2’s?
Hi!
I know this is unrelated to the post but can I ask what your wall color is?
Thanks! 🙂
It’s under the FAQs tab!
I used 1×12’s on the shelves. Just cut the other stuff to 11 1/4. Didn’t have much luck with the 1/2″ plywood. Worked fine.
Thank you for taking the time to put this together. What program did you use for the drawing? SketchUp? Do you have the design file you can post?
My husband and I followed your plans for the general layout but added a twist. We made them a little taller to work better with out room but we also used a 2×4 piece of wood for the top instead of 2×2. This was to create a hidden shelf for a concealed gun. Both of our nightstands look the same, but my husbands has a shelf and hinges on the top piece so that you can open it. Your plans were great to use!
Thank you, I can’t wait to build this for my living room.
First of all, I want to say thank you for the free plans!
Second of all, for all the trolls in the comment; you are either uneducated and/or ungrateful. These plans were just fine.
Lastly, for those that have issues screwing pocket holes to 1/2” material I have a option that easy and inexpensive.
I suggest drilling a scrap piece of 1×2 (or whatever you have laying around that won’t be visible) to the side supports and laying the shelf on top. Measure 1/2” down on the side supports and draw a line, then screw your scrap board to it. This will allow you to set the shelf on something and allow you to drill a vertical hole which is less likely to split.
This is a nice design. I’m making a few modifications, but am left with one question. It seems like the pocket hole screws attaching the shelf supports must intersect inside the vertical 2×2’s, right? Do the screws attaching the second sets of shelf supports just work their ways around the screws that are already attaching the first sets of shelf supports?
They screws drive in at an angle so they never touch inside the 2x2s
I love this table and plans. The only thing I’m slightly confused by is exactly where to put the the pocket holes. I know you explained it verbally but I’m more of a visual learner and just having a hard time picturing it. Do you have a picture showing where they go or maybe a video? Thank would be extremely helpful. I can’t wait to get started on this!
We are enjoying your plans!
We noticed in the directions we needed 4 more 1×2 for adding sides.
Just a note.
We also experimented with making a couple a bit taller.
Thank you!
Bond family
Catie asked a question on December 1, 2016. I’m stuck in the same spot of exactly where to attach the X pieces together once cut. Can you answer please?
You toe-nail them together. Just drive them in at an angle.
Thank you for making this plan, and for free at that! I am going to be making 4 of these for the bedrooms in our newly completed cabin that we have been building over the last 4 years.
Is there an option for printing this as a PDF without all the ads?
Hi since you seem to still be building these gorgeous tables I’m wondering if you have a video?
Hi do you have a video? Love the end table. I need visuals though. Thanks!
These are amazing. I have been looking for an end table to make to compliment the entertainment center I am making. These plans are easy to follow. Next I am experimenting with making a coffee table to match….Thank you!!!!!
Thanks for the plans, they were very detailed and simple to follow. I have some extra information for the do it yourself carpenters/furniture builders. If you are using glue for all your joints and have it on hand anyway. I will do a rough 80 to 100 grit sand before I fill any holes or cracks. I will empty my orbital sander dust collecting bag, then add glue to the saw dust to make my own wood filler. Mix glue in until it is about the consistency of peanut butter. Then I will fill all cracks and holes and let dry overnight. Then sand them the next day with 80-100. Then I will take a pencil and mark swigle lines all over the sanded wood. Then when I do my 150-200 final sand I will know I got it all because the lines will be gone. Thank you so much for the design. I have built one so far and am building another for both sides of my wife and my bed.
I made mine 36″ tall with a 16″x24″ top and I notched the X pieces lincoln log style. This was a great project.
If I use 3/4 plywood instead of 1/2, will I still use the 1” pocket hole screws with 1/2 pocket holes? I would love if someone would make a video of this. I’m go attempt to make two for the wife for Mother’s Day. I’m a novice, just trying to learn.
Hope you figured this out! If you are using thicker wood you need longer pocket hole screws. Consult Kreg’s guide here: https://learn.kregtool.com/learn/how-to-select-right-pocket-hole-screw/
Hubby and I are both retired and would like to make this beautiful table. My question is: is there a way of printing out the directions without all the ads etc? Thank you for your time. I look forward to hearing from you.
Unfortunately no. That is how I’m able to offer the plans for free– by having ads.
Thanks for this! Working on my third rable now. Adjusted the sizes to fit our space. They look great!