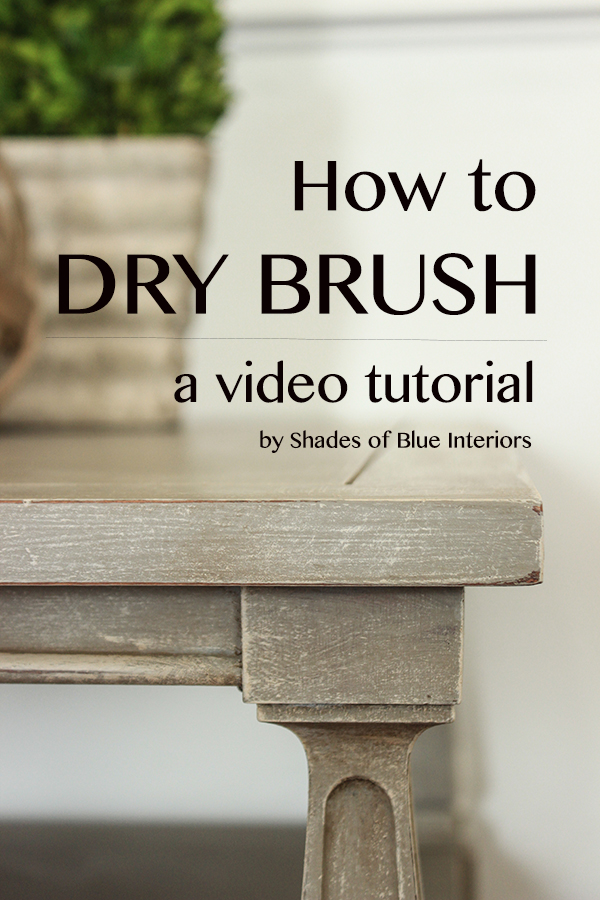
This post is to teach you how to dry brush furniture using any type of paint. Typically it is best to use a light color over a darker color, but I have used a dark color over a lighter stain on my master bathroom vanity and it looked great as well!
I’m happy to say I finally put together a video that I’ve been meaning to do for months! Every time I would get a new YouTube subscriber, I would think, “I need to do another video!” So, despite being snow day with school cancelled, I put on The Sound of Music in the basement for the kids, and started filming. If you listen carefully in one part, you can hear Julie Andrews singing! 😉

I had every intention of having this video edited and done last night, but apparently my HD is almost full and it took 4 attempts at exporting the video, before I googled the error and found out I didn’t have enough space to export! So that is what I spent today doing haha! Ah well, it’s working now, and I’ll be editing the next video for next week, on how to use dark wax!
UPDATE: How to Use Dark Wax Video Tutorial HERE
Here is my first (in hopefully more to come) video on brush techniques: Dry Brushing!
Rachel!! This is so good! I never knew what dry brushing was, SUCH a great tutorial. I love the videography too – I need to work on my transitions from frame to frame (I love how yours kind of faded into each other) and the scan of the finished piece with the text was a great ending. I need your tips on that too 🙂 And next video I would like a makeup tutorial – you look gorgeous!! Brush techniques for the face??
Rachel – Great tutorial. Besides the painting techniques, your lighting is amazing. Great job.
Mary @ Orphans With Makeup
love, love, love. You’re such a pro…xo
Great video! You are awesome Rachel! You are so great at the these videos, your professionalism shines through! Well done! xo wendy@frontporchmercantile.com
Rachel, I am inspired! I want to lighten up the dark wood of my dining room chairs, but didn’t know how to achieve the look I want. Now I know!
Thank you dear!
Donna
Hi Rachel, I love this technique. I have a plaster table base that I got from Ballard home design 100 years ago. It’s white with a stone or marbled look. Instead of throwing it away, I am thinking of refinishing this to give it a metallic or galvanized look. Would this technique work for something like that?
Short answer: yes. Long answer: I once gave a chair frame a metallic look by painting it gray, dry brushing with light gray, then mixing dark gray (almost black) paint with Annie Sloan’s clear wax, to give dimension and depth to the crevices of the chair. It wasn’t iridescent like metallic paints are, but it for sure gave it a metallic type look from afar. I would say this technique would also work well for a zinc type feel, but go very light on the dry brushing… Better to start with a very small amount and build up layers of dry brushing, rather than trying to get it all done in one coat. Good luck!
Love this technique!! On your final picture, it looks like there is a little stain or brown in it, is this just from using a dark wax to finish it? How do you apply the wax?
Thank you for sharing!
Yes, the dark wax gives it a warmer tone, with some variation. I did a video tutorial on how to dark wax here: https://www.shadesofblueinteriors.com/video-tutorial-how-to-use-dark-wax/
Hi Rachel – Get video! Can this technique be done on furniture that is factory painted and glossy? What prep technique would I use? Sanding? Steel wool? I have a TV console that has a 2 tone look but I want to lighten it a bit with some light grey.
Thanks
I would use a chemical deglosser before painting or dry-brushing any surface. Or you can use something like 220 grit sandpaper to take off the sheen. A surface, to have better adhesion for paint, needs to have some ‘tooth’ and a matte or roughed up surface is going to have a better result than shiny finishes.
I have seen a lot of tutorials, I have never commented on one, yours however is fantabulous, just wanted you to know! Thank you for sharing. Paint on Sister!
Thank you so much Karin!
BEST tutorial on dry brushing! Thanks for it. ❤️
Rachel
I loved your video and your technique I’m eager to start. You said any paint can be used. Would you clarify this for me please, as I’ve noticed in other tutorials that chalk paint is used. I’ve used this many times but it doesn’t wear well, say for end tables etc. so if as you say any paint can be used
this would wonderful. Thanks
Regard Janice
The trick to durability with chalk paint on end tables is patience in the form of many layers (8-10) with extra fine sanding between layers. I know the delight of chalk paint is supposed to be the fact that you don’t need to sand. I think that depends on your end game. If you use this technique on the top of an end table, not only will you achieve a silky smooth finish, you’ll have a piece that is durable enough to last until the next time you think it needs an update…no matter how long that may be!
So incredibly helpful!! Thank you!!
Rachel,
Thank you. I’m doing a vanity and the top I’m using a color by Heirloom Traditions Paints called Dearly Distressed. It used to be named, Prairie Gray, which I miss. It is what they call a “greige.”
The bottom I’m doing in French Vanilla. I’m super excited about it and thought for months about what color my vanity should be. I actually sit and blow dry my hair and do my make-up there, as I listen to my Christian devotions in the morning. I thought blush pink. I thought deep blue. It is interesting how furniture will speak to you…
But then I found a sweet boudoir chair at Marshall’s that was marked down for a faint ink dash on the middle of the seat ( which has since disappeared). I suppose it was rubbed off. It is a velvety vanilla, tufted seat back and the legs are a greige with dry brush (looks like) vanilla.
I’m a little nervous, but the top needs some kind of distressing. I like your suggestion of using gray or the color diluted with white. Excellent tip!!!!
Because I love the beach, I may add a detail under the mirror by gluing shells from my beach combing expeditions.
Thanks again so much. BTW, we love Sound of Music.
I love this!!! Great job on the tutorial! I have never painted old furniture, I have been searching different techniques on pinterest, but I think I am set on this technique for my dresser. I know you don’t recommend it for a dresser, but, I am looking for the beachy driftwood look at least on the top and the front drawer area, background can be plain white.
So, the base coat is chalk paint in grey? Do you coat it with some kind of protection polycrylic?
Thank you, I will appreciate any suggestions…..once again, I love it! Thank you
Yes the base is gray and I used clear and dark wax to protect it. Consider maybe doing a wash and dry brush combination? Especially if you want a beachy driftwood look and want it mostly white without a base of gray. If you did a white base the dry brushing wouldn’t be very noticeable.
Just found you through pinterest. I’m loving this technique and would like to use it on a couple of my current furniture. Do you have to use chalk paint for the base colors (gray and white)? Or can I just use a flat regular paint and use the wax over them? Does the white color need to be a bright white, or can it be more of a cream color? Thanks.
Thank you so much! This was perfect. I did this on a dresser yesterday and when I started waxing overtop it is rubbing off the paint? Just the dry brushed layer. Should I wait longer to wax it? Thank you!
That’s MY problem, too, Kjirstin. I hope she sees this and can solved our problem. My lovely dry brushing waxes right off.
Thank you for the instructional video. I also have to comment on your beautiful skin. I made my husband come and look. Do you even have pores?? LOL.
Lol!! Oh man thank you! I laughed so much as this! Makeup certainly helps! 😉
This is the best tutorial I’ve seen on the dry brush technique!
Thank you for the video because I was NOT understanding how to do this! I just finished chalk painting chairs in a cream color, would you recommend a lighter version of it to dry brush with?
Thanks!
Usually dry brushing is done with a lighter color but you can try it with a darker color! Just depends on what you want! I’d experiment on both sides and paint over the side you don’t like with the base color.
This helped me so much! Thanks!
Thank you for this great video. So well explained, I learned a lot!
This is such a great tutorial!!! I love the technique and you are beautiful!!!!
Love this tutorial; it’s very helpful. You give all the tips needed to make the piece look its’ best. Would love more of your tutorials; you do a great job. Thank you.
Can I start off with a darker blue then use lighter blues after the dark blue base please? Thank you
Can I start off with a dark blue base then use lighter blues to go over the darker blue please? Thank you
Yes, I’ve done that and it is great idea!
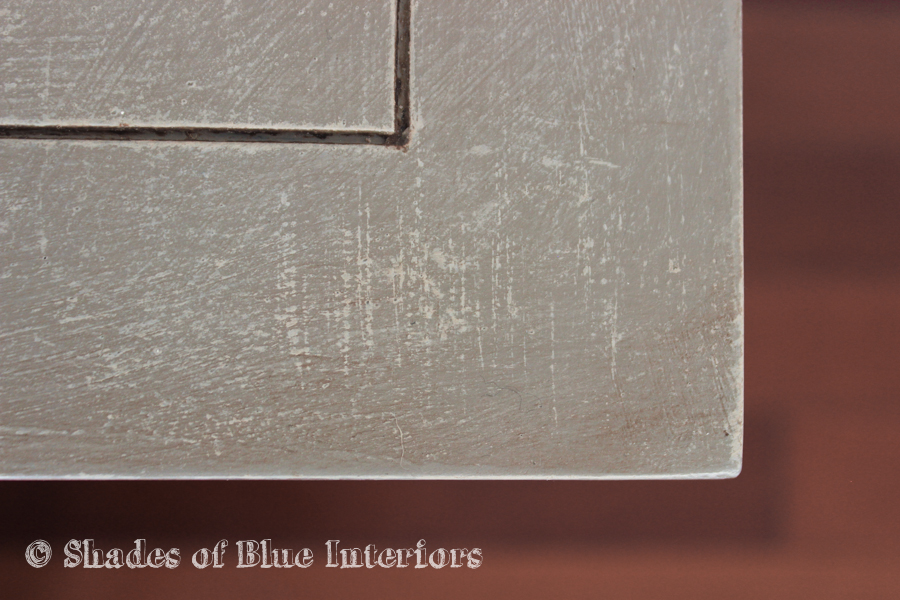
Thanks for this great tutorial – just what I was looking for and really love the look you achieved. I especially like how you used French Linen with Old White on top of French Linen, i.e., not having a big color difference between the base and the color you’re using to dry brush with. It looks like you distressed it by sanding the edges too. Was that after dry brushing? (Apologies if you said that somewhere and I missed it.)
Yes I used a course grit on the edges so it wouldn’t completely get rid of the dry brushes in other areas… like 80 or 100 grit.
Rachel,
Just found your site by way of Pintrest. Thank you so much for the video tutorial. It makes a huge difference in the learning to see the application in action verses reading without visual. Your verbal instructions are consider and easy to “get.” I’m getting ready to do a dining room table so I will take your instructions to geart….
Rachel, would it work to dry brush over a manufactured piece of
furniture with its original finish? I have a beige dining table and hutch with tightly woven cane back chairs. I would like to lighten these and attain a more beachy rustic look. Can I just dry brush white over these without painting them again?
Yes, absolutely!
VERY helpful 🙂 have looked at several videos and yours was by far the best.
How does this look differ from wiping off the top layer with a damp cloth to expose the layer underneath? There are so many different techniques!
What finish, color name and brand of paint did you use as your base layer? I love the look!
Hi Rachel,
Have you tried any modern makers finishes (specifically their dead flat finish)?
Hi Rachel
Awesome job! I love the technique. Any chance i missed how much of white and gray paint you mixed?
Hi Rachel, you mentioned that dry brushing is best to do on furniture that has detail. I have a tall jewelry cabinet with not alot of raised, detailed areas. Which technique would you recommend for this type of furniture? Any feedback would be greatly appreciated. I love the pieces of furniture you paint…. they are beautiful!!!
I’m always looking for new techniques to try on furniture; I can’t wait to try this one! I have a cedar chest that will be receiving the benefit of this tutorial! Today may be the day, weather permitting.
Really helpful! Especially the details about the flat surface vs. detailed surfaces…that saved me some regrets, I think!
Terrific tutorial. I hate sitting through 5 minutes of chit chat before technique starts in other videos. Your time lapse is great, and your instructions specific. So well done!
Very informative! Thanks so Much!
I don’t know which is more beautiful – the table or your makeup!! Thanks for the great vid!
Hello there, Thanks so much for this really informative tutorial. Apologies if you’ve addressed this point somewhere else, but do you clear wax the base paint before dry brushing??. It would really help me to know this. Many thanks in advance
No clear wax before dry brushing.
Tutorial was really informative. Watched it several times before completing my coffee table, which came out teriffic. Can’t wait to start something else. L.
Can you give brief instructions in chronological order such as : painted two coats french linen, used clear wax and dark wax, followed by dry brushing with french linen & old white, folowwed by protective top coat …or did you wax again?…just want to make sure the order of how to do each thing is correct in order to replicate the process. Thanks
2 coats paint, dry brush with lighter paint, distress, clear wax and dark wax.
Love your video and can’t wait to try it!! And I agree with everyone who said you’re beautiful. Thank you, Rachel!!
When in the dry brushing process do you apply wax?
what do you use for a top coat to protect it. Wax? polyurethane, varnish?
I am going to dry brush my roll top desk this afternoon. I’ve been really nervous to try it, but after watching your video, I’m ready to do it! Thank you so much!
I just got done dry brushing my roll top desk, you gave me the confidence to do it with your video and it came out great! Thank you so much!! On to clear and dark wax! You are awesome!
How do you choose between glaze and dry brushing? It seems oftimes the pieces would suit either.
My mother’s 1960s Mediterranean style bedroom set needs an update. Any suggestions on what technique would be best for this style? Colors? It has a lot of ornate detail on the drawer and door fronts…and, is solid wood and quite heavy.
Hi, I have a vintage 2 tier heavy table I painted in AS green. It is dark and I really like, but I would like to dry brush it. Would you recommend mixing the Paris Grey with this green to do a dry brush? I am a little timid about doing it. Thanks. I love the video of the grey table you dry brushed.
Thanks.
Hi Rachel! I am repainting an entry bench. It has a maple color stain on it right now. I have two questions. 1)Do I need to strip the stain off first before painting? 2) can you recommend a paint color? Our walls are gray and I’m not sure that I want a gray-ish bench.