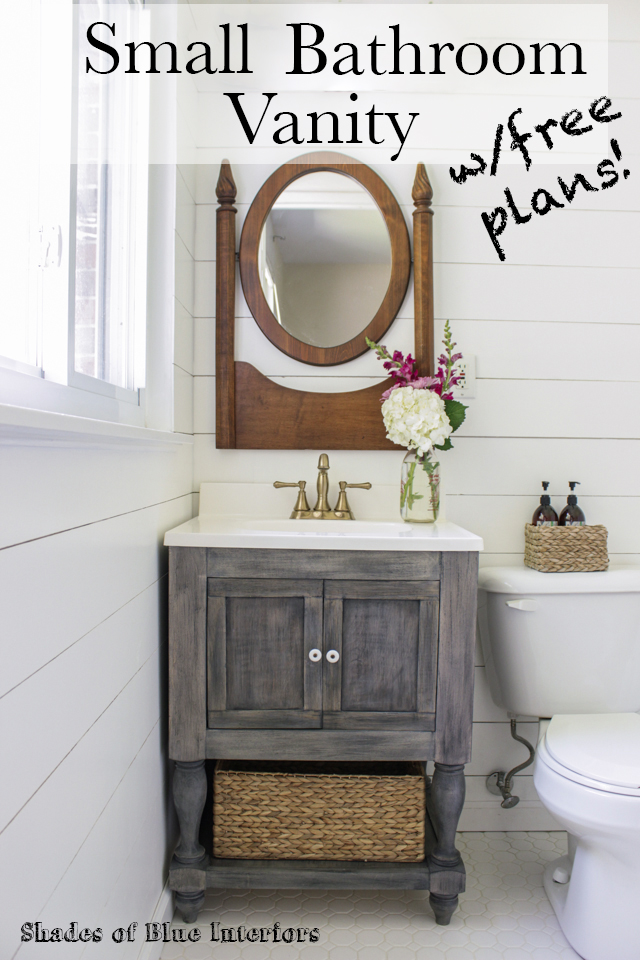
I have more master bathroom progress to share! If you need a refresher for this space, go HERE to see my design plans for the room.
This one has been done for awhile, but I JUST finally got the digital plans finished! Big thanks to Jamison from Rogue Engineer for cluing me into the fact that Osborne Wood has CAD files of all their products on their website (so I could stop agonizing on how to create turned legs in SketchUp)! And a HUGE thanks to Osborne Wood for sending me the turned legs that make this vanity absolutely perfect!
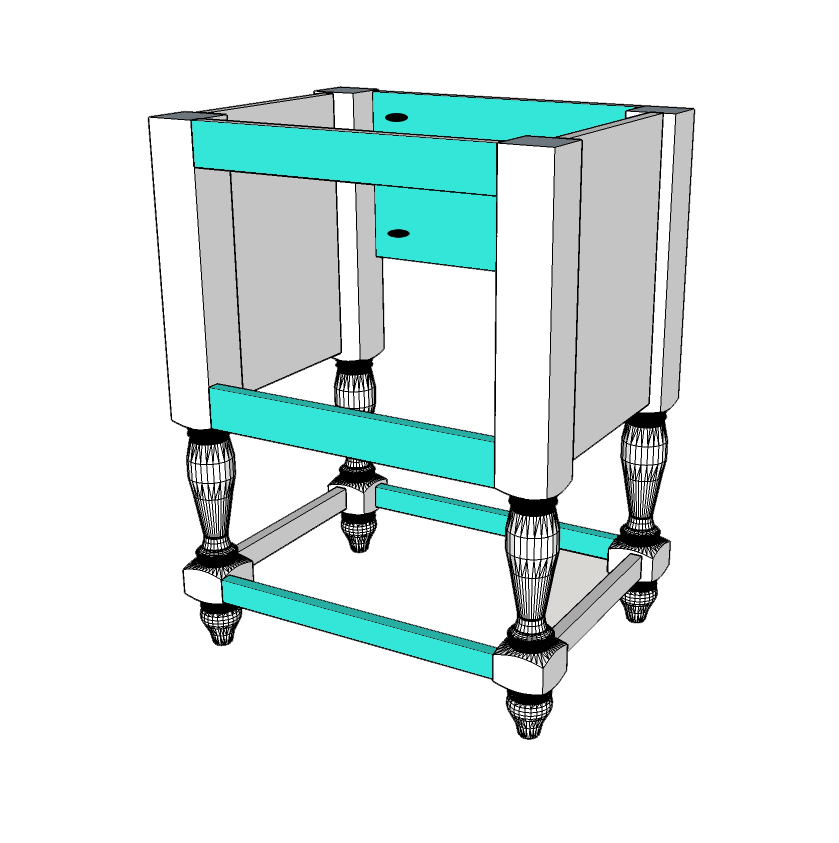
This vanity is basically a smaller version of one I fell in love with from Ana White. It was her Turned Leg Vanity that she built for her Momplex, inspired by a PB one. Even though it looks small, it actually has more storage than our previous vanity that had two long cabinet doors!
Vanity Base Dimensions: 24.5″ wide x 18.5″ deep x 32.5″ tall
Bottom shelf opening is about 10″ high, 18″ wide, 12″ deep
DOWNLOAD FREE PLANS HERE
Tools Needed:
(affiliate links below are what I use)
Electric or pneumatic nail gun (optional) or hammer
Measuring tape
Safety glasses
Hearing protection
Shopping List:
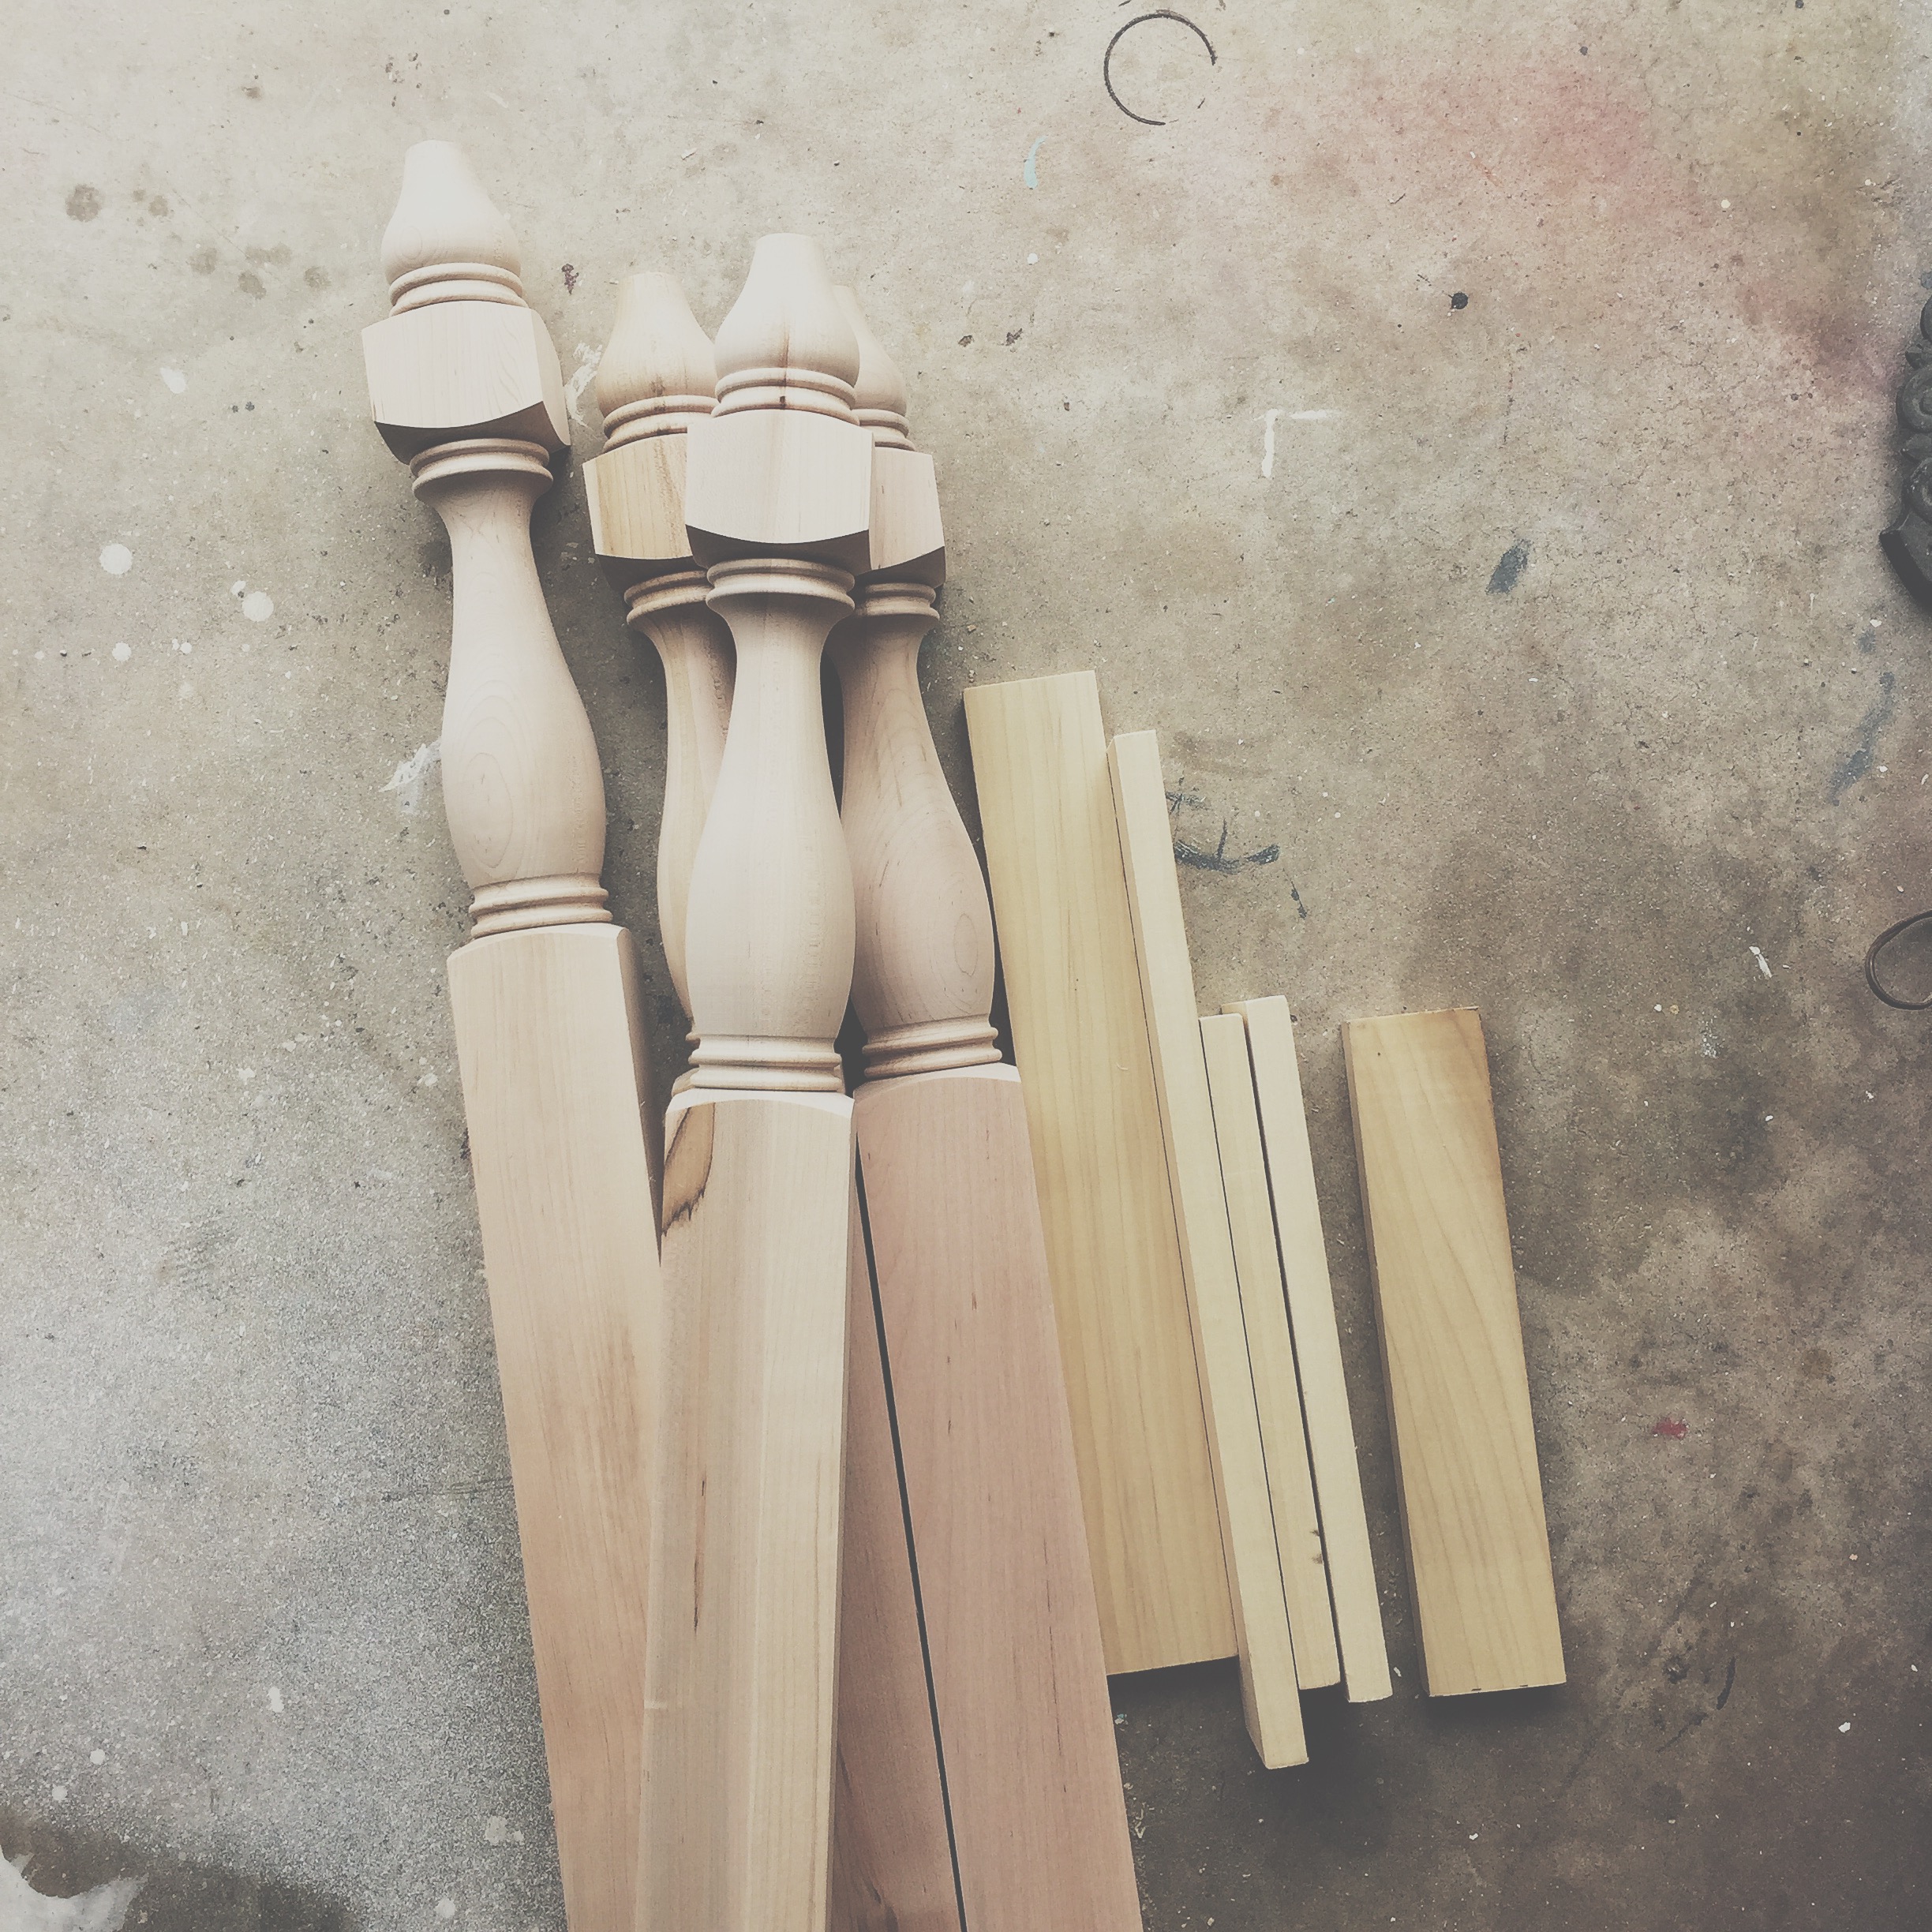
4, 35.5″ x 3″ Marshall Island Legs by Osborne Wood in Soft Maple
1, 8′ length of 1×3 poplar
1, 12′ length of 1×2 poplar
3/4″ ply, 4′ x 8′ sheet Purebond birch plywood
1/2″ plywood, 2′ x 4′ sheet Purebond birch plywood
220 grit sandpaper
1 1/4″ pocket hole screws
1″ pocket hole screws
1 1/4″ nails
4 euro style inset hinges
2 knobs
Stain and top coat of choice
Cut List:
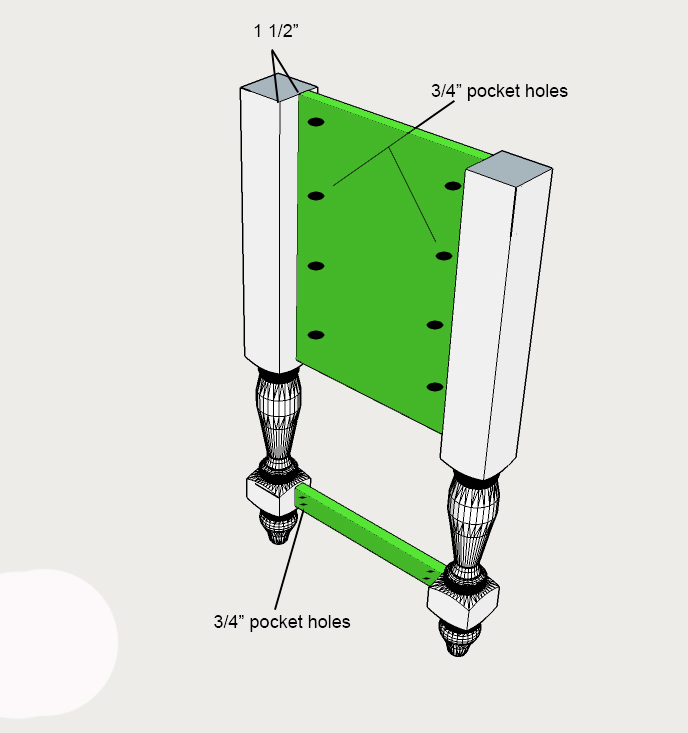
4, 35.5″ Marshall Island Legs @ 32 3/8″ (3 1/8″ off the top)
2, 3/4″ plywood @ 12 1/2″ x 17 1/8″ (sides)
1, 3/4″ plywood @ 18 1/2″ x 10″ (back)
2, 3/4″ plywood @ 16 1/2″ x 21″ + notches cut out of each corner – 1 1/4″ x 2″
2, 1/2″ plywood @ 6 1/8″ x 9 3/8″
2, 1×2 @ 12 1/2″ (sides of bottom shelf frame)
2, 1×2 @ 18 1/2″ (front and back shelf frame)
4, 1×2 @ 9 1/8″ (cabinet door frame – top)
4, 1×2 @ 9 3/8″ (cabinet door frame – sides)
2, 1×3 @ 18 1/2″ (front frame)
4, 1×3 @ 12 1/2″ (side trim)
**Remember to measure twice, cut once! and Before attaching anything with screws, use wood glue and clean up excess with wet rag! If wood glue dries on wood surface, wood will not absorb stain.**
Step 1:
Drill 3/4″ pocket holes on sides of 3/4″ plywood (the long sides of the 17 1/8″ x 12 1/2″ pieces) and 1x2s. Attach to 3/4″ plywood to legs, so the top is flush and there is a 1 1/2″ space from the inner corner of the legs to the plywood, using 1 1/4″ pocket hole screws. This will leave a 3/4″ ‘inset’ on the ‘outside’, which will allow the trim to be attached and flush at a later step. Attach the 1×2 to the bottom of legs, with the same inset.
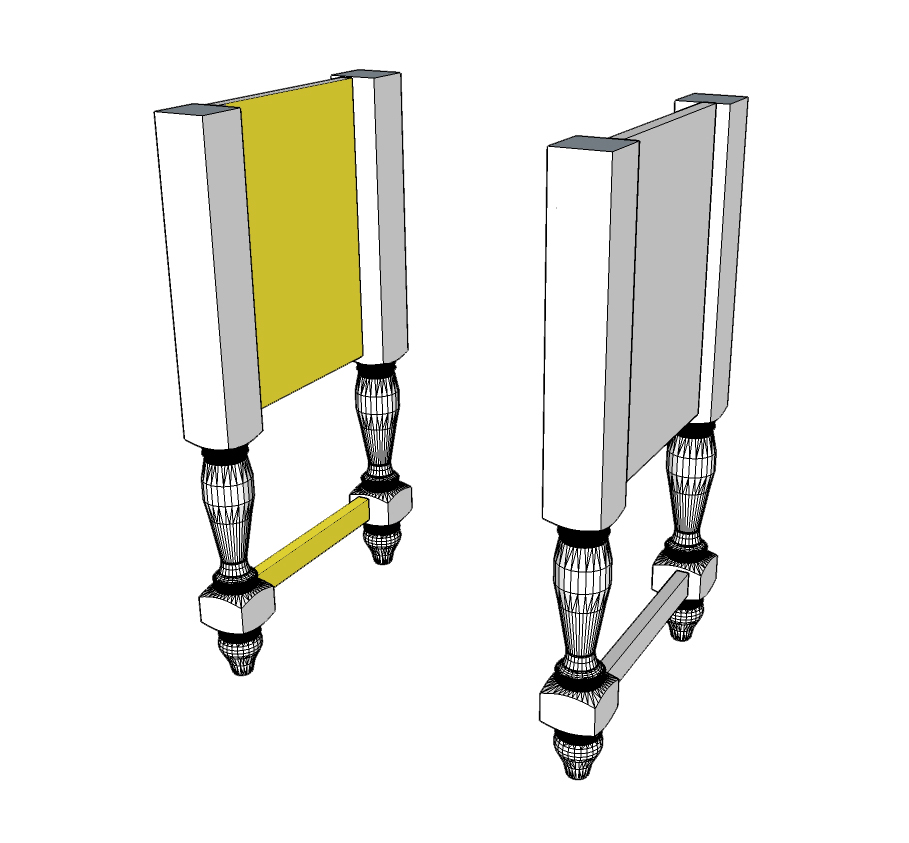
Repeat process for the other side.
Step 2:
Drill 2, 3/4″ pocket holes on either end of the 1x2s for the front and back of the bottom shelf frame. Drill holes of the same size for the 1x3s of the front cabinet door frame, and the back 3/4″ plywood piece. Attach with 1 1/4″ pocket hole screws.
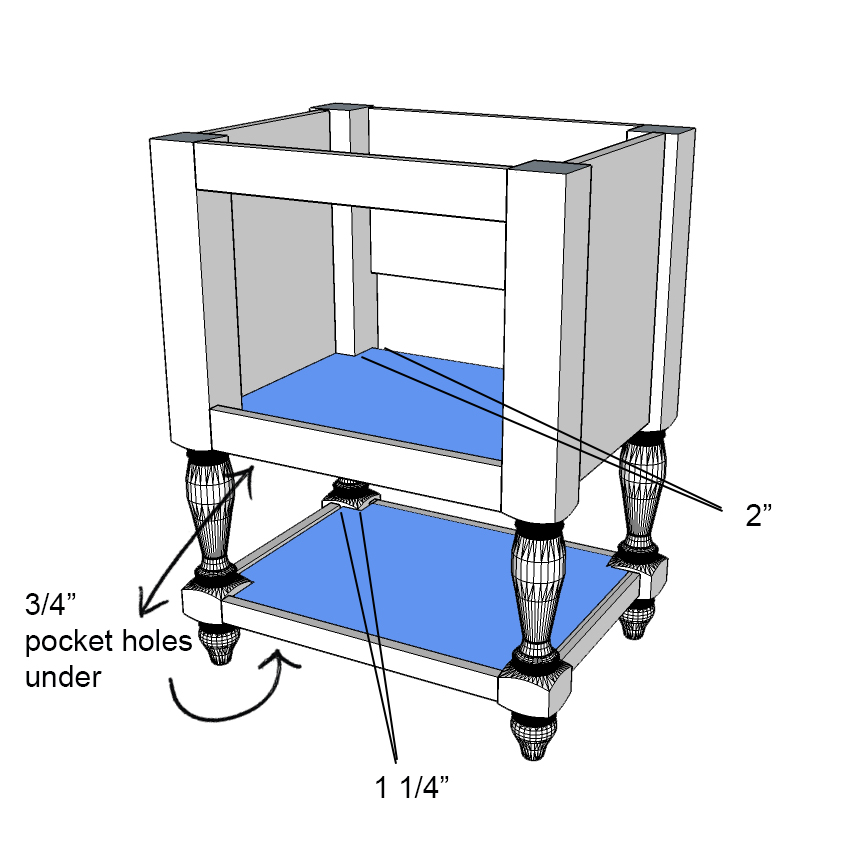
Step 3:
Notch out the base of the cabinet and the bottom shelf using the above guideline. Note that you will likely have to dry fit a few times and make minor adjustments so the shelf will fit before making 3/4″ pocket holes and attaching with wood glue and 1 1/4″ pocket hole screws. Allow a small inset (1/16″ or less) from the top of the shelf (3/4″ ply) to the edge of the frame (1×2) of the bottom shelf, so that when you attach the screws, it doesn’t go through all the way. Small gaps can be filled with wood filler and sanded smooth.
Turn the vanity upside down when attaching the shelves and attach the cabinet base one first, then the lower shelf.
Step 4:
To build the shaker-style doors, simply drill 2, 1/2″ pocket holes along all four sides of the 1/2 plywood. Then drill 3/4″ pocket holes into the 9 3/8″ long 1x2s. Using 1″ pocket hole screws, attach into the plywood to the 1x2s on either side, allowing a 1/4″ inset on the front. The back should be flush.
Step 5:
Attach the top pieces of the doors, first screwing in the side 1x2s to the top and bottom 1x2s with 1 1/4″ pocket hole screws. Then screw the plywood into the top and bottom 1x2s.
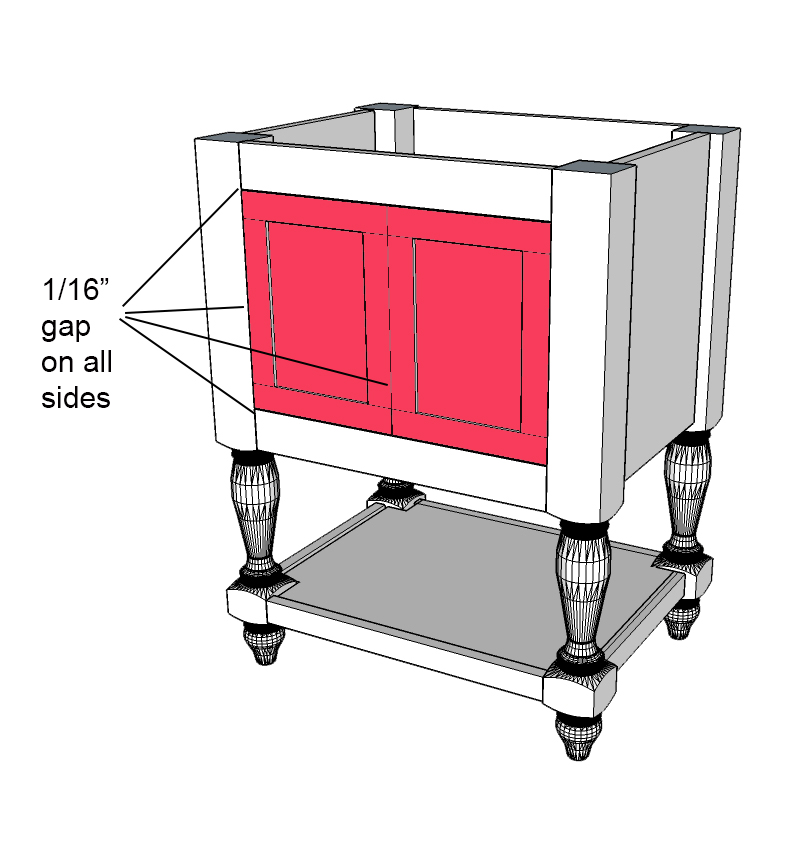
Step 6:
Hang the doors in the opening of the vanity, allowing 1/16″ gap on the top bottom and either side where the hinges will attach. Attach the euro style inset hinge by marking, pre-drilling, and screwing into place on both the legs and the doors. Doors should be touching each other so they can stay closed.
Step 7:
Mark, pre-drill, and attach knobs.
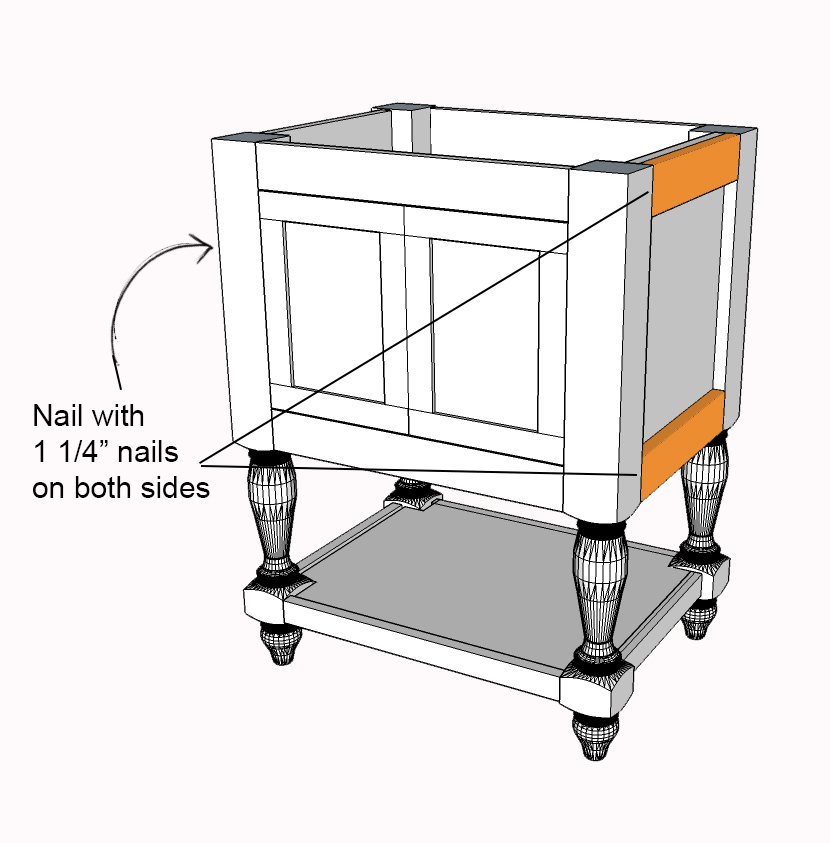
Step 8:
Attach side trim pieces so both the bottom and top are flush, using 1 1/4″ nails and a nail gun.

Step 9:
Fill nail holes and gaps with wood filler, let dry, and sand entire vanity smooth with 22o grit sandpaper.
Step 10:
Paint or stain with desired color and apply a durable top coat that is water-resistent, like an oil-based poly.
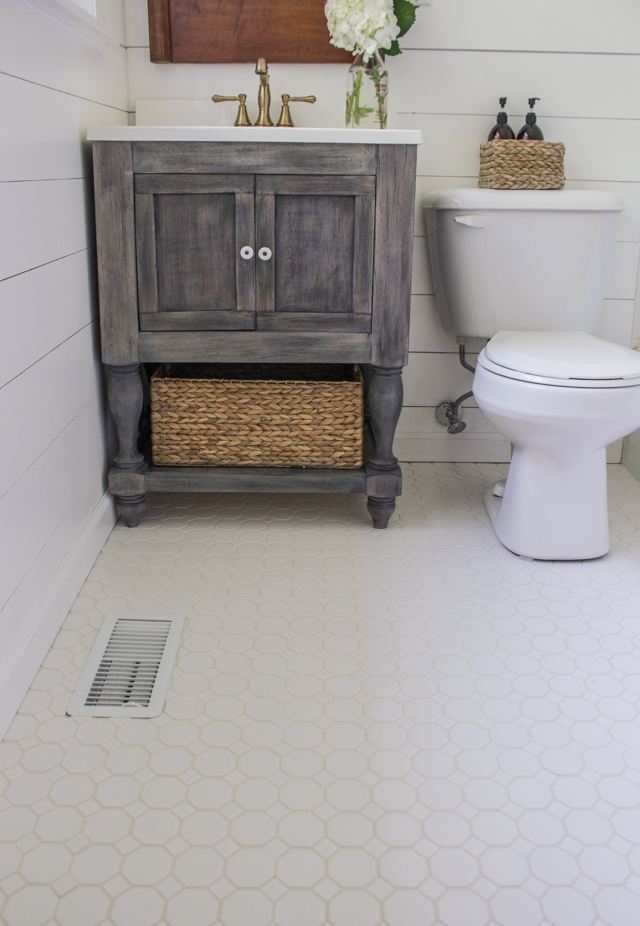
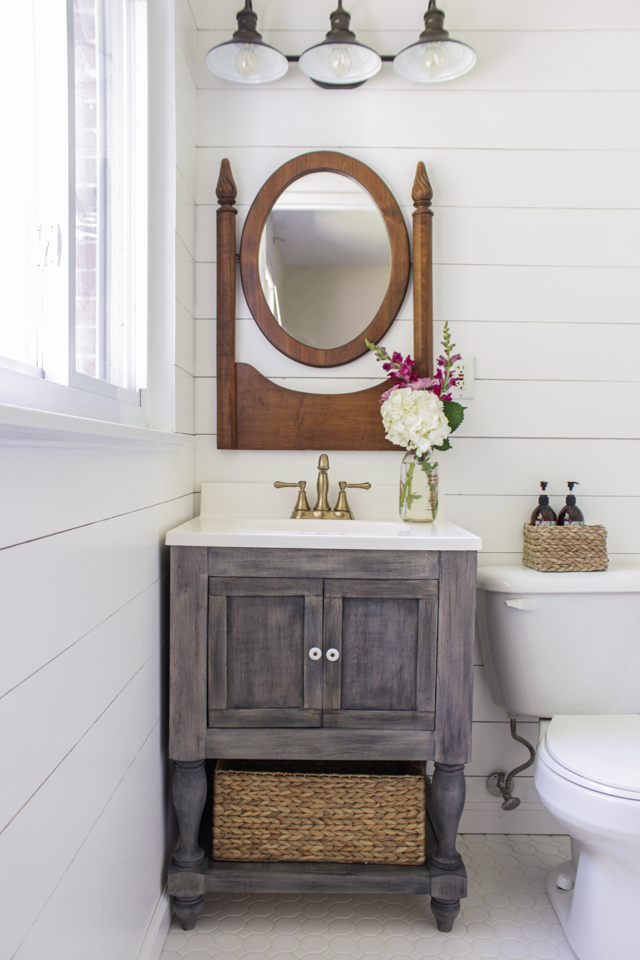
What a difference between the unfinished and finished, right? The legs are full of character and I can’t get enough of the curves! I chose the soft maple because I knew I wanted to stain it, although they have several other wood options.
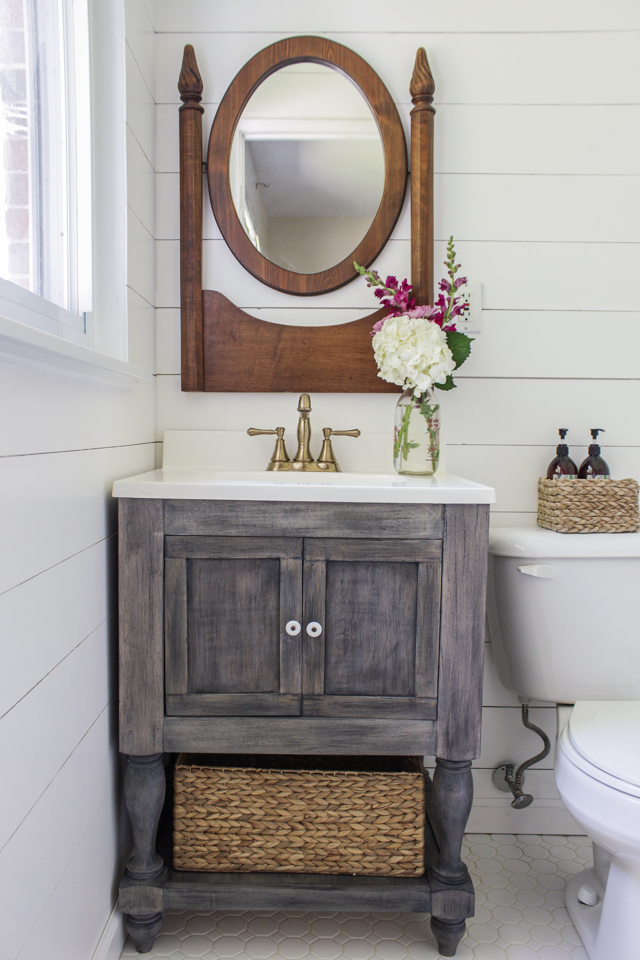
I wanted a slate, weathered gray finish, so I used Rustoleum Weathered Gray Stain, and then I dry brushed with Annie Sloan Chalk Paint in Graphite. Last, I sealed the whole thing with my go-to: Minwax Wipe-On Poly in Satin.
I re-used the old sink top (which was in good condition still) and used an old dresser mirror I had in my stash. This saved quite a bit of money. The faucet is new though.
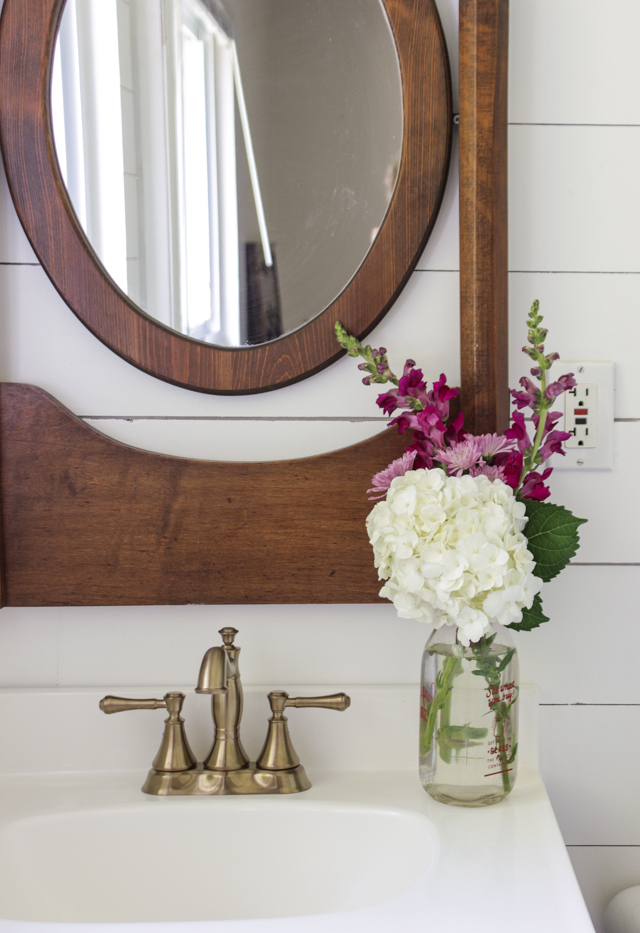
The faucet is my lover (haha!)…I’ve never been head over heels with a faucet, but there’s a first for everything, right? It is the Delta Cassidy Centerset Faucet in Champagne Bronze.
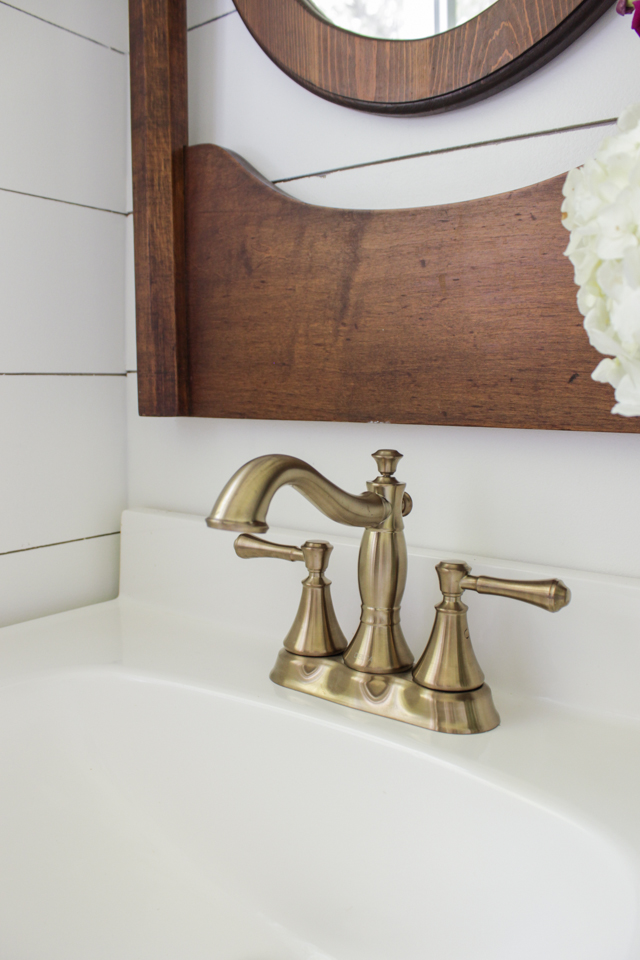
Can we just get a ‘hallelujah’ for the finish of Champagne Bronze? It takes a pretty, classic design and makes it WOW!
But back to the vanity… I love it. This tiny bathroom and my master bedroom have become my favorite places to be in the whole dang house. And I love my house!
I still have to do a couple finishing touches and I’ll be ready to photograph the whole thing, including the floating shelves which aren’t pictured here.
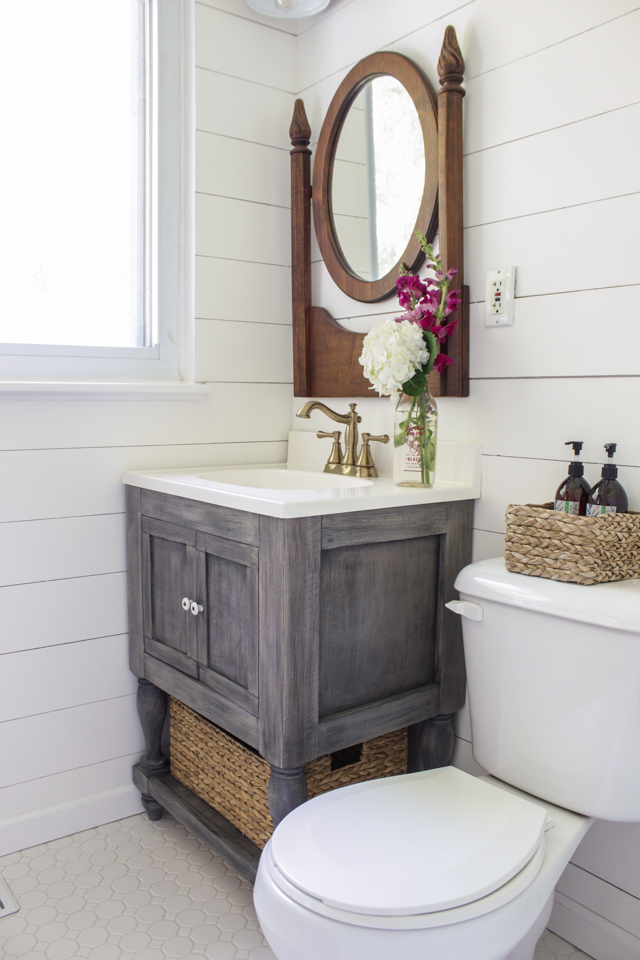
Notice the tone-on-tone tile… I chose an off-white grout so you could still see some subtle contrast, adding texture, but still clean and bright. I mentioned this before, but we used Fusion Grout which has the sealer built in, so it doesn’t get stained and dirty. Grout and tile were purchased at The Home Depot.
The plank walls match my bedroom wall and were painted with the same color: Benjamin Moore Simply White. My light fixture was on back-order when I took these pics, so this farmhouse style one was my stand-in for the pics. Rest assured the real one in antique brass that is all kinds of fabulous, will be arriving soon and you will see it shortly after!
So what do you think?
P.S. This post contains an affiliate links. I also was provided with the Marshall Island Legs from Osborne Wood and the faucet from Delta Faucet for this master bathroom makeover! I absolutely love the products and would not mention them in my posts if I didn’t feel honest about endorsing them. 🙂
I think you’re brilliant!!!!
I love how it all turned out! Not only did you design a cute vanity, but you packed a lot of farmhouse charm into a little space. Making a small master bathroom flow so seamlessly is not an easy thing to pull off. I am so inspired to get working on my downstairs bath!
LOVE it!!! Well done.
Wow! This is beautiful. And so simple without looking simple.
Posts like this really give me hope that I will manage my own custom vanity one of these days.
O.M.Goodness I am so excited about this. It is exactly what I have been looking to make!
The bath tub is not shown. I would like to see that part of the project. Love your plan! We have a contractor lined up but says it’s to hard to lift an iron tub up stairs. What did you do about the tub area?
Love it:)
Would love to know the cost to build – I know you reused the countertop and had some donated items, but your best guess overall, so I could bolster my courage and try this!
I have a teeny bathroom (the only one in the house) that is dilapidated and needs some love:)
The turned legs are the most expensive but the rest is super affordable… Total it would cost about $160 if you got the legs from Osborne Wood like I did.
Is it possible for you to have a download link to the sketchup file too? I would love to build two of these (size is spot on for the main bath but for the even smaller half bath, I’m going to need to slightly modify it!)
hmmmm I could email it to you! Give me some time this weekend and I’ll send it to you!
Rachel,
Would there be any way you could do the same for me? I know this is a while afterwards so hopefully you’ll see this but I’d need to adjust dimensions a bit based on my bathroom but I absolutely love this piece! Would really appreciate it 🙂
I’m sorry, I don’t do custom builds. A great resource would be to find a local furniture builder (usually you can find what they are building and selling on craigslist).
Oh I’m sorry, I thought the previous poster was saying they had to adjust the sizing as well. I must have misunderstood what she meant.
I love what you’ve done- everything! I use Minwax Wipe-On Poly in Satin, also. I used it for a desk,multiple coats for protection – however, i found that there’s a ‘sticking’ factor when i put something on it, a glass, for instance. Have you had that happen any time?
Do you have a picture of the inside of the cabinet? Curious as to how much storage space is inside since the sink sets down into it…
Thank you for sharing these plans. I love this vanity – it’s so similar to what I want mine to look like.
Hi! I live in Alberta, Canada, so shipping from osborne would cost me an extra $100. Any suggestions of places to find similar legs?
where can I get a sink for this specific size?
This is so perfect! What is the size of the sink top that you reused? I want to be sure I can get a standard sized top to fit 🙂
Love this idea! We have a small downstairs bathroom that we are going to remodel in the future and this vanity is the perfect size! Plan to make the top a solid piece and put a porcelain vessel sink in white on the top of it. Going to stain with an antique black gel stain and satin poly with brushed nickel faucet and door knobs. This is just what I’ve been looking for!
Hi! These are great plans, and I’ve successfully built this for my project. I have a few clarifications in the plans I think might help other prospective builders:
1) In Step 3, you really don’t need the pocket holes for the cabinet shelf in the back, or at least the plans don’t describe what they attach to. You will only be attaching pocket holes on 3 sides for the cabinet base.
2) Be sure on the measurements for the “notch outs” of the base. As the Osborne Woods legs have a 3″ diameter, placement of the 1×2 is critical. If the front/back are to be flush with the front, the notch out would be 2.25″ not 2″ (as a 1×2 is really .75 width)
3) I was pretty unhappy with the “Weathered Gray” stain, at no fault of the poster. It’s the look I was going for, but for some reason, my “weathered gray” application turned out looking slate blue-ish (I’m also using soft maple Obsorne legs, poplar trim and maple plywood)
4) Be very careful installing euro-hinges into 1×2’s on the doors. There isn’t much room for error. The hinges will also be quite close together as the pocket holes take up decent space.
This is a beautiful cabinet and the poster did a georgeous job! Thank you for taking the time to add the modifications!
What size is the sink top?
This vanity is great, but the real question is… where did you get that mirror??
Can it be made bigger? We have a 36″ now. It could be a little smaller, maybe 30″.
What type of euro hinges did you use? Before I order mine I want to make sure they will work properly
This is a great post! I’m a beginner when it comes to home improvement and this post has given me a lot to think about. Thanks for sharing!