This is a sponsored post ya’ll. National Hardware provided me with barn door hardware, in exchange for this post. My opinions are 100% my own, however… if I didn’t love it, I wouldn’t do it!
As you may remember from our master bathroom progress post a couple weeks ago, I shared that we would be installing a sliding barn door to create more space. Well, friends, today is the day you get to see this lovely addition, in all her glory!
 I was thrilled when National Hardware sent me their new sliding barn door hardware to try out. I chose the oil-rubbed bronze finish, which is more like a satin-finish black and I loooooove it! It is very well made, smooth as butta, and was pretty easy to install.
So, once I had the hardware in hand, I set out to find the perfect door.
Last fall I shared my master bedroom plans, and this door (top right) was my inspiration:
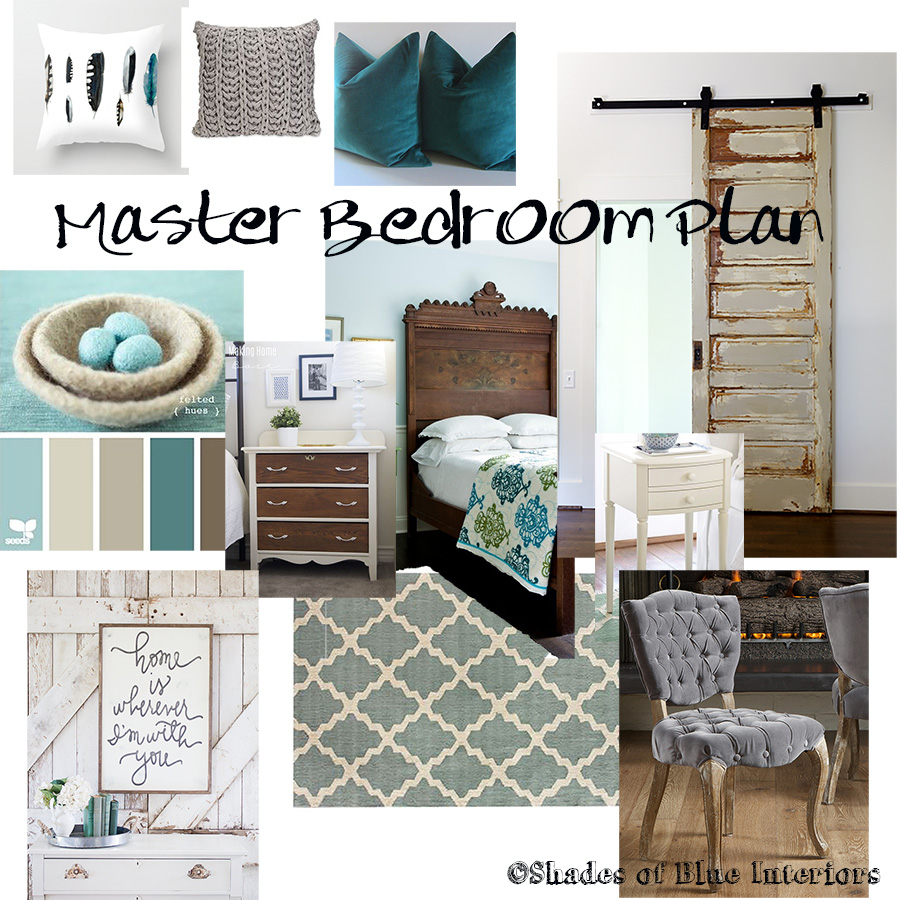
From the pics you saw a couple weeks ago, you saw that I found this old door on craigslist, which was caked in white paint. One side had several layers and the other, fortunately, had only 1 layer of white paint. The layers on the other side were weird colors too… one white, another pink, another pea-soup green, and another white layer… These crazy layers were not going to work, so I set out to create my own authentic, layered look with a color palette that worked with my room.
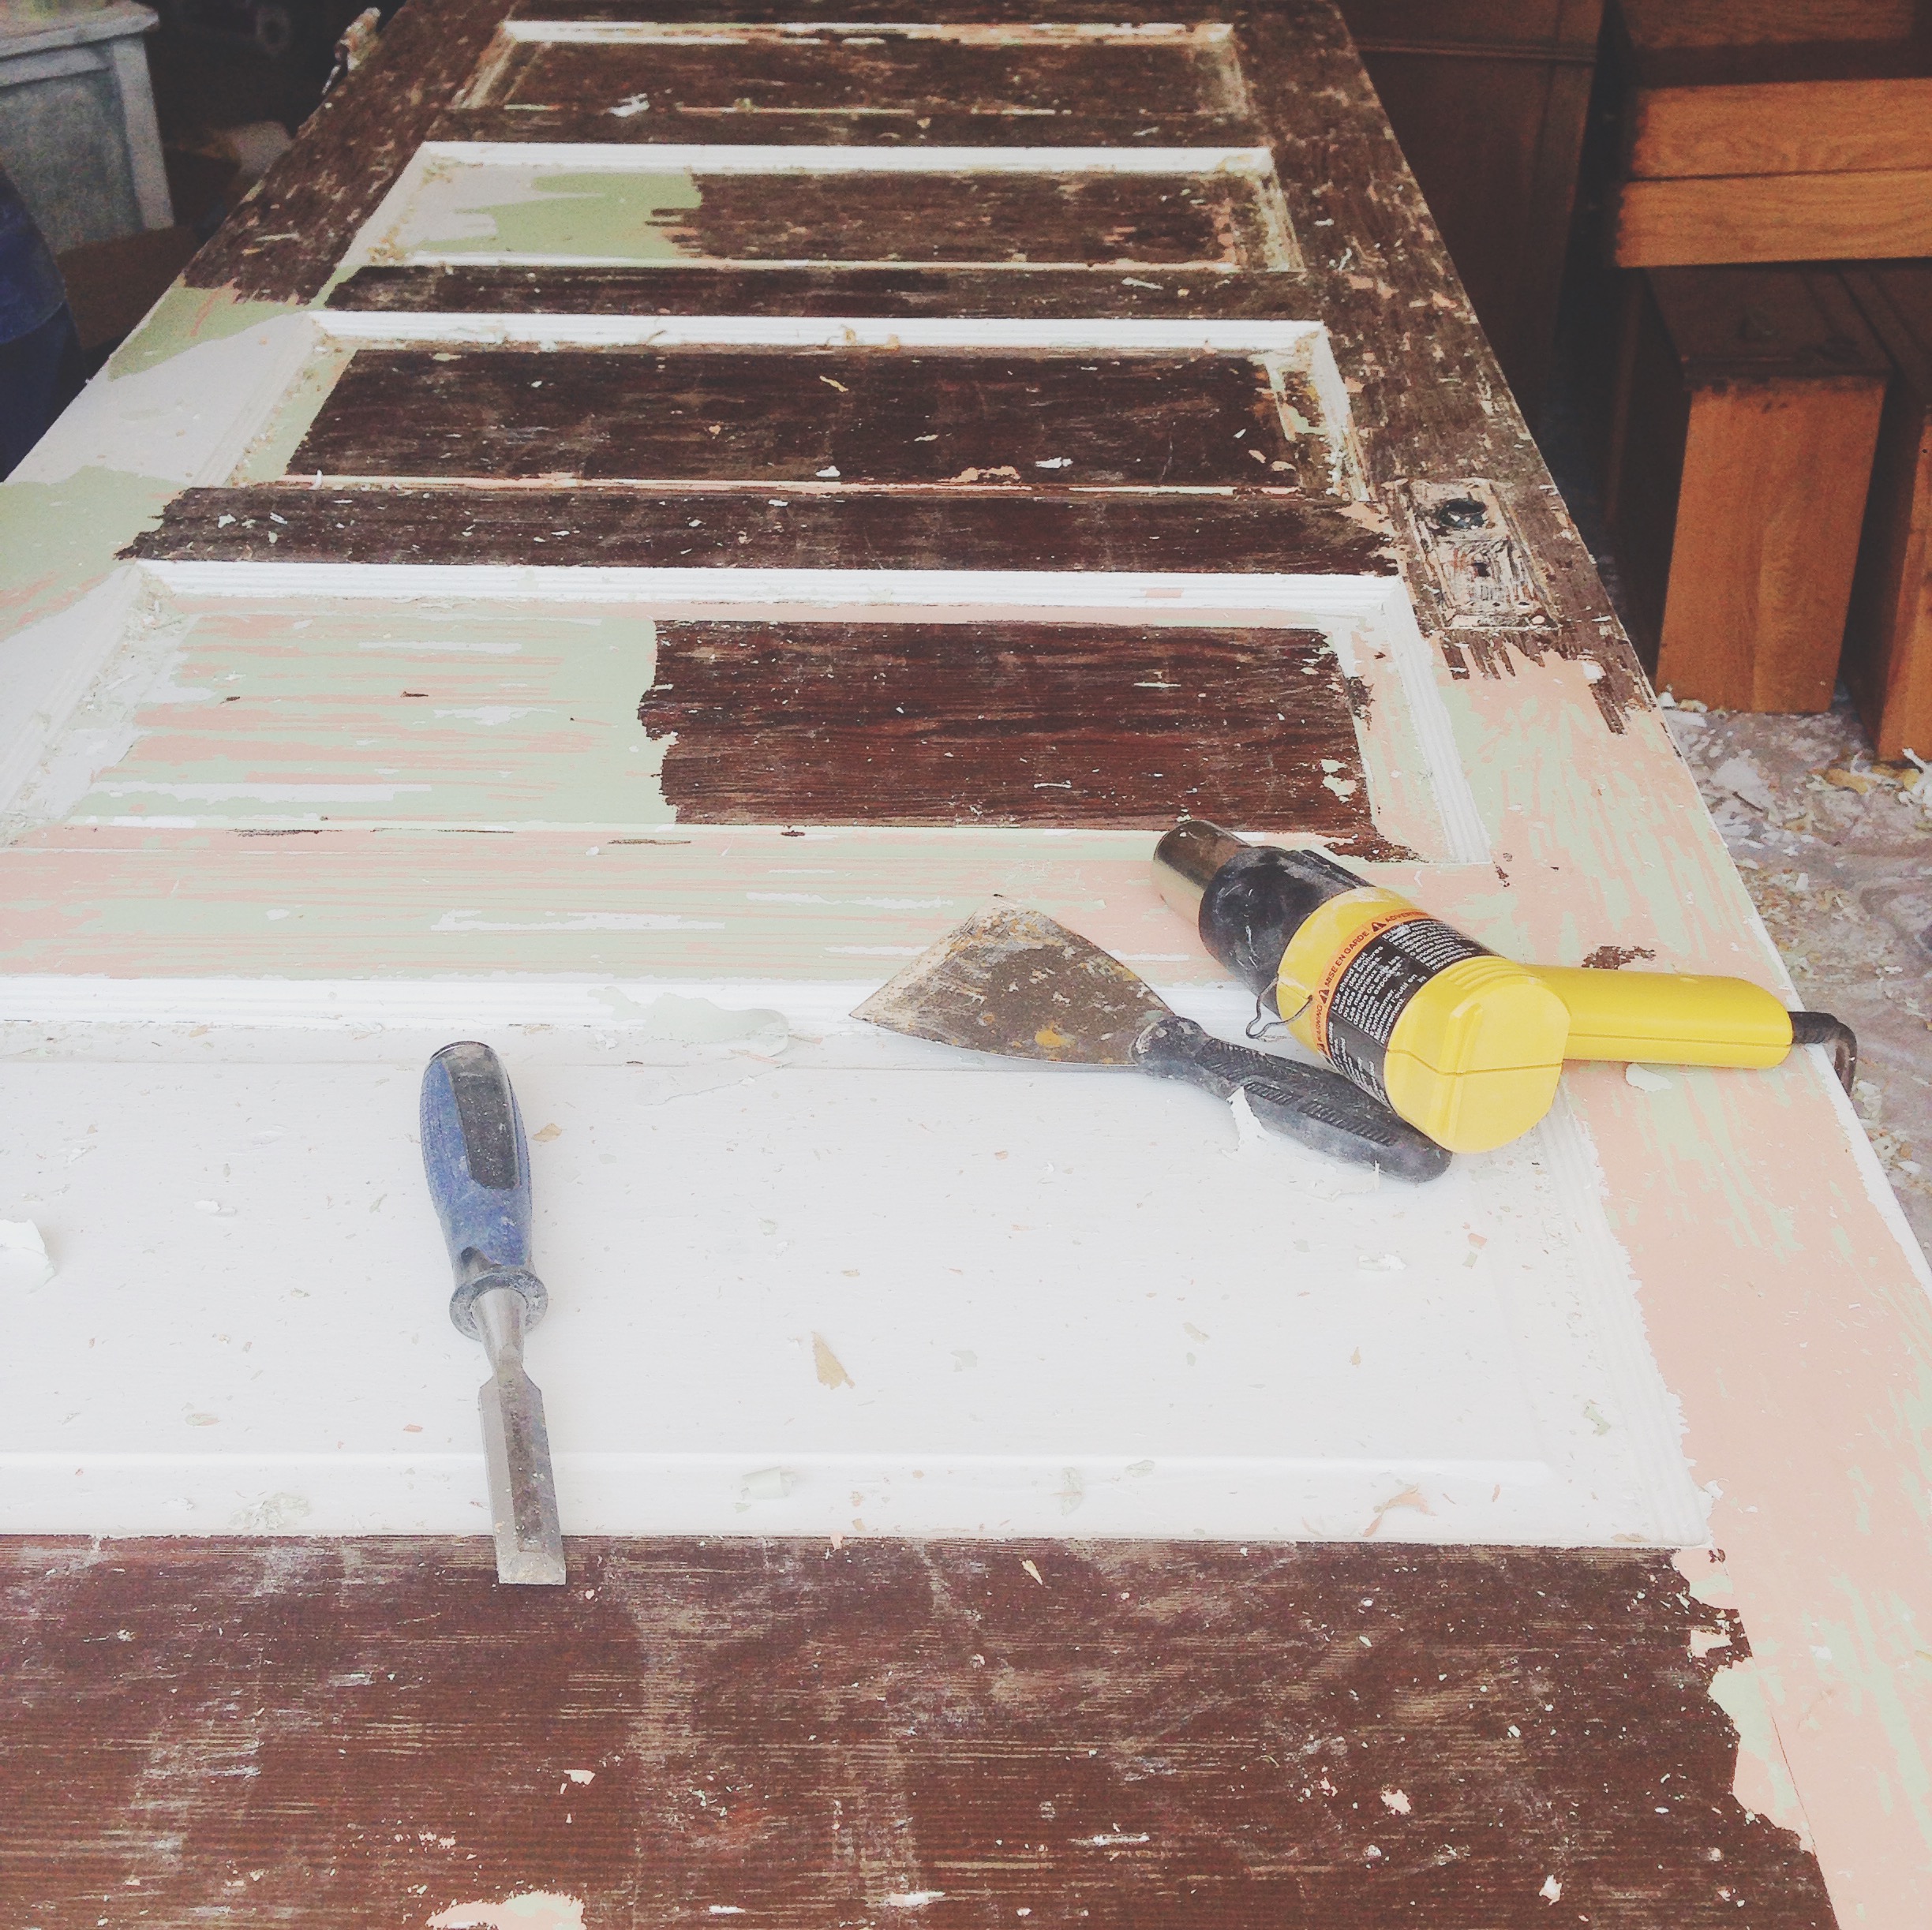
I used a metal scraper to get some of the white paint off, then used custom mixes of MMSMP Shutter gray, ASCP Country Gray, French Linen and Old White, to get this layered, chippy finish.
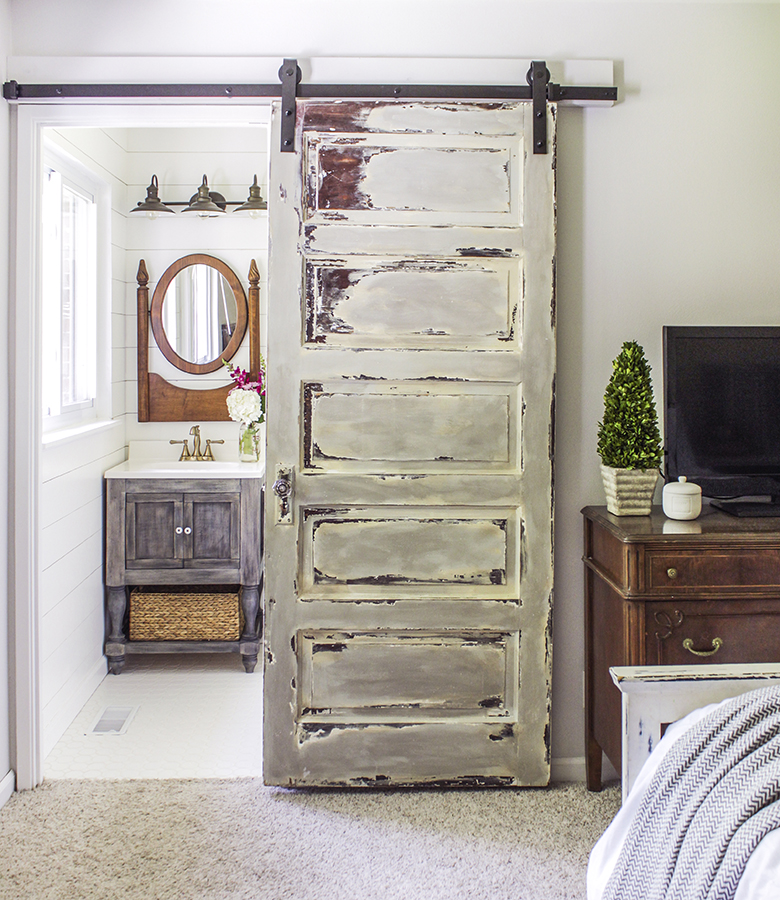
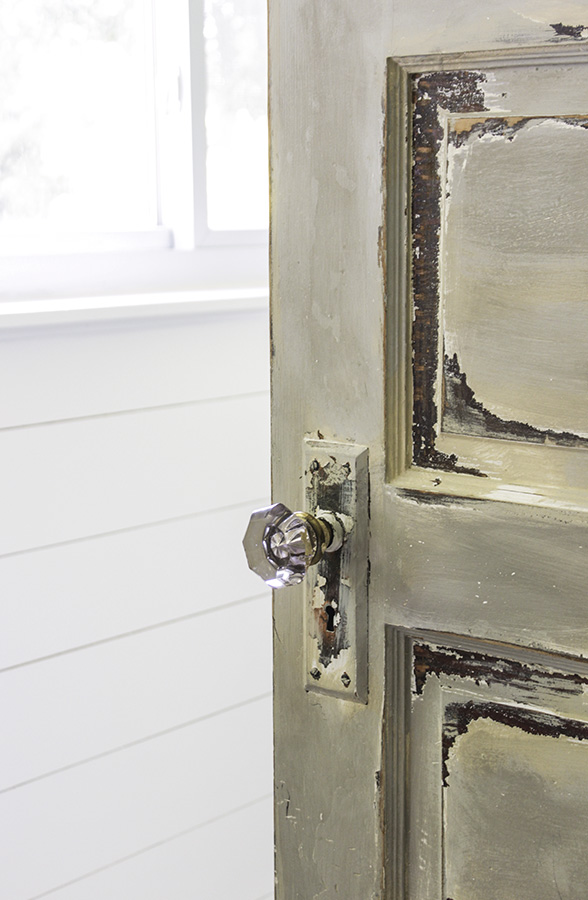
Then, I added one of my glass door knobs I had been holding on to, and it became everything I dreamed of.
Installing was very simple. The instructions provided were quite straight-forward but here is an overview with some tips we learned on the way.
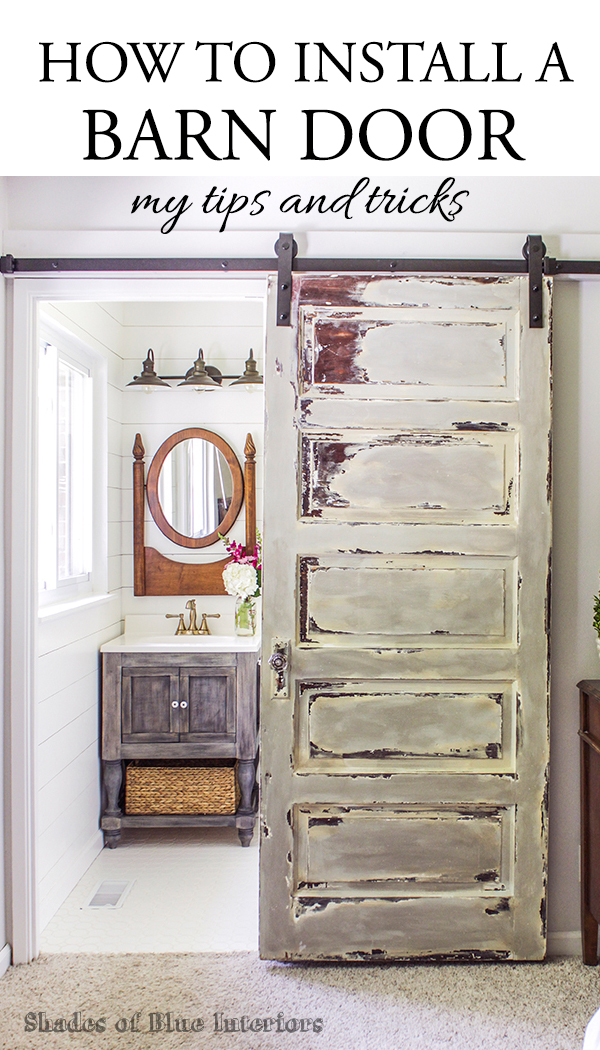
How to Install a Barn Door – My Tips & Tricks
1. Measure and mark where the holes will go on the door, using the template provided with the hardware.
If you use a salvaged door like I did, you might have to deal with the top or side not being perfectly straight. So, to work around this can place the metal strap piece that will be attached, on top of the marks, then draw a line all the way around it. Then you can remove the strap and make sure it is straight using a level and a speed square, or measuring the lines from the center beveled rectangles, making sure they all have the same distance. Also, it doesn’t hurt to stand it up and make sure it looks right, visually.
2. Pre-drill holes in the door where the bolts will go.
Make sure to use a drill bit size larger than the bolt (1/2″ at least), so you can slide the bolt in and out easily when attaching. If not, you will work up quite a sweat trying to screw that bolt in into the door.
3. Attach metal straps using the cap nuts provided.
There are two sizes of bolts that National Hardware sends with the kit. One for a super thick door, and one for a standard door. We used the size for a standard door. Make sure you use the right size bolt for the thickness of your door, or the cap nuts won’t be tight enough and door will wobble.
4. Measure and pre-drill 1/2″ holes in a 1×6 where bolts will attach the track.
The bolts for the track are about 20 inches apart, which is wider than typical stud width, so attaching the track onto a 6′ board (same length as track) is necessary. The instructions call for a 2×6, but after doing this, we decided the gap between the wall and where the door hung was too much (about 3 inches), so we opted for a 1×6, which provides a little more privacy for the bathroom. AKA I didn’t want my children trying to squeeze their mouths through the gap when they were trying to talk to me when the door was shut.
The instructions also say to drill these holes in the middle of the board. Our door was 80″ tall, which wasn’t long enough to reach the floor, if we did this (with an 80″ door frame opening and 1 1/2″ trim on top of that), so we opted to drill the holes 1″ from the bottom of the board (at center), so the top of the wheel would hit at the top of the board. That left about 1 1/2″ gap from the bottom of the door to the floor, which is taller than what is suggested, but we made it work by installing the floor door guide on top of a little wood block, instead of installing it directly in the floor (I’ll explain more later). Basically, all this is easier if you choose a door that is at least a couple inches taller than your door opening.
5. Paint the board to match the wall color.
You won’t want to paint after the track is attached… it will be harder to keep you hardware clean.
6. Use a stud-finder to mark the studs on the wall and board above the door.
Make corresponding marks on the board where the studs are. Before you attach the board to the wall, MAKE SURE you use a long level and trace with a pencil around the board where you will attach it to the wall. DO NOT rely on your door frame or adjacent wall. We learned this the hard way, but our door frame is not straight (probably because we live in an old house), so we had to make adjustments with the board to make sure the door hung level.
7. Screw 1×6 board onto wall where the studs are marked using 2 1/2″ screws.
You will want the level on the top of the board while you are screwing it into the wall. Start on one far end, then secure the other far end, once you make sure it is level. This is where your pencil traced outline of the board on the wall comes in handy. It helps you double-check the level-ness. haha pretty sure that is not a word! Once both ends are screwed in, attach other screws into the wall studs.
8. Attach track to board using 1/2″ socket drill bit.
Trust me you don’t want to attach this by hand. Use an electric screwdriver/drill with magnetic socket attachment bit that allows you to put the 1/2″ socket to it. It goes sooooo much faster. The bolts that hold the track will first go through a metal spacer provided, then into the board, then into the wall. These spacers make it so the wheel hanger doesn’t hit the board. Screw them into the board the same way you attached the board to the wall: put a level on top, start at one end, secure, then secure the other end. Finish by securing the middle two bolts last.
9. Measure and install door stops and jump disks.
You will have to hang the door on first, to measure where you want the door to stop on either end. While it is on there, you might as well mark where you want your floor guide to go as well. It will sit just past the opening of the door. Once you’ve measured where the door stops go, take off either end of the track bolts, slide on the stops, and then reattach the bolts to the track. Jump disks are optional, but you can easily screw them into the top of the door at the same time.
10. Attach floor guide to floor, and hang door.
If your floor guide needs to be elevated a little, like mine did, get a wood block that has has a thickness that allows a 1/4″ clearance from the floor guide to the bottom of the door (mine was about 1 1/4″ thick). Then make sure the width and length are about 2″ long and the thickness of the door plus 2 inches (so about 4″for me). Screw the wood block using 2″ screws into the floor where you marked the floor guide should go. Hang door, making sure to fit the door into the floor guide.
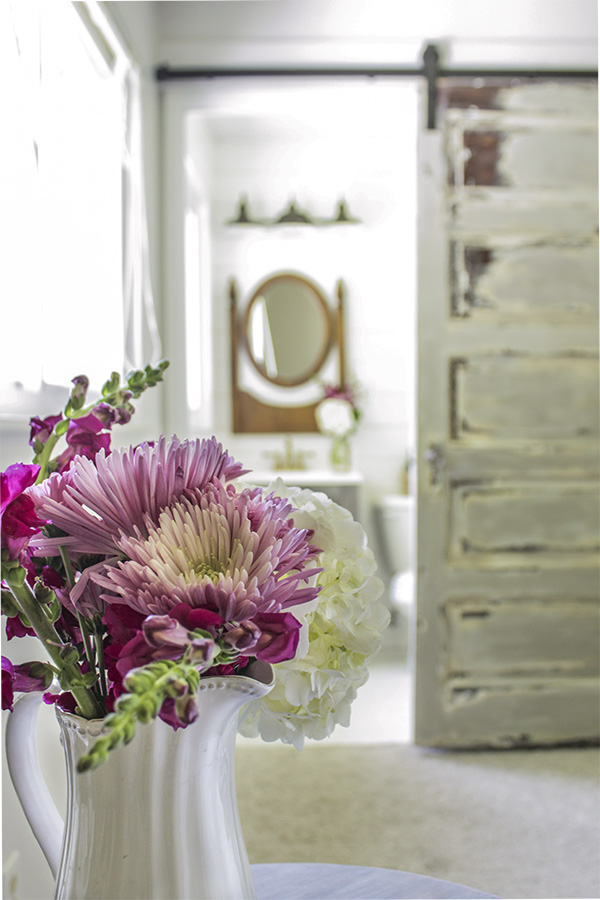
This door is one of my favorite aspects of not only the bathroom, but our master bedroom also, as it makes quite the statement! Our tiny bathroom now doesn’t feel quite as small, since there isn’t a normal door swinging in and out, but instead allows more usable floor space.
I highly recommend National Hardware’s sliding barn door hardware. Our tiny master bathroom has become our favorite makeover in our home to-date, and the door is a huge reason why.
This hardware that I was provided with is available starting August 2015. To purchase, go HERE.
**affiliate links included in this post.
um hi. you are killing it lately. LOVE.
That’s what I keep saying Cas…:)
Rach! I love! You’re amazing!
Seriously cute!!!
Looove it! Great tips!
Could you share a link to where the National Hardware kit is? I can’t find anything that looks like what you’re showing on their site. Thanks!!!!
Hi Brittan! The hardware kit I was sent and describe in this tutorial will be available next month (around that 1st I believe!) I will be notifying my subscribers when it becomes available as it is a brand new product launch!
Love the idea
Hi Rachel
I followed your tutorial on painting fabric and waxed the fabric before I saw your post suggesting not to wax if you don’t want it shiny. Since I waxed it can I sand it to get the matt look back?
Karen, once fabric is waxed, there is no way to remove it. Also I only suggested not waxing the fabric if it is velvet fabric…. I didn’t say anything about shiny-ness. Velvet holds more of the wax in the nap so it becomes stiffer— that is why I suggest to not wax velvet. I would suggest waxing smooth fabric bc it gives it some water resistant protection and makes it more pliable. Good luck.
Love this! I will need to try this! Where do you buy your ASCP? I live in AZ too and love that line of paint!
Thank you! I actually live in St Louis, not AZ but Annie Sloan Chalk Paint stockist can be found if you go to anniesloan.com… just search under the stockist tab… enter your city or zip and up will come the list.
Everything about this project from the idea through to the presentation is TOP!
We will be finding a suitable place to share this very soon!
Jamie
Thanks again Rachel, I hope you like the feature? Regards Jamie
http://www.renocompare.com/2015/09/reclaimed-sliding-barn-door/
Absolutely love all of this! May I ask the source for this lighting fixture? I noticed you switched it out, and this particular one from this post would go perfect in my half bath.
Yup I got it at Lowes: http://m.lowes.com/pd/allen–roth-3-Light-Hainsbrook-Bronze-Bathroom-Vanity-Light/50333847
Thank you so much!
Hi There. I’d love to purchase the same hardware you used, but I am on National Hardware website and I can’t find what you used. Is it actually called “sliding barn door hardware” in their catalog? You said it was available beginning Aug 1, but I’m still not sure I would be purchasing the same thing. Please let us know!
Thanks for the follow up! Here is the link to the exact hardware I used: http://www.natman.com/detail/920-decorative-interior-sliding-door-hardware-n186-960
Is there a way to “lock” the bathroom sliding barn door from the inside once it is slid closed for privacy?
Lisa, Yes we installed a hook and eye closure on the inside so there is an eye screw on both sides of the door frame to keep it open or closed if we want it that way. The hook is on the inside of the door about where the knob would normally be.
Thanks for this do-able project! I’ve got my door and now working on my courage. Ha! Question, what did you do about doorknob on the inside of the door? If I take the backside of the doorknob off the door, the front goes with it! Thanks again for posting this. 🙂
My doorknob came with a smaller metal turn handle thing on the other side that doesn’t protrude much. Looks like this: http://robinsonsantiques.com/glass-door-knob/glass-door-knob-13-16.htm#gk16
Does the door swing at all? I really want one for my pantry door but I’m so afraid it’ll be rickety and hard to open/close.
Each door hardware comes with 2 track options for the bottom of the door– 1 that requires a routed groove at the bottom and you just attach the track on the floor and it keeps it from swinging. The other option is more of a guide-track, that is attached to the floor and had guides on either side of the door to keep it from swinging. I think this would be awesome as a pantry door and it definitely wouldn’t be hard to open.
I used a barn door for my bathroom, but need some soundproofing around the door and opening to cut down on noise. Anyone have any ideas?
We turn on the fan to make any noises less noticeable. I’m not sure there is a way to “sound proof” a sliding barn door. It really has never been an issue for us, but I would say, the only way to make a bathroom more soundproof, is to put a normal door on it, or a pocket door. But even then, they aren’t sound proof. A loud-ish fan is the best way I’ve seen to mask any noises.
Hi Rachel,
This is an awesome idea, I just got a 100 y.o. door and I didn’t know how to use it, now I know. However I do not have a bathroom in our master bedroom, so, the door would be used in the common bathroom, and my question is: Do you have idea how could it be locked from the inside?
Thanks
We put eye screws on both sides of the door frame and the hook screw on the door so it can be ‘locked when it is open and closed.
I am in love ith your barn door! May I ask you how you got that paint effect with the different colors? Did you sand it down after or scrape it somehow? It looks amazing!!
Love this! We are putting a barn door in our master bedroom as well and are using a premise door as well. It was nice to see that you were able to make 80″ work. How wide is your door compared to your door opening and trim?
I find your fantastic idea!! But what is it necessary to buy as equipment to accomplish the mechanism of suspension of door? Beforehand thank you.
Sylvie
(I’m french)
Love this idea and was trying to figure out what size door I need to make it my own. My master bath door is 24in by 79in. If I measure including the crown molding it is 30in by 84in. Unfortunately I cannot find any antique doors that are 84in or longer. What are the measurements of yours? I’m nervous to buy a door and then it not work! Any advice would be awesome. Thanks! 🙂
I love the way you painted the door. Would you mind sharing the steps to get it to look that way?
I’m interested to see how you did the lock on this door. Can you post a picture of it, please?
Cool
Great Tips. Thanks for sharing with us.