With our bathroom makeover finished and the reveal post coming soon, I wanted to share a recap of all the bathroom progress we made in the 6 months it took us to do the remodel.
“I know that a 6 month timeline is not typical for a DIY blogger, and honestly I had imagined it would take about 6 weeks, 8 weeks tops.”
However, this time around I had a variety of obstacles running the whole gamut.
There were things relating to product unavailability, having to pivot for certain design choices that weren’t in the budget or were simply the wrong choice (only being realized once they arrived). We had some hiccups with having to replace or repair things we hadn’t anticipated but is pretty typical with older homes. I also struggled with some personal mental health issues and juggled a variety of new commitments…
In the past year I took on a new leadership position in my church, I became the (low-key) team manager for 3 soccer teams, and I took a deep dive into Diversity, Equity, and Inclusion (DEI) work in my school district which turned into being asked to be on the board of a local anti-racism group (which involved attending webinars, making phone calls and zoom meetings, researching, attending school board meetings, planning, writing letters, all while our school district was making national news for some parents threatening and harassing our Black admins to the point of one resigning and our superintendent resigning). I might share more about this later, but suffice to say that my heart has been in DEI work more than blogging this year, which is one of the reasons I’ve struggled to share on my blog or on social media.
Then my boys (ages 12 and 15) had an opportunity this spring where they tried out and were invited to play for academy soccer teams in the MLS Next League (this is a new league that has replaced the Youth Development League for US Soccer). After thoughtful consideration, they both accepted and this has been a huge commitment and lots of travel involved around the midwest.
I’ve had ups and (sometimes devastating) downs around family relationships and friend relationships, which has caused me to pull away from a lot of people– sometimes just focusing on my husband, children, and 2 of my sisters. I’ve discovered and grappled with repressed childhood memories of trauma, while also developing a closeness with my sisters as we have discussed the past and present, on all the topics.
The pandemic has also added a layer in where I’m frequently faced with people who choose themselves/their freedoms over loving their neighbor. It has made many situations where I once felt ‘at home’, now like I’m alone. My trust and confidence in others has faltered. I’ve also been reminded often that I need God constantly– desperately. I need His hope and His light so I can try to see others as He sees them, while also protecting myself and my family.
Whether you noticed my absence or not, there is my recap of ‘what took so long’. You may not agree with my viewpoints, but that isn’t new for me…I surround myself with diverse people of diverse viewpoints and I’m used to not agreeing with everyone on everything (even my husband). But those who have been around a long time I thought deserved an explanation, because in some ways you have been distant friends to me– supporting me and my business through the years.
Now we can discuss the actual point of this post– the bathroom progress!
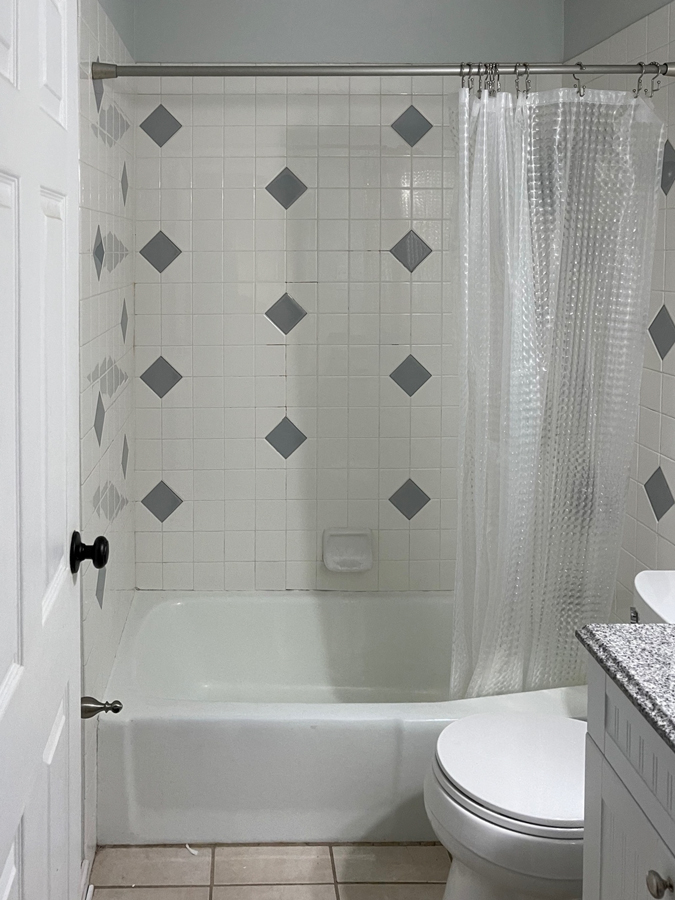
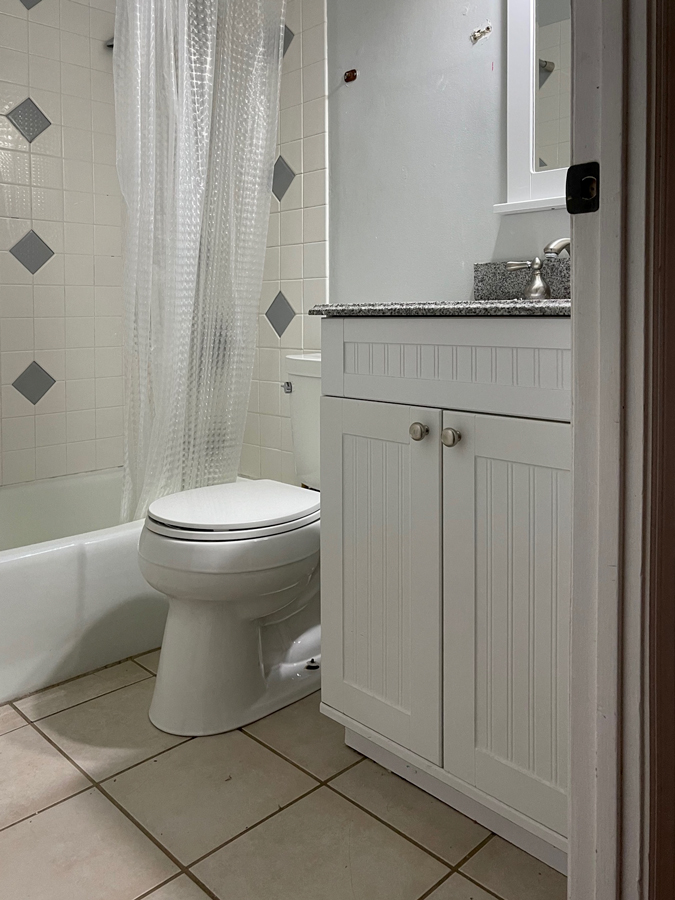
As a refresher, let’s look at the ‘before’ of this bathroom, shall we?


To see my original design plans, go HERE.
Tear out didn’t take too long but ripping out the tile in the bath area was a huge mess! I let Bruno do that part. 😉 We loaded it all on a tarp, hauled it out in trips, and took it to the landfill.
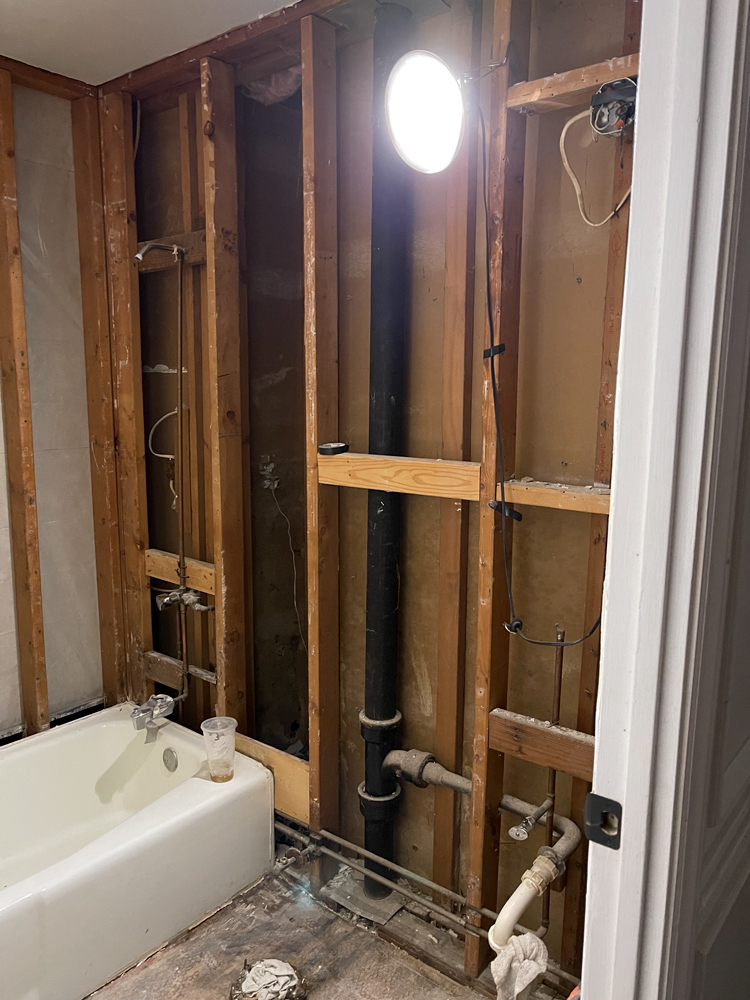
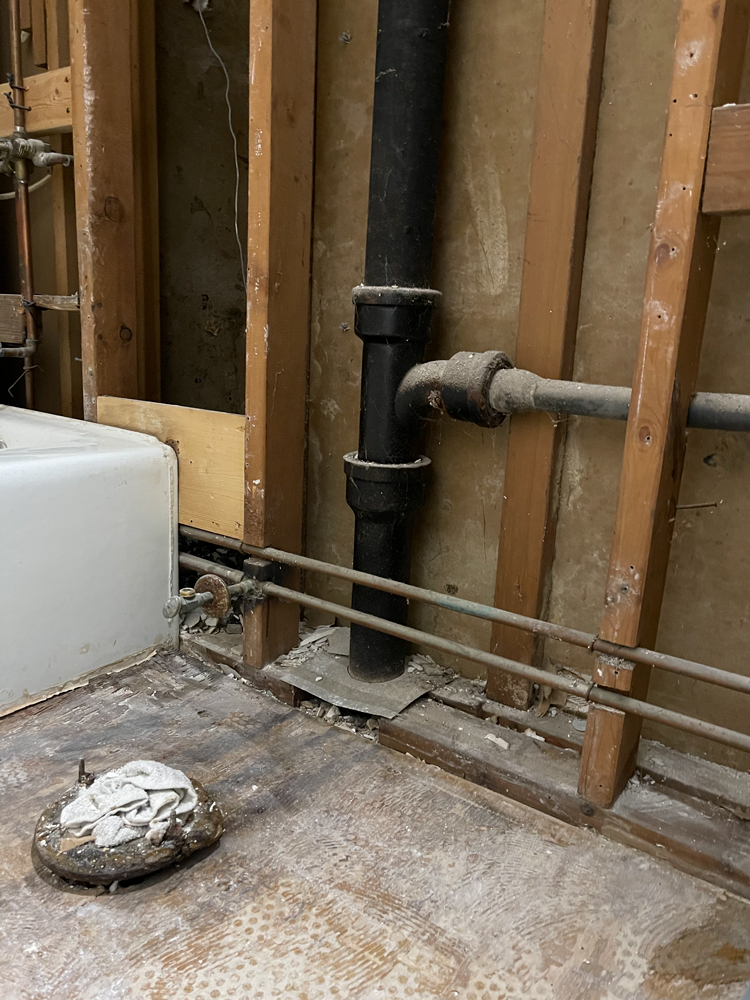
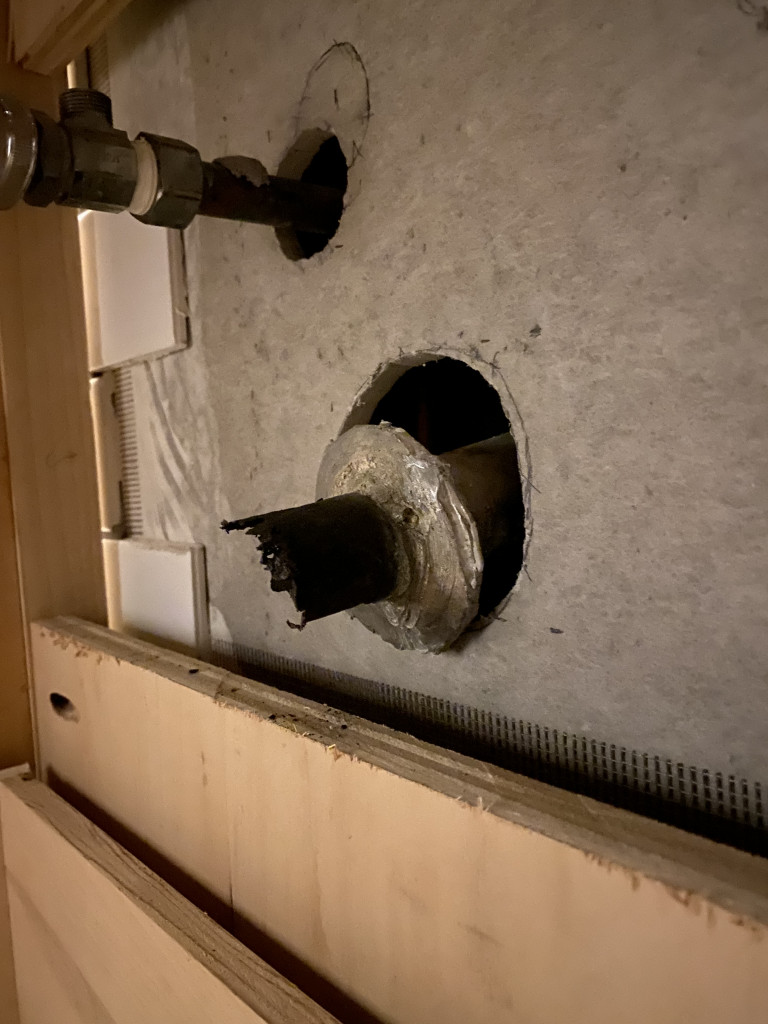
Once we uncovered all the studs, plumbing, and underlayment, we discovered a few things that needed to be fixed. One was the shower plumbing. Updated bathrooms now-a-days have a higher shower head height, and the valve is higher as well.
“My plan was to put in a separately mounted hand shower, but after getting a few estimates I realized it would add $300 for the additional plumbing line. That was not in the budget.”
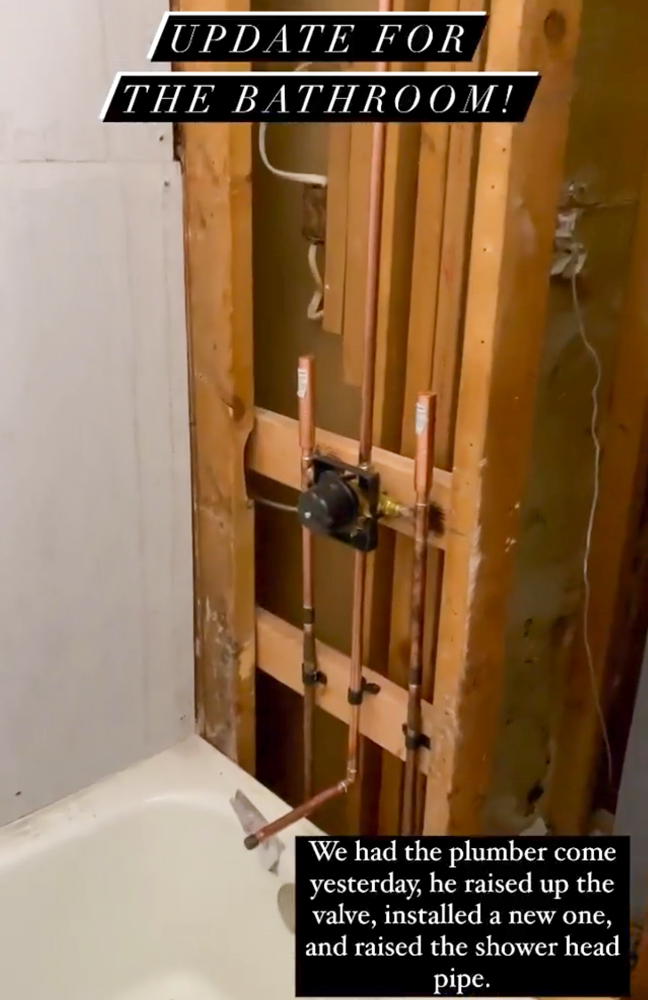
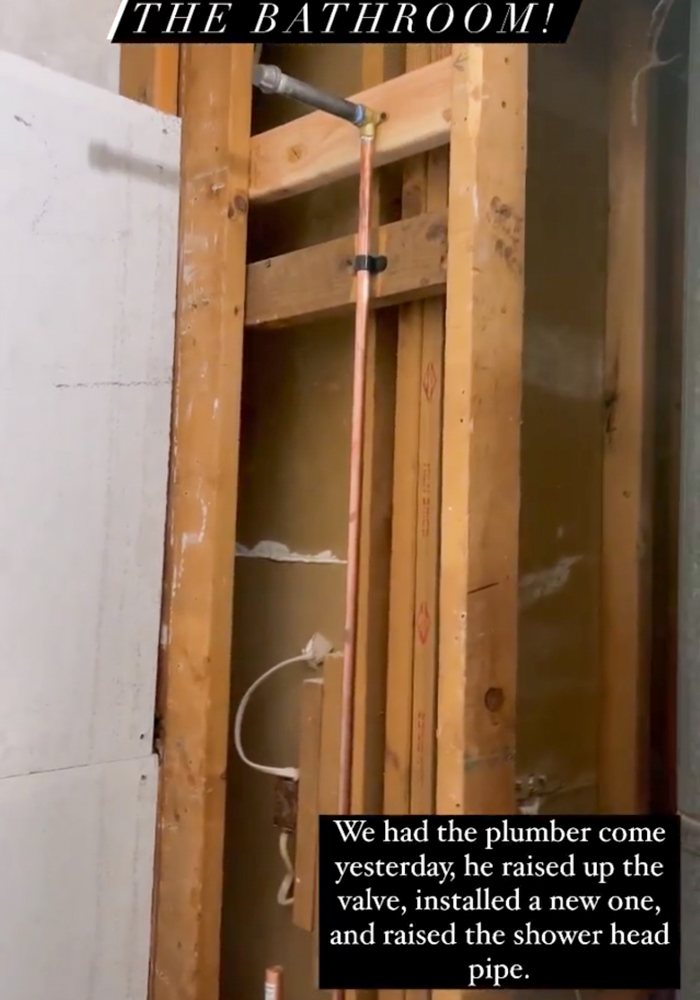
I needed to pivot, so I selected a different two-in-one shower head from Delta Faucet that still had a rain can shower head on top, but wouldn’t require plumbing changes beyond what I had already budgeted. Plumbing is one of those things I HIGHLY recommend hiring a professional for, since mistakes often won’t be detected until project completion. Potential damages could require an entire bathroom tear-out.
After the plumber came, we got to work on reinforcing studs that were loose or poorly attached, and adding a few where we knew there would be a drywall/cement board seam.
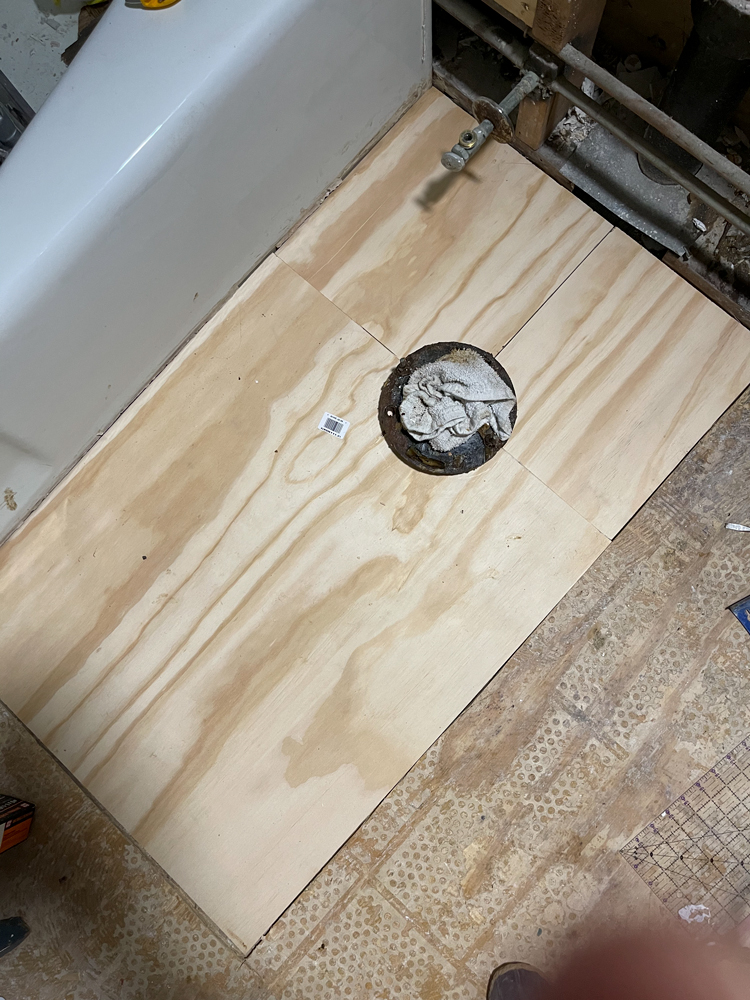
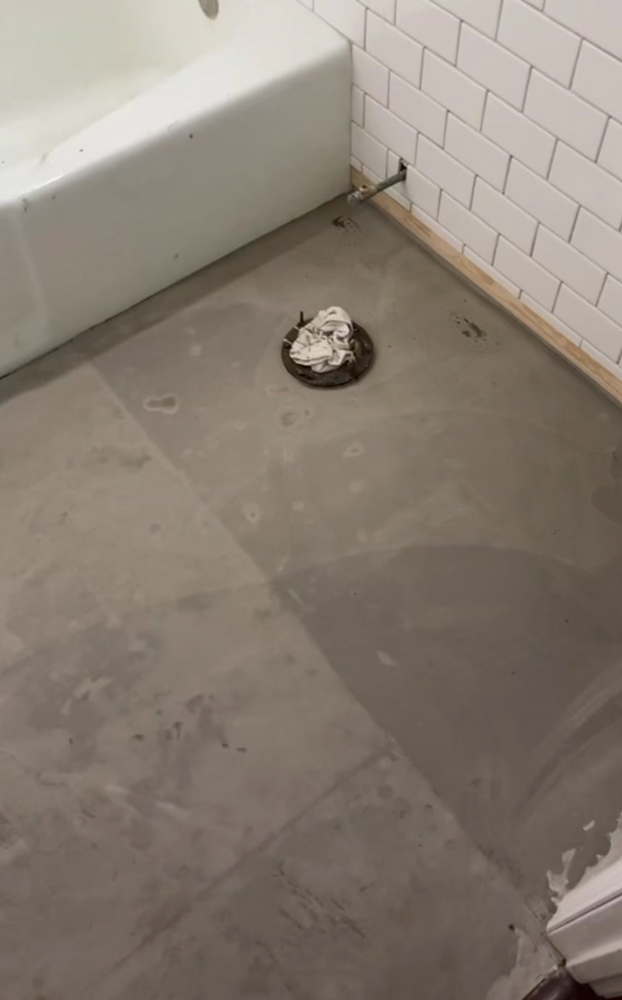
We also discovered a common problem in older bathrooms: damaged floorboards around the toilet. Fortunately there are 2 layers of underlayment and after removing the damaged part, the under layer was still strong and in-tact, so we cut some new 1/2″ plywood and installed it in 3 pieces around the toilet drain.
Repaired dry-rotted floorboards 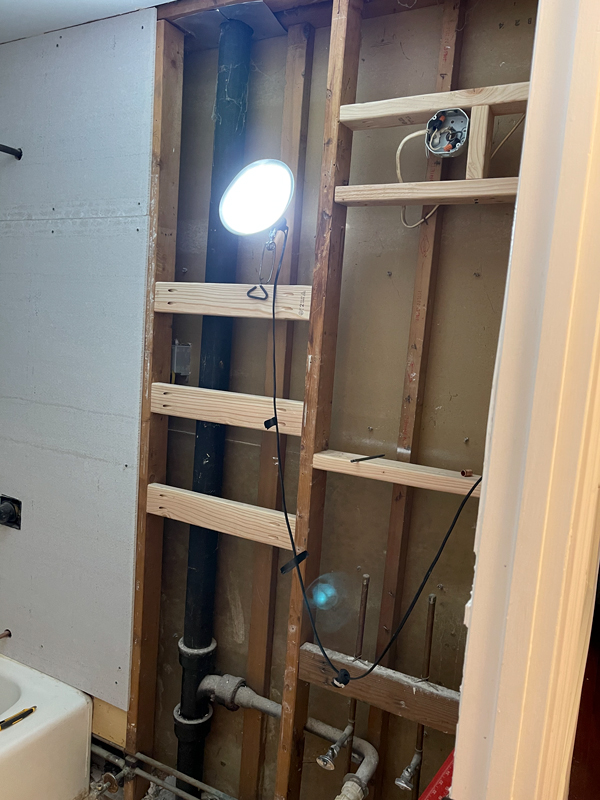
Added horizontal supports for the shelves and medicine cabinet, as well as moved the light fixture box up a few inches and secured it better to the studs. 

Installed hardiebacker on floors and all walls 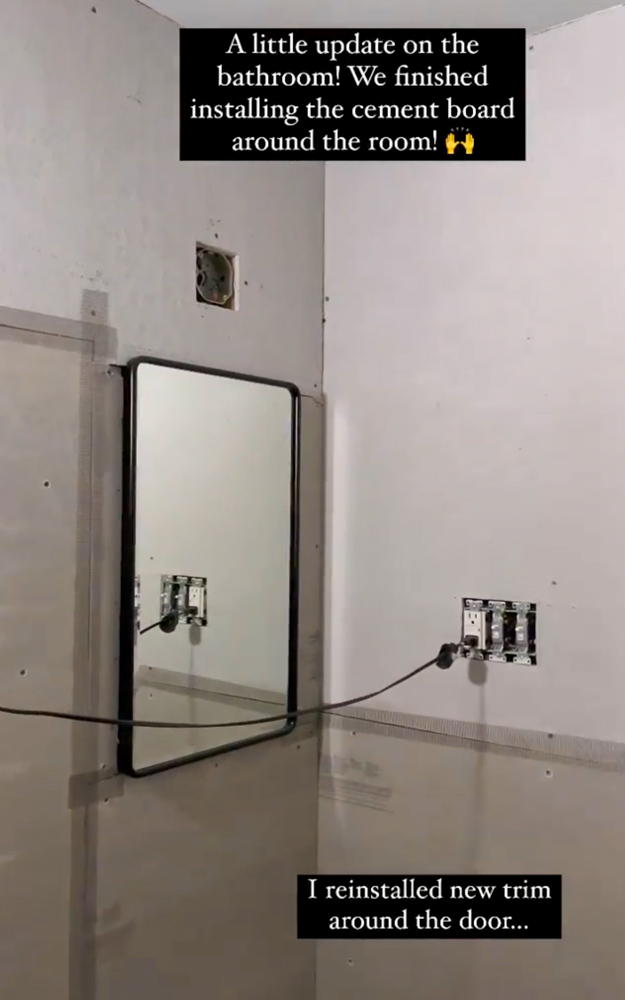
Self-leveling underlayment almost dry
At this point in the bathroom progress, I also realized I wanted a medicine cabinet above the sink, so I framed out the wall to fit the inset portion. After that we were ready for cement board. It took some time since it needed to be installed everywhere (floor and all walls) and cement board is very messy to cut and quite heavy.
“After we got all the cement board pieced together, we realized how uneven the floor was: about 3/4″ inch difference between one side of the room and the other. To solve this, a self-leveling underlayment would be needed.”
With subway tiles all over the walls, having an uneven floor would become very obvious. It also would cause issues for water accumulating (since the lowest area was by the toilet). We obviously didn’t want similar floor damage that we had just removed.
I mixed up a bag of LevelQuik in a big orange Home Depot bucket, adding water according to instructions until it had the consistency of thin pancake batter. I mixed it using a cement mixing paddle with a corded drill and it took me about 1 hour from start to finish. The most important part is making sure it is smoothed it out using a very large trowel and is thicker in areas that it’s needed (checking with a level).
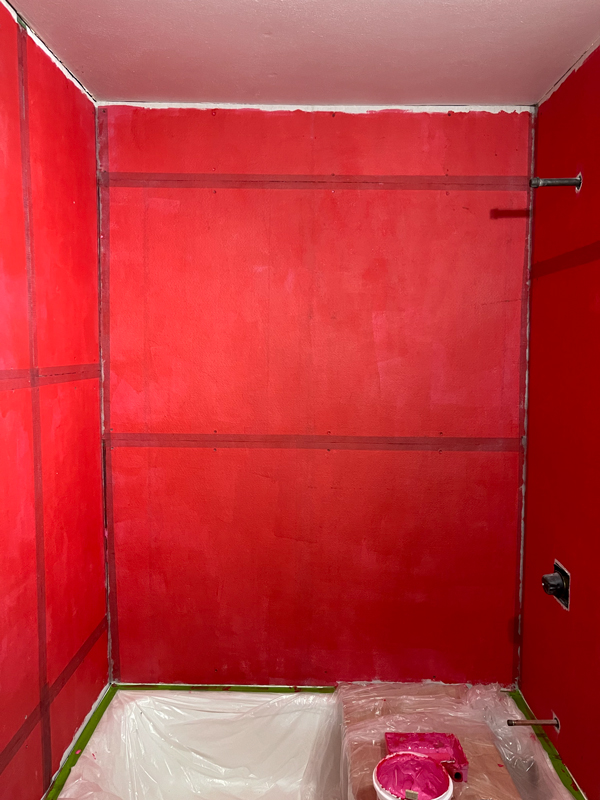
What 1 layer of Red-Gard looks like. We added 2 more coats and pushed it into the seems and corners to get a waterproof seal. 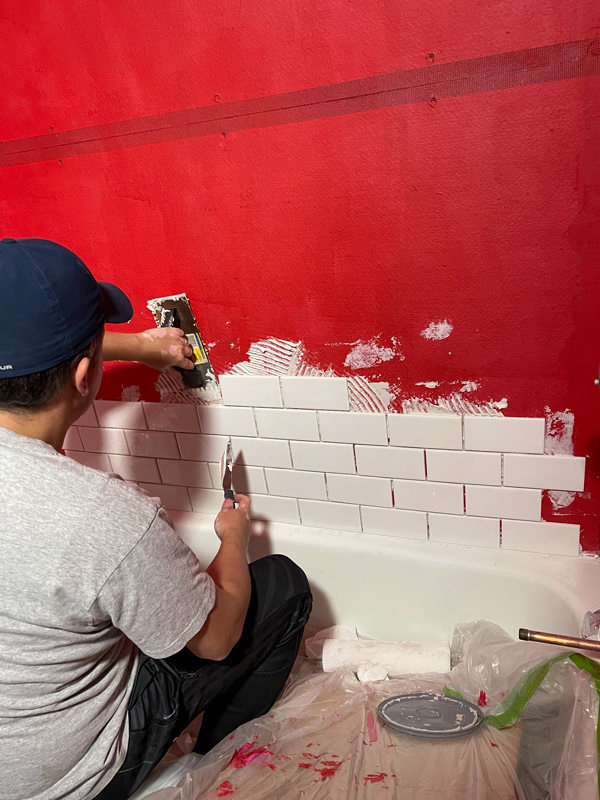
Tiling begins 
We started in the middle of the center wall in the shower and worked out and down.
According to my brother, who is a professional tile installer, it’s important to provide a waterproof barrier in addition to cement board before tiling, so Red Gard provides that barrier on the cement board in the shower/bath area. It’s nice because you can push it into gaps as thick as you want. Three coats are recommended.
While subway tile is inexpensive, it is time consuming to install, especially when going all the way to the ceiling. You have to check spacing and alignment all the way around and it has to be level. This process took a few weeks to complete.
Tip: When working on a big tile project that spans days/weeks it is necessary to fully remove the remaining mortar/mastic on the wall before each’s day’s end, so the surface is smooth and ready for the next day’s application of tile.
It is very easy to overlook small bits or mortar here and there, but if not removed it will dry hard as cement and be difficult to remove.

Before installing the tile on the wall behind the toilet, I 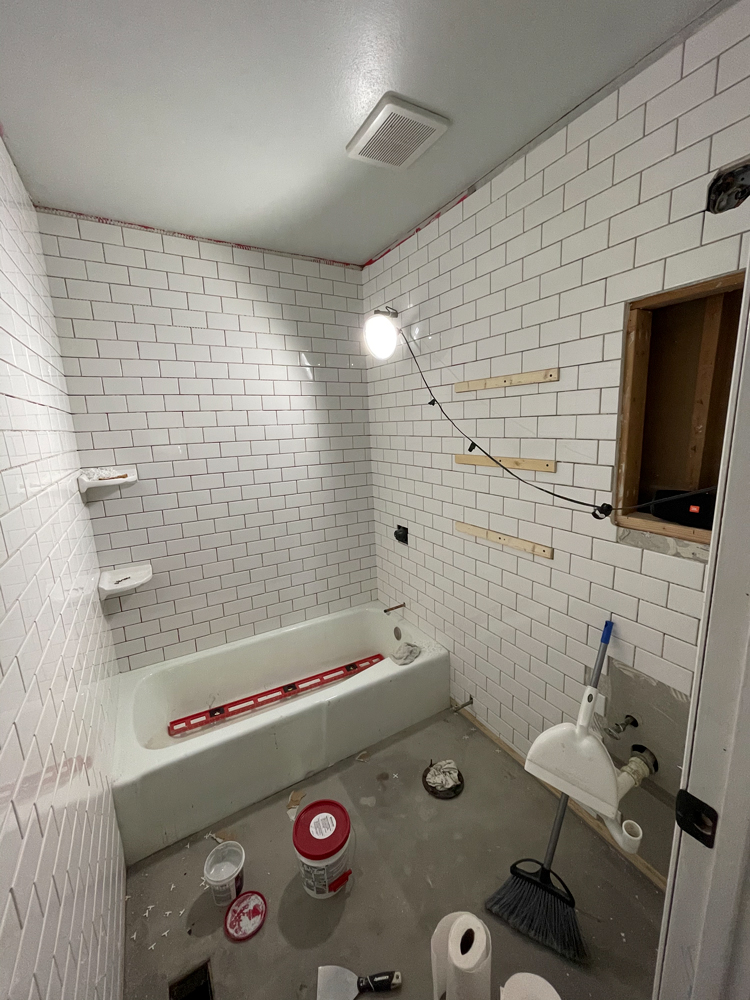
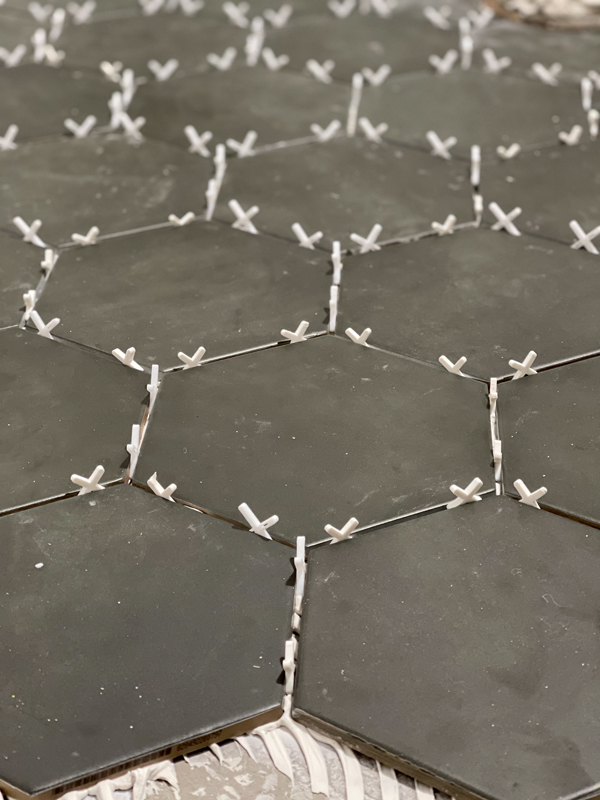

It took another couple weeks to finish all the grout on the walls which I wanted to do before installing the floor tile so I wouldn’t create a big mess of grout globs on the newly installed floor tile. While it isn’t really possible to do much ‘dry-fitting’ for floor-to-ceiling wall tile, it is a necessary step for floor tile, especially tile that is hexagon shaped. Once the floor tile was installed, I used a single component grout (Fusion Pro) for both the walls and floor because I didn’t want to have to mess with sealing the grout afterward. I decided to custom mix two colors of Fusion Pro grout to get the right color for the floor (Charcoal and Delorean Gray). My brother also gave me some tips for cleaning up haze from tile.
Tip: To clean grout haze quickly (for this type of grout), wipe the damp surface with paper towels, AFTER you have cleaned all visible grout residue with a wet sponge. This will limit or eliminate the need to use grout haze remover after the grout is completely dry.
With the tile finished, we were ready to install baseboards, door trim, and crown moulding. I opted for PVC crown moulding so I wouldn’t have to worry about steamy showers damaging anything (although we do have a ceiling fan with adequate ventilation). Installing crown in any small space is not for the faint of heart. It was a TON of back-and-forth, making small cuts, and starting over if needed. Honestly, caulk saved the day for one corner that I couldn’t get a tight seam.
By this point in the bathroom progress, we were 3 months in (May) and the only thing that made it a functioning space was the re-installed toilet. So when I went out of town for a few days for my son’s birthday, I came back to discover Bruno had surprised me with a fully functioning shower! He installed the valve trim, tub faucet, and shower head all provided by Delta Faucet (but with no pictures to document that process haha)!
The rest was wood-working stuff that is my specialty (between the two of us).
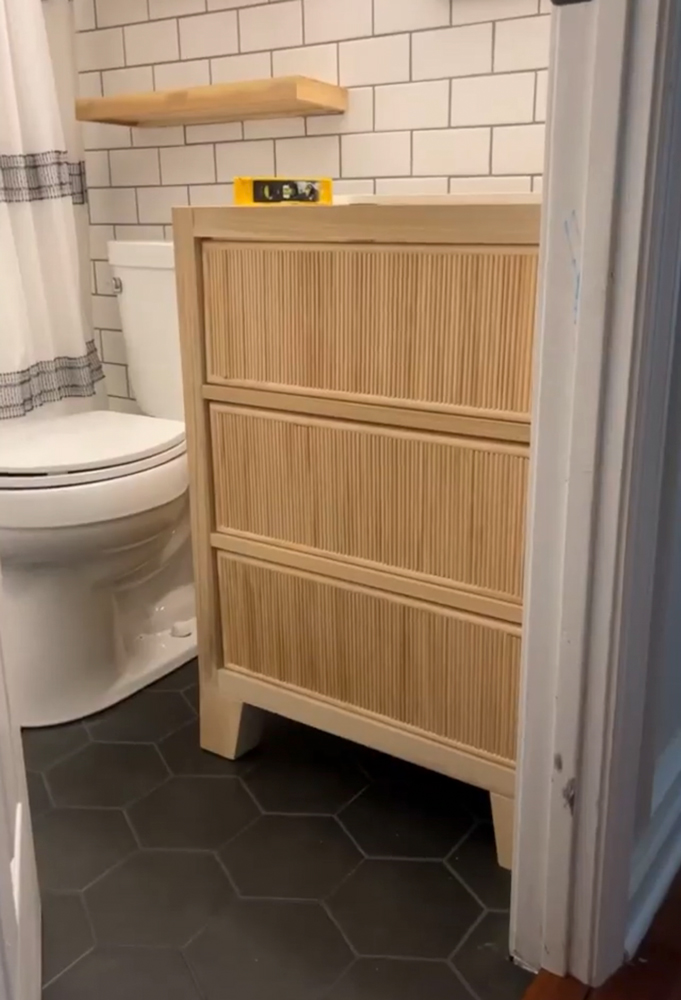
“I built the 3 wood shelves from poplar and installed them to wood cleats I had already secured before tiling.”
I opted to not stain them, just seal them with Varathane Spar Urethane (water based).
I didn’t get around to building the vanity until July and it took me a few days to finish. I built the frame from poplar 2x2s and the reeded drawer faces with pine. The feet were made by me also because I couldn’t find the exact design I wanted in poplar anywhere at Lowe’s, Home Depot, or online. I used a 3×3 small poplar board, then cut 2 angle pieces and glued them to the sides to get that two-sided taper look.
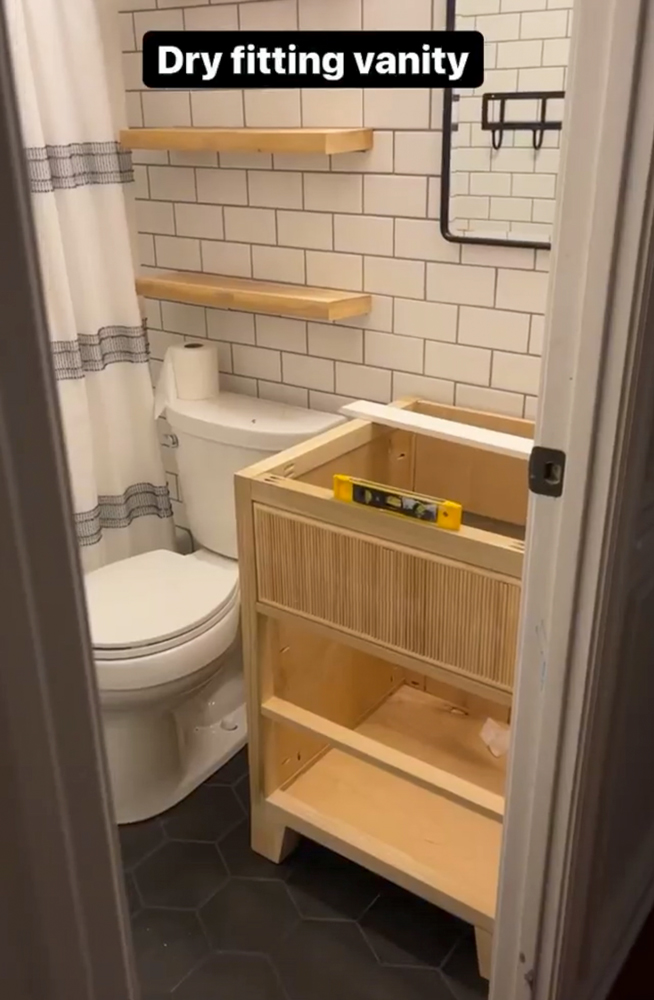
After dry-fitting the vanity, I was finally ready to measure and order the counter from the fabricators.
If you remember from a few years ago, I was gifted a slab of Montauk quartz from HanStone Quartz for my kitchen. I didn’t use it all and there was a small remnant piece left over that was big enough for our bathroom vanity. So I emailed the CAD drawing of the vanity, the counter measurements, and dropped off the faucet and the under-mount sink to my friends at DiPrimo Fabricators in St Louis. Like most contract work this past summer, they were super busy so it took a few weeks to get it done. We had some miscommunication and the on-site template-ing wasn’t done, so we almost had a bit of a disaster.
The counter I picked up was a little bit off (angle-wise), but they were able to fix it without much problem or delay– I just opted for a little less overhang than I had originally planned (but they did offer to cut an entirely new sink counter from a similar remnant).
By this time, it was the end of July and I was ready to hook up the the sink faucet.
“With the end in sight, I discovered the joint to the P-Trap under the sink was corroded and I would not be able to get a water-tight seal using a new PVC pipe. I would have to call our plumber and hope they wouldn’t need to open the wall to repair it.”
Before: corroded P-Trap joint 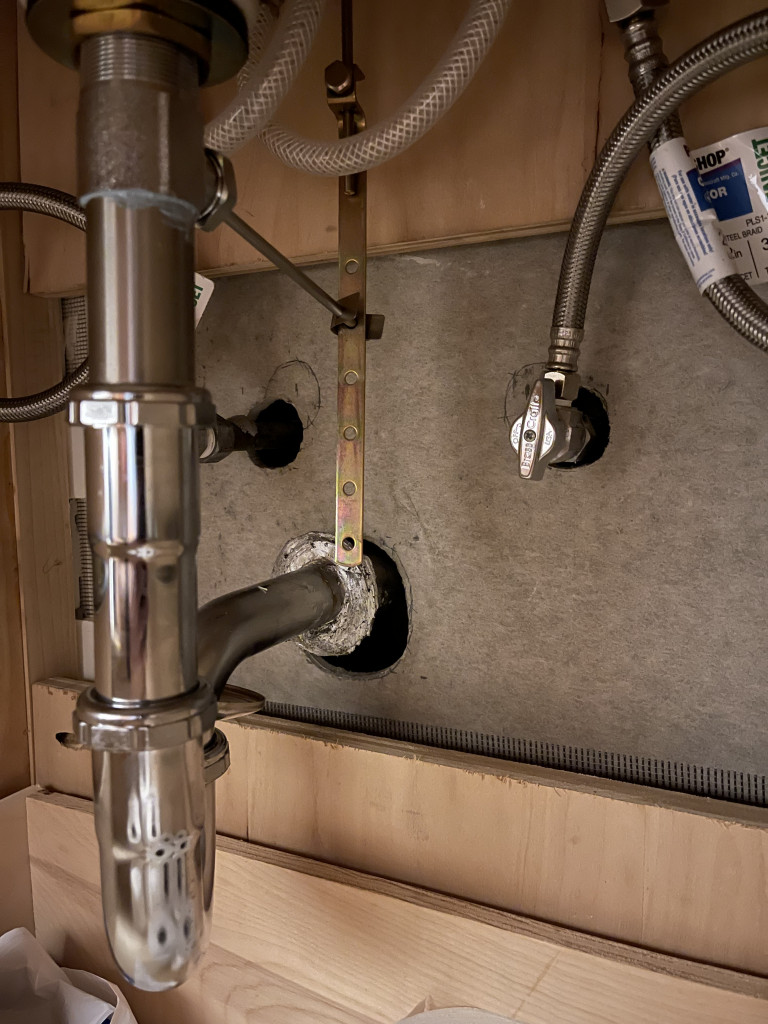
After: New trap joint re-wiped (sealed)
To understand what I would be looking into cost-wise, I called our plumber (Torrisi Plumbing) and explained the situation. I was able to text them a picture of what our pipe looked like with the corrosion and they quickly explained this was an easy fix and the joint could be re-wiped with lead WITHOUT having to open up the wall! I was so relieved ! Just so you don’t worry about the health concerns around using lead, it is what seals the outside portion of the joint but doesn’t taint the water, since the metal pipes are copper).
To make the repair faster, I wanted to find out what materials were needed, so I could buy the right parts to install and they wouldn’t have to leave for parts after arriving. The plumber did not ask me to do this, but it ended up costing me less since it made the process go faster (they charge by the hour). I watched this video tutorial and it gave me an idea of the process and materials so I knew what to expect. FYI, most newer homes don’t have copper pipes leading to the sink– it’s all PVC nowadays. This can be a fairly common obstacle, however, in older homes like ours.
With all the drama behind me, we were ready for styling and a photoshoot! Check back in a few days for the final reveal of our small bathroom for under $3k!
Do you have questions about the progress of our bathroom? Ask me below!
A very thoughtful post. First, I’m glad you have completed your bathroom re do and it turned our great. Second, I have noted your absence and you’ve been missed.
What’s been happening in our world has affected so many people in the ways you’ve described. No need for me to pile on, but let me applaud you for seeing what’s been going on, realizing you needed to do something, then stepping up to do what you can to call attention to issues that need to be addressed. You are brave. Take energy from recognizing that. Well done.
Hello! Wow, thanks for taking us on your bathroom’s journey. I so appreciate when folks share in-progress pics (and explanations) instead of just sharing perfect pics of perfect spaces.
I also wanted to say that I feel this sentence of yours deeply: “I’m frequently faced with people who choose themselves/their freedoms over loving their neighbor.” It’s heartbreaking stuff. Thank you for your courage in mentioning it here.
Hugs to you and your family, and I look forward to future posts from you. Your bathroom is going to be STUNNING!
You have been missed! I so admire your sweet caring heart. This past year plus had been challenging on so many levels. I too have struggled mentally.
I hope you are feeling better and will continue to share your many talents.
Thank you for sharing some personal updates. Prayers and encouragement sent your way to carry on with your hard, meaningful work! You’re growing and learning, that’s always a good thing…you’ll eventually find more people in your corner!
“One small crack does not mean that you are broken; it means that you were put to the test and you didn’t fall apart.”
My sentiments are exactly what Karen from Bainbridge stated above. I live in a suburban town in Southern California and the hatred that I’ve seen is heartbreaking. I am so proud of you for exploring the diversity and inclusion and I wish more people would LISTEN. You have a full family life to manage and still took on these important challenges. I applaud you and stand with you.
P.S. – Your bathroom is fantastic!
I’m looking forward to the reveal. I read all your post. Thank you for all the information.
You have definitely been missed. I am so sorry that you have been going through all of this but it shows how much you CARE! I agree whole heartedly with your thoughts on: “I’m frequently faced with people who choose themselves/their freedoms over loving their neighbor.” I wish I was as brave as you to put it out there because it is how I feel. Good luck with all of your new roles and know that you have support here in your subscribers!
The bathroom looks great and I cannot wait to see the final reveal! You go girl!
I am new to your blog and was excited to read about your bathroom reno. But wow, I know why I was prompted to look at this particular post. You articulated incredibly well how I’ve felt and although I know I haven’t been alone in my feelings, it’s always good to have such a strong reminder. Thank you!!
It’s wonderful to see the progress you’ve made on your small bathroom renovation! The detailed updates and accompanying photos in your blog post showcase the transformation and provide inspiration for others undertaking similar projects. The clever use of space, the choice of fixtures and finishes, and the attention to detail are commendable. Thank you for sharing your journey and design choices with us. Your dedication and creativity shine through in the beautiful outcome. Great job!