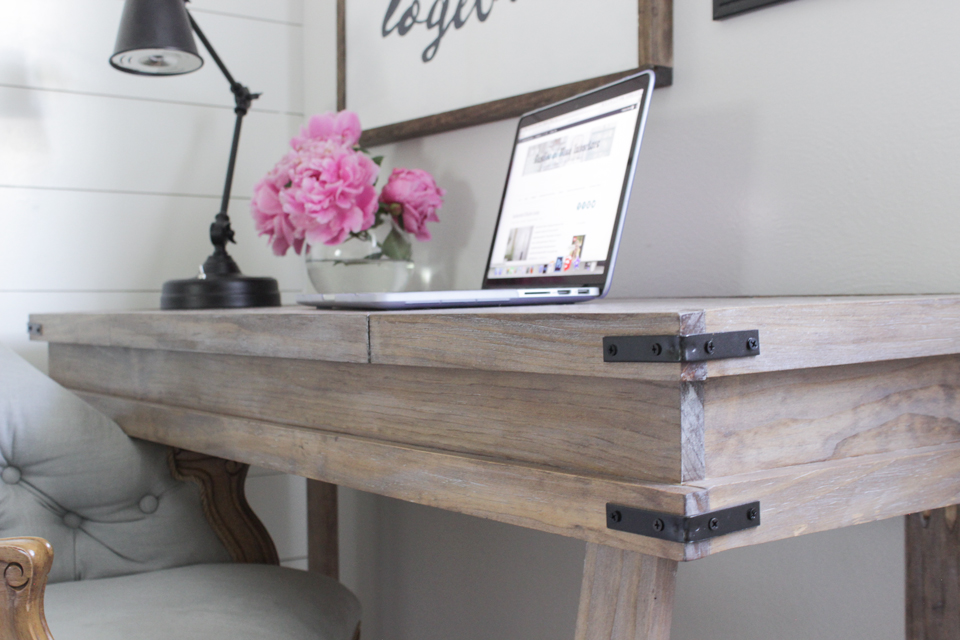
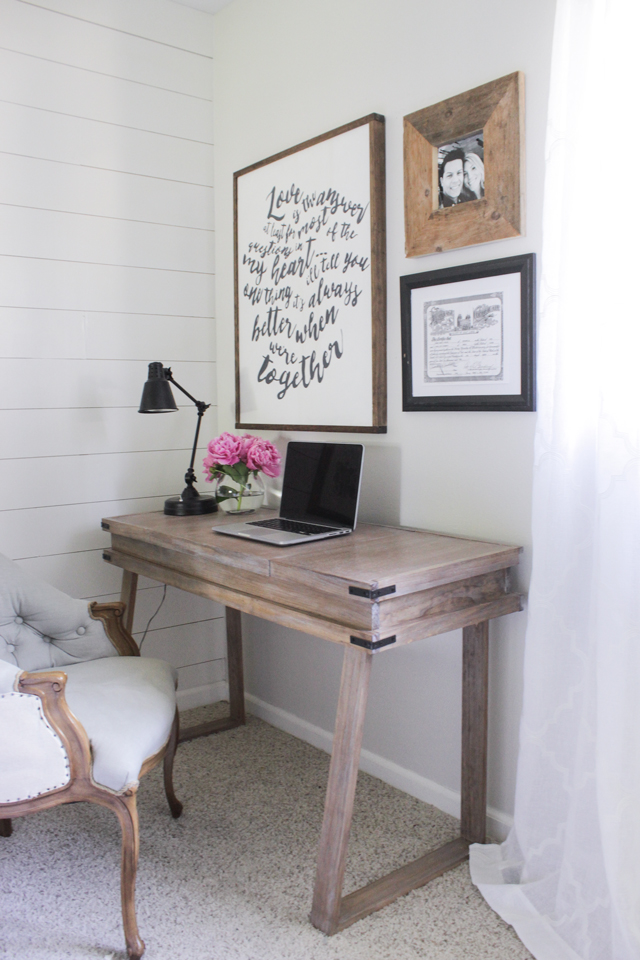
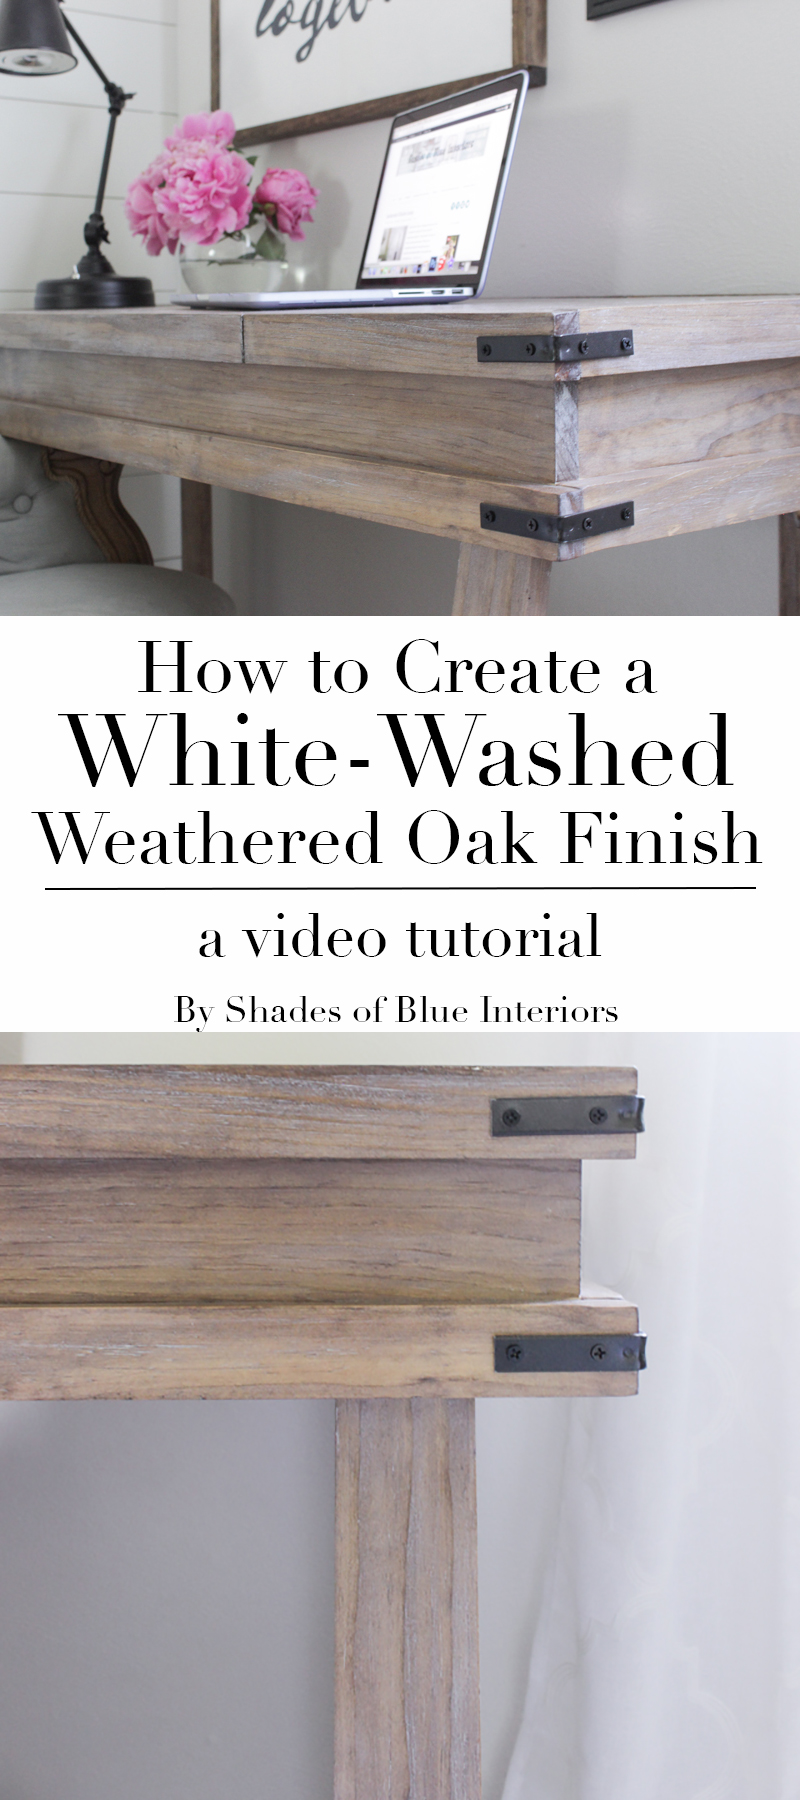
On Monday I just shared the build plans for the Three Compartment Desk I made for my master bedroom. The finish on it is so perfect and I thought I’d share with you how I created the White-Washed Weathered Oak Finish, but in the form of a video tutorial because I’m trying to do more of them and it’s a little easier to explain the multiple steps in video form.
Here is the list of supplies you will need:
(Affiliate links included below for your convenience. You are not charged anything more, but I make a small percentage if you purchase anything.)
1. Stiff large wire brush, small wire brush
4. Minwax Special Walnut Oil-Based Stain
5. Minwax Weathered Oak Oil-Based Stain
7. Clear furniture wax (I used Annie Sloan– important thing here is margarine-like consistency)
9. Cotton rags
10. Chip brush
Click here to see Elisha (Pneumatic Addict)’s tutorial on achieving a textured raised grain on pine.
I recently build a tufted bench and used this same method on the legs and the result is just as fantastic-looking. I’ll be sharing the bench hopefully next week! 🙂
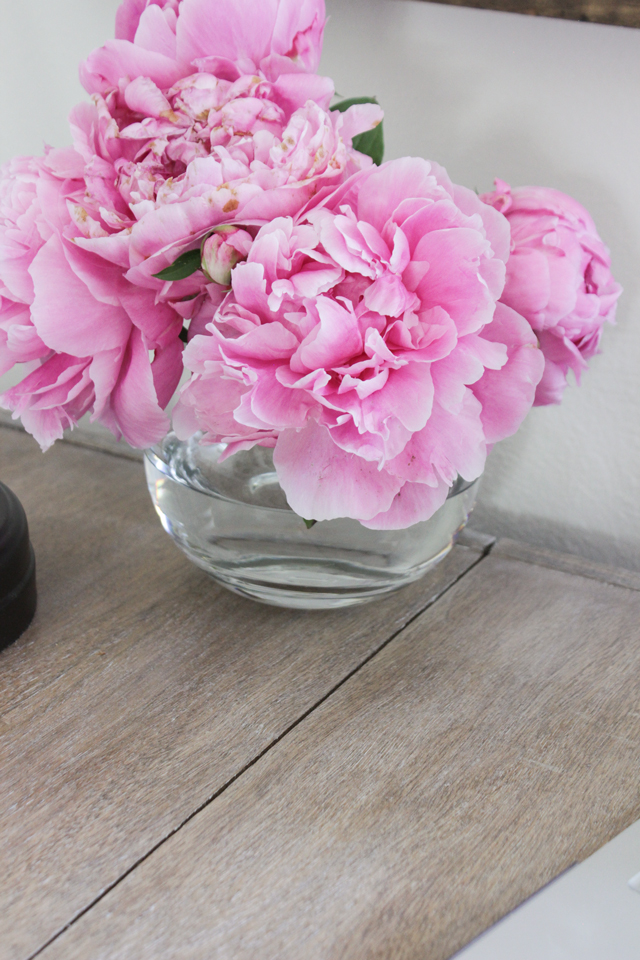
I love how the white wax perfectly settles into the grooves of the wood but you can still see the original stained finish. So many times I see how white-washing can cloud up a stained finish, which is great if you want to cover an older orangey-pine piece of furniture, but when you start with bare wood, keeping the integrity of the original stain can be tricky…. until now! I seriously experimented with about 5 different methods before realizing this one was by far the best.
It really looks like the authentic RH finish. When I went to AmericasMart in January, I saw SO much natural wood finishes in furniture coming back, and most of it had this same white-washed technique where it only settled into the grain. That was the seed that was planted for this tutorial. It took me awhile to get around to it and get it right, but I’m so happy with the result.
So what do you think?
Thanks for reading (and watching)!
xo, Rachel
Pin this for later!
Stunning! It reminds me a little bit of liming wax, which I think might be the same or similar kind of product as the clear wax/gray-white paint mixture. Thanks for sharing this. Great job! –Kat
I want to try this on my dining room table but need a durable finish. Can I put another coat of shellac over the wax/paint layer
You are welcome to try but I’m not sure how well it would stick.
Love it!!! I just bought some of the new Annie Sloan white wax and am loving it!
Love both the desk and the tutorial! Thanks 🙂
Thank you for teaching me this technique! I cannot wait to try it out! Amazing desk too….
morning…love the look, and i really like the desk as the make up vanity. i do have a question regarding your final step. with the wax, is this a product that will leave cup rings, as in a coffee cup etc. if so, can i add a sealer on top of the wax as a final coat?….this family is not a coaster family:(
The shellac really acts as a sealer and the white wax is mostly just to settle in the cracks so I don’t think it would leave any rings– we aren’t a coaster family either and so far my husband’s sodas haven’t left any rings! 😉
What are the corner pieces called? I would love to add those to my peice. It’s so pretty!
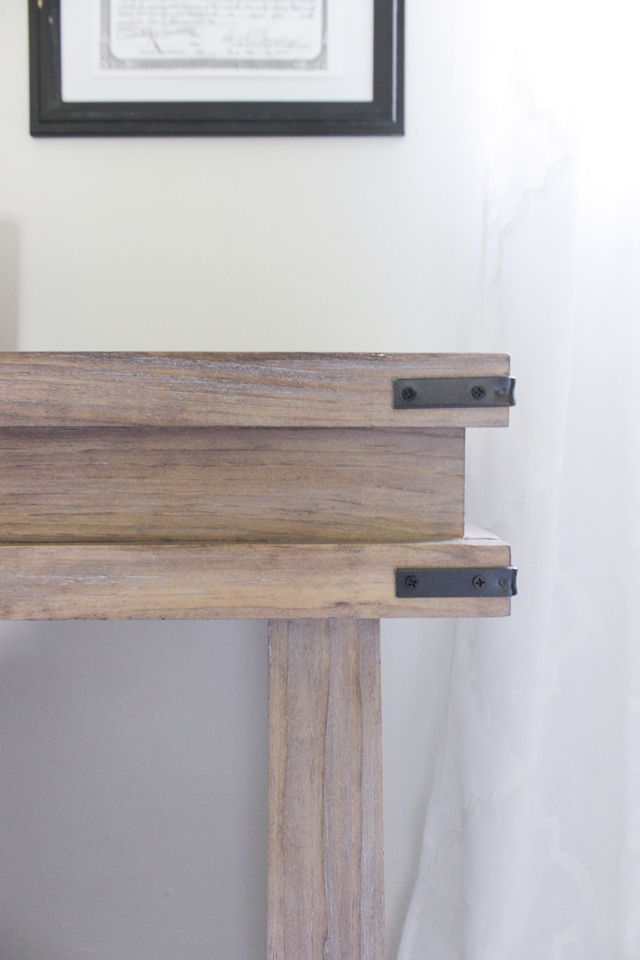
They are called L or corner brackets which I included in the list of materials and I sprayed mine with oil rubbed bronze spray paint.
This turned out beautiful and I love the video! I’ve never tried this technique but now I can’t wait to try it out!
Gorgeous finish – thank you so much for the video tutorial Rachel!
Do you think if you do this on oak you should still use the wire brush step?
No you don’t need the wire brush step with oak because oak already has an open and visible grain. Unless you want it to look a little more textured, but even then oak is pretty hard and wouldn’t scuff up easily.
Silly question…my kitchen table is already oak so I can skip the wire brush and do the rest to achieve this look?
Yes! That’s right! Just make sure you have stripped the wood so the texture of the grain is visible and isn’t filled in with poly.
Ok great what can I apply as my last step to make it durable against spills and of coarse cleaning, since it’s a kitchen table.
How would I do this if I have medium colored (like a darker honey) wood coffee and end table from Pottery Barn years ago? They are really beautiful pieces but need a make over badly. Would I strip the original finish and then proceed to your steps? Thank you!
Yes you would need to strip it first. I would use Citristrip to get the clear coat completely off, clean with mineral spirits, and then sand it get off any excess residue.
Great video, but please can the music. Made it difficult to watch….or listen to.
hahahaha Ray! it’s hard finding decent, royalty-free music, and I try to have something playing to keep things from getting a little mundane. Sorry you didn’t like that tune tho… I’ll keep note to not use that one again! 🙂
I’m trying to recreate this look with pine but it’s not turning out. Any advise?
Justin, I used pine too…. I’m not sure, especially if you followed all the steps. I didn’t skip anything in the video or leave parts out. Maybe try again on a scrap piece? :/
Beuatiful piece!!!! How long should you wait inbetween the two different colors of stain? The stain can says 4-6hours.
Hi! I think I got here via Pinterest, but can’t be certain.
I seldom watch videos, but did yours. I actually achieve an extremely similar look by going light colors first, then a darker on top. Interesting that it looks so similar. I’ve been shy about finishing a reclaimed pine kitchen floor I laid (packing crates, pallets, and 2x10x3/4″ pine planks from a reuse center) because I didn’t want to bring out the yellow or red by mistake. I’m going to try your sequence.
Thank you for taking the time to put together such a concise video.
Hi Rachel,
I’m going to try this on a pine pedestal table. Any steps I should leave out or add in?
Thank you! LOVE the desk
Thanks I am in love with this tutorial. I do have a couple of questions though. The wood I used is already oak so I didn’t do the wire step. Is there a suggestion on other types of wax that would give the same consistency of Annie Sloan? I am ready for this step in my process but really scared on using the wrong wax and messing up the project. I also wanted it to have more more of the gray undertones so I used a layer of classic gray stain, & it still looks really dark. I’m scared to move forward. This is for my bathroom vanity. Thanks for any advice you can issue
Classic gray is a lot darker, especially on oak (which absorbs stain differently than on pine). I would try EITHER putting a layer of Minwax Weathered Oak on top to lighten, OR Verathane’s Sunbleached stain on top to get it lighter– you wouldn’t want to leave it on, but wipe on, wipe off– The both would really lightens up the gray but the Weathered Oak one would lighten less. Do you have any scrap oak from your vanity? or an inside portion that you can try it on? The white wax will lighten things a bit, but it mostly settles into the grain. You can use Miss Mustard Seed White Wax or Americana Decor I have heard has a creme wax that looks like it would work too.
Hi- I’m building an outdoor table with fir and would love to try this technique but I will need a poly on top to protect it instead of shellac. Do you think this would work if I followed all the steps but substituted the shellac? Thanks!
Kate, if the you followed the instructions you would see the shellac is mostly just to seal in the stain– and Shellac is just a brand name of a type of poly– so you are more than welcome to substitute it with an outdoor poly. Just be careful that is isn’t one that is super thick- otherwise it will fill in the grooves you made and will leave nothing for the white wax to settle into.
I used this technique and it worked great but I am doing it on my kitchen table and need something to seal it with what can I use ? Pleaseeee helppp
Love your desk and stain so much! Thanks so much for this video- so helpful! I tried it out on a test piece of pine and mine seems a quite a bit lighter than yours. Did you just do one coat of the special walnut and one coat of the weathered oak? This is my first time to stain something and I might just need to apply it more liberally. Thanks!
Some pine boards have a sort of sheen on them… sand it smooth to remove the sheen using 220 grit sandpaper. It should be completely dull. Also make sure to stir the stain well before you apply it and let it sit for 10 min before wiping it off.
HI! I absolutely love this. I wanted to do this to our wall of shiplap in our front foyer. Will it work the same? If so, how long to you allow each stain to sit for before wiping? Or did you even have to do that?
Thanks so much!
Caroline
I let each stain sit for a few minutes– the longer you let it sit the deeper the stain will be… I didn’t want it to get too dark so I didn’t let it sit too long.
Ok awesome, did you sand in between? And do you think this will work just as well on shiplap?
No you do not sand in between. Just after maybe a little to make it look more authentic by allowing the original wood to show through a bit and not allow the stain to look so perfect. Yes I think it would work on shiplap… i don’t see why not!
Could you use poly instead of shellac? Excited to do this to a french accent chair!
I think poly might be bit thicker filling into grooves and it for sure takes longer to dry– shellac takes just a couple minutes.
Thanks for the video! I recently built my wife and I a farmhouse bed from pine and can’t decide what to stain and or paint it. I really like the look of your desk. With it being a bed, is it ok with just the shellac and wax? This is my first wood DIY project ever and I have absolutely no idea what I’m doing lol! Any advise and or tips would greatly be appreciated!
Oh yeah! You would be totally fine with this technique! Beds are pretty big so I would just anticipate being patient and not trying to rush anything so you make sure everything is even and consistent.
Thank you very much for the feed back!
How much does this all cost?
Great tutorial and desk. I have RH furniture with this finish on deconstructed chairs and other pieces. I had an antique foot bench that I wanted to recreate the RH finish that had a dark stain. I was able to recreate it with a few paint colors and Annie Sloan wax. I reupholstered it in burlap. Gorgeous! Good tutorial for sure, but know it can be done with existing pieces also.
Can I use this technique on a bench? Will the white paint rub off with the wax when someone sits on it? Thanks!!
I love this look and I have bought everything , but when I tested it I realized that I need it to be darker. Can you please give me recommendations to replace the oak stains with? I really appreciate your help.
Hi! This tutorial was awesome, but I have a few questions. I just finished building a farmhouse entryway table with regular pine 2×4’s and I already put a wood conditioner & Verathane natural wood stain on the table but would really like to try your method. If I just go over the table with the wire brush, do you think I still need to completely re sand the table and start from scratch? Also, I just purchased Amy Howard liming wax, can this be used in the place of the clear furniture wax/ white paint mixture you created? Thanks so much!
Can I use a polyurethane (clear satin ) as my shellac?
Would this work on refinishing an oak floor? Or what would you recommend for a floor?
For floors I wouldn’t necessarily recommend using pine— if you can afford it, then oak is ideal— in that case you can use white oak stain by Minwax. If you have pine… I would say experiment with some different options but ultimately don’t use wax— it’s not durable or protective enough for floors. Woca makes an oil for floors that is a white/bleached tone that is good!
So I did the first two stains so far but mine is looking much darker than yours at This step. Was I suppose to side the stain off after? I just rubbed it in lightly with a rag so there wasn’t really any excess to wipe off.
Hi Rachel,
First let me say, thank you for this tutorial. I read through all the comments, and see where people have asked about doing it on a dining room table. I saw you mentioned doing a final coat of shellac may not work… do you recommend anything else? Or if this is the look I want, I will have to deal kind of thing? Lol. I will also be doing it to a bench that goes with the table, I saw someone ask if it would rub off when sat on… thoughts? Thanks again!
It won’t rub off, no. Also I have a few friends that have used wax as a top coat on a dining table, and didn’t have any problems! They just didn’t use harsh cleaners– mostly just a wet rag to get things clean. So… you can try that! I don’t know of any other top coat that would adhere to a wax top coat, but I would suggest doing all the steps on a scrap piece of wood and testing out a few different top coats to see if something does happen to work!
I love this! Thank you!! I want to do this on an outdoor table. What do you recommend as a final coat to seal it better for outside?
I love this! Thank you for sharing! I want to Do this for an outdoor table. Di you think using a waterproof clear top coat instead of shellac would work? Do you have any other reccomendafions for outdoor use?
Thank you!!
Hi there, me again. How long did you wait between each stain? Did you wipe off right after applying?
I just went through the steps and mine has an orange undertone. What did I do wrong?
I have done this on a few pieces of furniture and highly recommend not using wax if you are doing a kitchen table or outdoor furniture. In place of the wax step use paint thinned out so it is pretty darn watery looking and wipe it on like you would the wax. Then you can seal it with a good poly afterward. Poly doesn’t adhere to wax so this will help if you need that durability.
Can you do this over finished cabinets?
I don’t think it would work as well.
Hi. I just came across your site and was interested in the staining technique you did for your three compartment desk. It says that I cannot view it as it is restricted and I need access. Is it still available and how would I get access.
Thanks
Love this tutorial!! Can’t wait to try it on some pieces of furniture in my at-home office. I also love the paint color on your walls with it – the light grey. Would you mind sharing the name of that paint?
Can this process be done on a real solid oak table minus the steel brush? I like the look and need to refinish my kitchen table. Thank you
wondering if the steps are written out. not everyone learns the same. i cannot learn as well by watching and learn by reading. i hate having to watch a video over and over again.
I love the color of this! I want to do it to a farmhouse table for outside. So since the last coat is the wax, can a clear coat go over the top to protect it outside?
Unfortunately I don’t know of an outdoor clear coat that will adhere to wax.
Hi! Thank you for this tutorial! I’m wondering if I have to use wood conditioner before applying the stain? On a practice piece of pine, I did the 2 layers of stain with and without conditioner and like the deeper color without the conditioner. Thank you for your help!
Conditioner isn’t required, it just makes the stain apply more evenly as some spots on wood can absorb more than others. But if you like it without, then don’t use the conditioner!
Okay thank you so much!
Hi! Can this be done on an oak table? Will it look similar to the look of the pine table?
Yes, it will look similar but oak has different undertones (oftentimes it has pink or red undertones) so you might experiment with a scrap piece of oak or try in a less conspicuous area to make sure you like the look!
Thank you! Should I still use a wire brush with oak?
No, not necessary.
Hi!!! I loove the finish on this piece! I’m trying to recreate it but I live in Mexico City and can’t find Shellac. Do you know another sealer that may work? Or what can I ask for exactly?? Poly from Minwax would do?
Thank you!
I would find a quick-drying polyurethane– something super thin. Minwax Poly typically is thicker which will fill in the grooves that you have created and won’t give you as much texture.
Hi there!
I’ve been working on making a bed for my 15yo daughter. I’ve started staining the pieces that make up the headboard (lots of 1×3’s stained various shades of minwax to give a re-claimed look…golden oak, American, special walnut, provincial, ebony, classic gray…which isn’t showing up hardly at all)
I’m loving how it’s going so far…her 15yo self…not so much. She thinks it’s too ‘bright’ Now I’m trying to figure out how to mute it. Should I put weathered oak over all of it to even the tone (wipe on, wipe off) then shellac and use the wax paint mixture? Maybe with a cream color paint vs. white?
Any thoughts would be appreciated.
Thanks!
I would use actually Sunbleached instead of weathered oak– because sunbleached is more white and weathered oak is more gray. Then if its not the tone you want, I would use a white or light gray paint mixed with the clear wax– a cream paint will make it look more yellow IMO. Good luck!
Thanks so much! I really appreciate your response 🙂
Have a great week!
I am just finishing up with this process but wanted to know how protective Shellac is. My project is a wine bar and wanted to make sure it was protected. I love your tutorial and can’t wait to build that desk too.
Rachel-
Thanks for the video. I love the desk design and finish. Just the style I was looking for that will work for my daughters room. Small desks are a hot commodity these days unfortunately. I hope you can answer this question. Where did you source the chair paired with the desk in the photo. I often find myself liking unrelated things in posts and drive myself crazy trying to find them.
Hope you can help.
Thanks again and keep up the good work
Hiya,
Firstly thank you for the video the finished look is fab.
I wanted to ask about using the wire brush. Do you just go in a straight line, or with the gran already there? Do you just do it once or go over a couple of times?
Not much information is given re the using of wire brush to get the right effect.
Thanks so much
Yes, I said it in the video, but you brush with the grain of the wood and as demonstrated, go over it several times.
Instead of using a wax and paint mixture can I use a white wash in order to seal it at the end with a satin polyurethane
You could, it would look a little different. Experiment on some scrap wood first if possible!