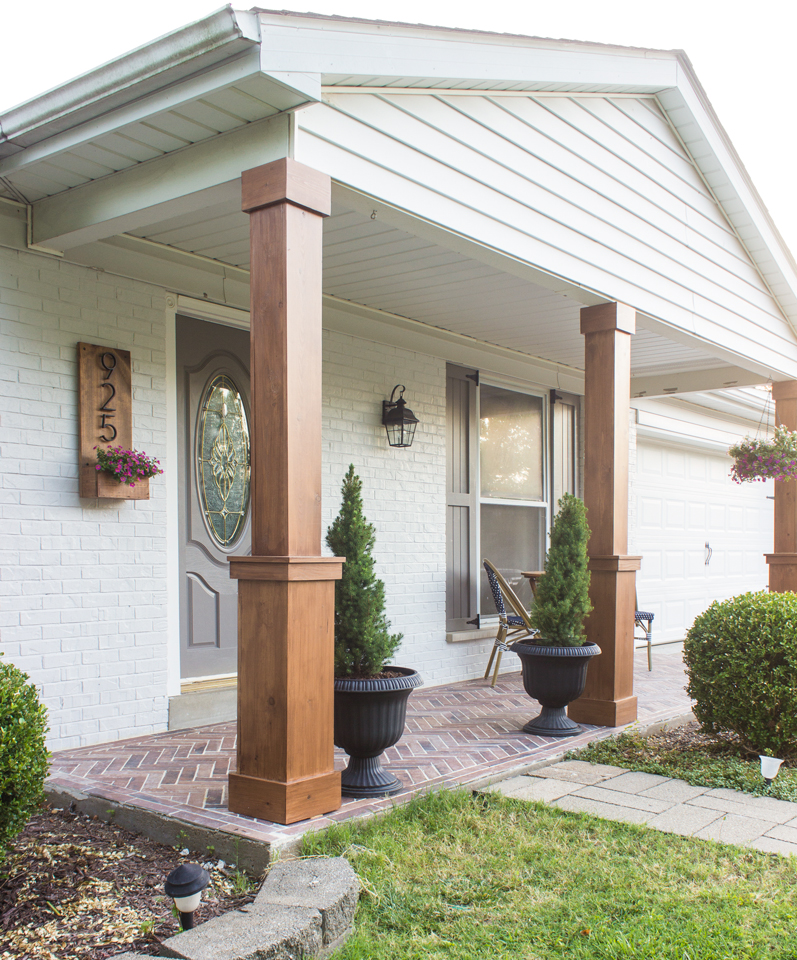
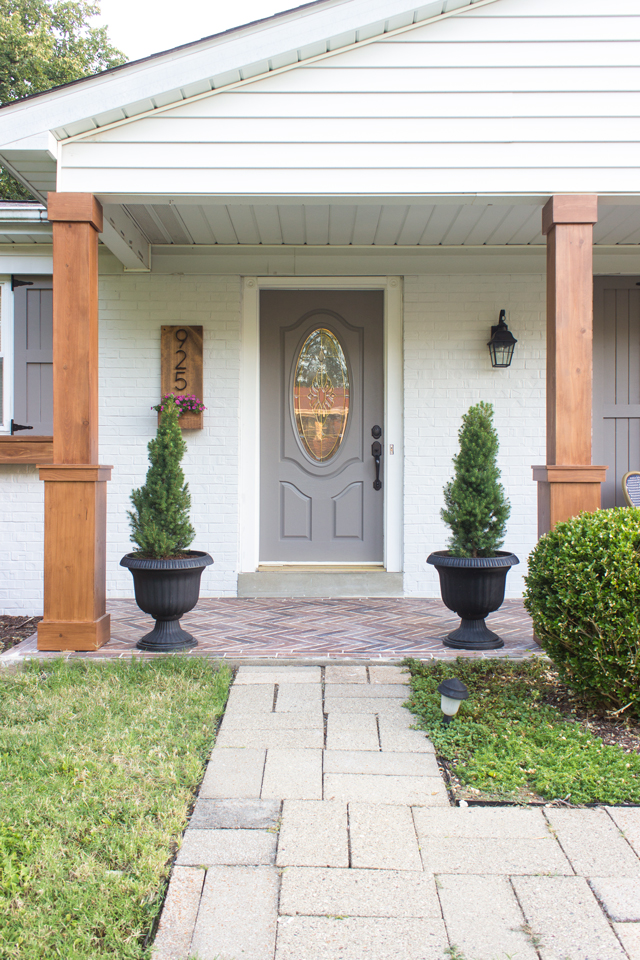
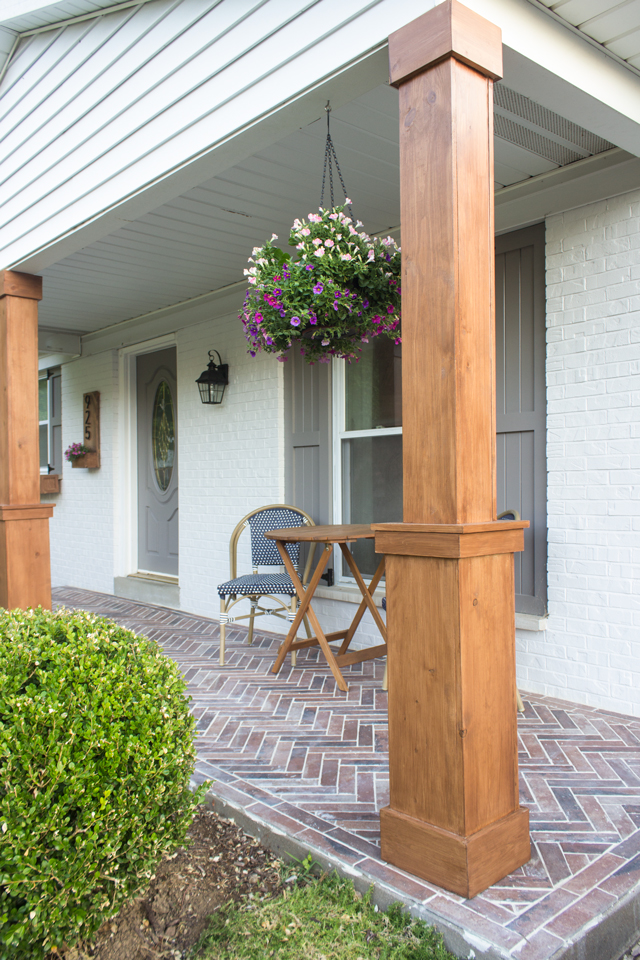
Today I’m going to show you all how I added some major curb appeal to my house by creating DIY Craftsman style porch columns. This is a great weekend project and will give your front porch a beautiful update, whether you decide to stain them, like I did, or paint them.
I’ve been obsessed with Craftsman style homes for many years… I can remember when we were a young married couple living in Salt Lake City, I would admire all the Craftsman style homes. They had darling front porches with the signature columns that showcased the hand-crafted look. Last summer I added Craftsman style shutters around my windows and I’ve been planning and scheming ever since then, to ‘beef’ up my columns by wrapping them in stained wood. Well, last week I made that dream a reality when I shared my front porch makeover.
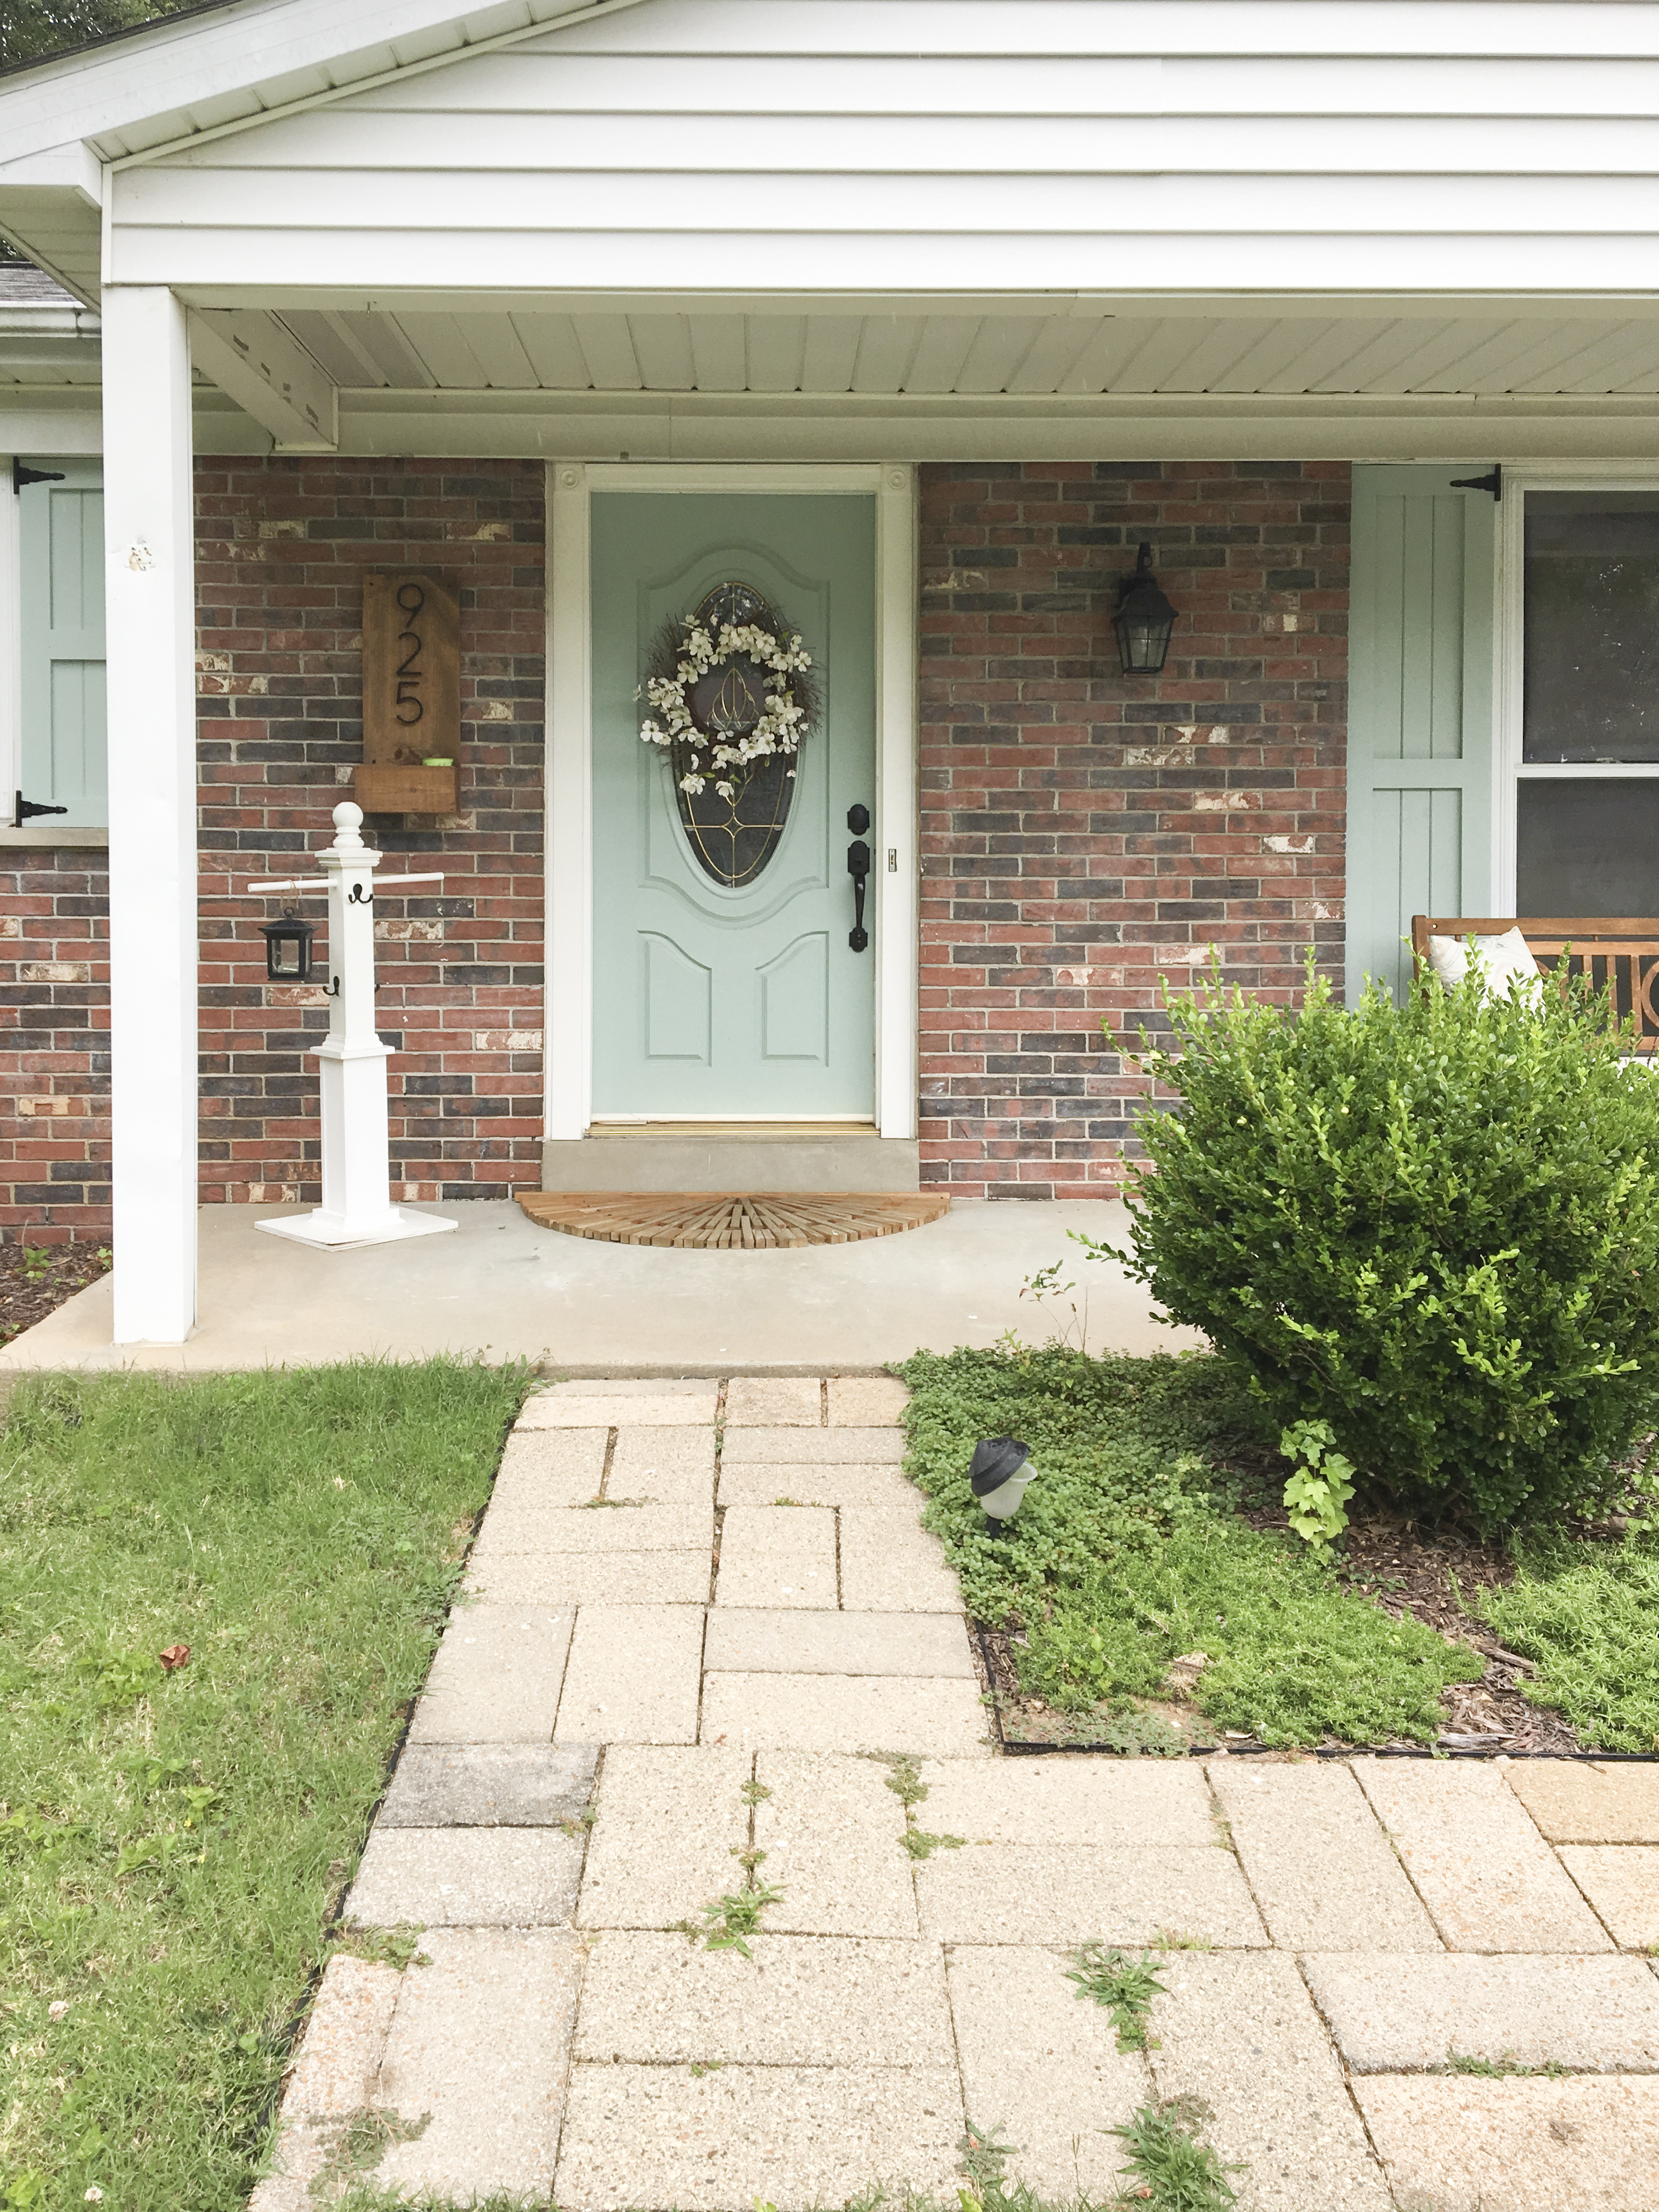
Previously, our columns were simple 6x6s wrapped in a white metal flashing-type material. It was really lack-luster.
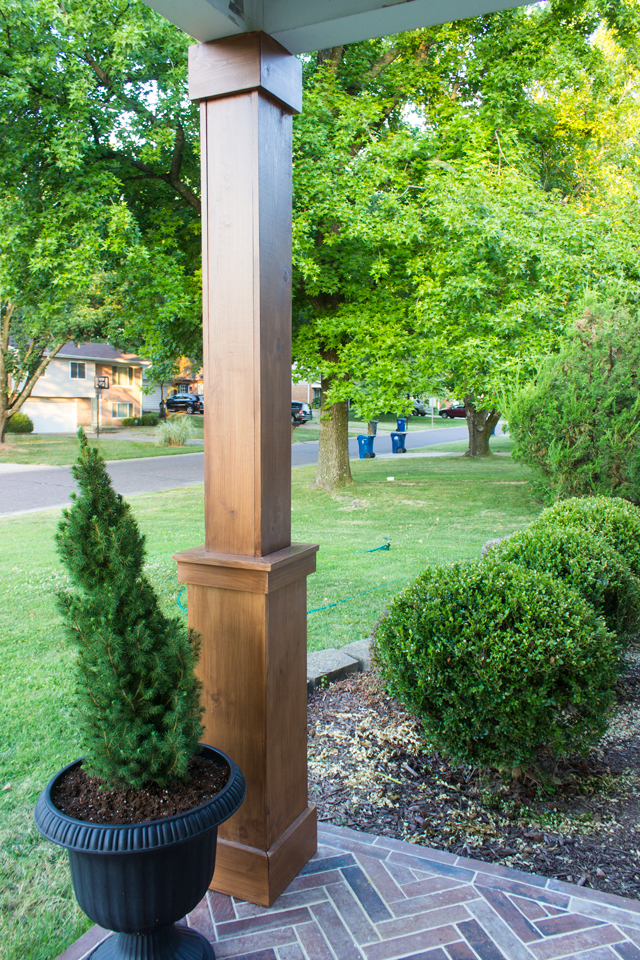
Now they have character!
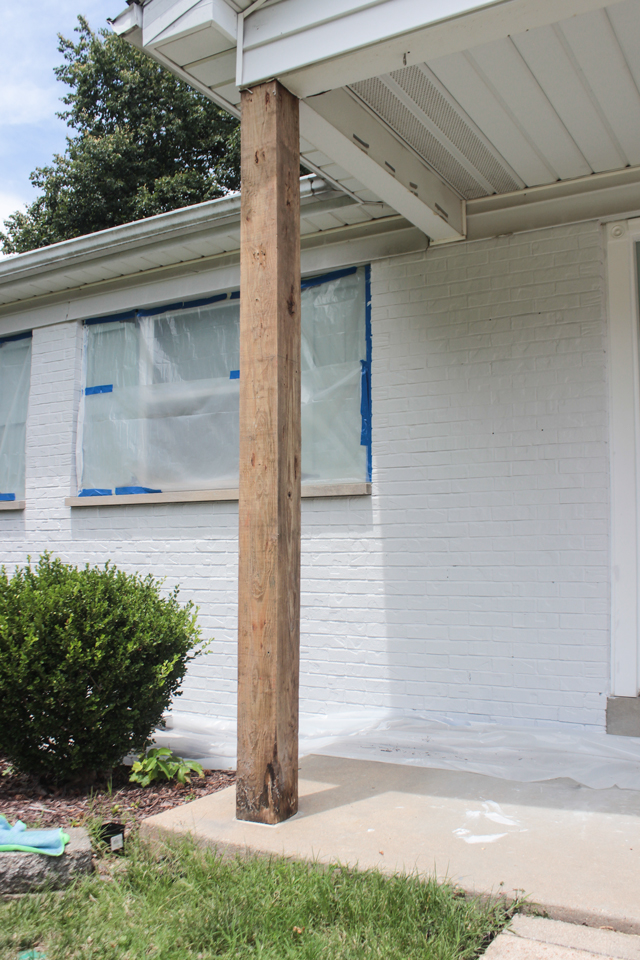
The first thing we did was remove that white metal column wraps, and this is what we were left with:
I feel like what I chose to do was “ALL THE THINGS” and hopefully you can figure out what you want to omit (if anything) from my tutorial to achieve the look you think is best for your home.
So this is what the process entailed:
-Wrap columns in wood, including top trim
-Build separate base unit
-Build and attach a non-load-bearing column
-Attach base unit to column and finish cap trim
-Stain wood
Like I said, maybe you just want to wrap your columns in wood, but don’t want that ‘beefier’ base unit. Maybe you want to wrap the columns in wood with the base unit, but you don’t want to add an additional column. Maybe you want to want to wrap your columns in wood, but want to paint them, instead of stain them. Whatever the case, I hope this is helpful!
Materials Needed for 2 Columns w/Base Units: (some affiliate links below)
**(Make sure and check all wood so that it is as straight as possible with no warping or knots on the edges)**
4- 1×8 boards @ 8′
6- 1×6 boards @ 8′
4- 1×10 boards @ 8′
2- 1×3 boards @ 8′
100- 2″ brad nails (or regular nails if you don’t have an electric brad nailer)
220 grit sandpaper
BEHR Stain and Waterproof Sealer in Chocolate
Tools Needed: (Affiliate links below)
Electric brad nailer or pneumatic nail gun
Step 1: Attach Boards Around Existing Columns
Measure height of your porch columns and cut 4- 1x6s to that size. Place glue on one side of the 1×6’s and nail onto the sides of the columns at the top, middle and bottom. If needed, use a clamp to get the board lined up straight and even with existing column, and to get it snug onto the 6×6. Once both sides are attached, glue and place the 1×8 onto the front of the column. Nail it into place and repeat this process for the back 1×8 board.
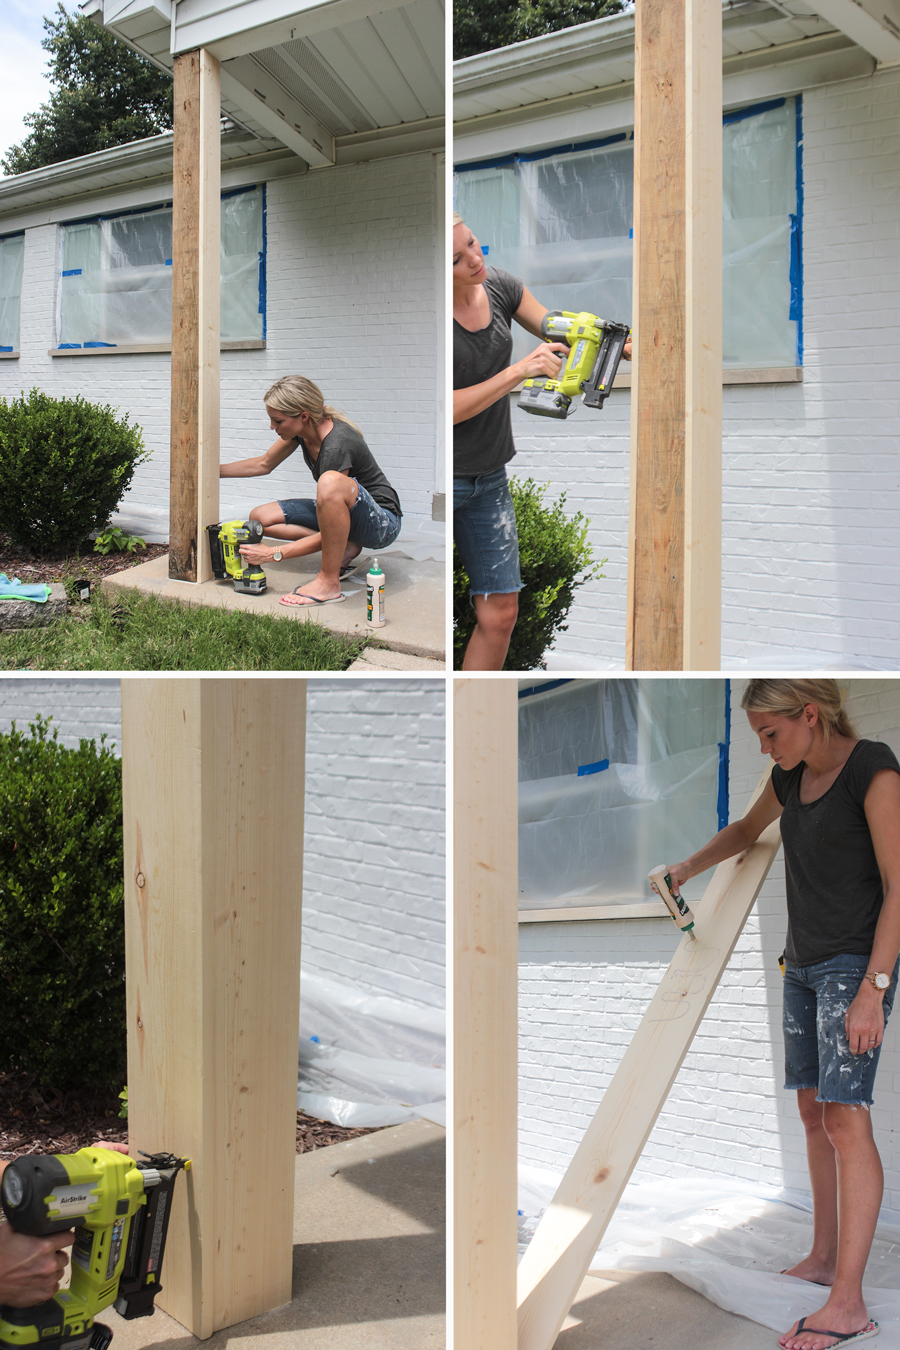
Step 2: Attach Top 1×6 Trim
Cut 4 pieces of 1×6 @ ~7 1/2″ on the short side and ~9 inches on the long side with mitered angles on both ends. **Measure the exact width of each side of the column before making these cuts, as sometimes the 1×8 boards are a little less than 7 1/2″ (which is the nominal width they are supposed to be). I find it best to cut them a little large and then shave of a little until the perfect fit is found.** Glue the backs and the mitered edges before nailing into place at the top of the column
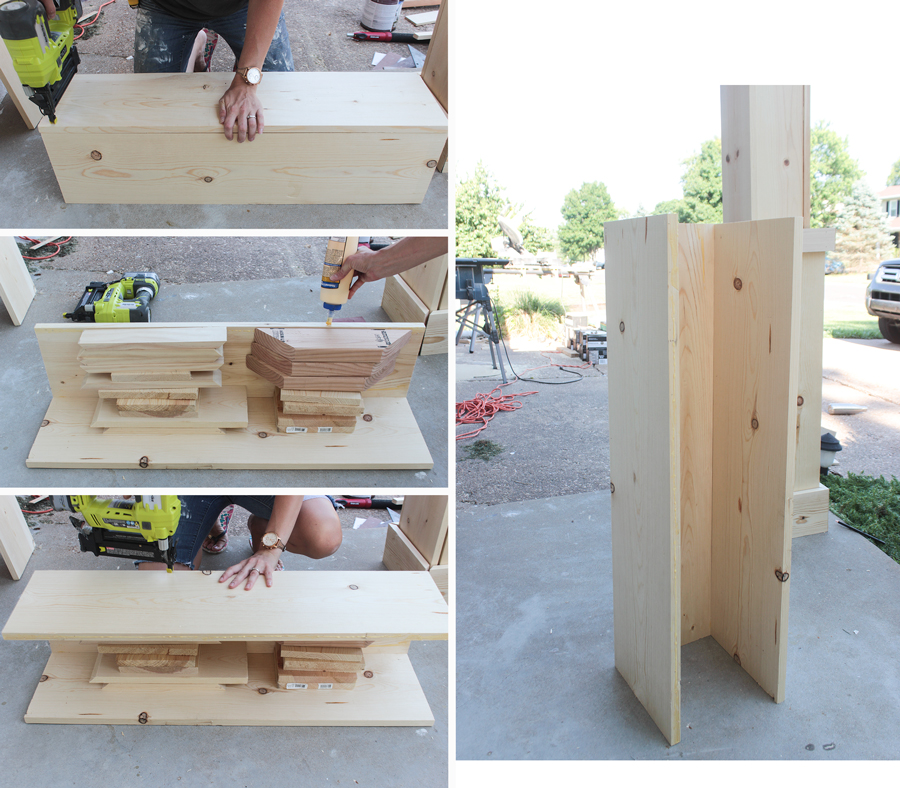
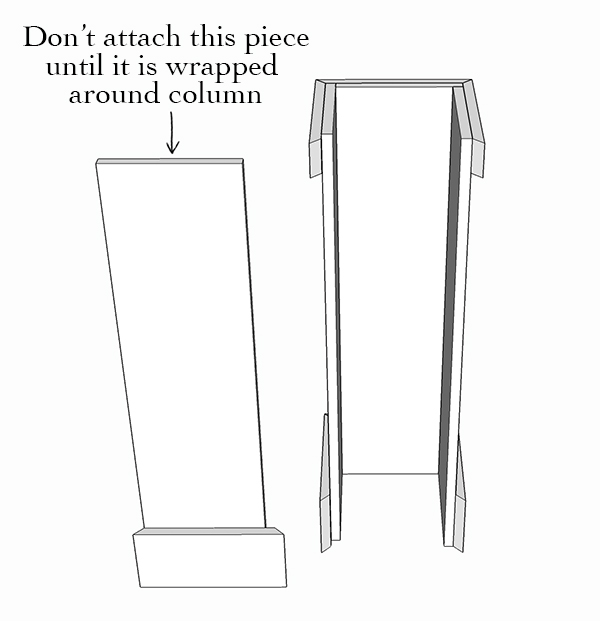
Step 3: Build Base Unit
From the 1×10 boards, cut 8- 36″ pieces. Place one of the boards propped up on some stacked scrap wood (or books or paint cans, or whatever you want), so that it is about 9 1/2″ off the ground. Slide another board under the ‘propped up’ board so that they are flush and perpendicular. Glue and nail them together.
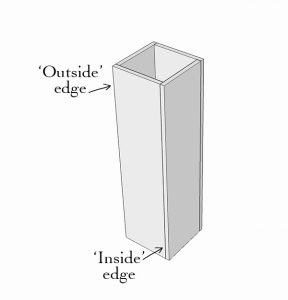
(Pictured above is basically how you will be building the box… except you won’t attach the last side until it is installed around the column)
Turn those two attached boards so that one is on the ground and the other is up. Use scrap wood to prop up another board that will sit on the edge of the board that is sitting up. Note that each side will only have one edge with nails. All the 1×10 boards will have one edge that is on the ‘inside’ and one edge that is one the ‘outside’. Once the third board is glued and nailed into place, stand it upright.
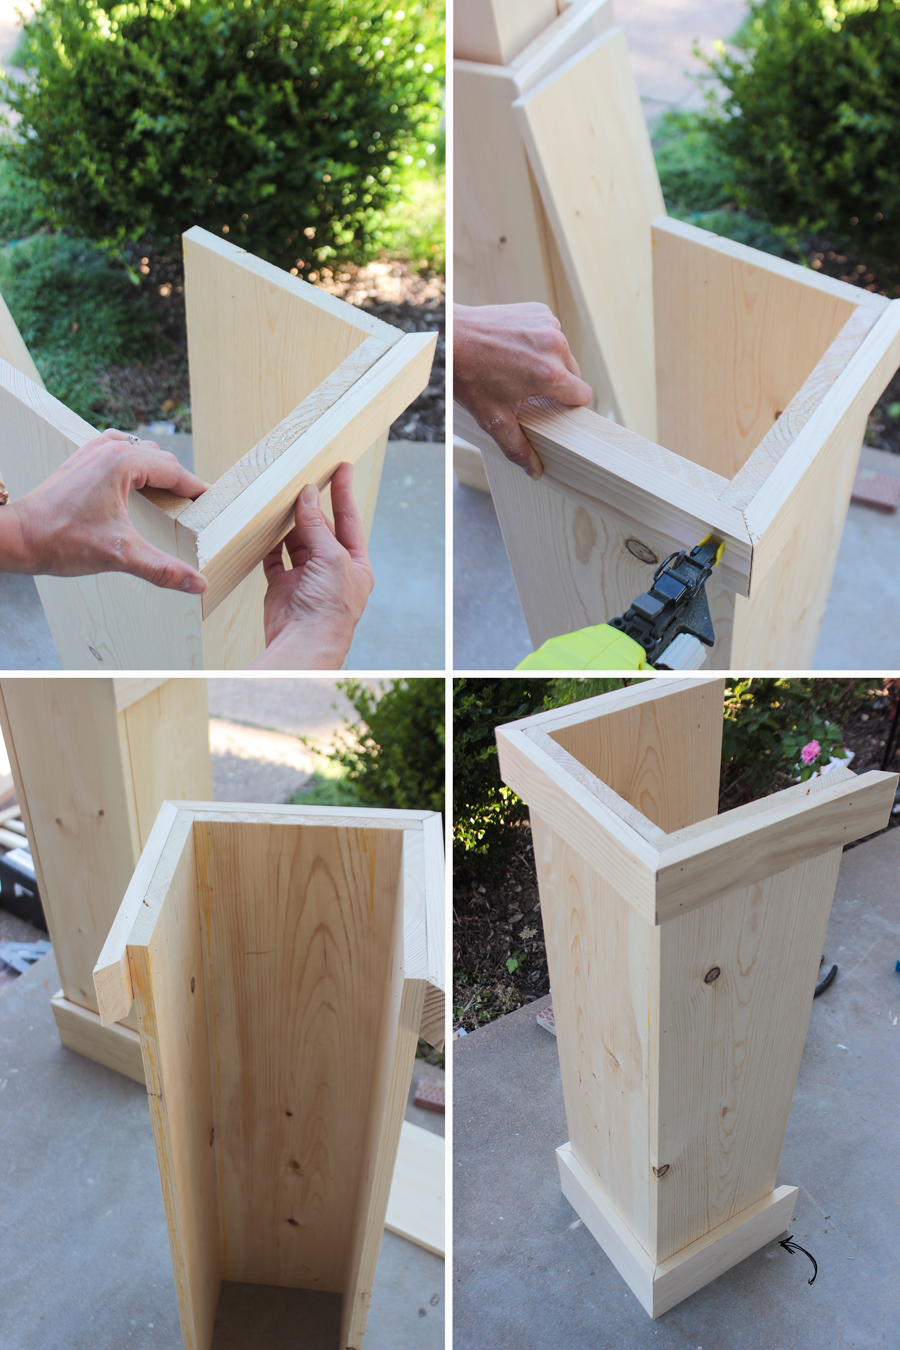
Step 4: Trim Out Base Unit
Measure and 45 degree miter cut 4- 1x3s @ 10″ on the short side and 11 1/2″ on the long side (double check and measure the actual width of the columns so that your mitered joints are nice and tight). Glue and nail each side into place on all three sides of the base unit, flush with the top.
Measure and 45 degree miter cut 4- 1x6s @ 10″ on the short side and 11 1/2″ on the long side. Glue and nail each side into place on all 3 sides of the base unit flush with the bottom. Note that you should have an extra, 1×10 board that is 36″ tall, an extra 1×3 and and extra 1×6– set them aside for when you install them around your column.

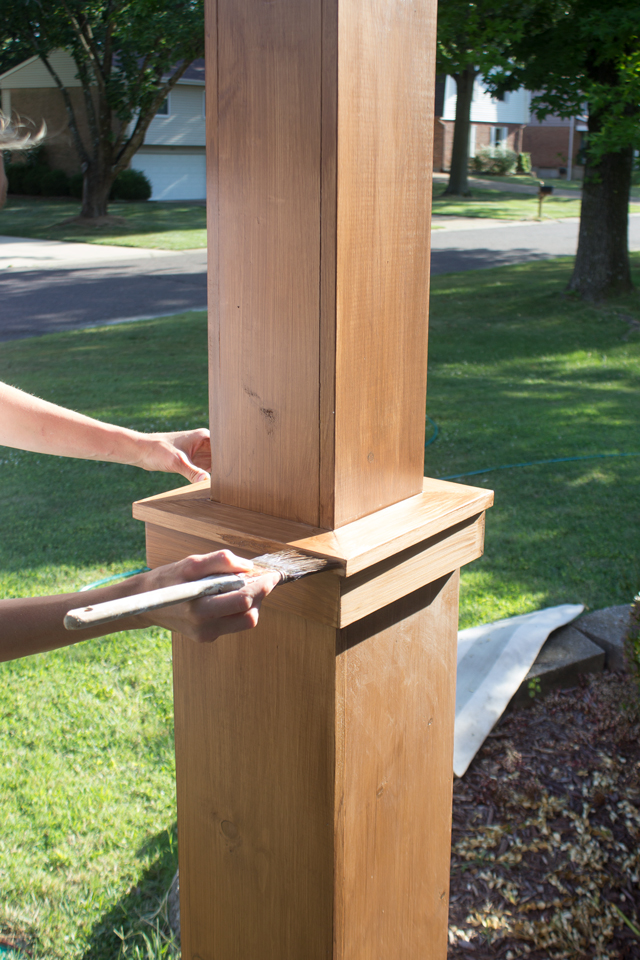
Step 5: Stain Wood
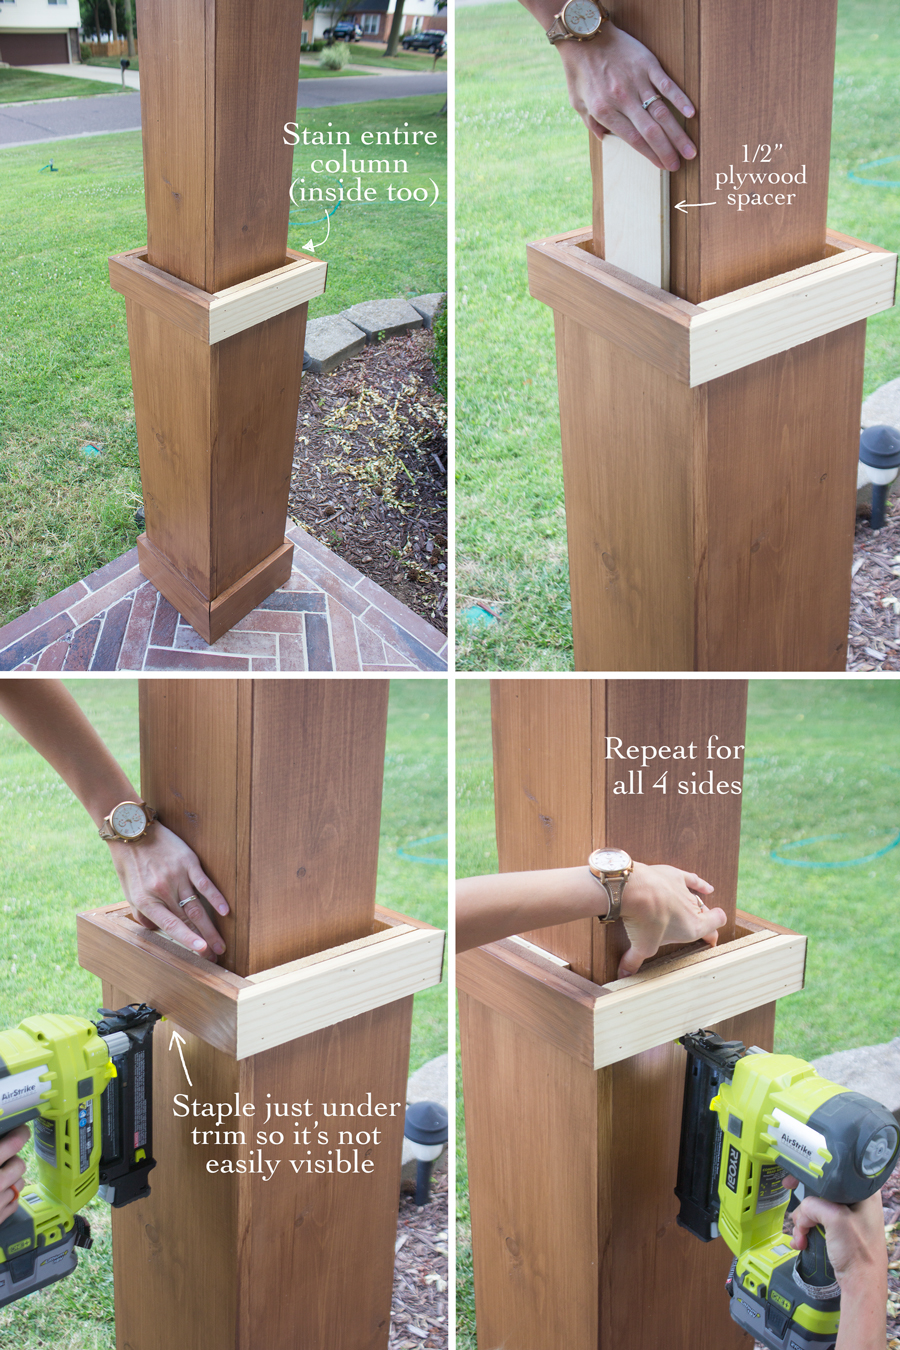
Fill nail holes and seams with wood filler. Let dry and sand completely with 220 grit sandpaper. Sand all the wood, even if it didn’t have wood filler, to remove woodmill residue/layer. Follow exterior stain instructions and clean/sand the wood properly. Apply 2 coats of stain on entire column (without base unit attached), and both sides of the column base. This ensures that water won’t damage the inside, even if water gets into seams/cracks.
Step 6: Attach Base Unit to Columns
Wrap base unit around one of the columns so that the open side is facing the house. Put the 4th side of base unit into place and attach it securely using glue and nails. Attach the top 1×3 trim piece last (cut to fit). Attach 1/2″ plywood spacers between the column and the base unit on all 4 sides, driving 2 1/2″ nails directly under the 1×3. You might have to use some shims to get the base unit tight on all side and level. The nails should go through the base unit, through the 1/2″ spacer, and into the column.
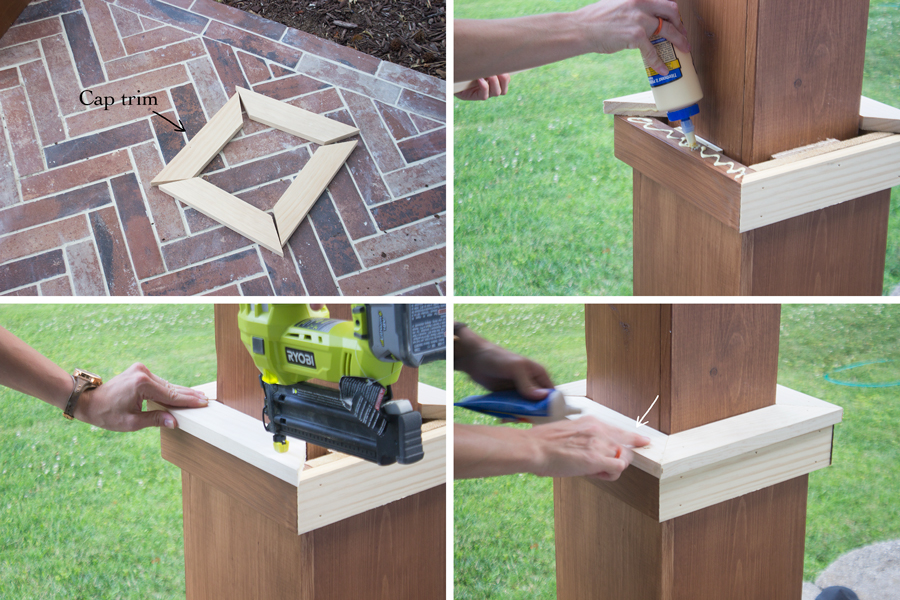
Step 7: Attach Cap Trim to Base Unit
Cut 8 pieces of 1×3 @ ~7 1/2″ on the short side and ~12 1/2″ on the long side (45 degree angle cuts on each end). Measure each side individually and cut accordingly to get the best fit. Glue and nail the 1×3 cap trim pieces to the top of the base unit. Fill nail holes with wood filler, sand and apply 2 coats of stain to match the rest of the columns.
Optional Step: Build Faux Column & Attach to Porch
To build a non-load-bearing column, simple build a ‘box’ using the same size boards as you wrapped your other columns in. However, you won’t attach the last side until the column is properly in place. Measure the height of where you want the additional column to be and cut the 1x6s and 1x8s accordingly. Try to get as close to the actual height as possible, so your boards will be nice and snug (dry fit before installing). Note that the height will be slightly smaller than the columns on either end of the porch. Attach the 2- 1x6s to each side of the 1×8 with glue and nails. Put your column box into place (make sure to measure placement on the ‘ceiling’ beam and on the ground so that it is evenly and symmetrically spaced from the door). You may need to use a mallet to tap the box into place, or even use shims in some edges (in case the ground is uneven).
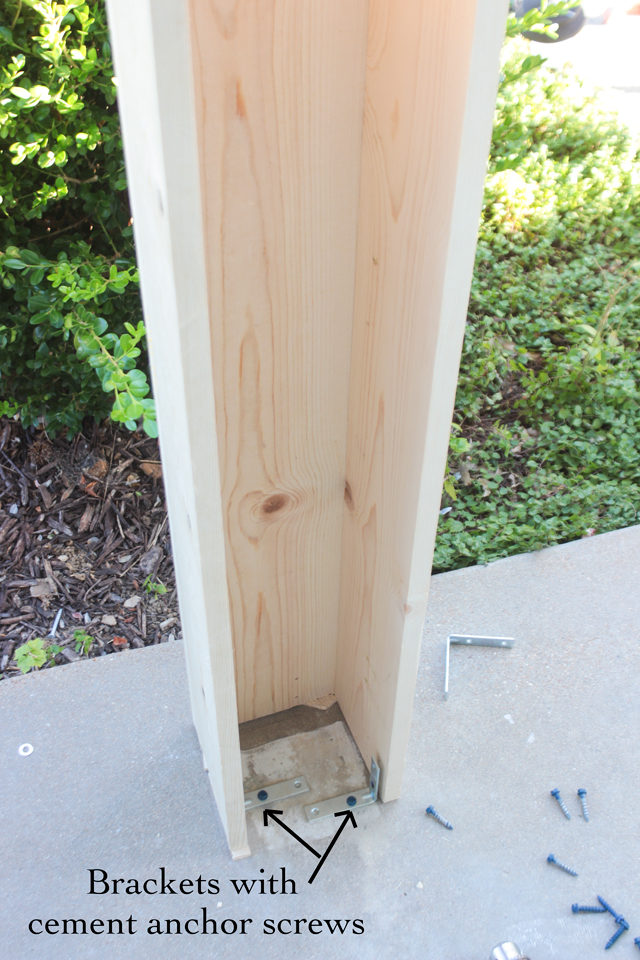
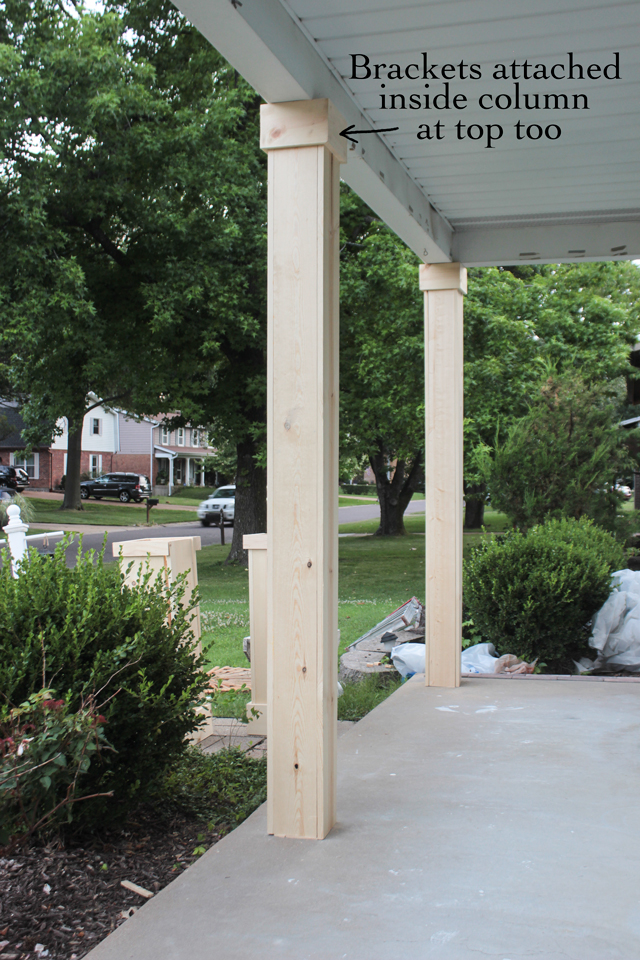
To attach the column box to the porch, measure and mark where 2- L brackets will fit on the inside of the column at the bottom and at the top. Pre-drill holes into the concrete (using a concrete/masonry drill bit) and attach the brackets using concrete anchor screws. Attach the other end of the L brackets using 1″ wood screws (the screw tips might come out the other side a bit, but it will be covered by the column base unit). Repeat this process for the top of the column box, but instead of using concrete anchors, use 2 1/2″ porch screws to attach the brackets into the ‘ceiling’ beam. Once the column box is securely in place and brackets are all attached, attach the 4th side of the box using wood glue and nails. Finish off the top trim of the column using 1x6s with mitered corners, as was done in Step 2.
Not bad, eh? These would look beautiful painted white as well… and if you painted them, you could use caulk instead of wood filler if you wanted to.
I hope you found this tutorial helpful! Let me know if you have any questions!
To see Front Porch Makeover go HERE.
To see Craftsman Shutters Tutorial go HERE.
To see Number Sign Planter go HERE.
To see Craftsman Cedar Window Planters go HERE.
Exterior Brick Paint – Behr Masonry, Stucco and Brick Paint in Dove Gray
Door and Shutter Paint – Behr Marquee Exterior Satin Enamel Paint in Creek Bend
Stain for Columns and Planters – Behr Semi-Transparant Waterproofing Sealer and Stain in Chocolate
Porch Tile – MSI Brick Porcelain Tile in Red
Number Sign Numbers – Black Elevated House Numbers
Shutter Hardware – Richelieu Black Gate Hardware
Hi There, the columns look amazing! I was actually wondering about how you did the brick part on your cement area. It looks awesome, too!
Huge impact and what a huge difference as well! What a beautiful addition to the front of your house and major curb appeal! What a handy lady!
Hey, Rachel. Wonderful update on your porch columns. It added character to your outdoor area. You certainly did an amazing job. Thank you for the detailed tutorial, too.
Fantastic tutorial, and stunning finished porch. I have those same “paint shorts”!
Hi! Great tutorial. How many coats of stain did you add? Did you also use a gloss to finalize it?
2 coats and no gloss to finalize– the sealer is built in!
Is it imperative to sand before using the stain? We applied one “roll” on coat it was super dark! Waaaay darker than the picture. I wonder if a brush application versus roller made a difference as well? Thoughts?
We just completed our columns, and we definitely sanded before we stained. We did 2 coats of stain on ours, and we used a brush, no roller.
How did you remove the metal columns?
Great job! I am so impressed you extended the columns a bit beyond the porch, the way they should. I want that so much for our columns.
it’s seriously perfection!! I love it! you nailed it. lol, literally and figuratively. I always see homes with columns too frail. they all need this!
Did you paint the cement floor or did you put down brick?
It’s brick-look porcelain tiles! 🙂
Do you have a link to the tile you used?
This is the most beautiful wood column I have found! Great job!! Can you tell me what type of wood you used, please?
Stacy
Did you find out what kind of wood? I have been searching all the sites.
Thanks
It’s just pine that has been acclimated to the outdoors for 30 days.
yeah but, now that it is 5 or so years later, i bet you have some rot on the bottom pieces. even stained and sealed, untreated pine will rot rather quickly in the weather. It looks really beautiful but should have been done in cedar to last longer. and cedar will stain much better while also adding some texture.
Wonderful job!!!
What paint color did you pick for the exterior of your house?
Hi, what kind of wood was used?
Pine!
If you don’t mind me asking, what’s the cost to do this?
Looks great. Some words of caution though, be mindful of water intrusion. The flat surface of the lower portion cap can direct water into the column. Next time consider building the bottom section first. This will allow you to bring the cap all the way into the structural post. Second, when you build the cap bevel it 10 degrees so that water sheds to the outside (you can even flash it to the post to get real fancy). Then built your upper section on top of that. Make sure to cap the upper section too. And on the base, keep the bases at least 1/8″ off the ground. That will prevent moisture from picking up the base. Paint or seal the insides too for extra protection.
If you can keep water out of the inside they will last longer than you!
Great tips! Thank you! I definitely could have done a better job as you described. I did stain/seal the inside of the base unit, and there is a small gap at the base for drainage, so hopefully there won’t be too many problems. Thanks for your advice tho— I still have a lot to learn!
Great job this really helped. I’m doing this as well. For ours I put in new 4×4 treated posts that sit on a 2x6x0’-5 1/2” treated baseplate anchored to the brick. Drill weep holes in the baseplate. The new 4×4 posts are toenailed top and bottom to resist twist as they dry out. The 7” (5 1/2” inside dim) box runs full height and attaches to the baseplate at the bottom and to spacers on the 4×4 at the top. The box is made from (2) 1×6 and (2) 1x7net (ripped from 1×8) making it 7” square. The bottom box is just like you did it. I used pine also and preprimed everything both sides, edges, ends. (Painting them white). I set the 7” box and the 10” box 1/4” off the brick at the bottom to avoid rotting.
We just built ours, and my husband said we needed to keep it off the cement, for that very reason. We raised the bottom up so it is not sitting on the cement. They look amazing!! We are so happy we took the time to build these, instead of getting the pvc columns. So much prettier.
Hi Ryan,
Question for you, hope to hear back soon…
I have 17″ square columns at my entry way. They have a hollow brick base that is a few feet high. There is a hollow wood structure running through the brick down to the concrete floor. This wood structure has 2x4s at the corners, then OSB, tying it together. On top to finish it off is a wood siding material. I’m interested in flashing the point where the wood structure exits the brick base. How can I flash this – especially the outside corners?
How wide are the finished columns? Trying to see if they will fit on my porch as completed here
Hi, does your new columns over hang your header? I want to beef up mine, but that’s the problem I’m running into!
Yes they do a bit. Just the width of the 1×6 though, so it’s less than an inch.
NIce Job Rachel! Love the brick look porcelain tiles as well. Did you do that yourself also?
Hi what measurements of wood would I need if I only want to cover my top half of columns? Half of the porch is brick. I would basically need the top done.
Wow, what a difference. You nailed this project. It’s to beautiful to rot, so I hope it will last a lifetime.
What type of stain did you use and what color?
I actually listed this information in the tutorial– under materials needed.
Hi there, I like this look a lot. Great tutorial and plan on using it.
I live the color you painted your house. Do you mind sharing the color?
Sure! It’s found in this post: https://www.shadesofblueinteriors.com/front-porch-makeover-behr-100-giveaway/
Thank You
How are your posts holding up? I asked my contractor about doing this and he was hesitant about using pine outside. I also want to stain my wrapped columns. Your porch looks great, btw!
So far so good! They look about the same! I think it’s important to let the pine acclimate at least 30 days outside before doing anything with them.
Is your wood treated?
No. It was acclimated outdoors for 30 days prior to being stained with outdoor stain.
How do I leave a small space at the bottom for water? Is there some sort of spacer I can buy or a base that can be covered by the wood? I have looked and can’t find anything.
What would you recommend for the bottom box if you were wrapping a 4×4 post. You used 1x 10 for your 6×6 post
What would you recommend for the bottom box if you were wrapping a 4×4 post. You used 1x 10 for your 6×6 post
1×8
Great job! I, too, love the Craftsman-style home. We had our front porch completely replaced. We plan on staining/painting this spring. Trying to get ideas on landscaping on each side of our front steps to determine how we will have the cement attach.
This is gorgeous – what a difference adding that second column made!
Thank you for your detailed step-by-step – I’m excited to wrap the column in front of my house as a summer project!
Love this look. What was the finished size of the columns? Upper section 7”and lower 10”?
HI,
Great job on the columns. A couple of suggestions would be to install the base cap trim at a slight slope as you would an exterior window sill to prevent any moisture from sitting on the trim pieces. Also, a thin bead of exterior silicone sealant applied to the inside edge of the cap trim between the cap trim piece and column might help with weatherizing the columns.
Again, great job on the columns, they look great!
Did you have to rip any of these boards to make them fit? You covered a 6×6 post (actually 5.5 in.) with 1×6 pine boards (also 5.5 in.), so far so good. Then used a 1×8 (actually 7.5 in) to cover the entire span. 1″ + 5.5″ + 1″ = 7.5″. This assumes that your boards are actually 1′ thick. From my experience they are usually not 1″ but .75″. This makes your span 7″ exactly, which means you had to rip .5 inches from the 1×8. Or am I missing something? Thanks!
Look beautiful painted columns. Really appreciate!
Pretty good, the only thing I would do different is mitter ALL of the corners, the 1 x’s.
Thank you so much for the post!!
I’m making some changes to my carport and with the current time at home was looking to upgrade the columns with some more curb appeal so this is a wonderful help!
coukd you offer your some insight on how you let the wood acclimate outside? I’m assuming you set it outside on sawhorses under a tarp or something? I purchased the lumber to do this yesterday and I want them to last a long time. Any advice on this would be appreacited. Thanks!
You have it exactly right. I left long out for 30 days. Longer is even better!
I have the same question as Dan. Did you have to rip the 1×8 to 7” to get it to fit flush with the 6×6 on the sides? Or is a 6×6 more true to size? Did you use any kind of spacer? They look phenomenal. Looking forward to doing mine next week.
How lovely! Thanks for the inspiration.
Hello, would you be able to provide wood/material sizes needed for original pillars that are 4.25″ ??
Thank you!
I would use a 1×6!
Hello Rachel, would you be able to provide the wood sizes & material sizes needed for covering 4or posts (actually 4.25″)??
Thank you!!
I am excited to find your post! The column on our house is flush with the edge of the overhang. Am I correct the wrap at the top of your columns now hang out a little bit?
Yes!
Does pressure treated wood need to be used to wrap porch post if the wood is being painted?
Thanks
If you can find it, yes it’s best! Otherwise you need to let your wood sit outside for at least 30 days before use and then stain/seal all sides before attaching it to your home.
Hi great job. Have you had any trouble with carpenter bees?
No, we haven’t.
Hi! I’m in the process of redoing my columns, following your tutorial (so big thank you!). Quick question – what shade of stain did you use and was it Minwax brand? Water- or oil-based? I love the color of your columns so I wanted to check with color wood stain you used! Thank you Rachel!
Stain details are in this post above– it’s a semi-solid stain by Behr.
Wow love love love
Are you glad you painted your brick?
I limewashed mine but don’t like it at all.
I think it’s my poor talent n the way it is aging.
Thinking about painting it now.
Can I just copy you lol
I LOVE our painted brick! Copy away!
Hi. What type of wood did you use? Is that pine?
If so, did the stain blotch at all?
Nice job!
It was pine. The stain didn’t blotch. It is an almost solid stain, so very little wood grain shows through– just enough to still look like wood, but not enough to become blotchy.
Looks amazing. I like doing things like this. I’m actually in the process to update a 6×6 post on our back deck. This has really helped give me ideas of how I want to do it. I have to ask did you make your house number/flower box? I love that too!
Do you know what kind of pine wood? I came to home depot and all they have is radiata pine I just don’t know how well it will do with weather once treated.
Leave it outside for 30 days to cure and acclimate and then when you treat it with outdoor stain you should be good to go!
It looks great. I needed ideas for my porch posts, would you mind if I copy your design?
Love ❤️ your house! What color did you use on the shutters and front door?
Beautiful! And this is a great tutorial. I have wanted to do the same with our spindly column wraps. But the boxes already come out to the edge of the concrete slab, so I don’t know how to make the bottom portion bigger than it is now without making them look uncentered.
Looks great the only thing that might top it off is a stained pine tongue and groove ceiling !
Just saying, Dan
No metal flashing on collar means collar will have to be replaced more often than if you did put metal flashing.
Can I pay someone to build this column for me? I thought it was a column I could order, I was looking on Lowe’s website and it brought me here.
What color wood stain did you use?
Looking at the original 6×6 column, it looks like there is wood damage (the black areas) from moisture climbing up the post because it is sitting on the concrete pad. Did you treat the wood support post to prevent further damage? It also looks like you installed the wrap pieces touching the pad, too, are you seeing any moisture intrusion from it touching the pad and being exposed to water sitting there, and traveling up the wood?
Yup… I’m going to have to redo it this summer! The support post is treated wood tho. I’ll be updating this post later!
Thank you for all of the great instructions and all of the details. I need to make my columns 10 feet tall. What height do you suggest that I make the base units?
Hello! Beautiful! We are looking to do this but I’m wondering how your columns are holding up. People are discouraging us from getting pine, but it’s so much more affordable and if all we have to do is acclimate it, I’m hoping it’d be ok.
Yes acclimate it and coat all sides with the stain before assembling them and you should be good!
I came across this project a couple months ago. After painting our house along with the stone, the 4×4 post just didn’t look good. One of my neighbors were moving and had alot of lumber he was getting rid of so I got as much as I could. I had to buy 6 1×6, that’s all. It looks absolutely beautiful. I wish I could share a picture.
yeah but, now that it is 5 or so years later, i bet you have some rot on the bottom pieces. even stained and sealed, untreated pine will rot rather quickly in the weather. the looks and craftsmanship you applied is excellent. It looks really beautiful but if done in cedar it would last longer.
Agreed! And you are right– the bottom pieces have some rot and need to be replaced. Even so– the interior beam is solid, so replacing the outer trim pieces are not a big deal, and the time and investment was worthwhile even for 5 years.
You took an already nice looking home & made it Absolutely Spectacular!!
Wish all people (especially in U.S.) would maintain their existing homes better & make these type of updates instead of building these WASTEFUL, GIANT McMansions that aren’t built to last the way some of the European homes are (like Germany for instance.)
I think it’s shameful & despicable how (especially Americans) think they need to live in such huge containers!!!