Picture frame moulding is a great way to can add character and subtle sophistication to any room. With just a few tools, you can add create a focal point wall, or you can install it around an entire room. Either way, picture frame moulding will add tone-on-tone texture to your walls and make your ceilings look taller. Today Im going to be sharing the tutorial so you too can add this treatment to your walls
Last fall when I did the #BehrBox Challenge, a component for the front room makeover was continuing the picture frame moulding around the rest of the room. I fell in love with what a difference it made to the whole room, but we were exhausted and stopped short of continuing it down the hall.

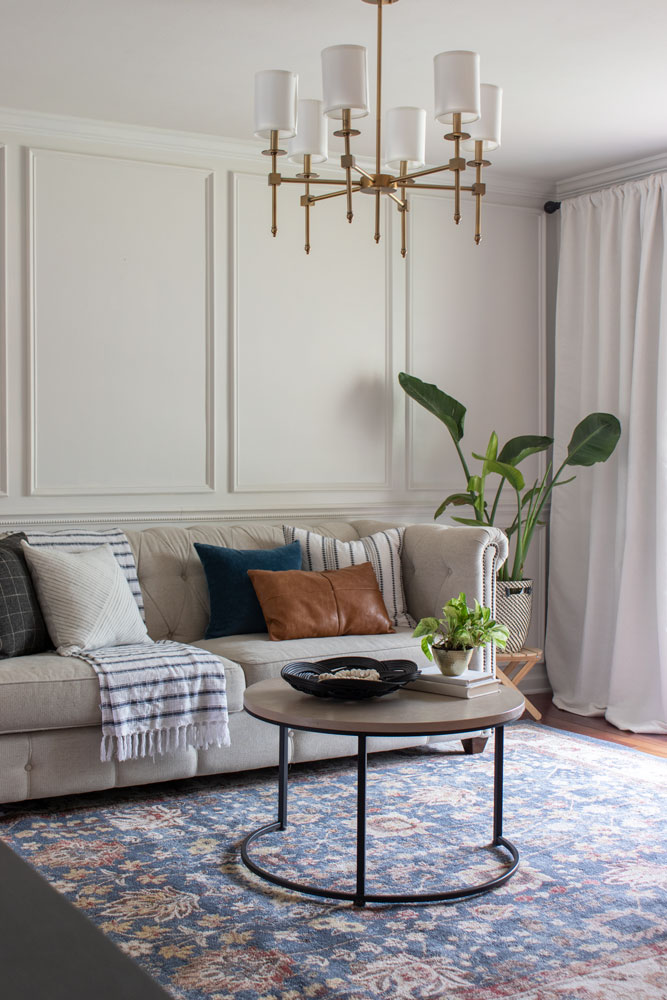
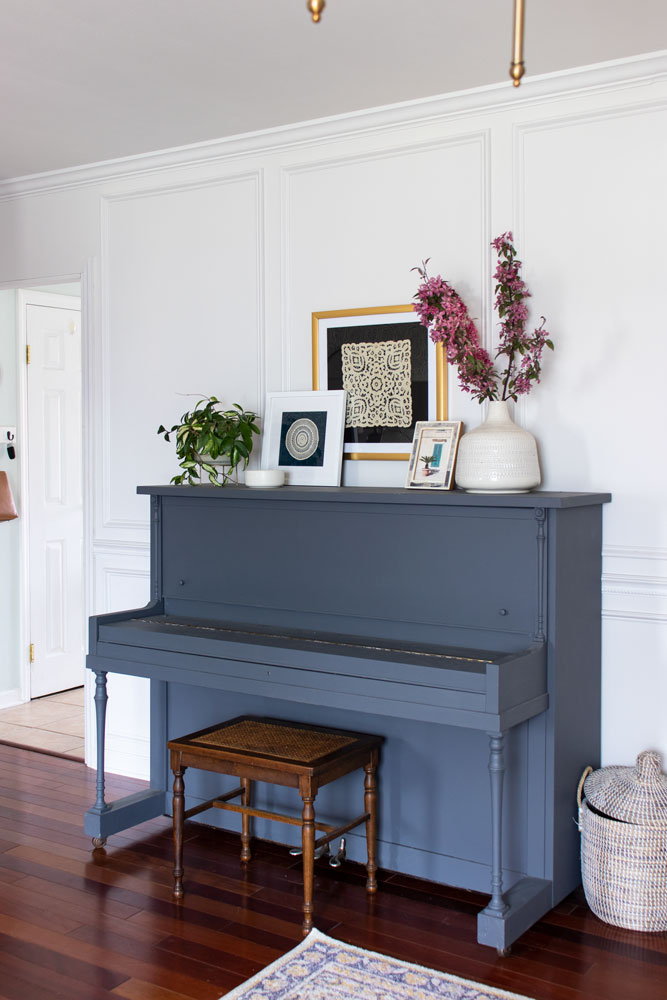
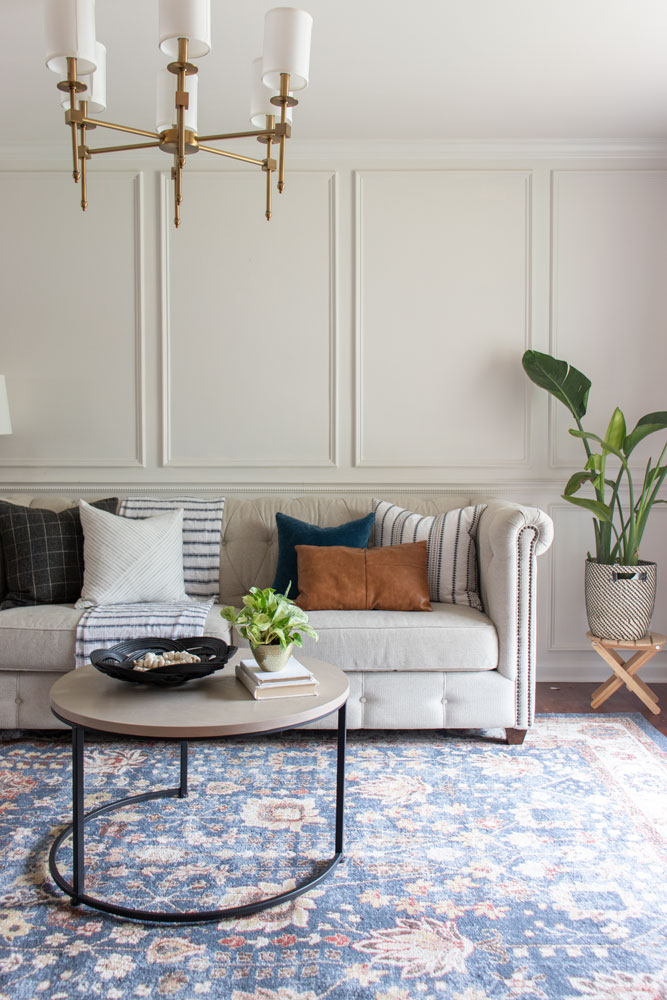
This past week I finally finished the hallway, so I thought I would finally share the much requested DIY picture frame moulding. We recently moved the furniture layout in this room, so where the console table was in the above picture, now has the piano with some vintage lace art (below).
Affiliate links are used in this post.
Tools & Supplies:
Tools-

Measuring tape
Hammer
Pliers
Level (optional)
Supplies–
Liquid Nails Paneling Adhesive
Plastic Wood, Wood Putty in White
Paper Towels
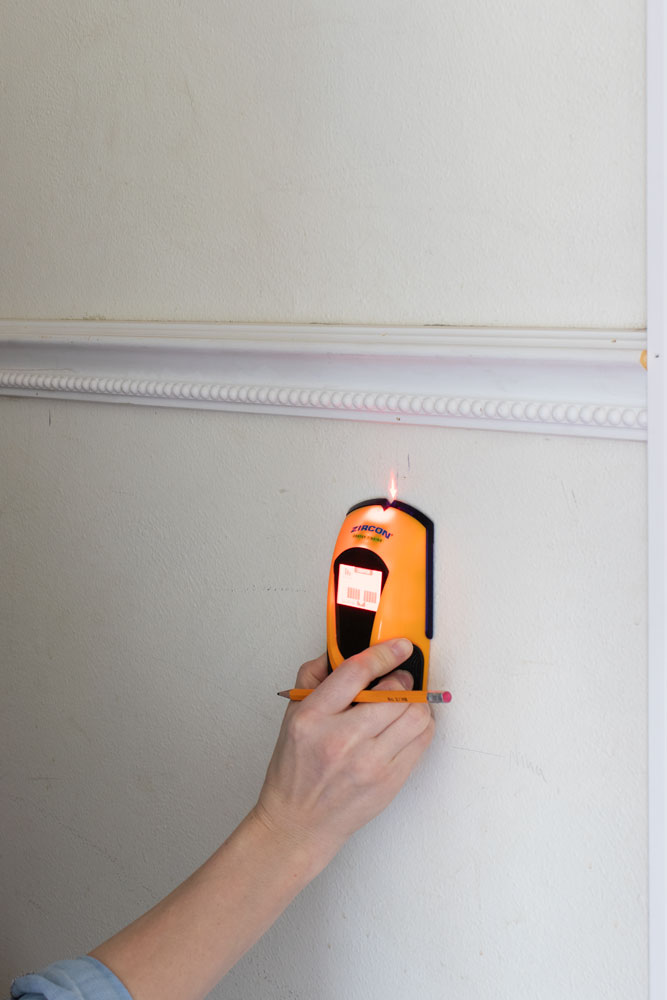
Step 1: Mark Stud Locations
Step 2: Measure & Mark Chair Rail Height
Measure the height you want your chair rail to be and mark it along several locations along the wall. The bottom edge of my chair rail sits 34″ from the ground, so I made a mark of the height at every location where there was a stud.
Step 3: Nail Chair Rail into Studs
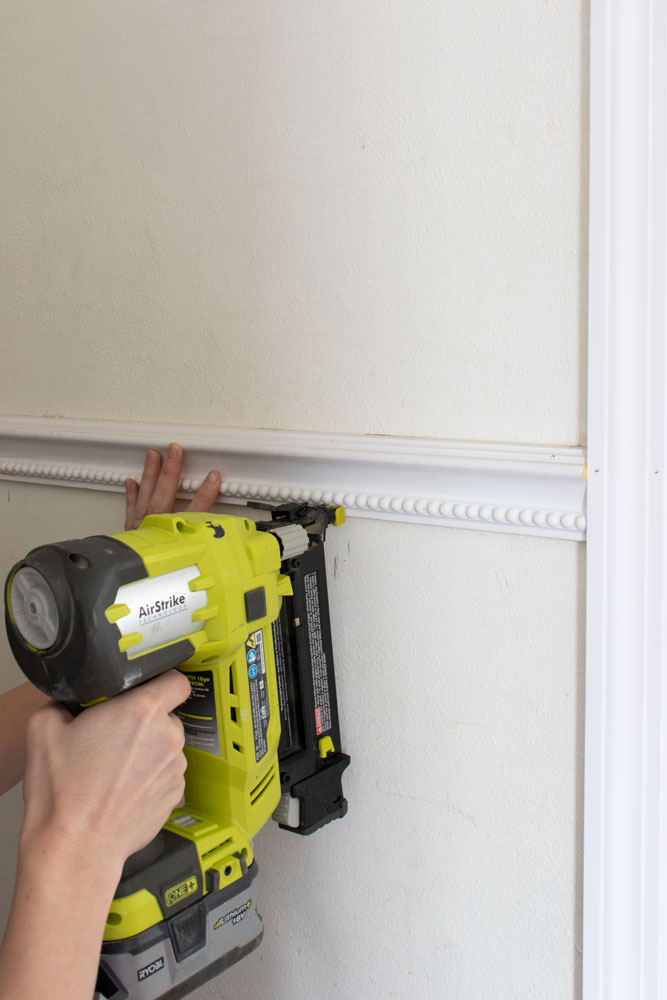
Run the chair rail between two door frame trim pieces, where the bottom edge of the chair rail is lined up with my marks in step 2. Make sure it’s level before you nail the chair rail into place.
Tip:
Nail the moulding near the middle (wherever a stud is closest to the middle) FIRST, then nail the ends.
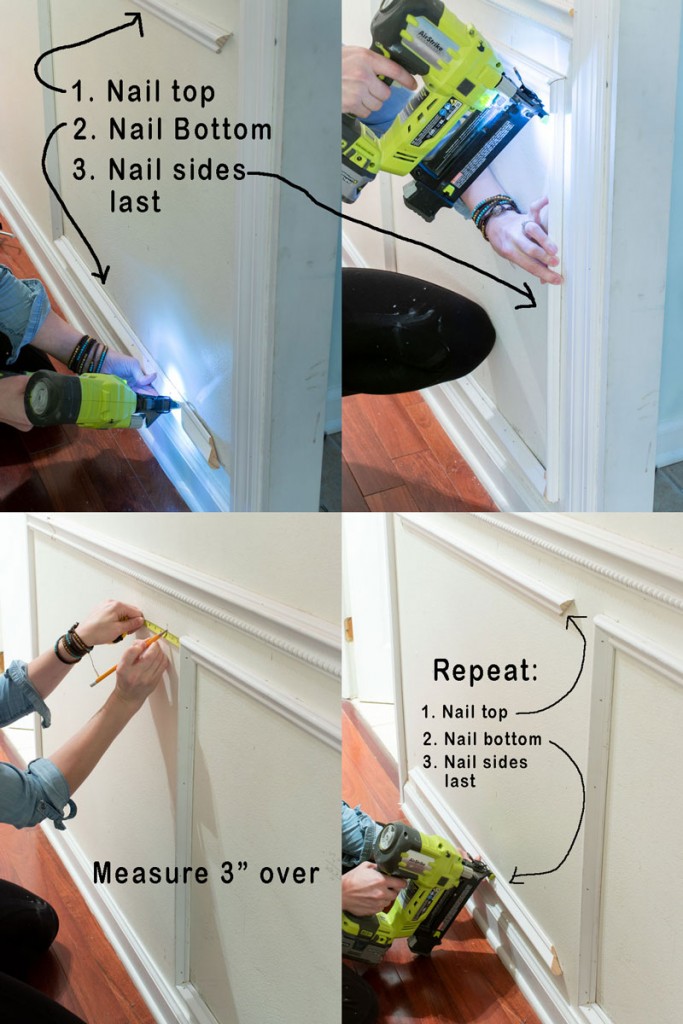
4. Measure Corner Placement of Moulding
Measure and mark 2″ over from the door trim, and 2″ down from the chair rail and ceiling, and 2″ up from the chair rail and baseboard. If one end of your wall is a corner, leave 3″ from a corner and 3″ from a wall-end. There will also be 3″ between the “picture frames”, but we will get to that later. Make little crosses so you know where to position the mitered corners of the moulding.
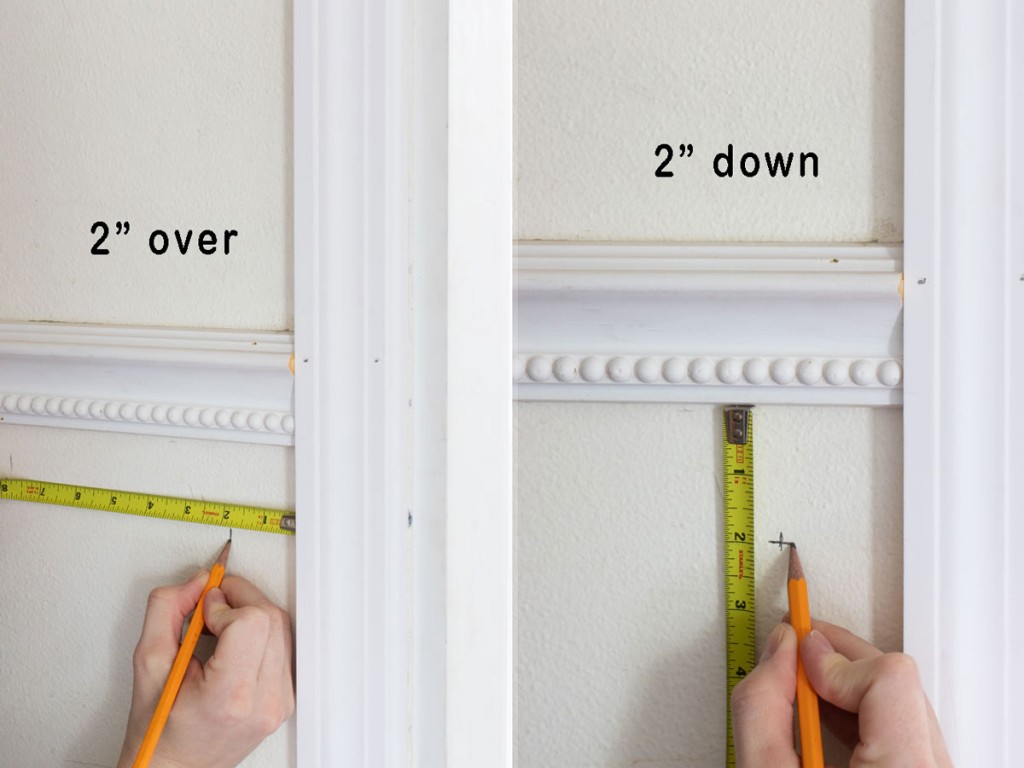
Only measure and mark the rectangles that are closest to the door trims for now.
5. Calculate How Many “Picture Frames” Per Wall and Mark on Wall
Calculating how many pictures frames on any given wall doesn’t have to be complicated. A good rule of thumb is to have their width be around 30″ (mine are mostly 31″ around the room, give or take an inch or two), but one wall has to have all the same “picture frame” widths. Adjacent walls can have some slight variance without it being noticeable.
So, say you measure the length of a long wall and you think you can fit about 5- 30ish inch-long “picture frame” rectangles. You will use this formula:

This formula takes into account that between each rectangle will be 3″ and there will be 3″ space on either end (if one side has a doorway, just subtract 1″ from the numerator in the equation since the space next to doorways is 2″).
Make the corner “+” markings on the wall for each rectangle so you know where to line up the trim when you nail them down in a later step.
6. Calculate How Much Moulding You Need
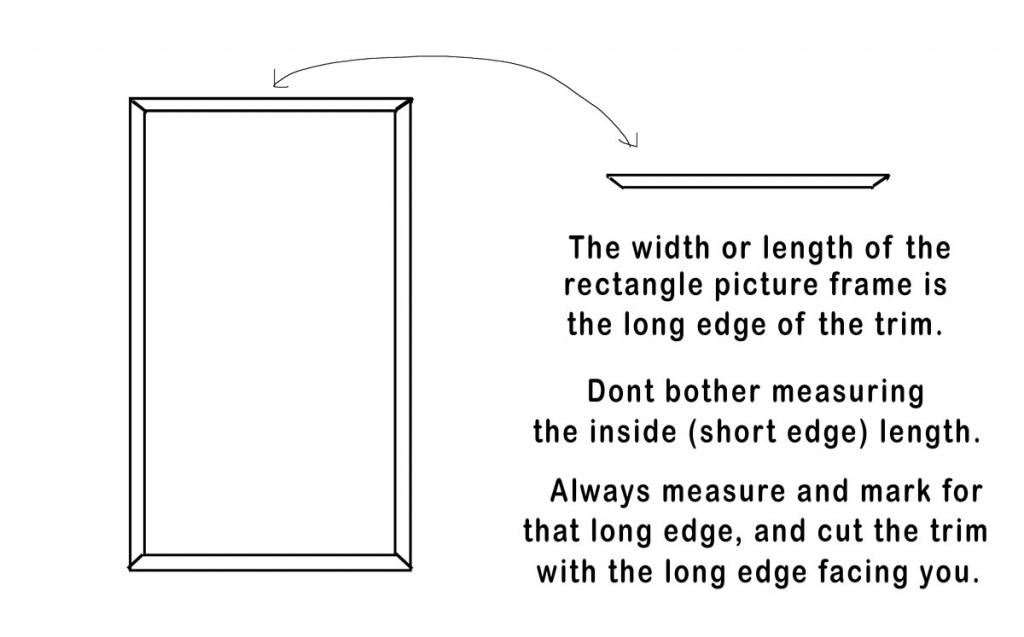
Once you know the dimensions of each “picture frame” rectangle, that outside edge is going to be the cut lengths for the trim/moulding. To calculate how much moulding you need, add those lengths up (in inches) then divide by 12 to get the number of feet. Round up to allow for mistakes when cutting.
Then, write down each piece measurement for each “picture frame” rectangle so you can make all the cuts at once.
7. Cut Moulding to Calculated Lengths
To cut the moulding to the previously calculated lengths, here are some tips I use to make the job fast and easy. First, have the thick side of the trim (the outer edge) facing toward you (facing out). Always measure and mark on this side, since the measuring tape can easily hook onto this thicker end. Next, move the blade 45 degrees to the left and line up the laser with the longest point on that edge. If this is a new piece of trim, it will be a straight edge you will be cutting off, instead of an angled one like pictured below.
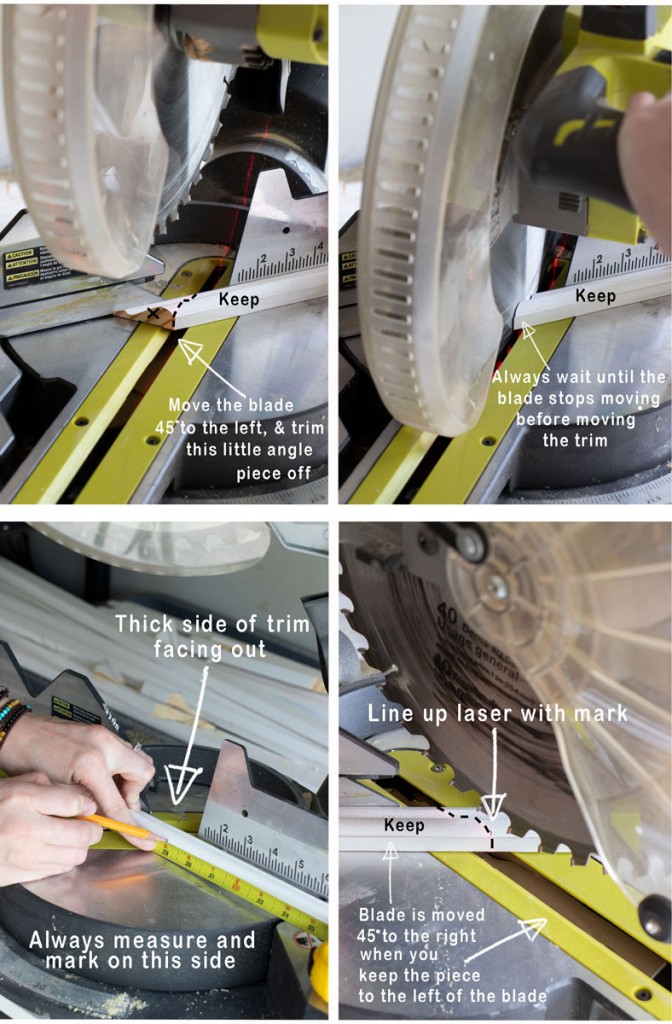
Once you have made that first cut, wait until the blade stops moving completely before lifting the blade and moving the trim down. This prevents injury and splintering. Then, move the blade 45 degrees to the right. Lastly, measure and mark the length of the trim piece you need, line up the laser with that marked point, making sure the blade doesn’t overlap it, and make the cut. Repeat this for each cut length that is needed.
Tip: Mark each piece with a pencil, saying where in the room it will go.
Step 8: Attach Trim To Wall
Apply Liquid Nails to the back of the first piece of trim. Smooth out the quantity so that excess doesn’t squeeze out the sides when you nail it in place.

Position the trim moulding so that the corners hit exactly on the “+”s you drew.
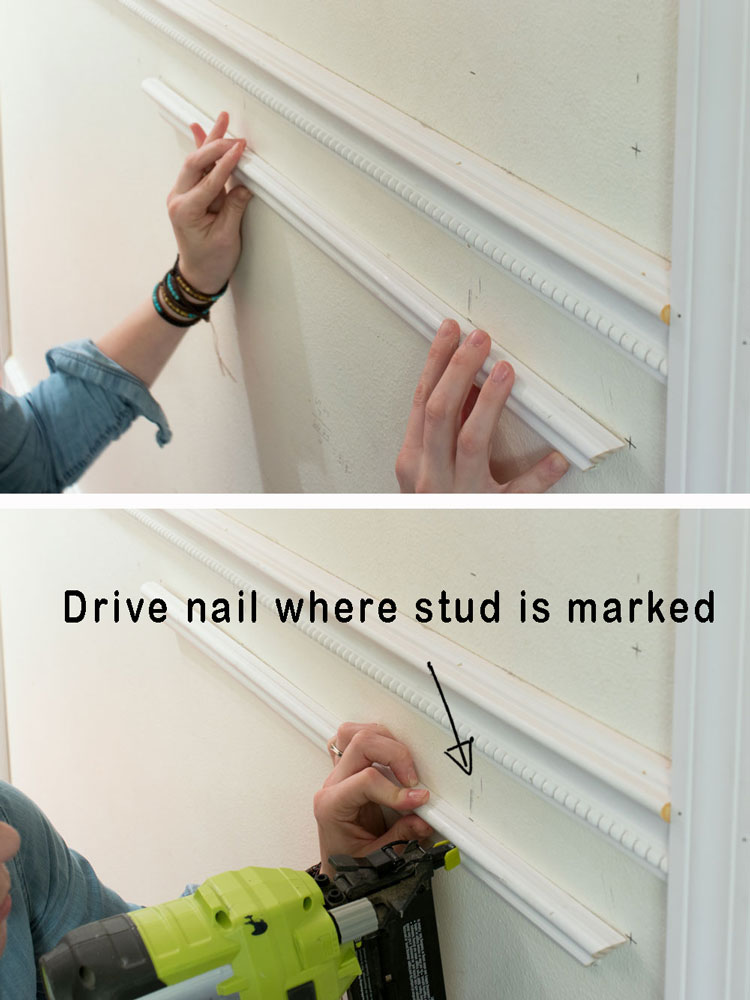
Drive the first nail in the middle part of the trim going into a stud, previously marked, then the corners (regardless if it hits a stud or not).
Attach the top, then the bottom, then the sides. This allows you to make sure your length is right for the sides and make cut adjustments if needed, before you attach it.
Tip:
WHen Attaching Moulding in an area without a stud, drive the nails in at a downward angle, to prevent it from slipping with gravity.
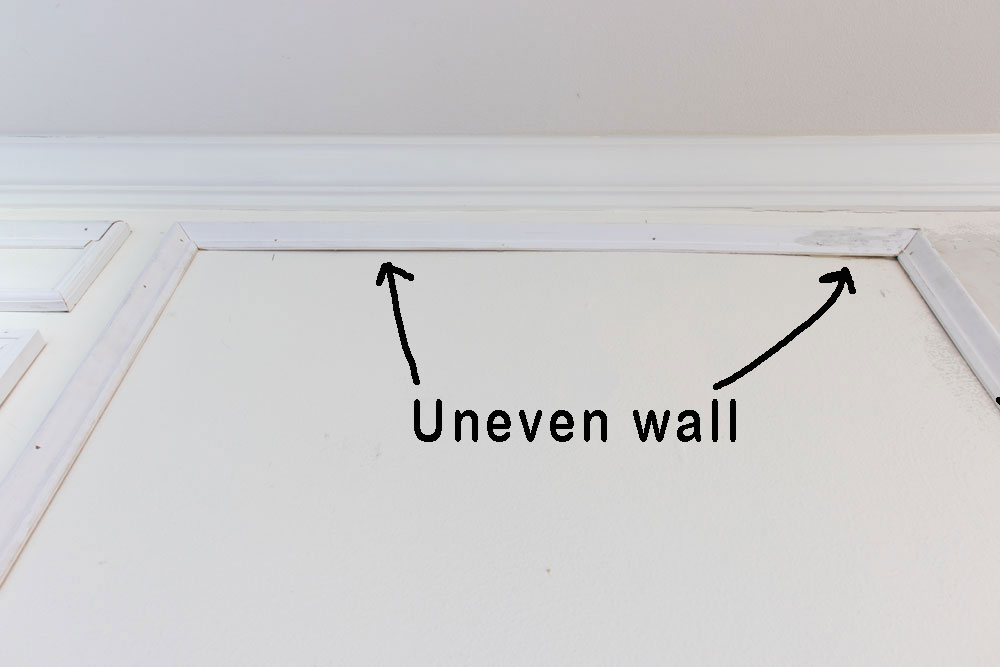
Tips for Uneven Walls
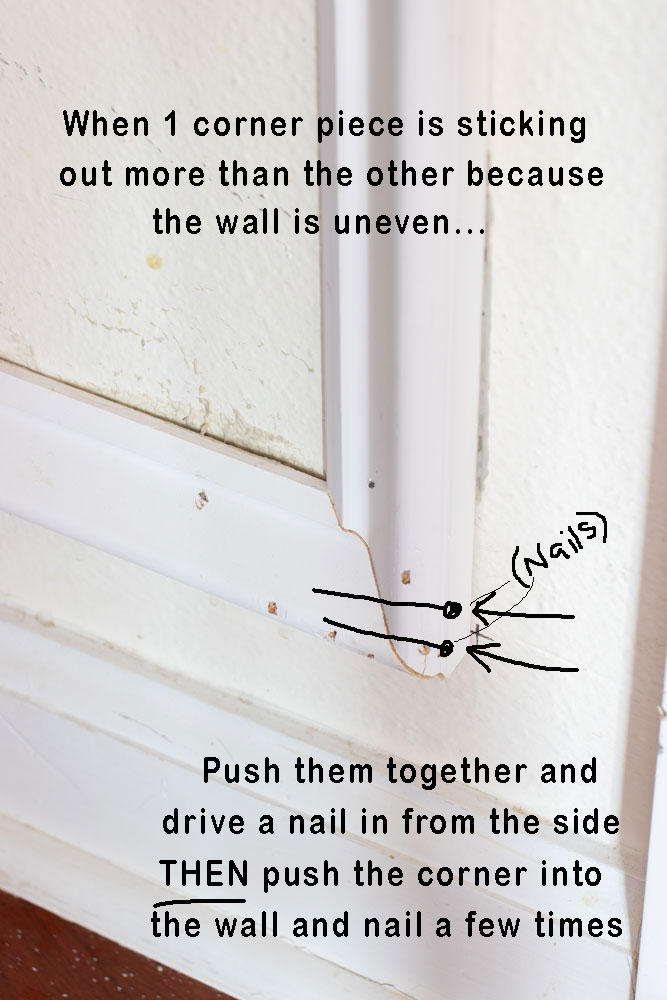
With many older homes, walls are sometimes uneven. The most important thing when working with this situation is to get the mitered corners lined up as close as possible, then allow wood filler and caulk later on to cover up any gaps.
When one mitered corner piece is sticking out further than the other mitered corner (not sticking out longer, but pulling away from the wall further), I use my hands to squeeze together the corner as best I can, and drive nails in from the side so that the nails are joining the two pieces of wood together first. Then I can nail that corner into the wall.
Common Fixable Mistakes
Sometimes, the trim moulding shifts ever-so-slightly when you drive the nail in. If this happens, use a hammer or mallet to tap the side of the trim to get it back into place. If a nail is driven in at too much of an angle and curves back out, use pliers to remove the nail and try again.
Step 9: Caulk Edges
Using flexible caulking, apply a thin bead of caulk to the edges of the trim moulding where it meets the wall. Do not apply it to nail holes, as the caulk will shrink when dried and leave visible nail holes still.
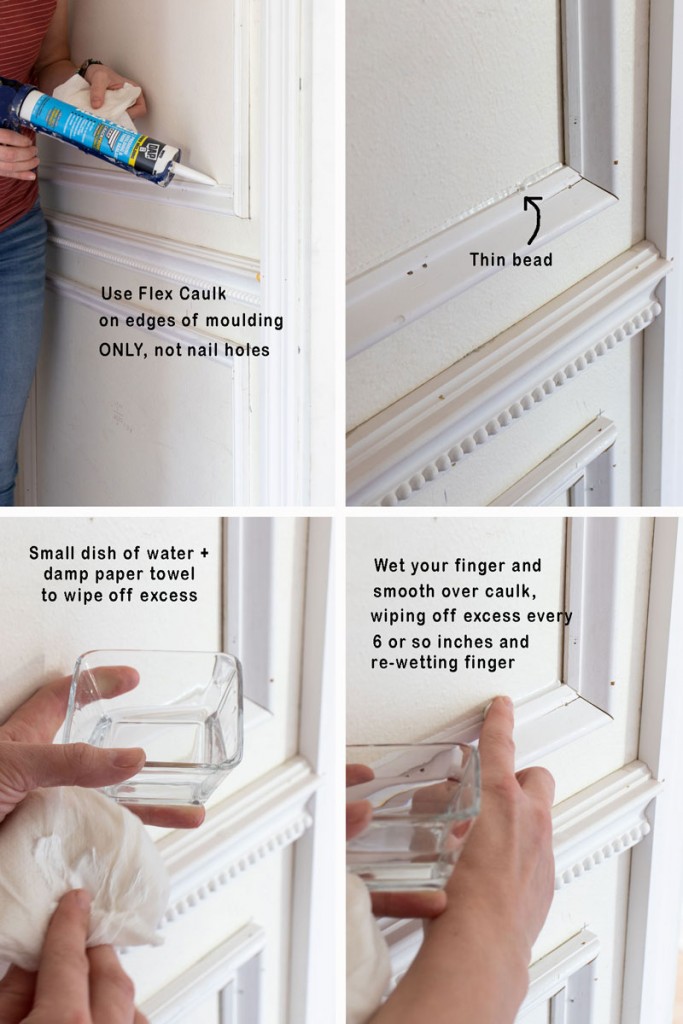
A trick I learned that smooths caulk easier and less messy, is to have a small dish of water to dip your finger in as you smooth the caulk line out and remove excess. Wipe off excess onto a damp paper towel.
10. Fill Holes and Mitered Corners with Wood Filler
Use white wood filler to fill all the nail holes and mitered corner seams. BE sure to not let excess wood filler sit on the trim, as it will be much more difficult to remove once it is dry. Just rub off excess with your finger.

After the wood filler is dry completely, using the fine grit sanding block to lightly sand smooth the areas that wood filler was applied. You don’t want to sand so much the primer comes off, but enough so it doesn’t feel rough.
Step 11: Paint Moulding
Using a 2″ sash paintbrush, paint 1 coat on all sides of the moulding first, and in between the rectangles, then use a small roller to paint the insides of the rectangles. Repeat this, so the trim and walls have 2 coats.
Now you can enjoy your work for years to come!
I hope you enjoyed this tutorial and it can prove helpful if you decide to add picture frame moulding inside your home!
Be sure to pin this for later or to share with someone you know who might find this post helpful!
Wow, looks great Rachel! I’ve been thinking about adding trim to our family room and will definitely be using this as a resource. Thanks for sharing the whole process 🙂
Perfect! Love this! I want to do this at my home.
Elegant yet subtle impact! Thank you for sharing!
I absolutely love this idea for my walls, Now to get my husband to come on board
Your home is so beautiful!!!
Absolutely beautiful as always! I haven’t watched you in a while but it looks like your family have moved. Sure is pretty & I think you have had another baby.
Hope all are healthy and well!
Thanks for sharing!
LOVE it!!!!!
So pretty! What finish or sheen did you use when you painted the walls? Thank you!
Wow looks really nice! How tall are the ceilings? I have 8 ft ceilings and really want to add that touch to my walls but not sure if that would work out
I also have 8 ft ceilings!
Can you tell me the maker and pattern number of the picture frame moulding you used for this project. Thank you!
Hello! This looks great. Quick question, is it OK just to use the nail glue only or do I have to attach the trim using both the nail glue and nail gun?
The glue alone won’t provide enough adhesion while it is drying.
It looks fabulous and your instructions are great! Did you use eggshell sheen paint for the whole wall? Thanks so much!
How far down from the ceiling did you install the molding?
Is the molding even with the picture window in the room or higher, closer to the crown molding and ceiling?
Higher, closer to the molding and ceiling, which is why there is a small rectangular picture frame moulding on top of the window, running the same width.
Why did you use two different sizes? Where did you use them?
Above and below the chair rail, and above and below window casing and door openings.
I also would like to know if there’s a rule of thumb for the distance from the top of the moulding to the ceiling.
I don’t know if there is a rule or standard but we did roughly 3″ from the bottom of the crown.
Thank you so much for this tutorial and for keeping the posting up! I used this a few years ago for our master bedroom and it turned out spectacular! However just like you I was exhausted by the end of it.
Painting was the absolute slowest and painstaking process. The only part that can fit a roller of any size is inside the frames, so it is hours upon hours of painting the trim and spaces between “by hand” with a brush.
Fast forward two years and I am doing this again in the girls’ bedroom (I must be a glutton for punishment). I have reflected back and streamlined the painting process:
1) Sand, prime, and paint the walls: Total # coats you need – the final coat of color.
2)Prime and paint the trim pieces individually prior to attaching to the walls. Total # of coats you need – the final layer.
3) Install moulding pieces
4) Now you only have your last coat of color to apply with everything on the walls.
You can do the first two painting steps with a brush for cutting the edges and a large roller for the walls. You can also roll on paint to the trim individually having it sit on saw horses.
The final coat of paint will be the only one you have to use a brush for almost everything and a roller for inside the frames.
Of course, you have to be extra neat with the caulk and nail hole filler as this is done right before the final coat of paint. However, it is worth it to me for the time and effort this saves.