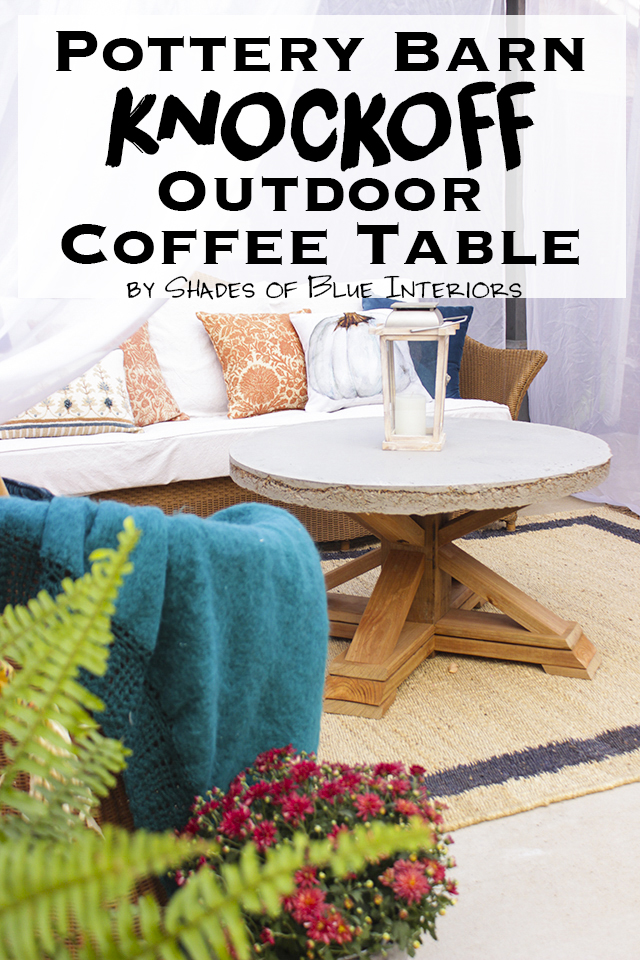
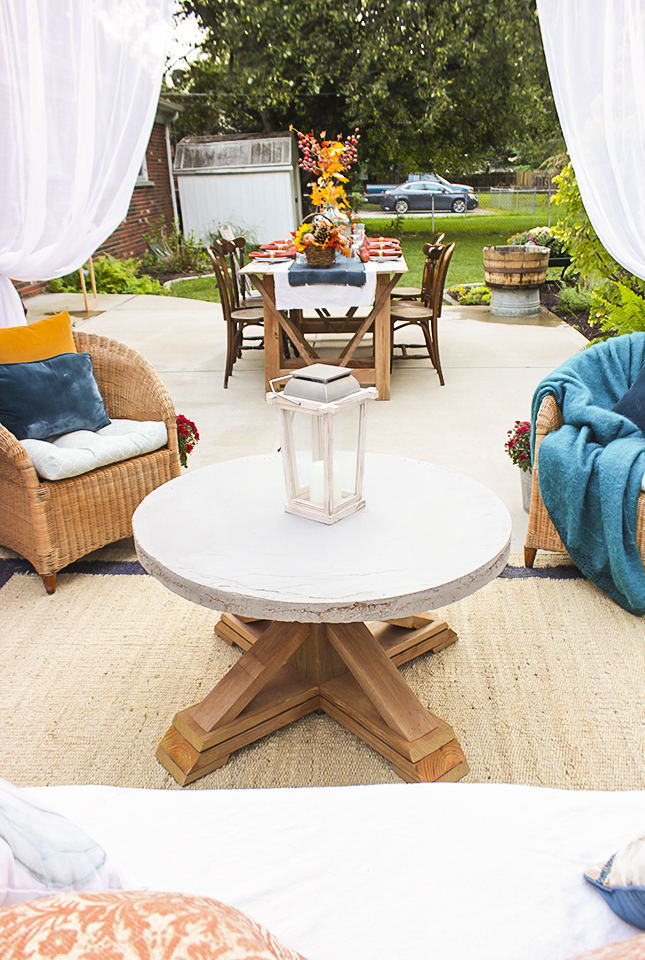
A few weeks ago, I participated in the Home Depot Style Challenge and was assigned my patio to makeover. I was so excited to finally have a reason to put a little more effort into this space and I ended up making 2 tables, including this Pottery Barn Knockoff Outdoor Coffee Table! The PB version was over $1000 but the design was very similar to the trestle end table I designed and built earlier this year! So I adapted it to this version!
For the cement top, I used the same method that Jamison from Rogue Engineer used when he created his cement-top outdoor side tables— creating a form with metal flashing! He actually gave me some helpful tips and I’ll show you more below…

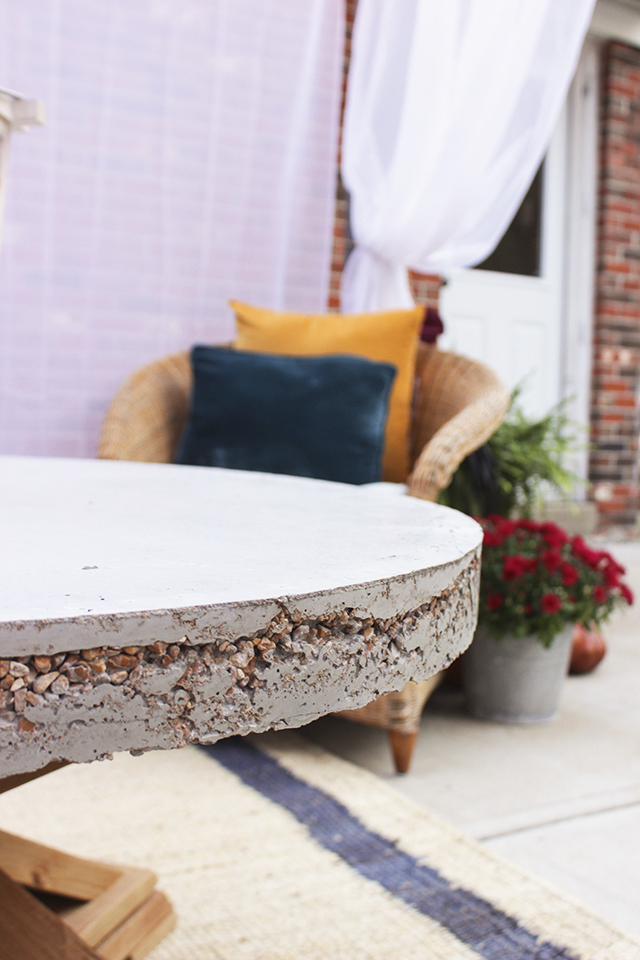
I ended up accidentally creating a layered ‘live edge’ top because the first back of cement didn’t have enough portland cement! I could easily go back and fix it with just some mixed up portland cement, but this look grew on me and now I love it! A little more visual interest…
Ok now on to the plans! This table top is 3 feet across and about 20 inches tall. It is super heavy, at about 200 pounds including the table top.
Tool List:
(affiliate links are what I use)
Circular saw (to cut 6×6)
Orbital sander with 150 grit sandpaper
Hearing protection
Safety glasses
Tape measure
Supplies List:
1- 6×6 cedar toned, weather shield pine @ 6′ (you only need 18″ of this, but they don’t come in shorter lengths)
1- 2×6 cedar toned, weather shield pine @ 8′
1- 1×6 cedar toned, weather shield pine @ 8′
1- 2×4 cedar toned, weather shield pine @ 10′
1- 1×4 furring strip @ 6′
2- 80 lb. bag of Crack Resistant Professional Grade Quickrete
12″ height metal flashing, 10 feet
Heavy duty plastic drop cloth
Scrap plywood (about 4′ x 4′)
Plastic bucket for mixing concrete
Wooden trowel
Stirring stick or concrete mixer drill attachment
1 1/4″ nails, 18 gauge
8- 2 1/2″ exterior pocket hole screws
Cut List:
1- 6×6 @ 18″
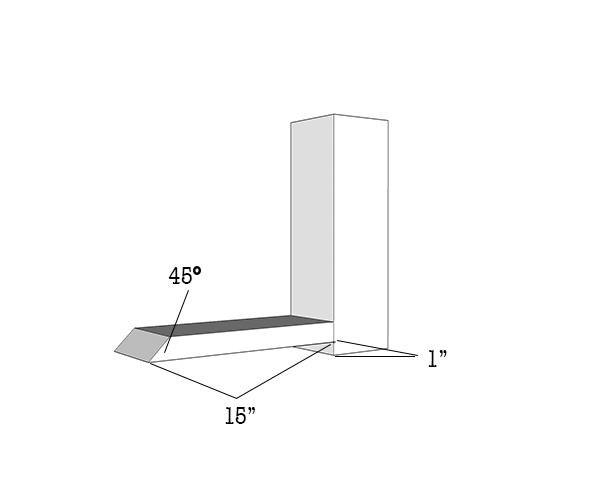
4- 2×6 @ 15″ with one end cut to 45 degrees (longest length is 15″)
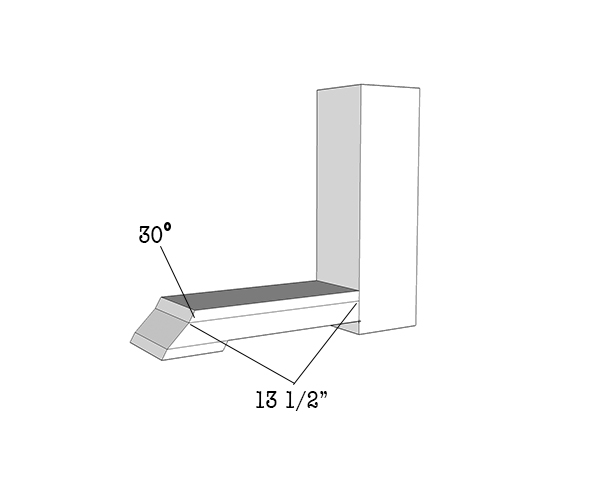
4- 1×6 @ 13 1/2″ with one end cut to 30 degrees (longest length is 13.5″)
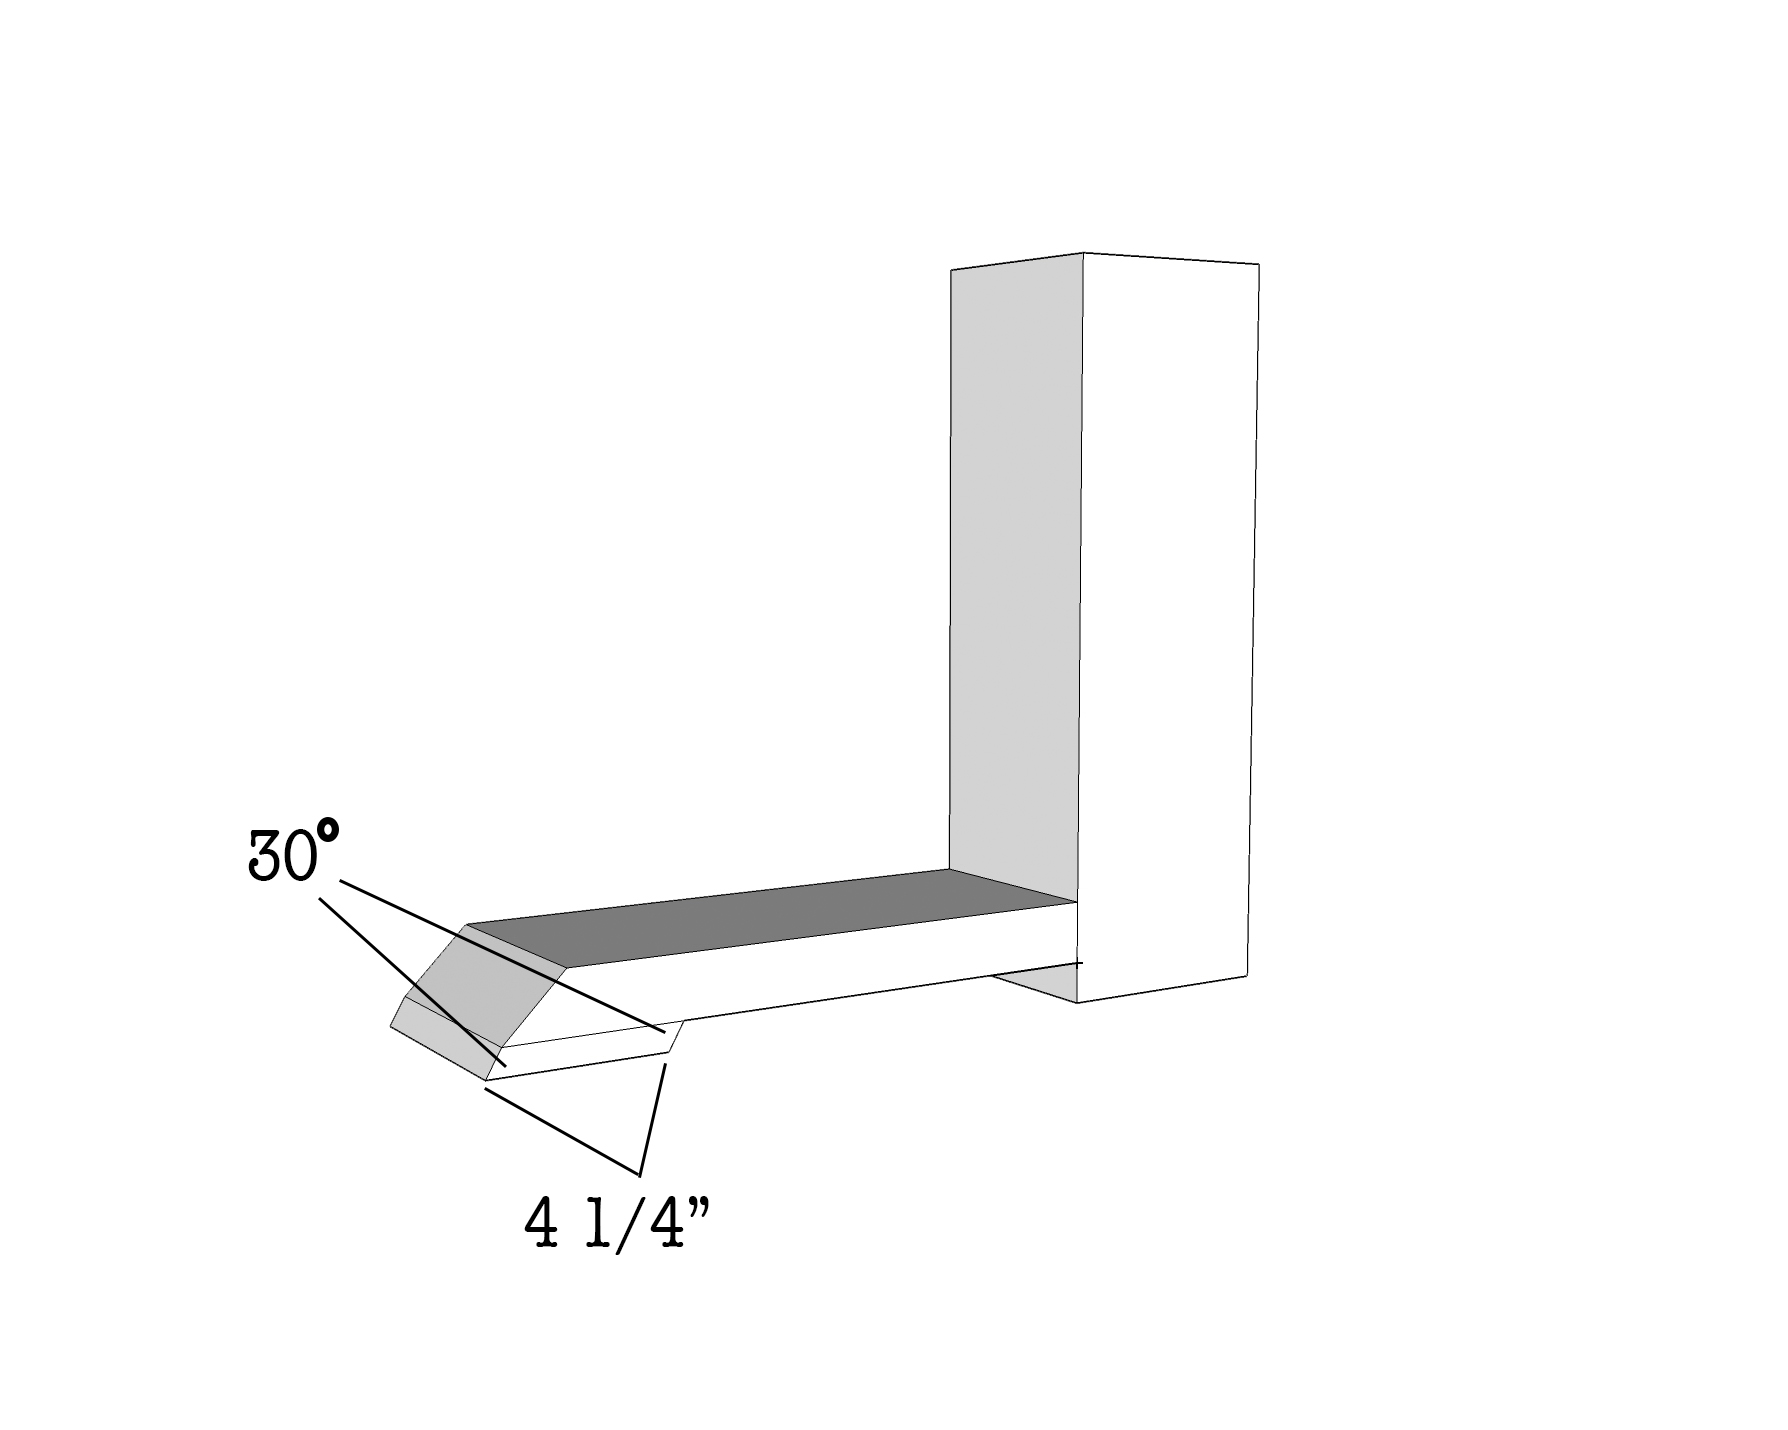
4- 1×6 @ 4 1/4″ with both ends cut in same direction to 30 degrees, parallelogram style
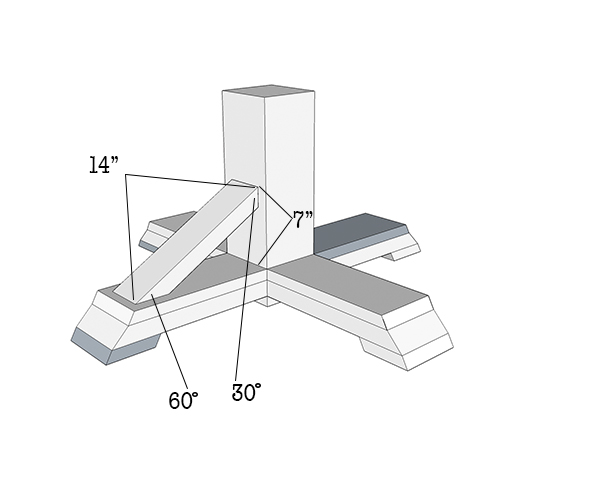
8- 2×4 @ 14″ with one end cut to 30 degrees and the other end cut the same direction to 60 degrees
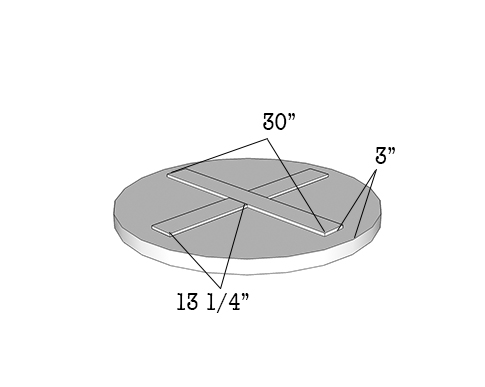
1- 1×4 furring strip @ 30″
2- 1×4 furring strip @ 13 1/4″
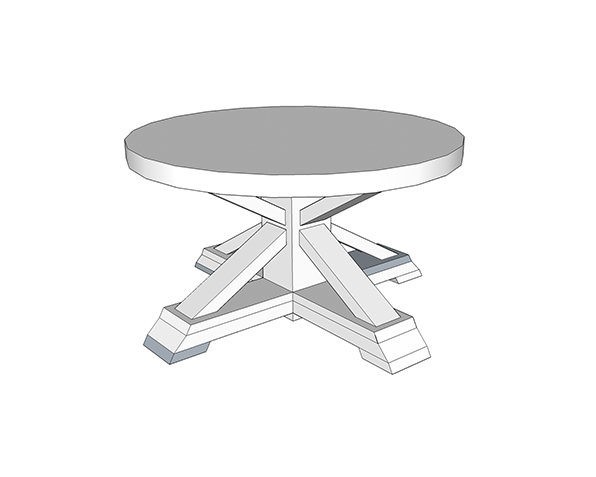
Step 1: Attach Legs to Base
Drill 2, 1 1/2″ pocketholes on the underside (closest to the flat side) of all the 2×6 legs. Use 2 1/2″ pocket hole screws and wood glue, 1 inch from the bottom of the table base to attach the leg to the table base..
Step 2: Attach Feet
Using wood glue and 1 1/4″ nails, attach 1×6 ‘foot’ to each leg.
Step 3: Attach Top of Leg
Attach the 13 1/2″ length of the 1×6 to the top of the leg by nailing into place. .
Repeat steps 1-3 for remaining 3 legs.
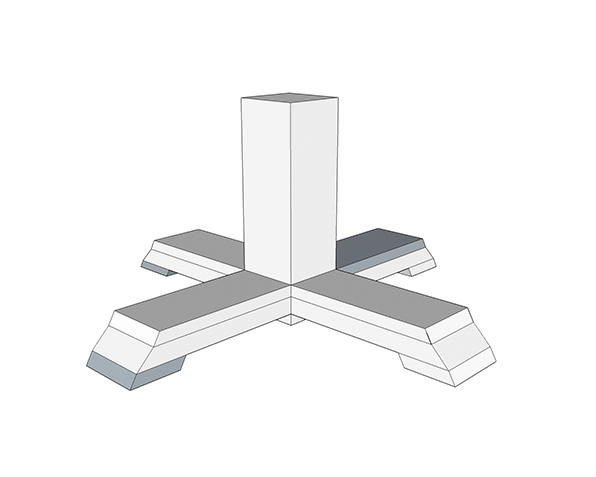
Step 4: Attach Trestle Supports
Place trestle support centered on each leg and side of table base (1″ space on both sides). The trestle support should be about 7″ from the top of the leg. Secure in place with wood glue and 1 1/4″ nails driven in at an angle.
Repeat for remaining 3 sides.

Step 5: Make Cement Top
Place a piece of plywood on a flat, level surface then put plastic drop cloth on top. Then, using the metal flashing, create a circle where the circumference is exactly 7 feet. Secure the one end to the side with strong tape. Take the plastic utility bucket and mix up about 1/4 of a bag at a time with water, and pouring it into the form after each mix is complete. Once one entire bag is mixed up and poured into the form, take a wooden trowel and smooth out the concrete inside the entire form. To sink some of the larger pebbles deeper, lightly tap on the surface of the wet concrete with the wooden trowel. The portland cement will rise up and it will smooth out. If you don’t want a layered look on the edge, be sure to focus on smooth out the edges. Ensure the thickness is even by using a ruler along all edges and middle. Wait approximately 1 hour and repeat this process for the second bag. Once second bag is completely mixed and in place inside the form, place the 30″ furring strip, centered, in the cement. There should be about 3 inches on either side. Place the remaining furring strips (13 1/4″) perpendicular to the 30″ strip and centered, so that an “+” is formed. Let dry for 48 hours and remove form. Sand any sharp edges or marks with 150 grit sandpaper and orbital sander.
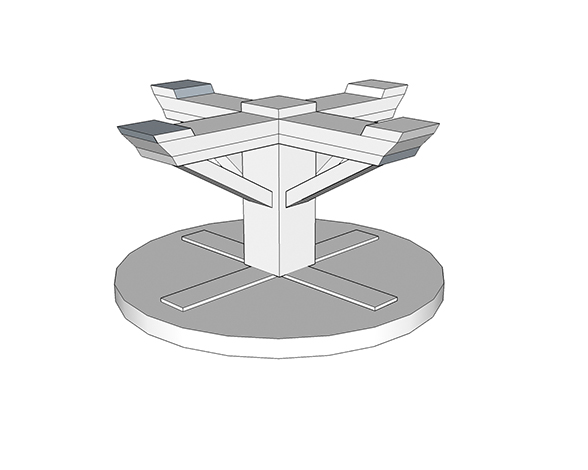
Step 6: Attach Base to Top
Pry the cement top up using a lever, so that it is on it’s round edge, and with two people, place the cement top, centered, on the base that was previously built. This diagram shows it upside down, but it would be more difficult to flip the entire table over with the base already completely attached, so isn’t recommended.
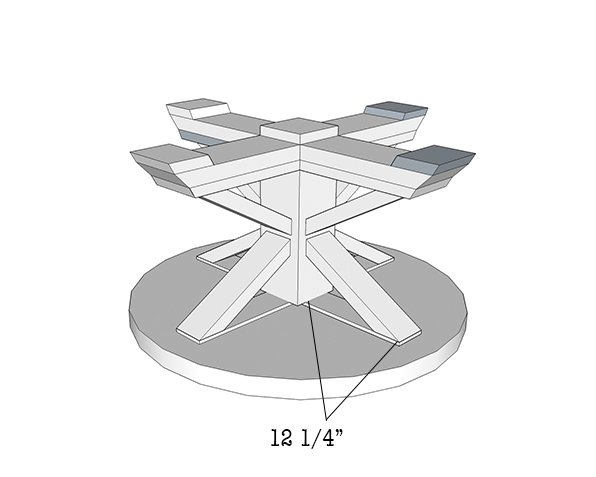
Step 7: Attach Remaining Trestle Supports
Place remaining trestle supports on all 4 sides of the base, making sure the “+” frame on the underside of the table lines up with the center of where the 2x4s are. Secure in place with wood glue and 1 1/4″ nails driving in at an angle. When attaching the nails into the wood frame in the concrete top, make sure to drive them in a a couple inches from the 60 degree angle side. If not, the nails won’t go in all the way because they will hit the concrete.
We love this table and is by far the sturdiest thing I have ever built.

Let me know if you build this, I’d love to see pics!
This is so beautiful and it looks far better than the one at Pottery Barn. I’m wondering if you can give me the measurements for an end table, sofa table and a dining table? I don’t know how to do this myself and I will greatly appreciate it.