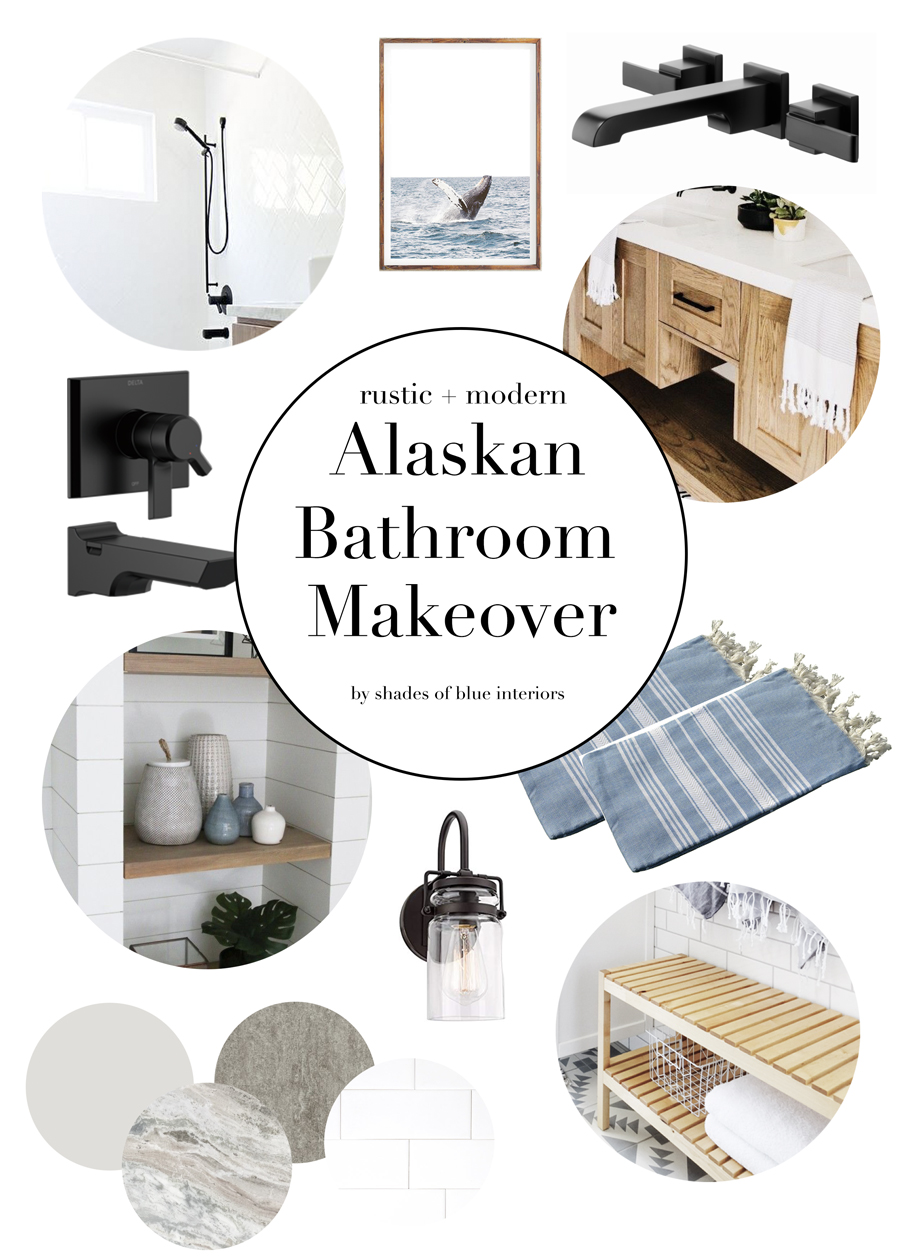
Today I’m so excited to share with you an Alaska Bathroom Makeover Reveal. This bathroom combines elements that are both rustic and modern while using a color palette inspired by Alaskan landscape and weather, with various shades of gray, dusty blues, natural weathered wood tones, and matte black accents.
This post is sponsored by Delta Faucet. While I received the Delta Faucet products mentioned in this post, all expressed opinions are my own. I have partnered with them several times over the years (for my master bathroom, my kitchen, and my basement bathroom) because I love and believe in the quality and look of their products!
If you read my previous posts this summer you will know that we took a family trip to Alaska, where I grew up. We visited family, played and had fun, but we also added some work. We stayed with my sister in Juneau, Alaska and while we were there made over her bathroom. I shared my design plans for this bathroom a few weeks ago, and then I also shared the top 10 things you must do while visiting Alaska.
The inspiration for this makeover was the climate and landscape of Southeast Alaska. Various shades of gray in the overcast skies, faded blue mountains, natural timber, and matte black, blue and gray rocks along the glacier-scraped mountains. My sister and her husband are fans of clean modern lines and matte finishes, so I wanted to incorporate both Alaskan rustic elements, as well as modern elements through the design style of the vanity, hardware, and fixtures.
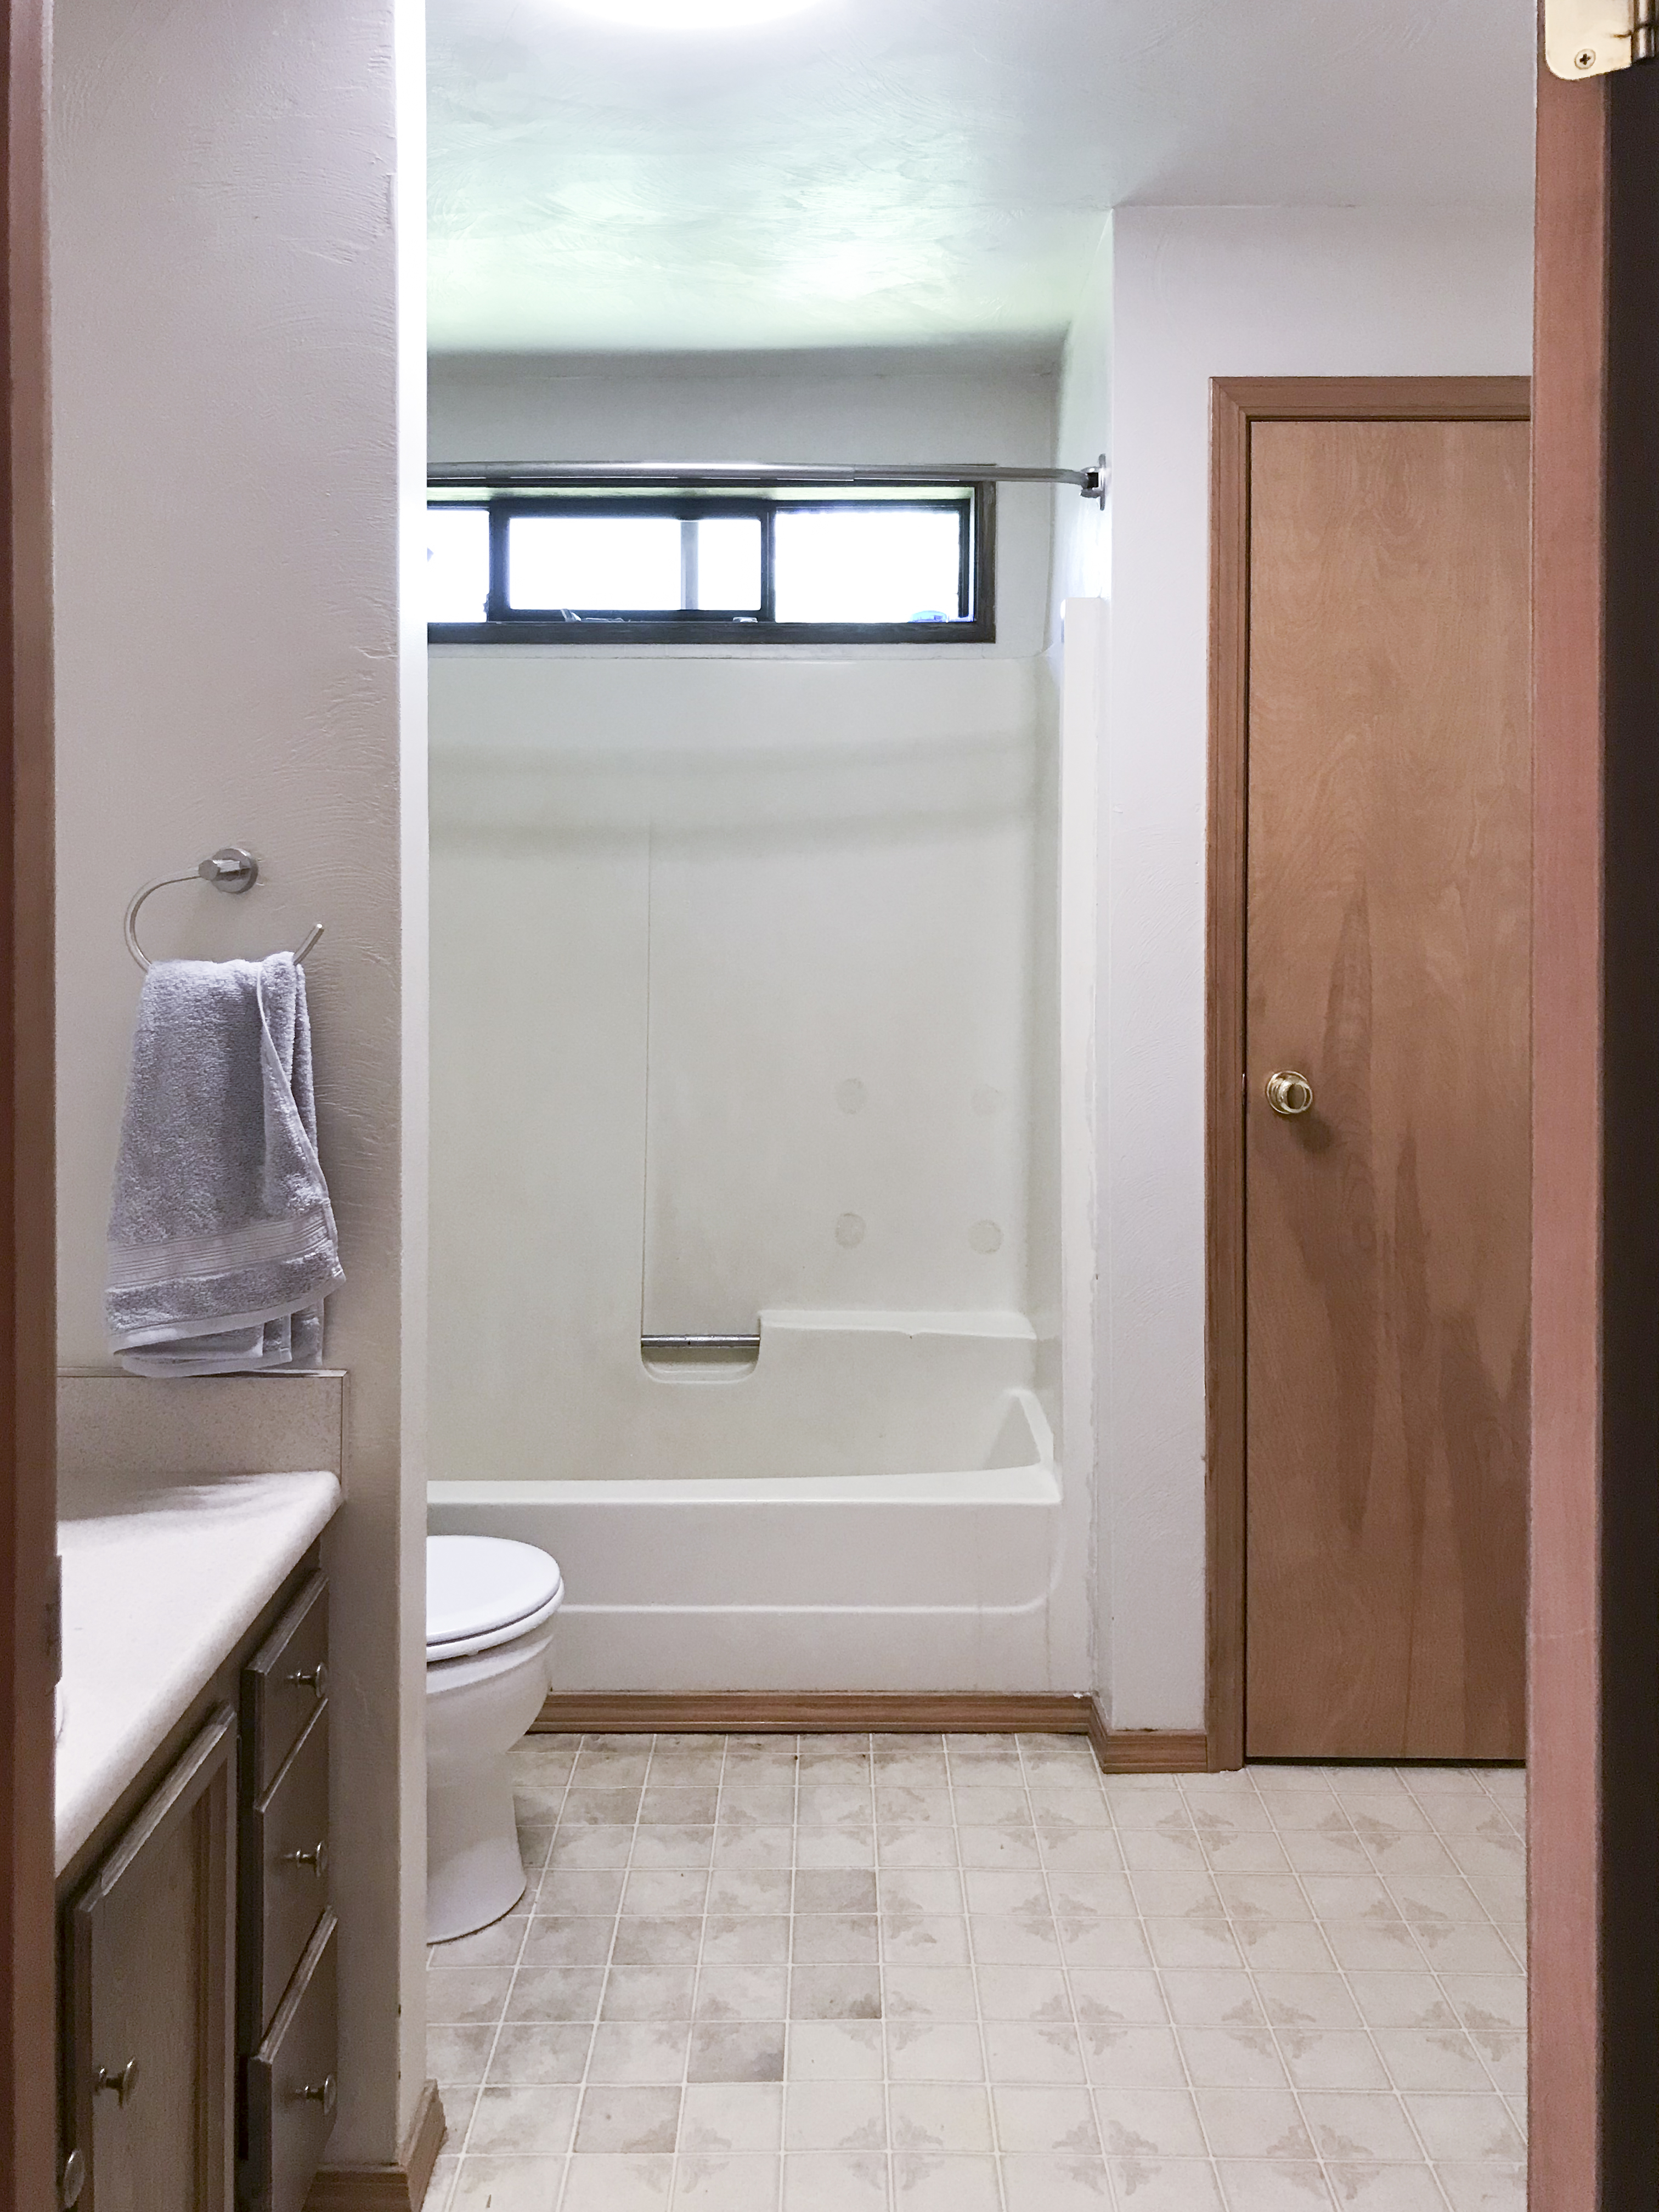
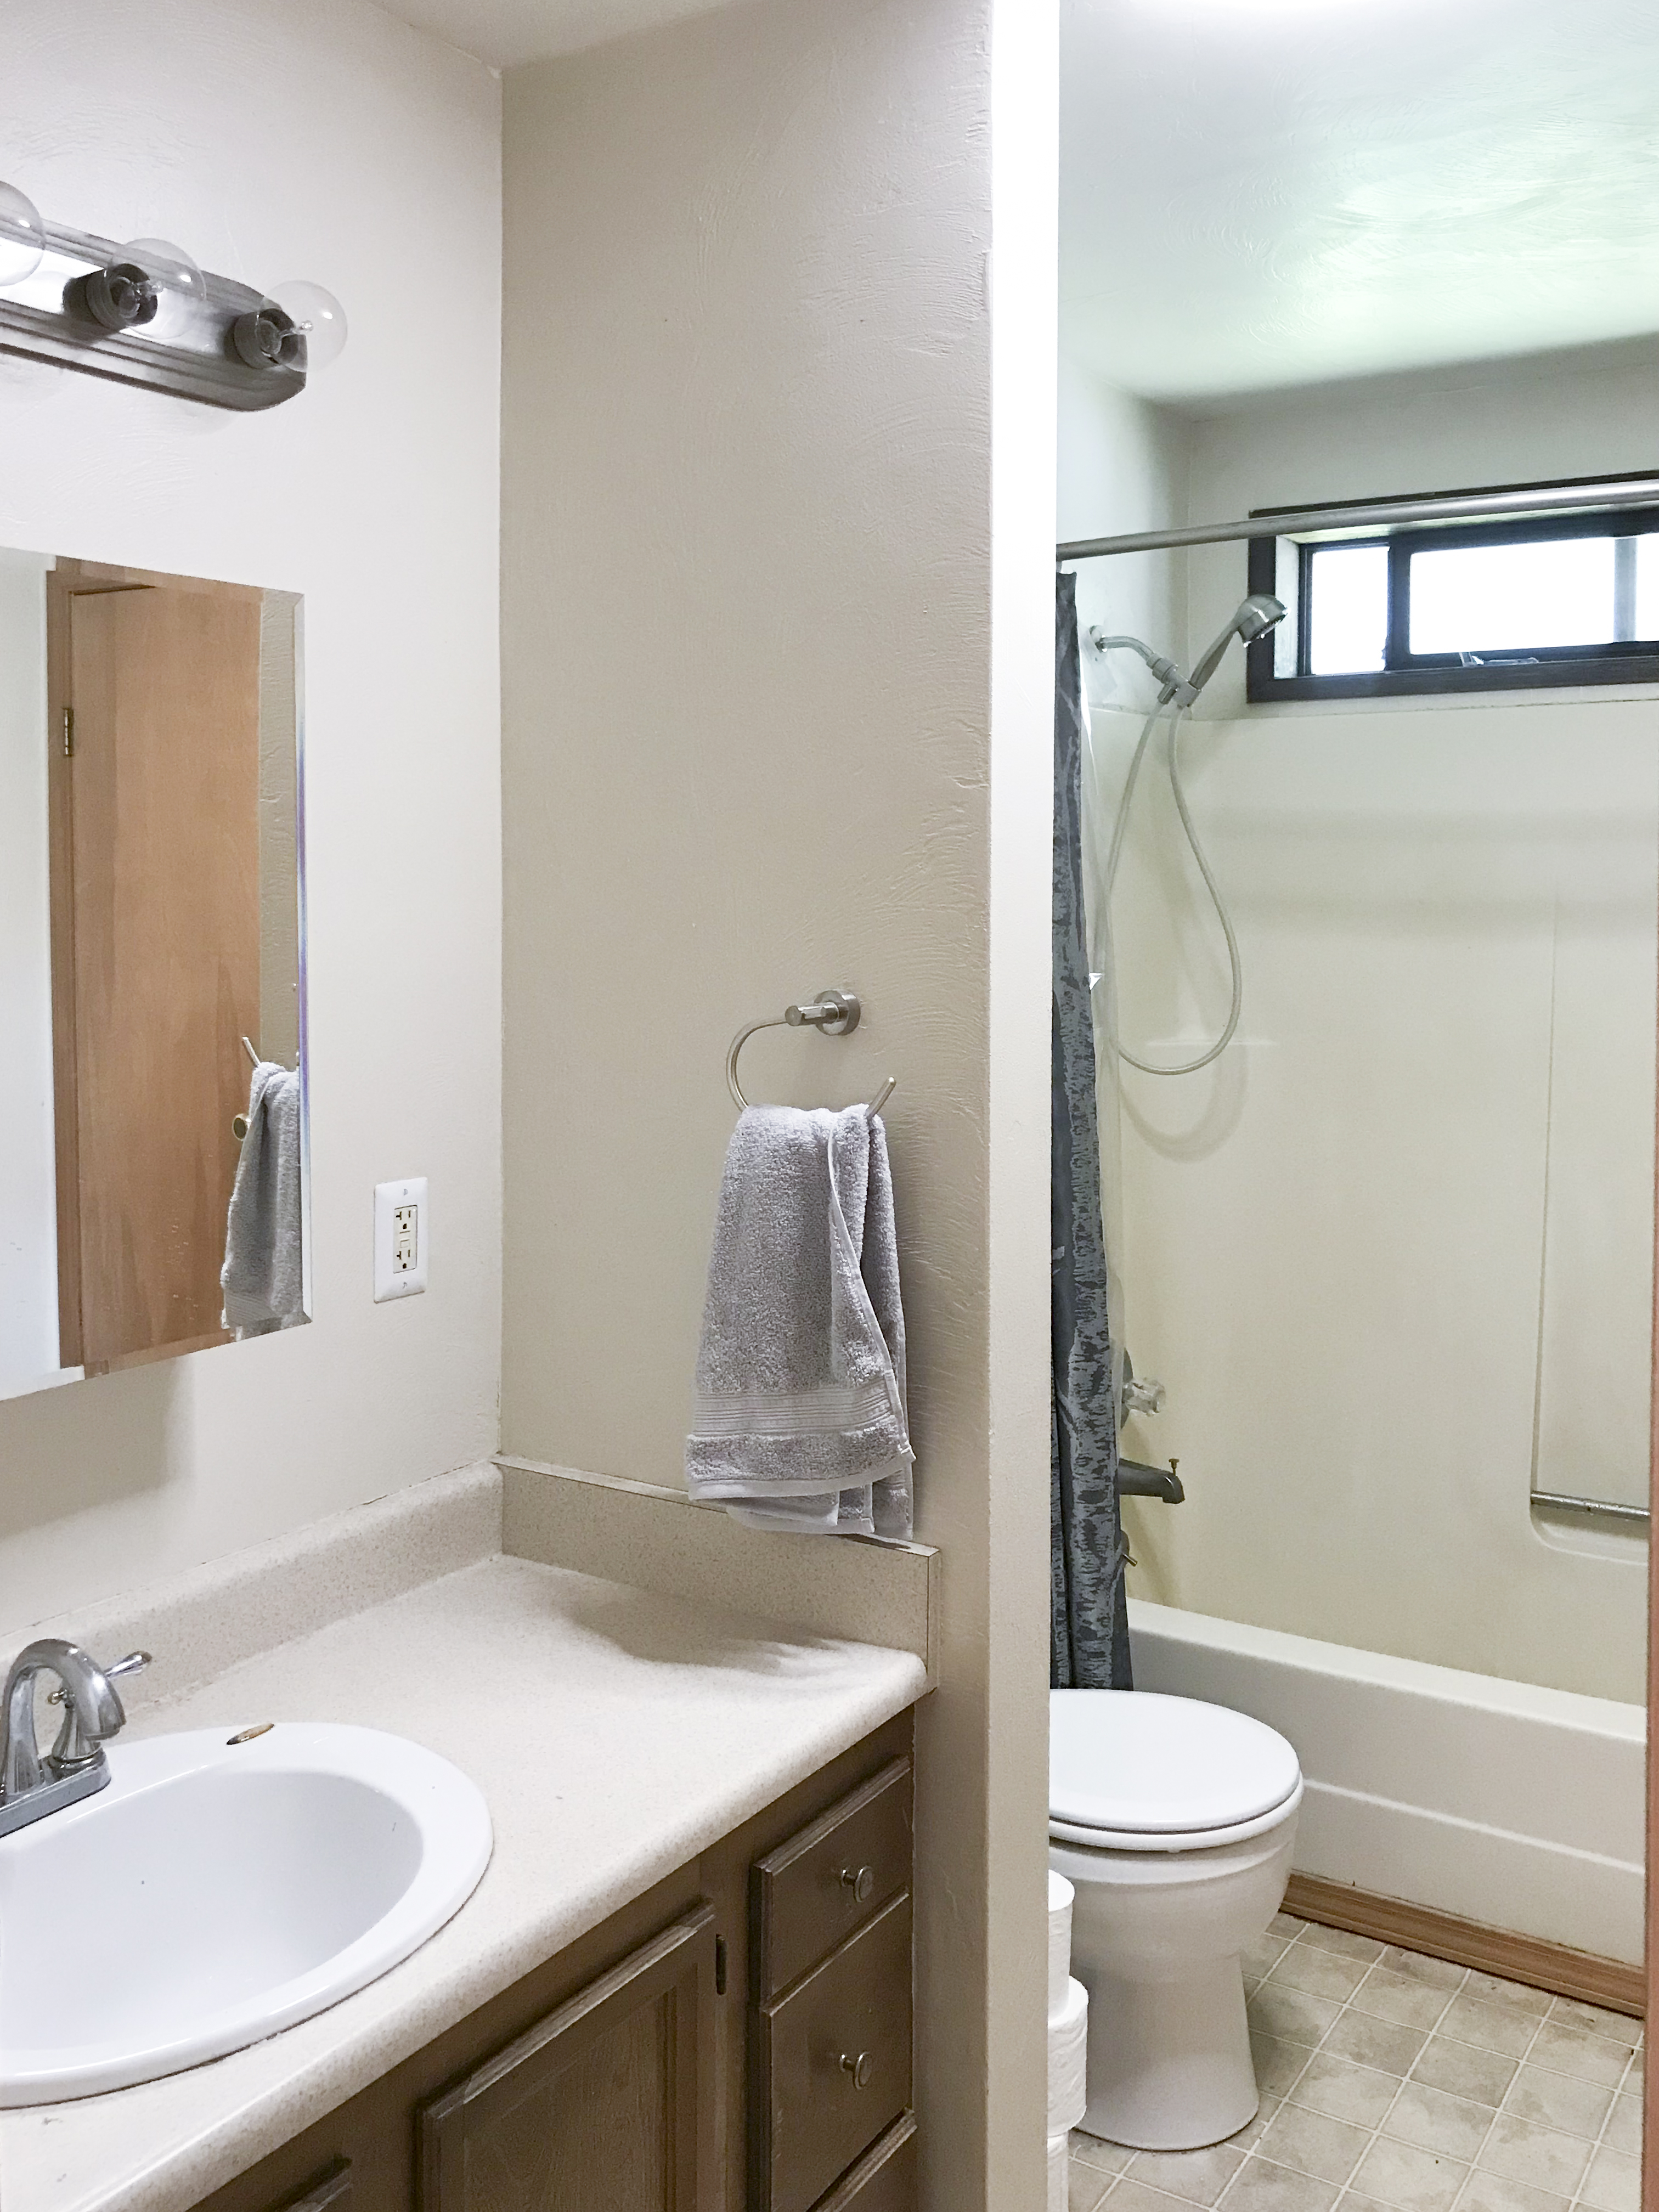
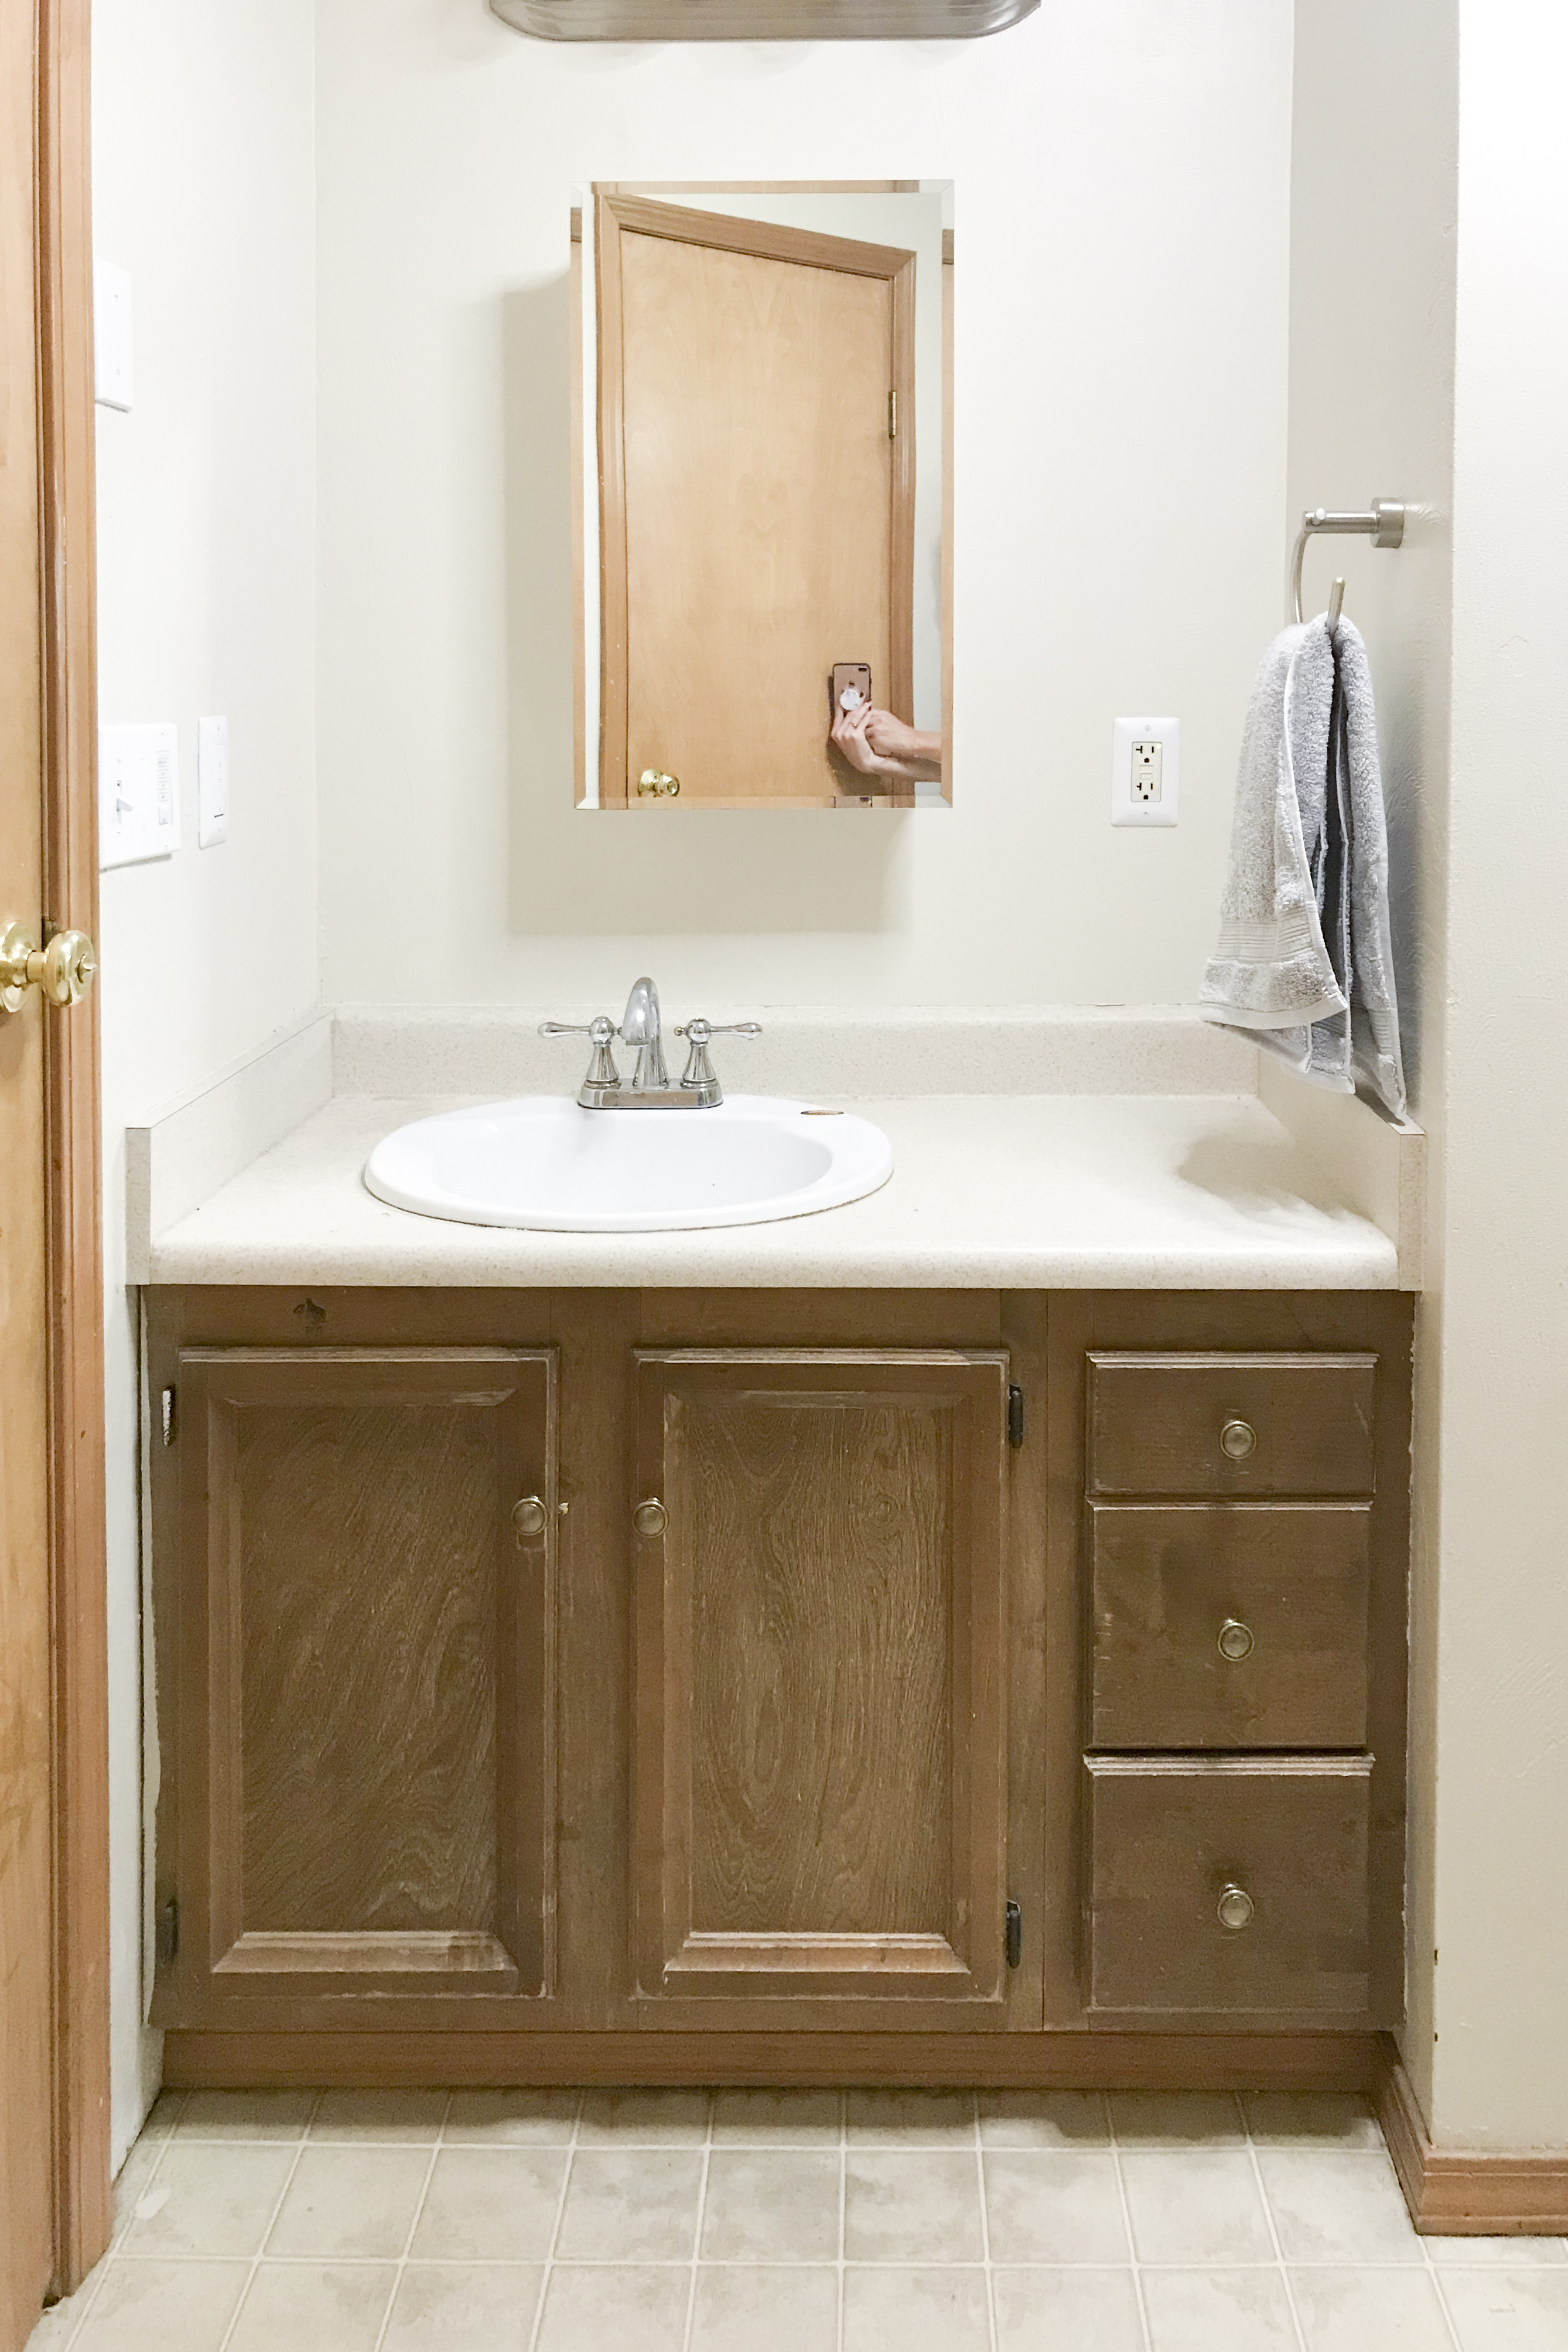
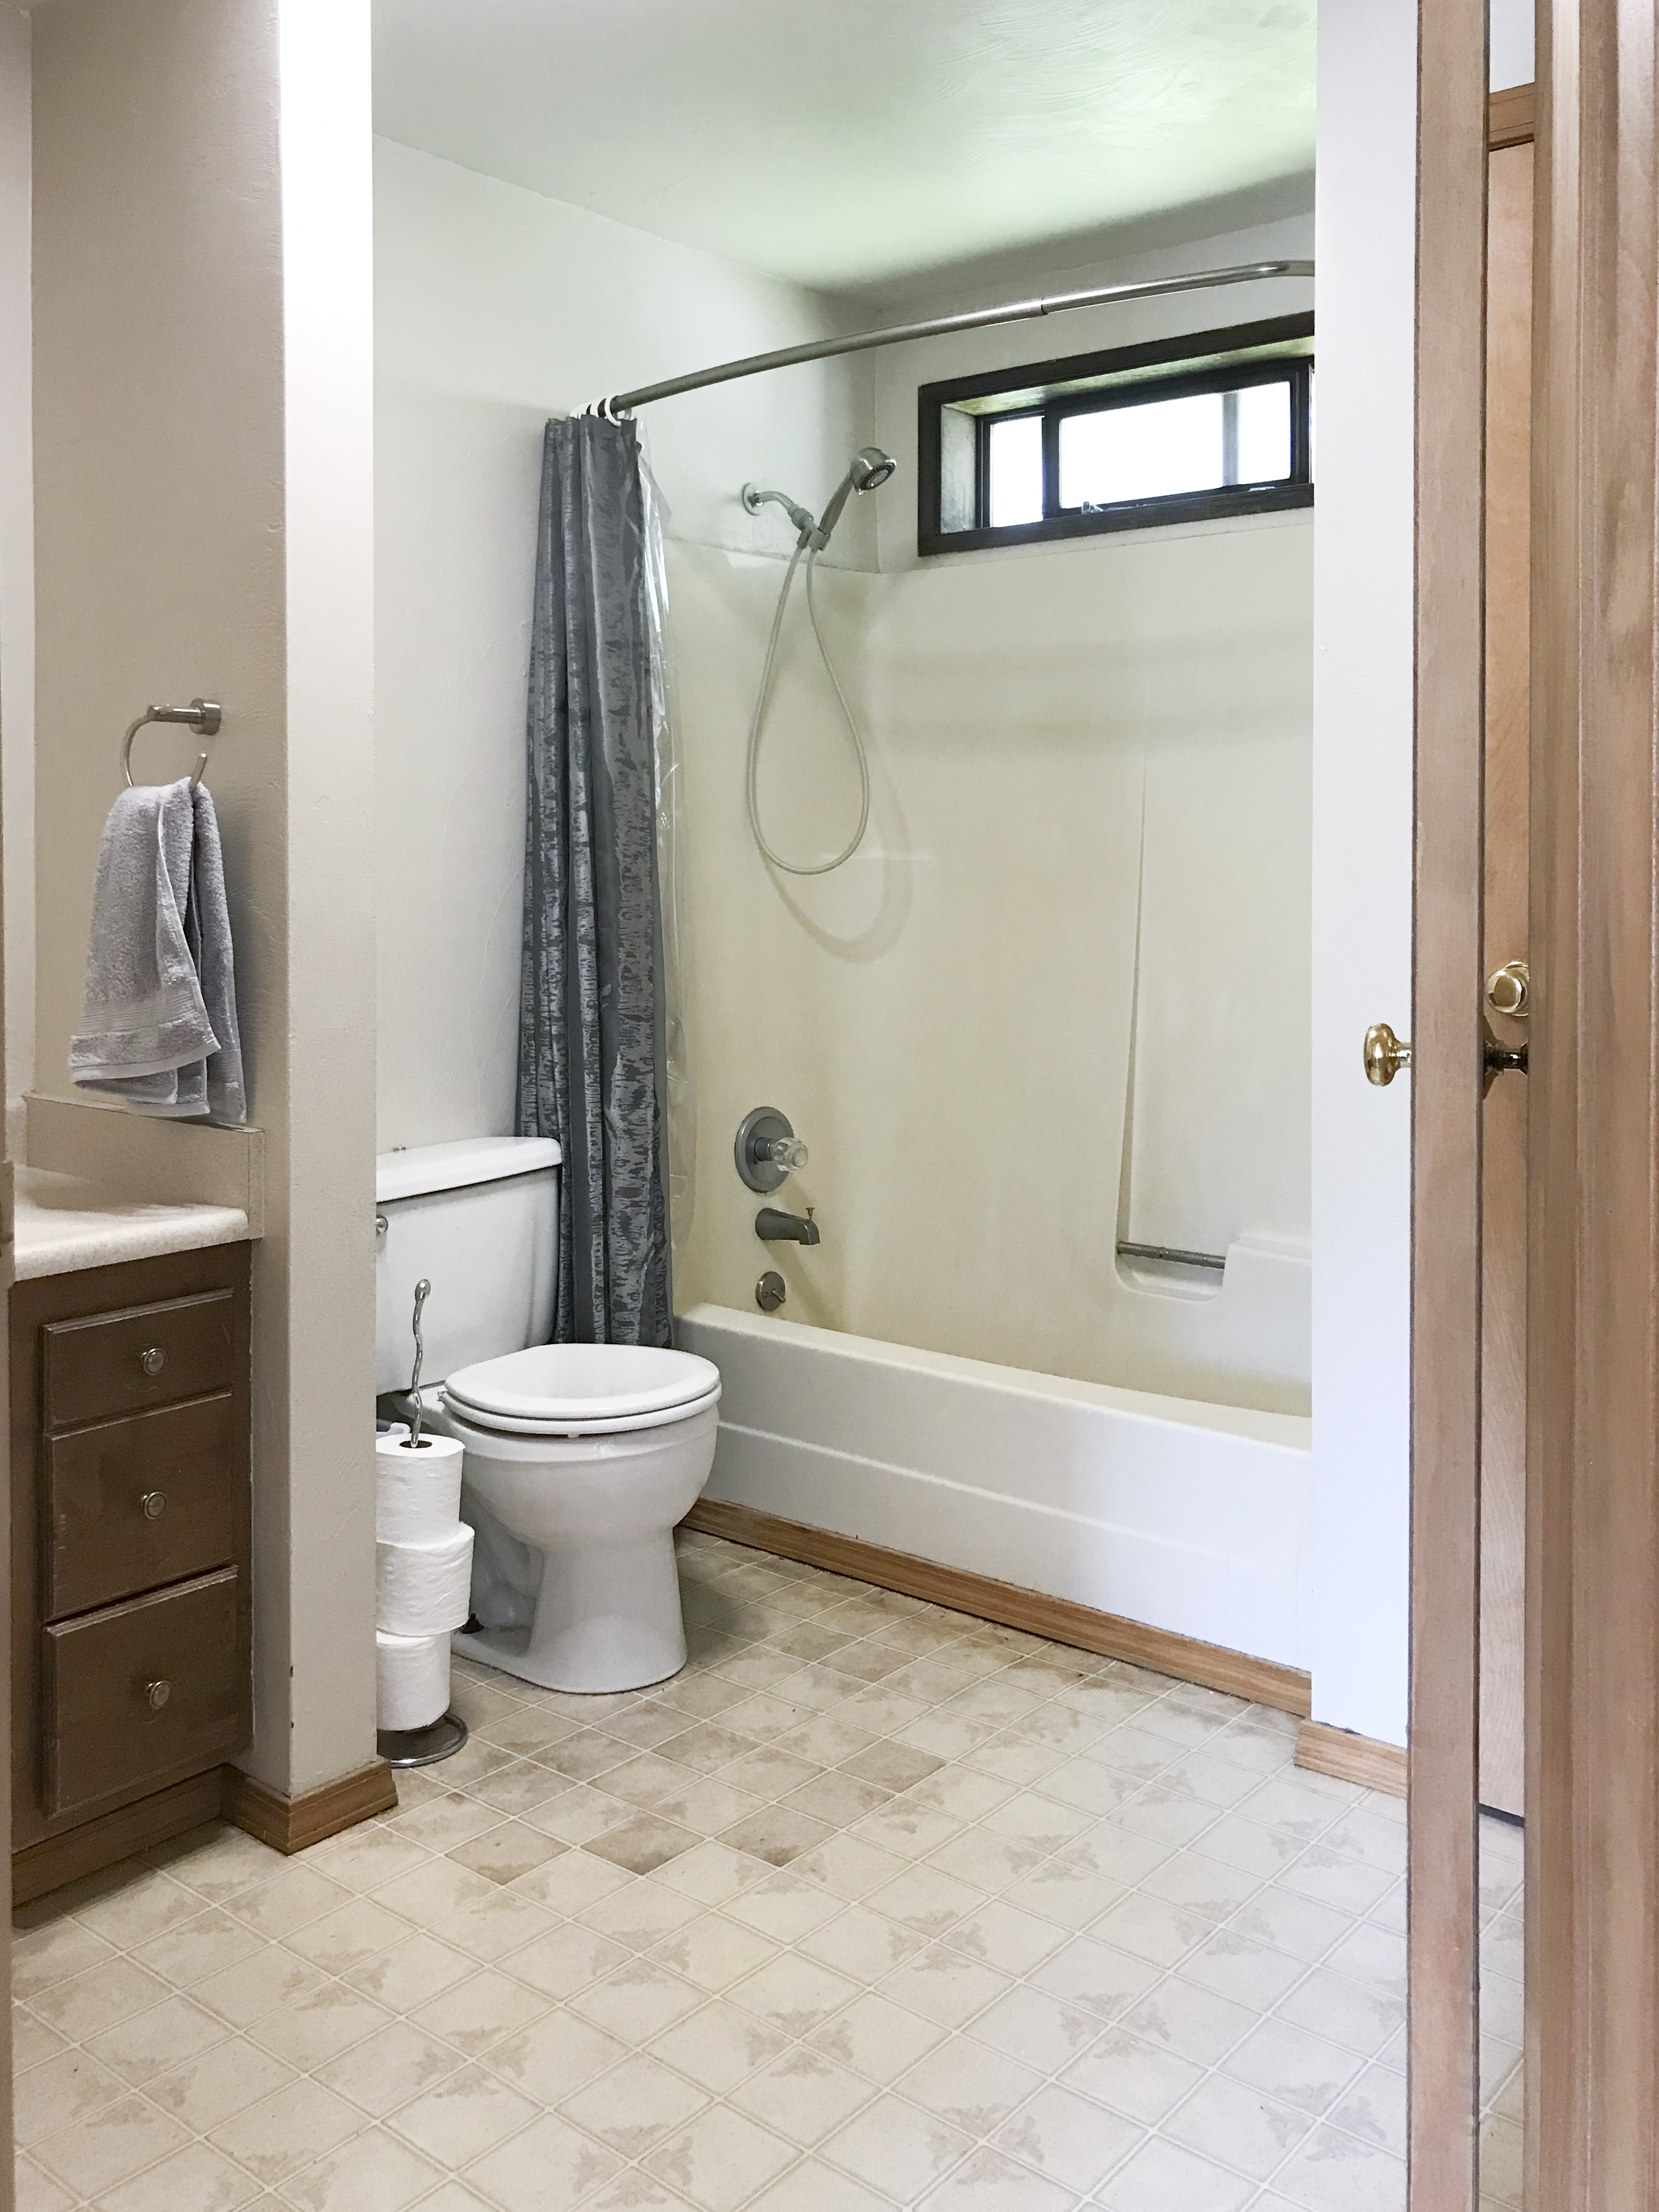
As a reminder this is what it looked like before:
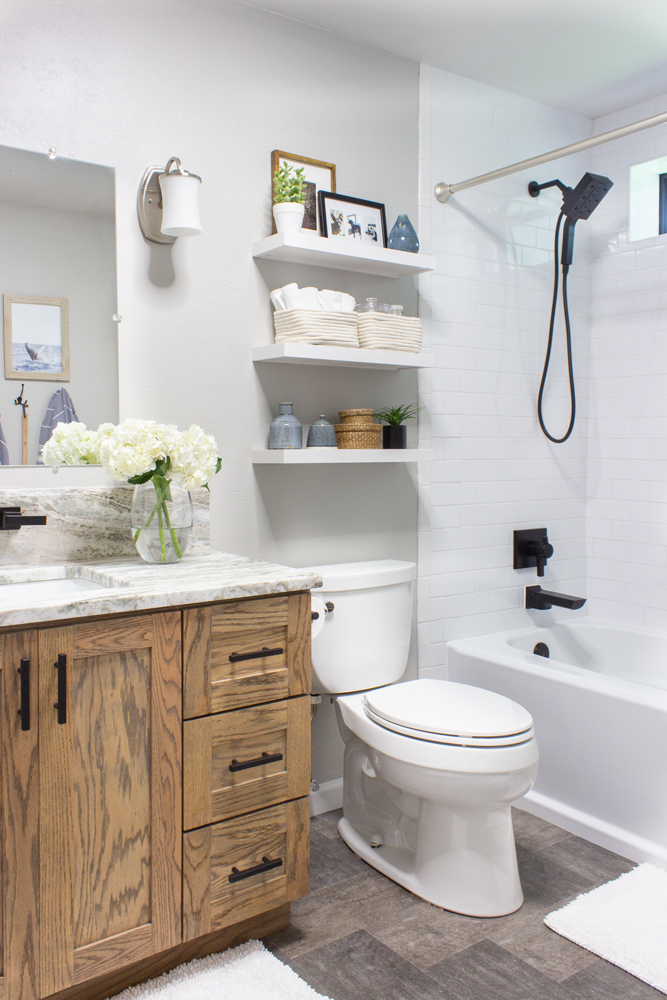
And now the after:

We completely gutted this bathroom! There is really nothing in this room that is the same except the basic layout.
We started with the tub and shower surround. They got yanked out, and we had to pull out the drywall as well, so we could move the plumbing (had a plumber do that). Then the tub went in (not without difficulty), then the hardie backer (cement board) was installed everywhere we wanted to lay tile. After the hardie backer was in place and we painted on a couple coats of Red Gard (waterproof seal), and we were ready to tile! The tile we chose was basic white subway tile with bright white grout (I used single component Fusion Pro Grout because the sealer is built in).
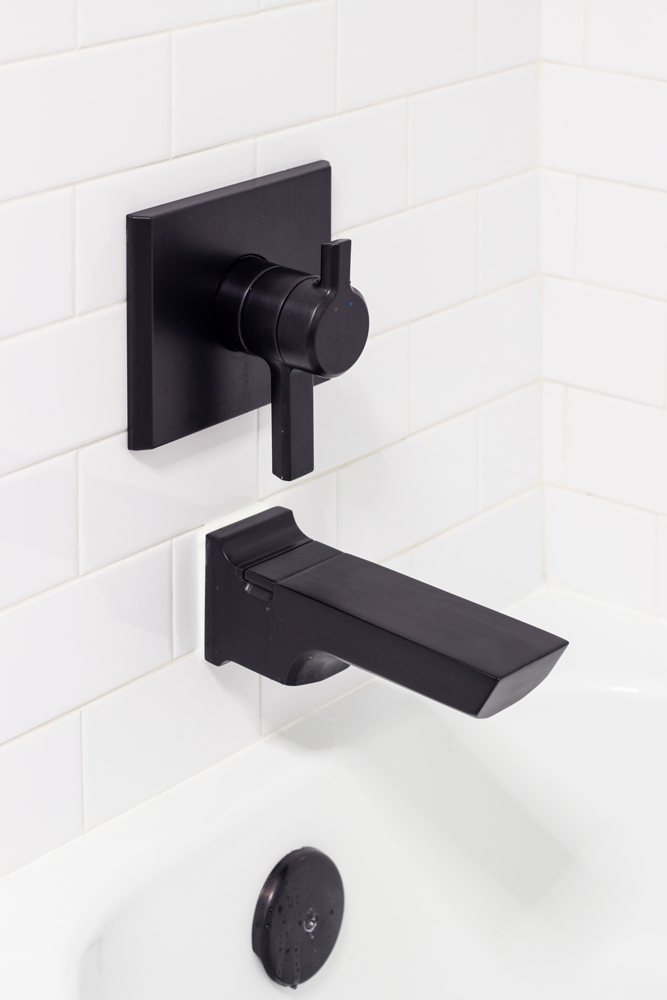
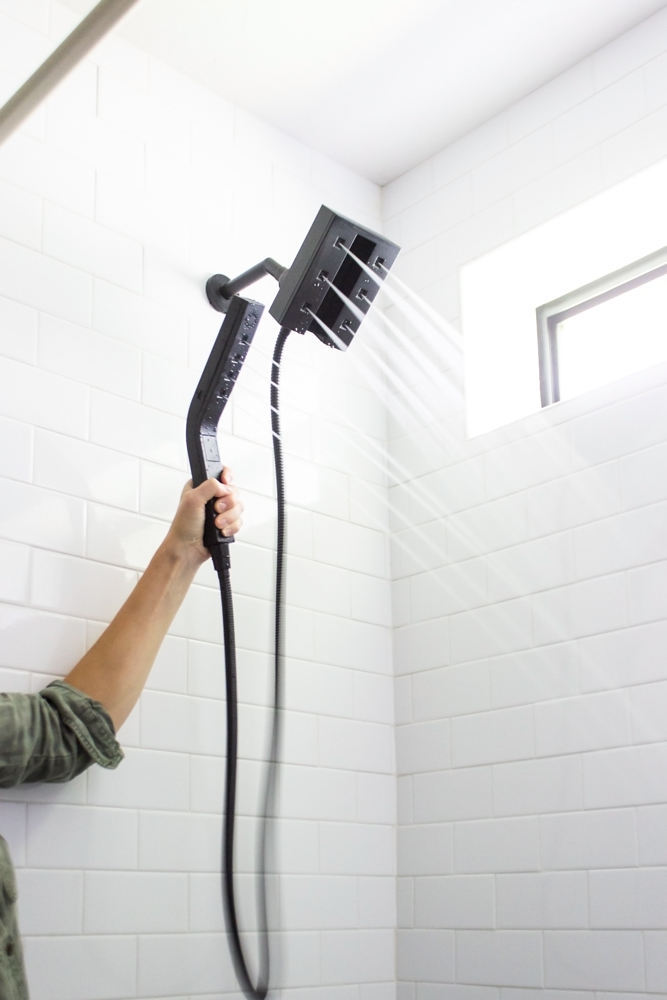
I was thrilled when it was finally time to install the gorgeous new modern Pivotal TempAssure 17T Series Valve and Tub Spout in Matte Black.
The shower head had to be detachable since they wash their dog in this tub, so we selected the H2Okinetic In2ition 4-setting Two-in-One Shower Head, in the same Matte Black finish. That detachable sprayer easily snaps into the center part of the main shower head and by pushing a little button on the side, you can choose to have the water only come out of the sprayer.
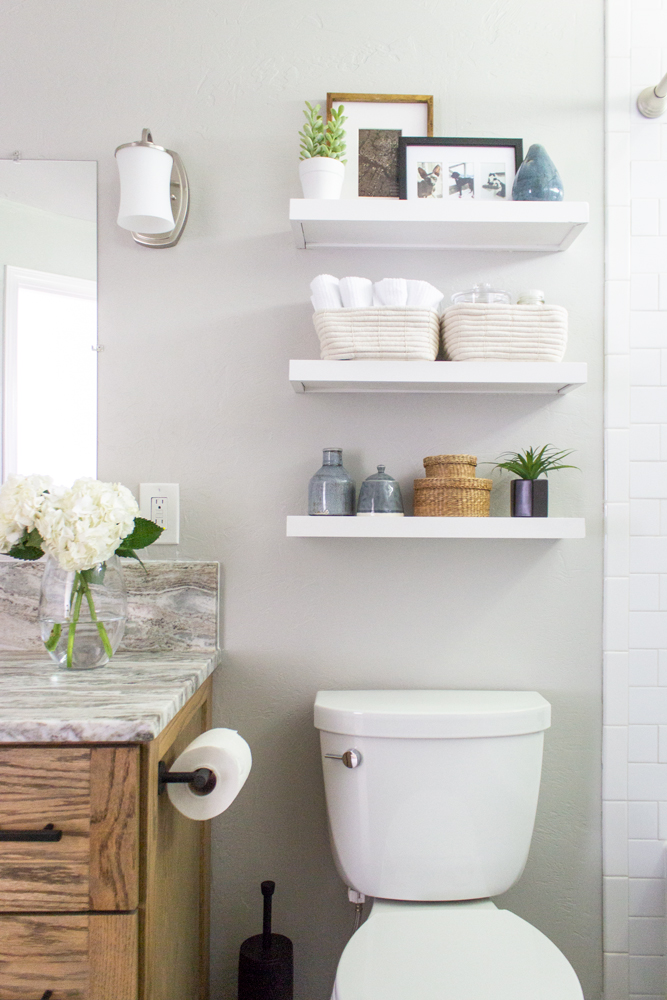
Once the shower was done, we tore out the half wall, old flooring, old toilet, and old vanity. We had to open up the wall to move the plumbing for the wall-mounted sink faucet, and to move the light fixtures. We also had to add some extra studs behind the toilet to support the floating shelves, so that wall was opened completely up.
In my previous post I mentioned a big list at the end, all things I was going to try to finish that week, before we left town. However, we didn’t get everything done and we chose to hire out the drywall mudding and texture because it needed someone experienced who could match the existing wall texture in the rest of the bathroom. Because of that, I ended up flying back to Juneau about a week after I left with my family, and did all the finishing touches and took pictures in a few days.
All the hassle was worth it, though. I loved seeing it all come together.
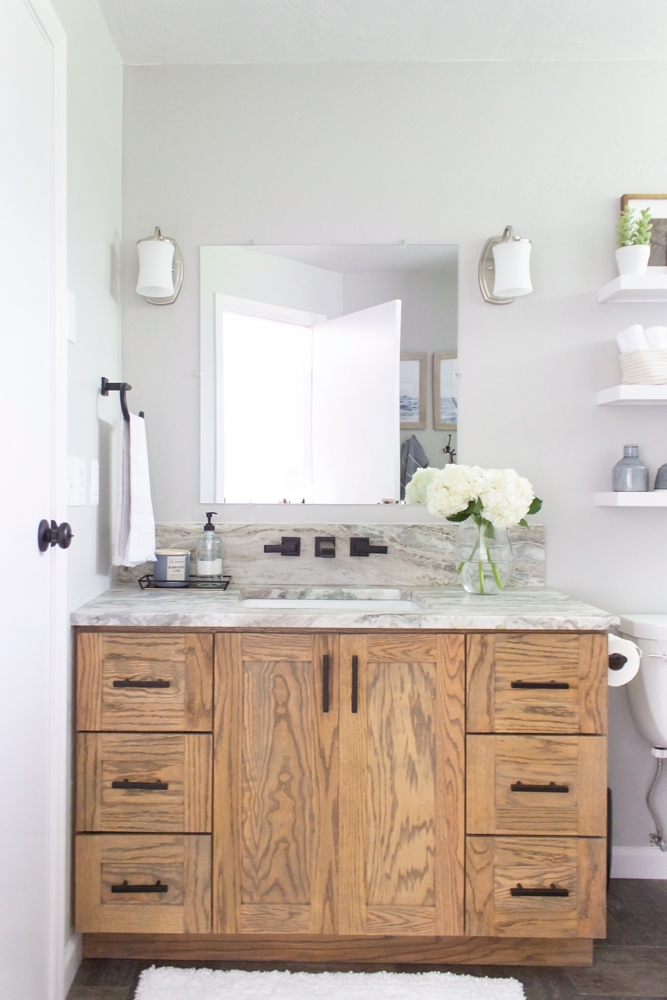
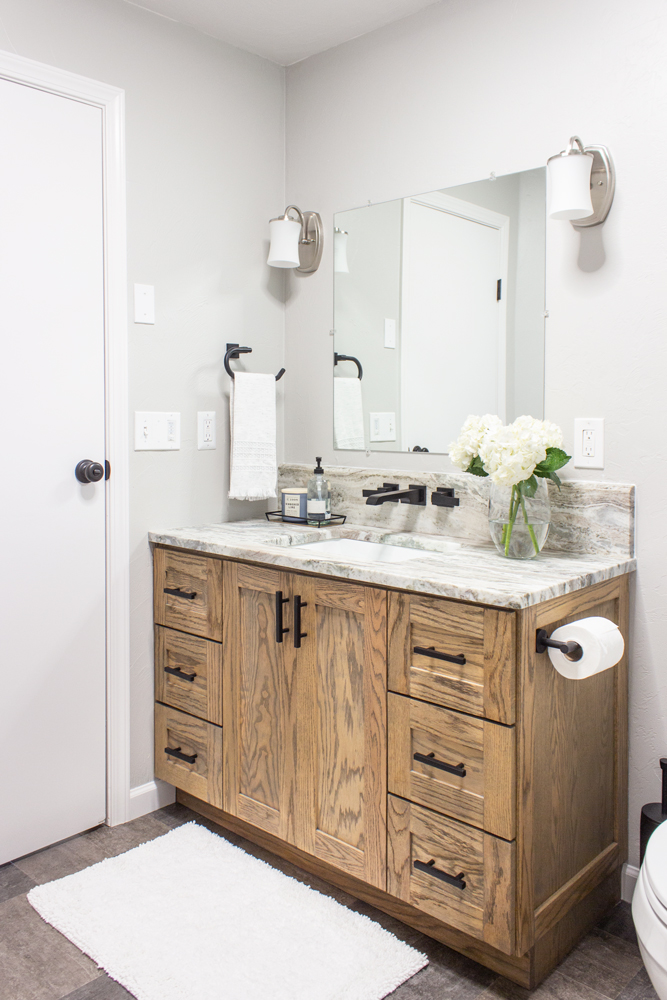
I ended up choosing different light fixtures than the ones I originally had picked out, and preferred these simple, nickel finish ones that coordinate beautifully with the matte black finishes, and blend in a little better.
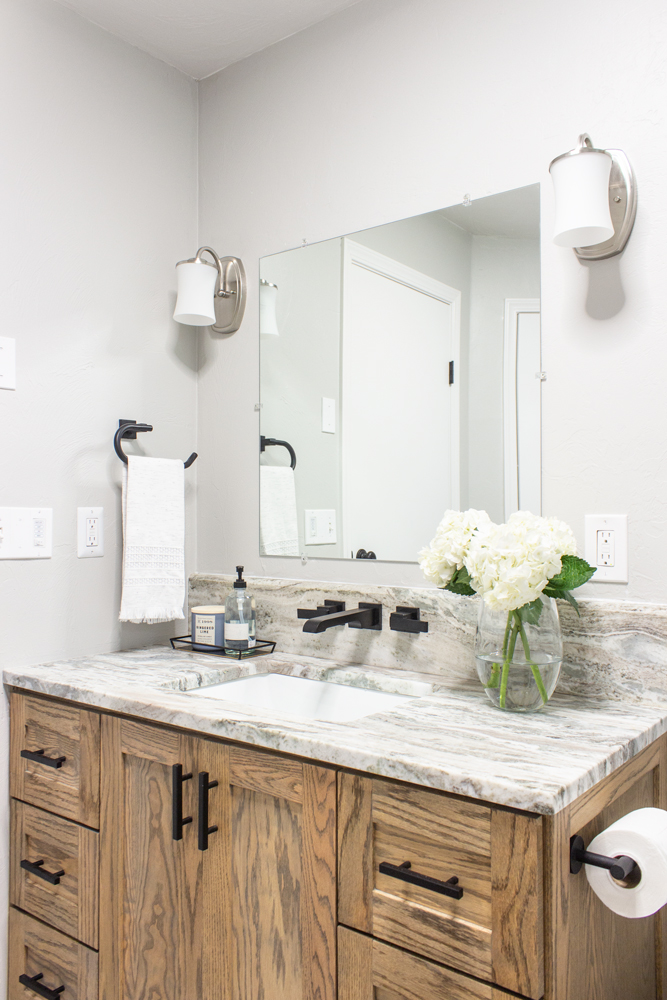
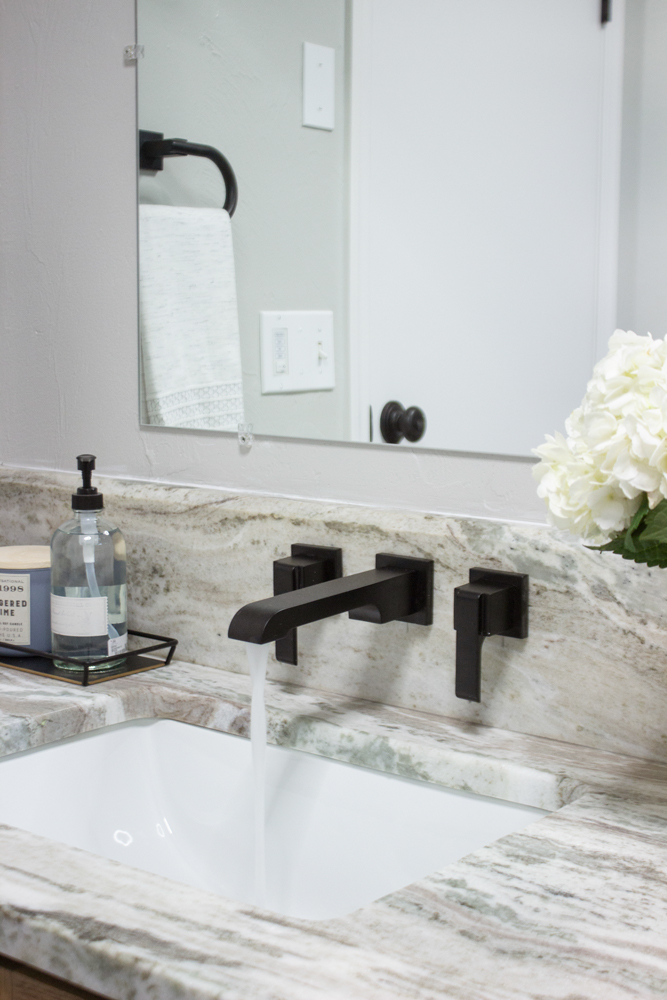
I designed and built this vanity to be almost a foot and a half longer than the previous one (which we had room for now that the little half wall was gone). I’ll have build plans up for it soon! With a new granite counter with a 7” backsplash, we were ready to install the Ara Two Handle Wall Mount Faucet in matte black.
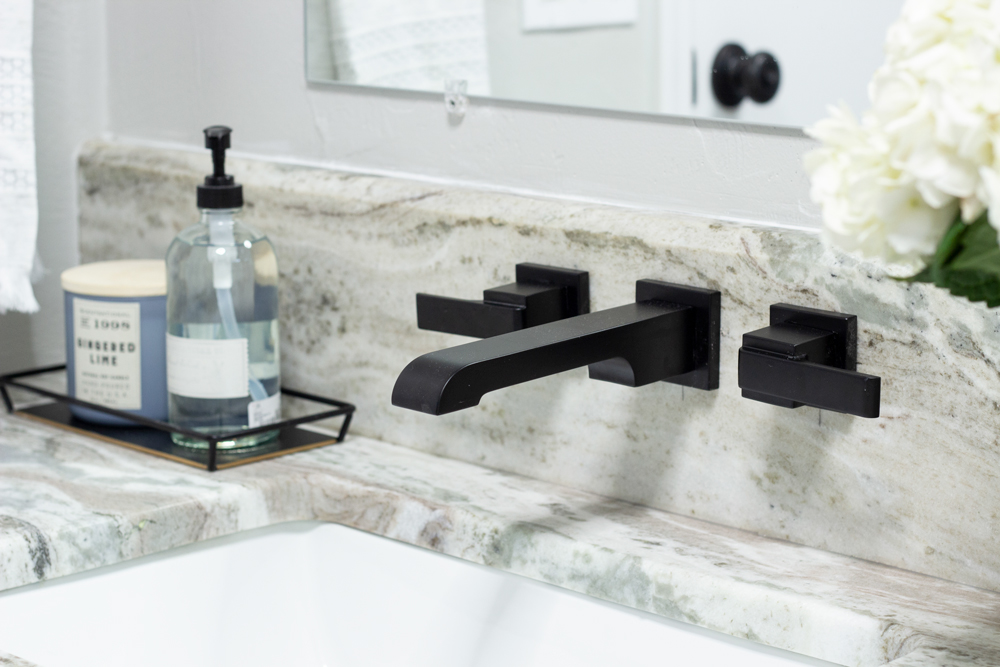
This design is so beautiful and sleek, and can I say I’m completely OBSESSED with this Matte Black finish??? While I have always opted from the Champagne Bronze for the fixtures in my master and basement bathrooms, I couldn’t stop staring at and petting these ones! They are velvety smooth and because they aren’t flashy and shiny, it allows their design and shape to stand out more.
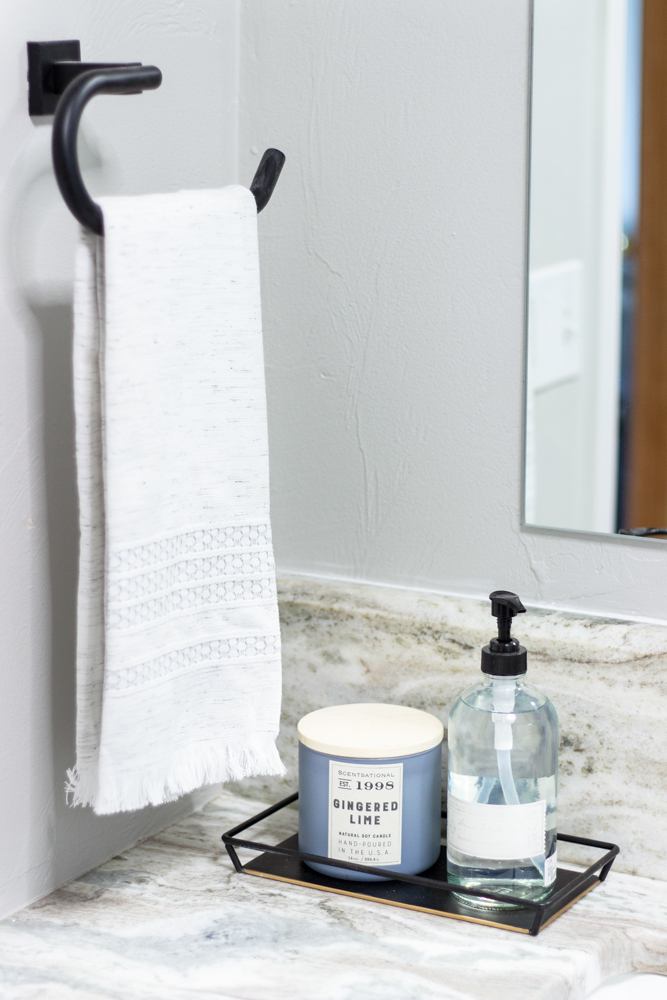
I was able to find a number of matte black accessories on Amazon, like this towel holder, the toilet paper holder, and the sink & tub drain. The small tray that holds the soap and candle is from Target.
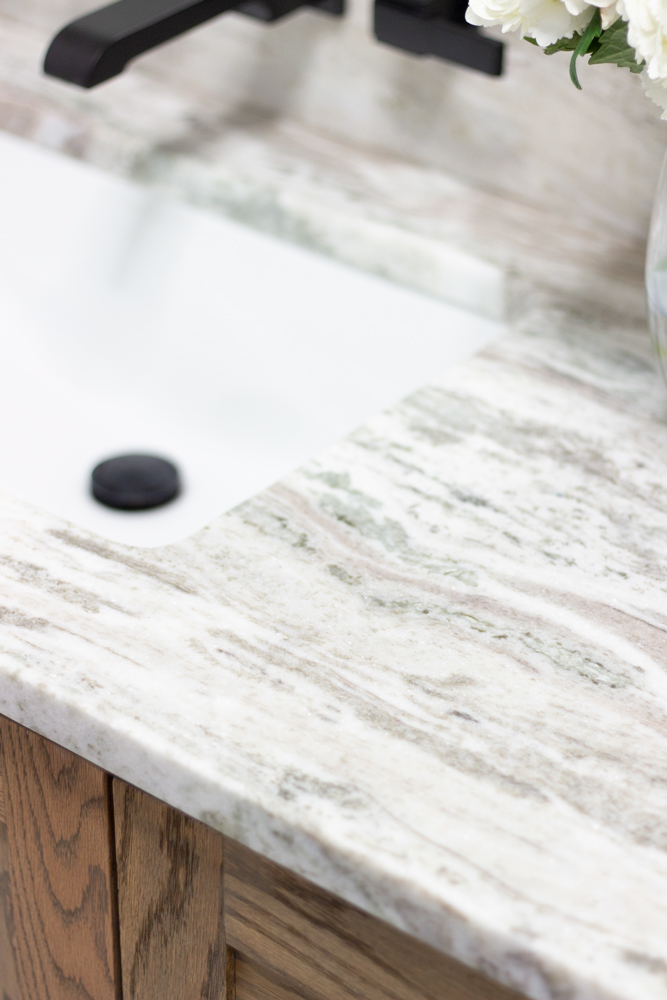
The counters turned out even better than I had anticipated. Although they were easily the most expensive part of the room! This is where it pays to DIY parts of a room makeover– because we saved on labor by DIYing the tile, the custom vanity, floating shelves, flooring, and pretty much everything else, we were able to splurge on the granite counters, hire out mudding and texture, and hire out plumbing. This allowed us to stay in a reasonable budget but get expensive-looking results.
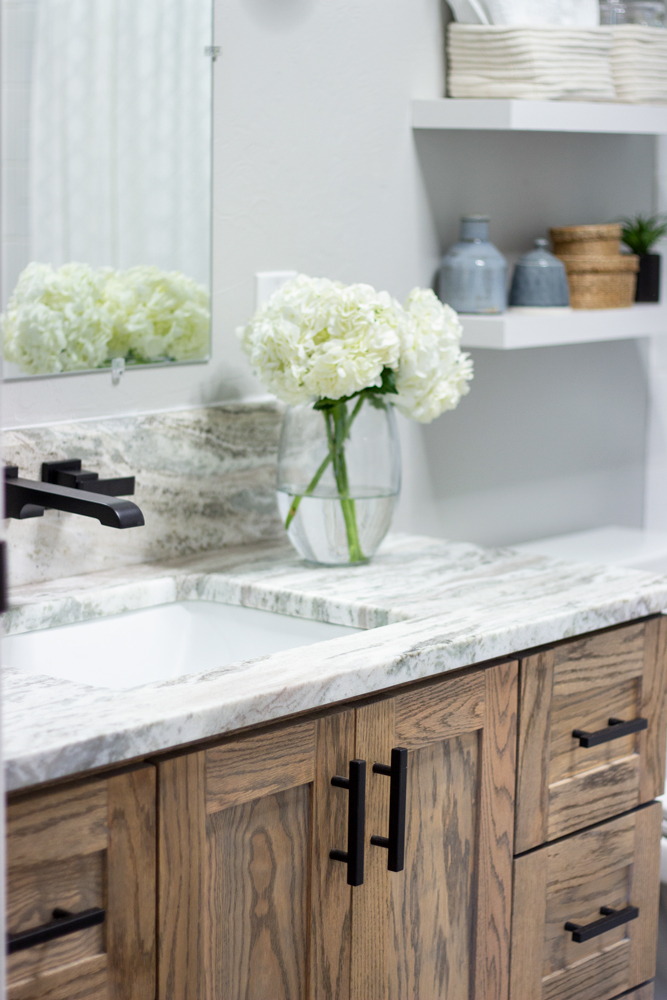
We loved the honed finish of the granite.
I partnered with Behr Paint for all the paint for this bathroom and I’m so glad I did! With all the wall and ceiling patching and the natural wood doors doors, we had to paint the ceiling, doors and trim, and the walls. I chose Behr Marquee because it has been my go-to paint for pretty much everything the past 2 years. I love the thickness, coverage, and durability. It is a paint-and-primer-in-one, and it is mildew resistant, so it is perfect for a bathroom! The baseboards and door trim were pre-primed so I just put one coat of Behr Marquee Semi-Gloss in Cameo White (their whitest white), and I put 2 coats on the doors. Then for the walls, because there was some areas that had drywall and patching, we did 2 coats of Behr Marquee Eggshelf in Dolphin Fin. Behr Marquee recently launched their flat ceiling paint, so I used it on the ceilings in Cameo White.
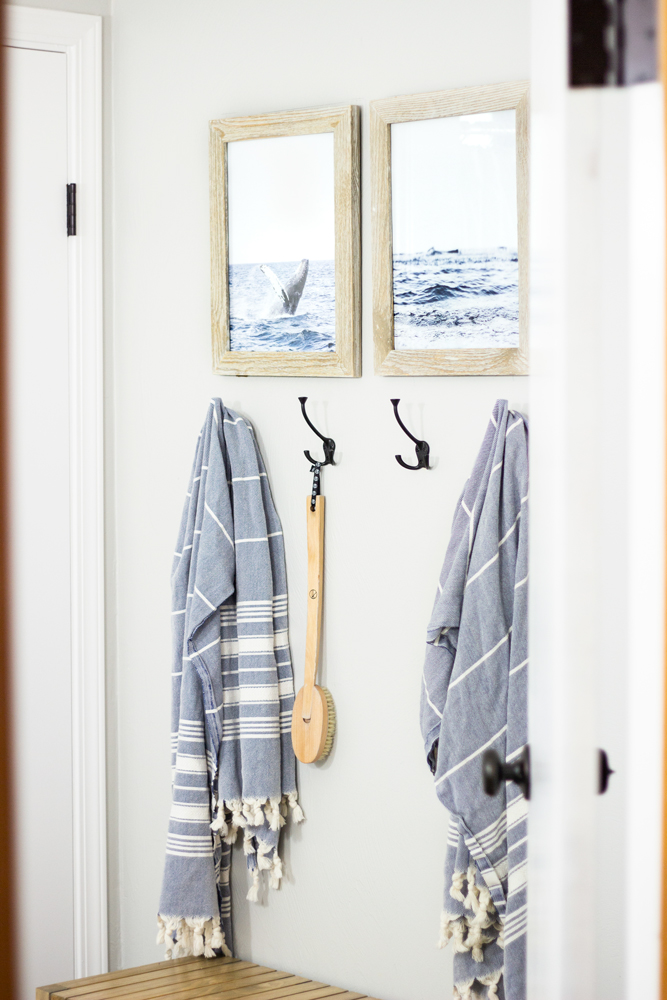
Right across from the vanity on the opposite wall was this area that had nothing but a towel rod before. It was mostly a wasted space and because the bathroom is so big, I wanted to put a bench here. That way when guests come to visit and shower, they have a place to put their change of clothes, without setting them on the toilet or ground. I wanted the bathroom bench that is identical to this from IKEA but they were sold out. I decided to build one that were the same dimensions at home, so I could disassemble it, pack it in my suitcase, and re-assemble it/stain it once I flew back up here. It turned out pretty sweet and I’ll have build plans up next week!
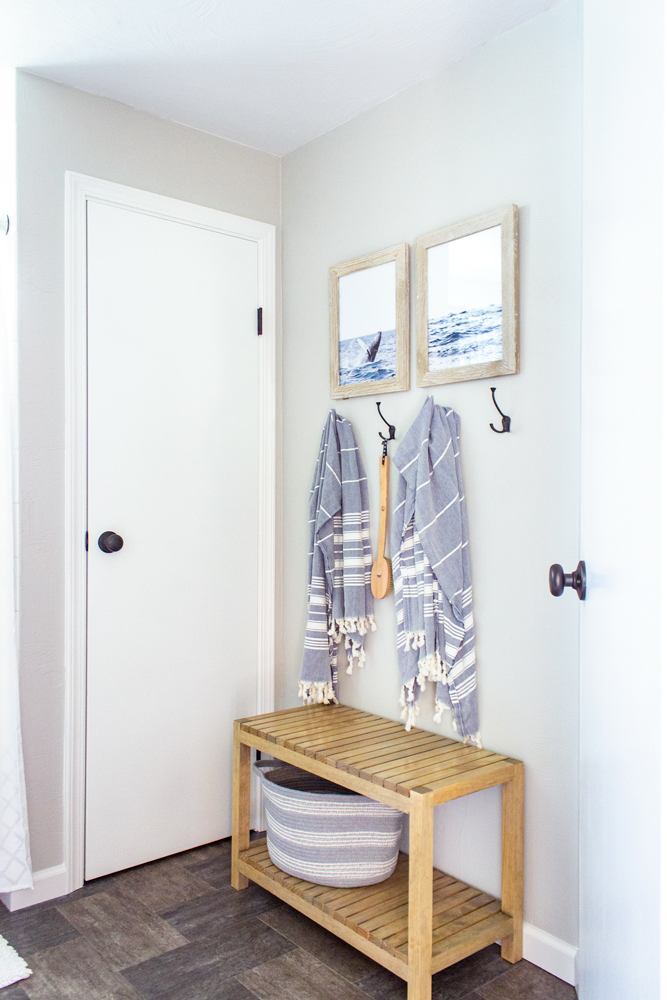
The basket underneath is for dirty clothes, and the 4 hooks above is much more practical for multiple towels hanging now. I searched everywhere for the perfect color Turkish towels and was happy when I found these perfect worn denim colored ones on Amazon. Even though these ones were a little more expensive than what I normally pay for a towel, they are quite large and thicker than previous Turkish towels I have bought, which means they are more absorbent!
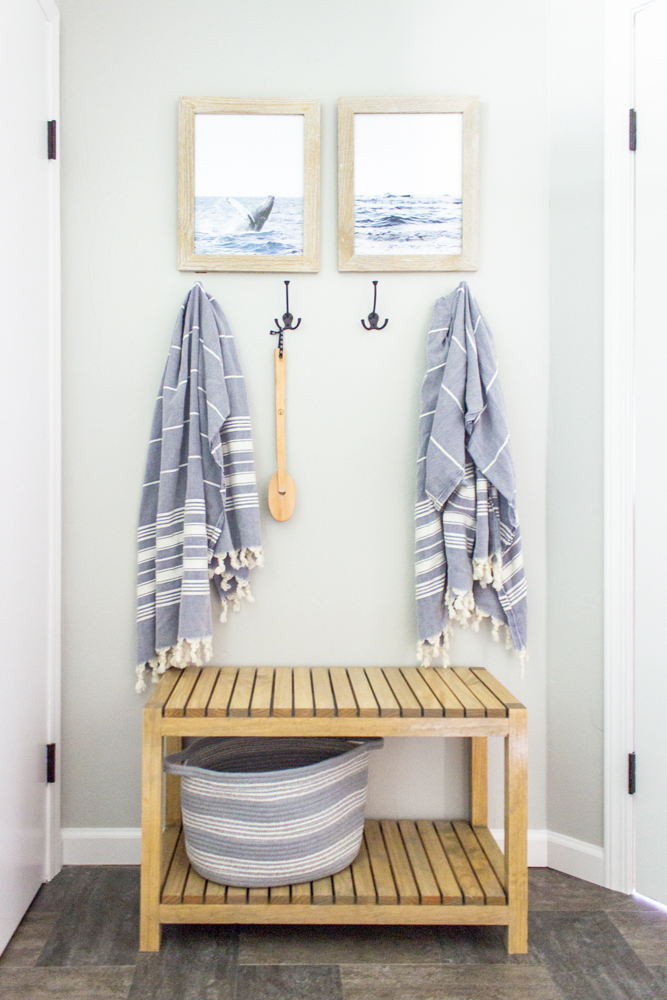
The artwork exactly what I had in mind for this Alaskan bathroom, as these two scenes are familiar for anyone who lives in Southeast Alaska. They were both from a set of 3 digital downloads on Etsy.
The floors were something my sister already had purchased the materials for, over a year ago, since she installed this throughout her entire upstairs. She wanted to continue it into the bathroom so there wouldn’t be a transition piece at the doorway. I’m normally a tile-in-the-bathroom type of person, but I must admit this vinyl tile that is 100% waterproof doesn’t look bad! It is also warmer underfoot than tile.

Here is a better look at the floating shelves I built, identical to the ones in my own master bathroom.
This vanity is my 2nd favorite build ever, only behind my modern farmhouse buffet. I’ll have build plans available for download up next week also!
 I hope you enjoyed this bathroom makeover and seeing the final result, especially if you were following along in the process in my Instagram Stories!
What was your favorite part?
For more articles on design and DIY, visit Delta Faucet’s blog, Inspired Living.
Souces:
(Affiliate links used)
Sink Faucet – Delta Ara Two Handle Wall Mount Faucet in Matte Black
Tub Faucet & Diverter – Delta Pivotal TempAssure 17T Series Valve and Tub Spout in Matte Black
Shower Head – Delta H2Okinetic In2ition 4-setting Two-in-One Shower Head in Matte Black
Paint- Behr Marquee Eggshell in Dolphin Fin (walls), Behr Marquee Semi-Gloss in Cameo White (trim and doors), Behr Marquee Ceiling Flat Paint in Cameo White
Vanity- DIY
Vanity stain – Varathane Fast Dry Stain mix of Weathered Gray (wiped on first and wiped off quickly) and Golden Oak
Vanity hardware – Amazon
Towel ring – Amazon
Counter tray – Target
Candle and soap – HomeGoods
Toilet paper holder – Amazon
Mirror- Home Depot
Sconce lights – Home Depot
Floating shelves – DIY
Shelf Styling Objects: Frames – HomeGoods, White pot plant – Target, Blue Pottery Vases – Wayfair, Fabric woven baskets – HomeGoods, Round baskets – thrifted, Black pot plant – Target
Toilet – Kohler Cimarron in White
Tile – Home Depot
Grout – Fusion Pro Single Component Grout in Bright White
Tub – Delta Classic 400 60″ in High Gloss White
Shower curtain – Target
Flooring – Armstrong Alterna in Night Owl & Tender Twig
Bath mats – HomeGoods
Door handles – HomeDepot
Bathroom bench – DIY or Ikea
Turkish Towels – Amazon
Hooks – Home Depot
Picture frames – HomeGoods
Art – Etsy
Love it. My favorite part is that you can build all of those items and pack them in your suitcase!
This is beautiful everywhere but the mirror. Why did you not frame the mirror? Ever item has attention to detail except that.
That was actually intentional Glenda! I find that a simple frameless mirror can be modern and pretty without needing to draw attention to itself, letting the other areas shine. I’m not the first designer to do this in a bathroom either… you can go on Pinterest and search “bathroom frameless mirror” and see several examples. Sorry you don’t like it.
Absolutely beautiful!!! You did a fantastic job! Hard to pick just one favorite, but that countertop is gorgeous!
Wow!! You did a great job. I am in love with these beautiful bathroom makeover ideas. The wall designs, mirror, flooring textures, all the accessories – everything creates a sophisticated and splendid look. But I am looking for something that can cover the windows for privacy purpose as they face towards roadside. But don’t have much knowledge about that. Can you suggest me something that will layer those windows beautifully and will stay for a long time without any damage?
You made a fabulous showing! Difficult to pick only one top choice, yet that ledge is dazzling! I locate that a basic frameless mirror can be current and lovely without expecting to cause to notice itself, letting different territories sparkle. This is excellent all over the place yet in the mirror. For what reason did you not outline the mirror? Each thing has tender loving care aside from that.