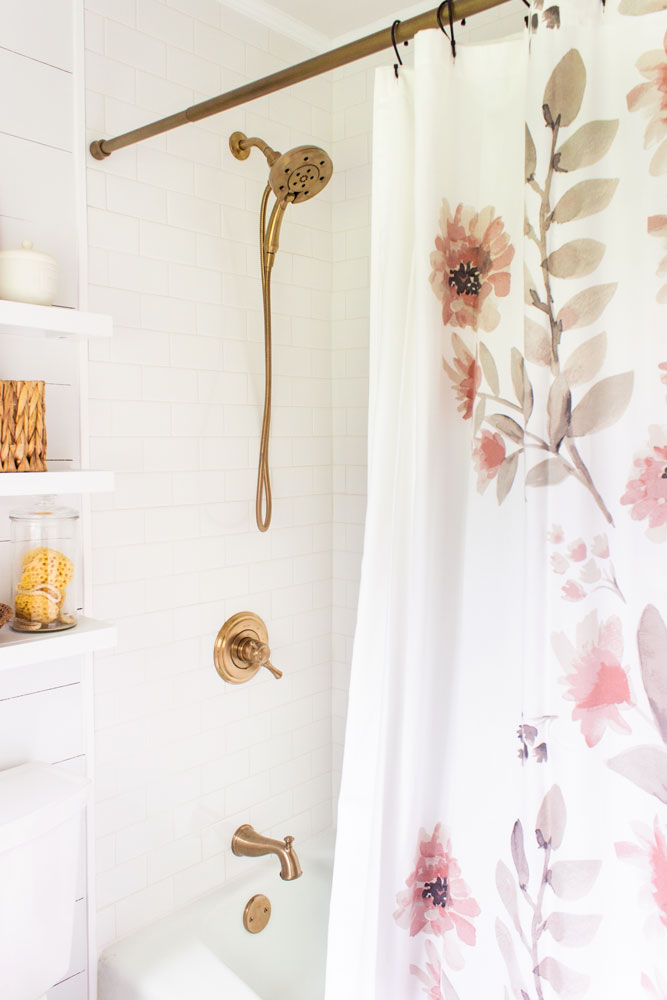
I’m so excited to today to share with you my master bathroom shower update! This has been something we have been wanting to do for years, especially since our initial (partial) master bathroom makeover 4 years ago. We replaced our plastic shower surround with white tile and installed new champagne bronze tub and shower fixtures from Delta Faucet to make our tiny master bathroom officially complete!
I partnered once again with Delta Faucet on this shower update because I love their products– the quality and style is unmatched and while they provided me with the products, all opinions are my own. If you have been around here awhile, you may remember I partnered with them for my initial master bathroom vanity faucet, my kitchen faucet, my basement bathroom, and most recently– my sister’s bathroom makeover last fall. I wouldn’t continue partnering with them over the years if I didn’t love their products and stand by the quality.
So now on to the motivation we had to tackling our master shower just a month before I’m scheduled to have my 4th baby.
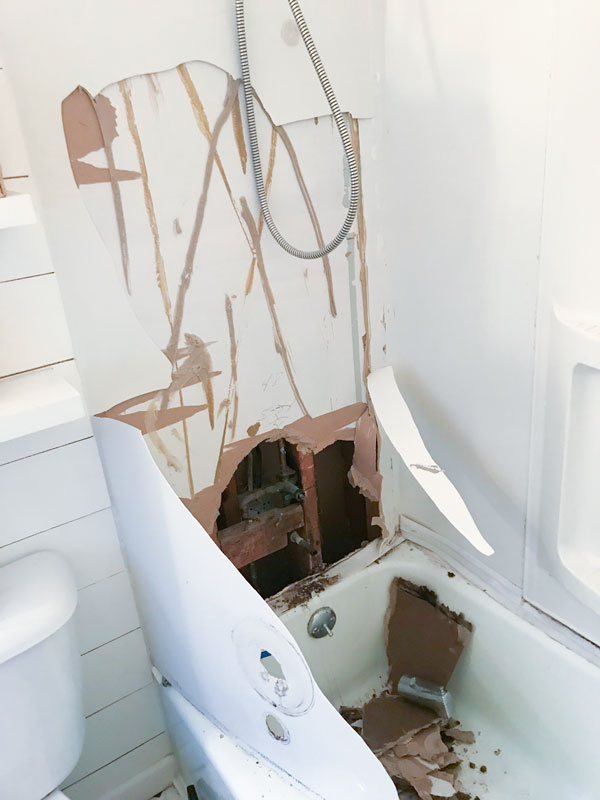
As I mentioned, 4 years ago when we did the initial makeover, we put off doing the tub/shower area because it was a bigger expense. Years went by and other home projects were a priority. Then in January, our tub started leaking into our basement laundry area. Nothing was damaged because we discovered it immediately but both Bruno and I knew that we would need to tear out the old and install new before the baby arrived. We put off most of the work until around the beginning of April but have been going steady since then.
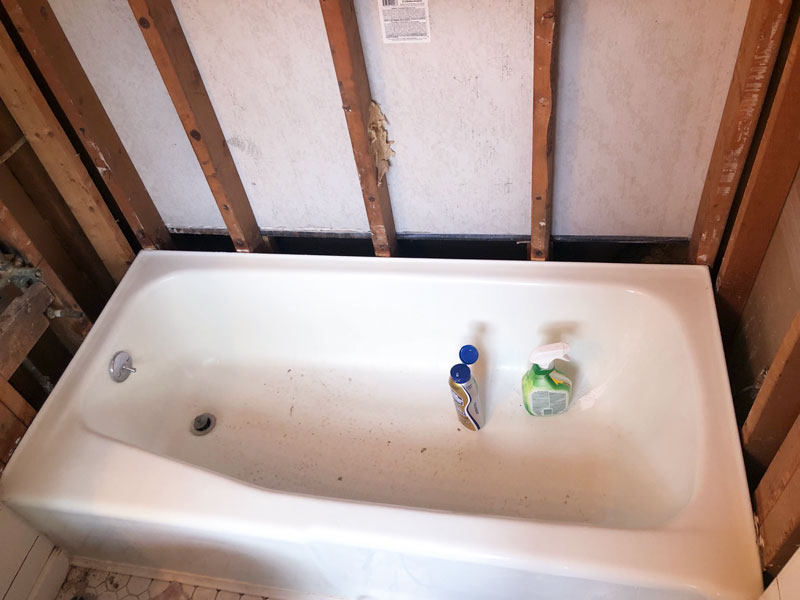
This photo gives you a glimpse of the state of things shortly after we discovered the leak.
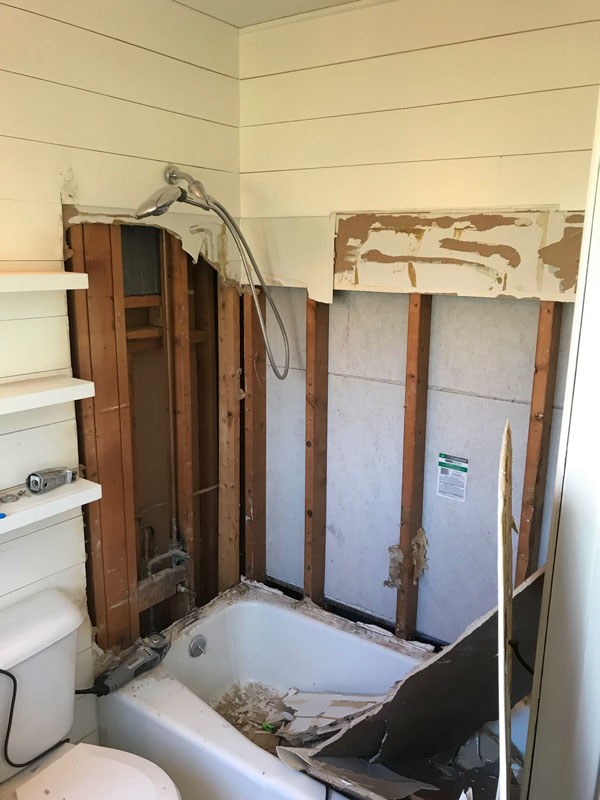
I got started on the tear out, using a pry-bar and cutting out strips of drywall and the wood plank with the Dremel Saw-Max (like a mini hand-held circular saw).
We knew we wouldn’t be able to replace our old tub because it is steel, and would require removing a wall to get it out of the bathroom. But even knowing we would have to salvage it, once I saw all the adhesive and junk stuck to the edges I was sure that we would have to pay to get it re-glazed once we got all the gunk off.
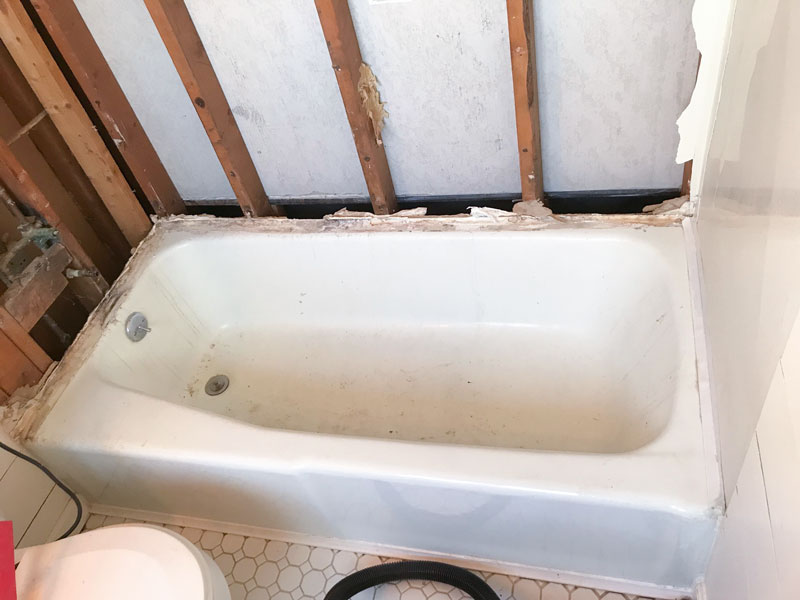
It turned out, my husband was able to get it ALL off AND CLEAN (even though it took him a few hours on a Saturday). He used mostly an oscillating multi-tool and a chisel to get all the adhesive and debris off, which left lots of marks. The marks he was able to remove using a scrubber and Bar Keeper’s Friend (the powder and the liquid).
Look how amazing he got the edges to look?!
He also removed the rest of the drywall up to the ceiling.
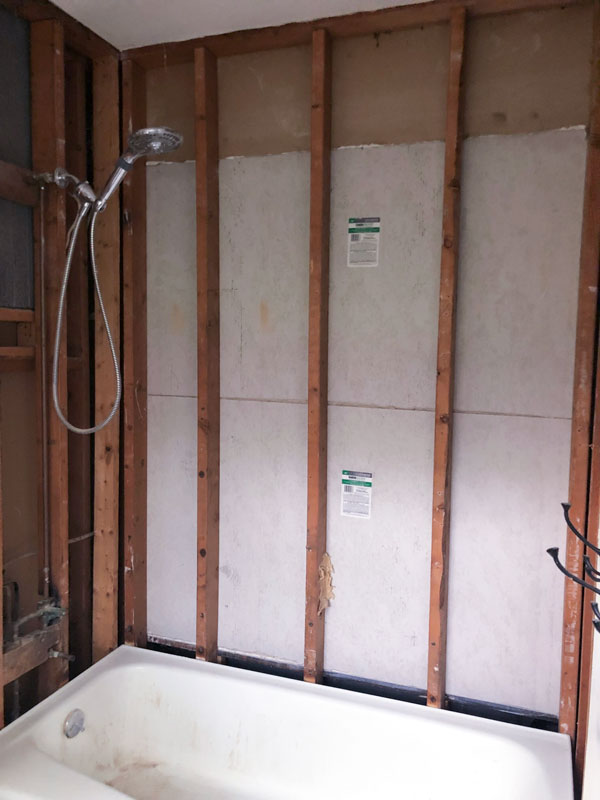
We got started installing the vapor barrier (thick plastic sheeting stapled to studs) and the hardie backer and left the plumbing wall for last.
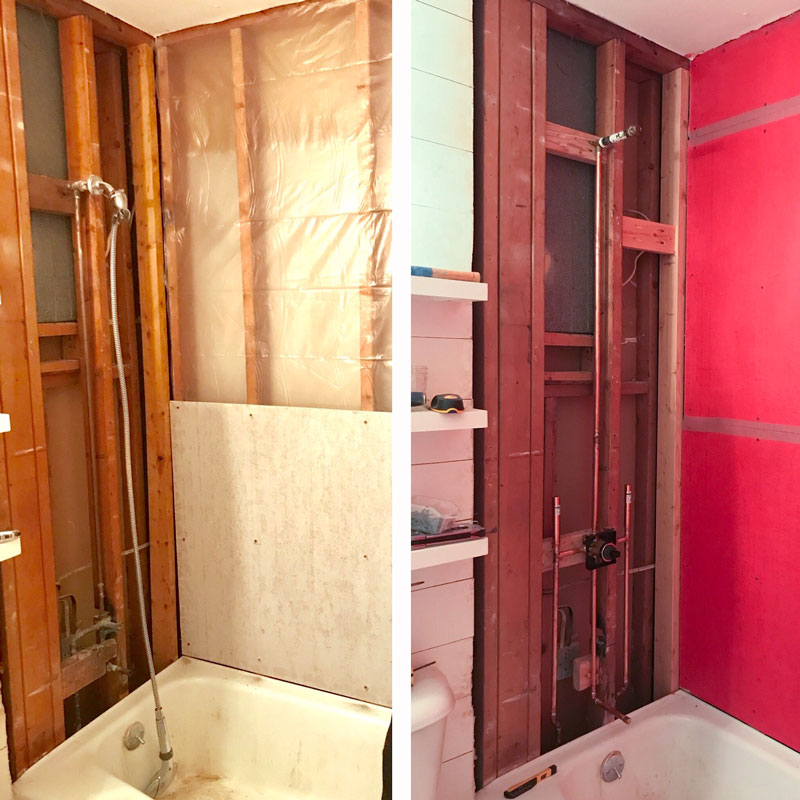
We knew a call to the plumber was necessary because we wanted to move the shower head height up, and install the rough valve that we got from Delta Faucet. Most people forget about this necessary component when switching out the faucet valve. The old rough valve we had in there (which was also the source of the leak) was a completely different set-up and brand, so we needed a new one soldered in.
You can see the side-by-side before and after below. Our plumber moved the height of the shower head to 82″ from the floor, moved the valve height up to 36″ and installed water arresters (new code requirements).
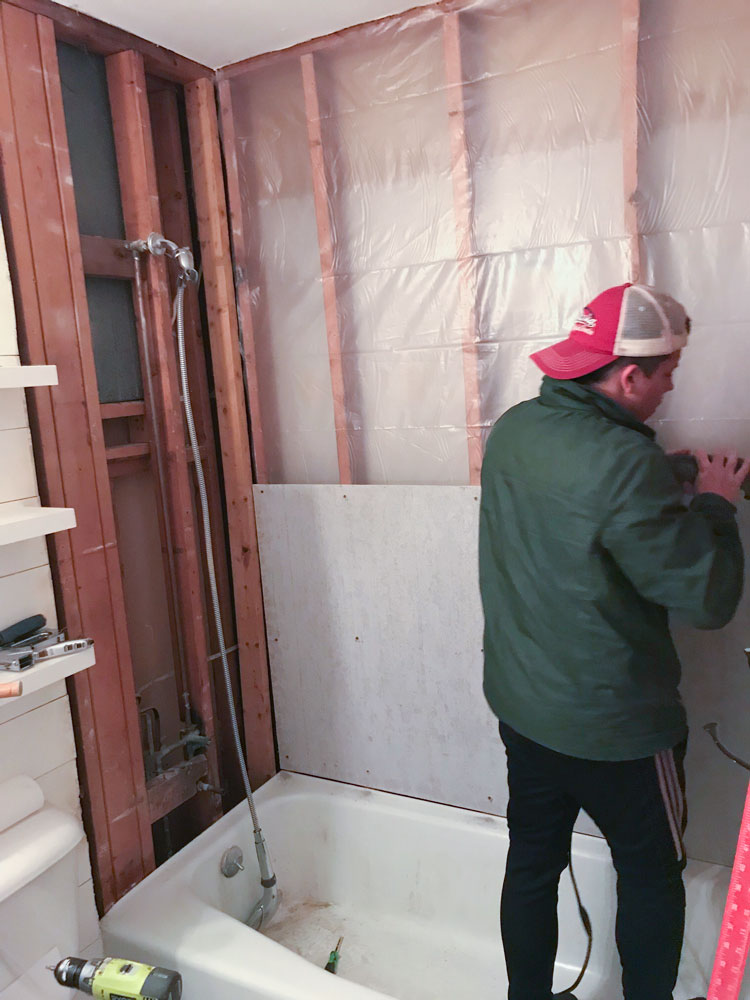
I had to replace a stud in the corner that was warped and reinforce it with a 2×4 cleat running horizontally and was grateful for my Kreg pocket hole jig that made attaching it to the studs super easy and strong.
In case you were wondering, the red color on the wall is 2 coats of RedGard– a waterproof barrier that you paint on top of hardie backer. Once plumbing was finished, we were ready to lay the tile.
Because I installed my sister’s subway tile last fall, I felt pretty confident in doing this job solo. I knew what to expect. I worked slow (it took me over a week, working in spurts), but as long as you don’t leave the excess mastic on any areas that you aren’t currently laying the tile, then working in sections is great and feel much more doable. I also used a score and snap tile cutter for 95% of this job, so it was less messy and virtually silent work.
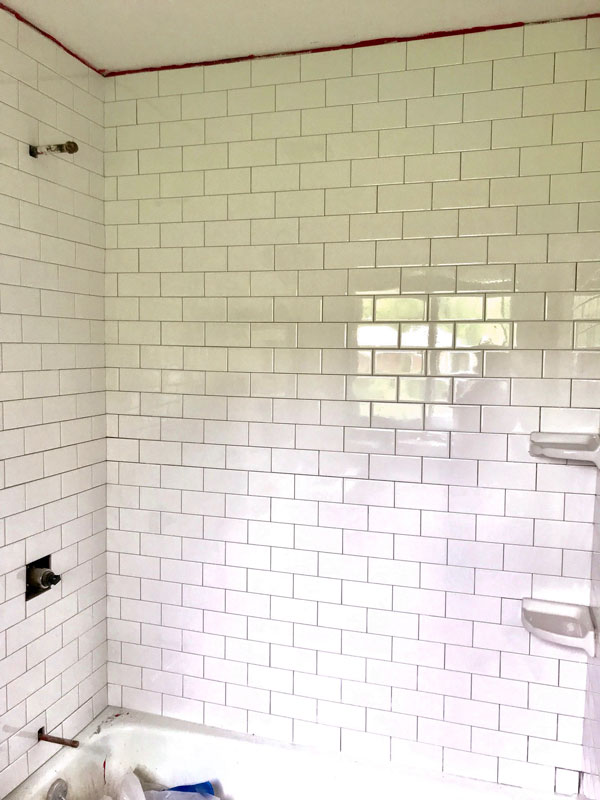
I opted to not use any spacers for my tile because subway tile has a small built-in spacer, and I used white Fusion Pro grout that is a single component grout (meaning it has the sealer built-in).
A tip my brother gave me (he’s a professional) and that worked great was after we did the initial wipe-off of grout with the sponge, I wiped off any excess with paper towels. The paper towels allowed me to get off all the residue very quickly and I didn’t have to use a grout haze remover (which in the past I always had to use). I used about 2 rolls for the whole shower.

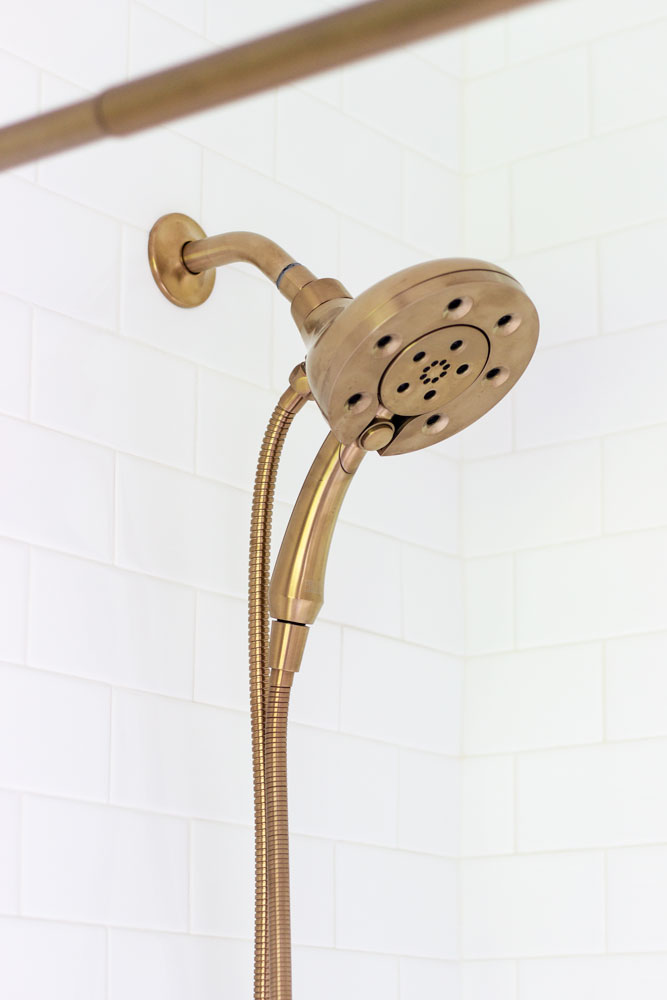
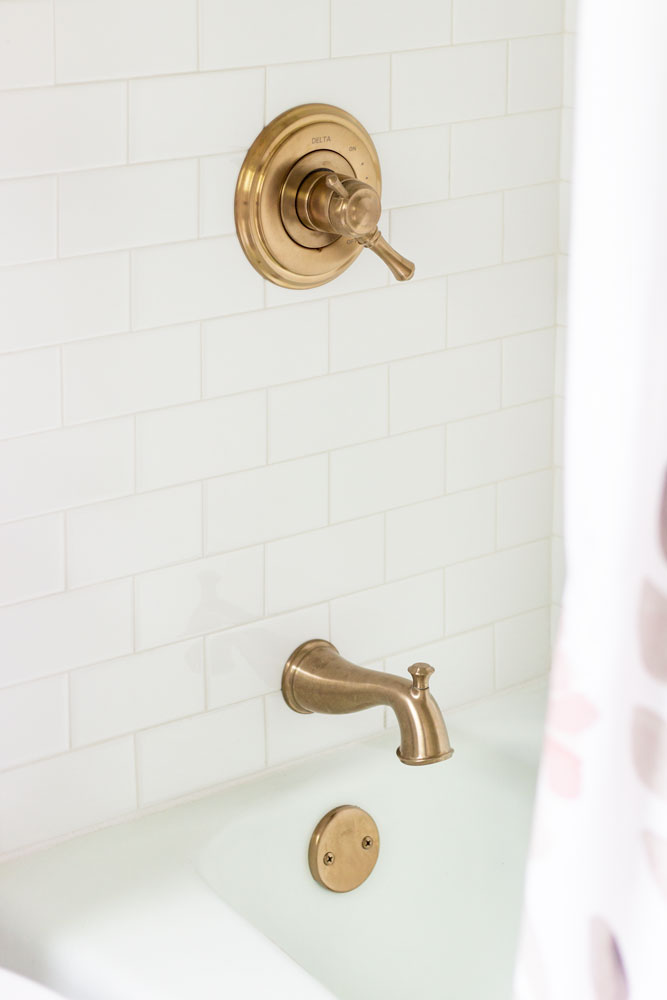
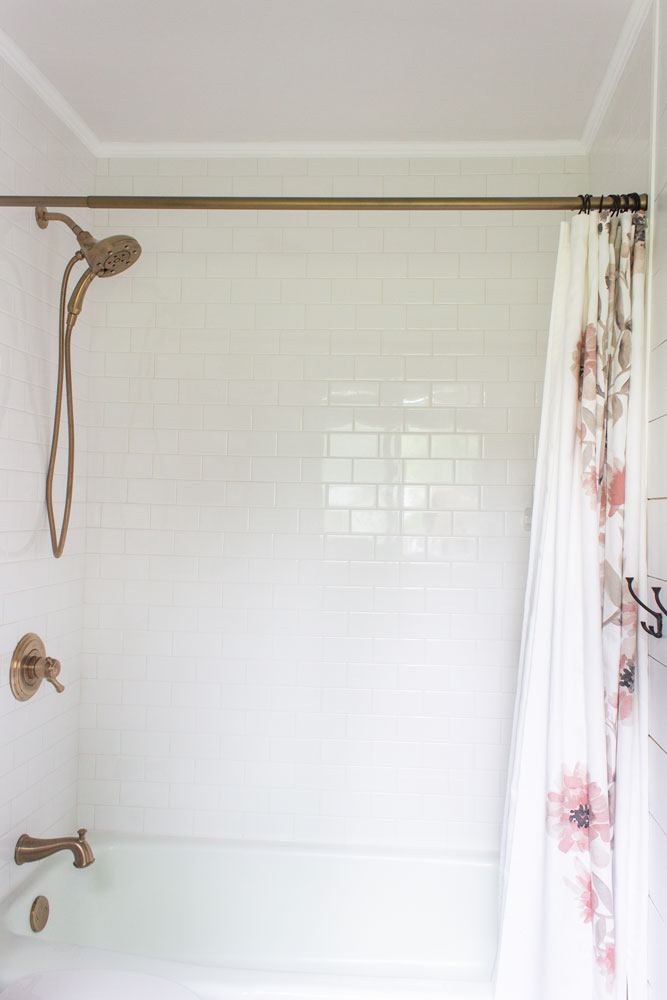
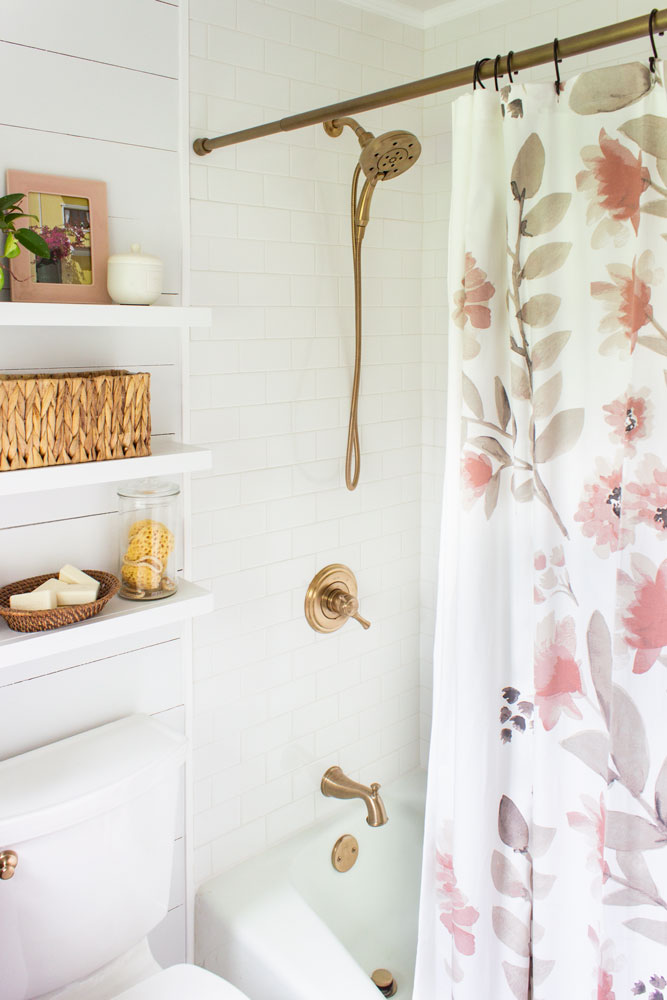
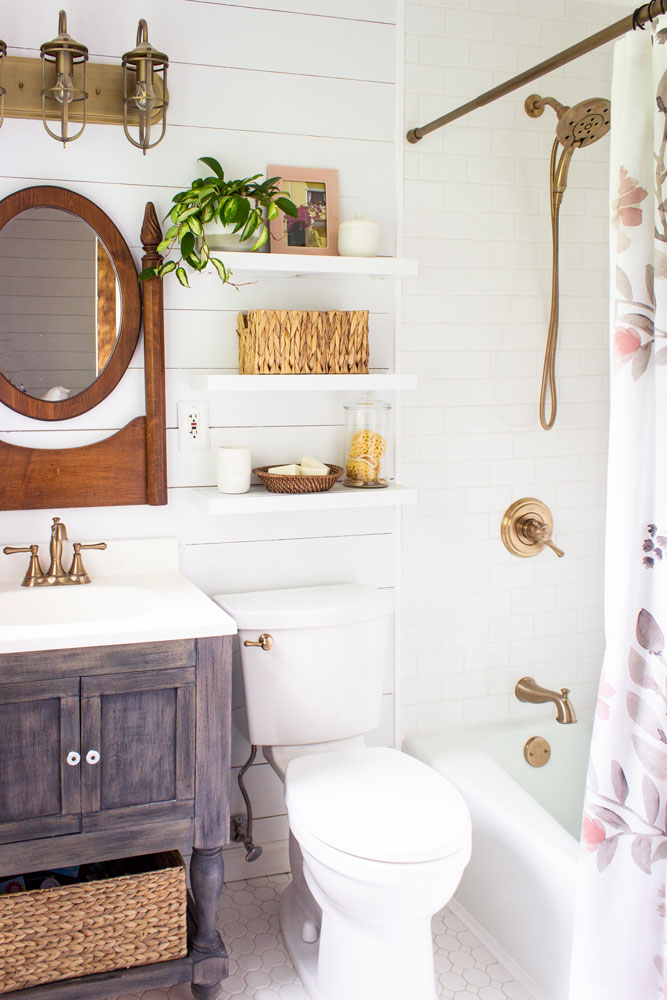
After the tile was grouted, we installed the beautiful fixtures from Delta Faucet. I chose everything from the Cassidy line in Champagne Bronze to coordinate with my vanity sink faucet, and since I wanted a pull-out shower head, I selected every component separate (vs. combo packages they offer).
H2Okinetic In2ition 4-Setting Two-in-One Shower Head
Cassidy Tub Spout with Pull-Up Diverter
Cassidy Monitor 17 Series Valve Only Trim
MultiChoice Universal Tub/Shower Rough
Cassidy Traditional Tank Lever
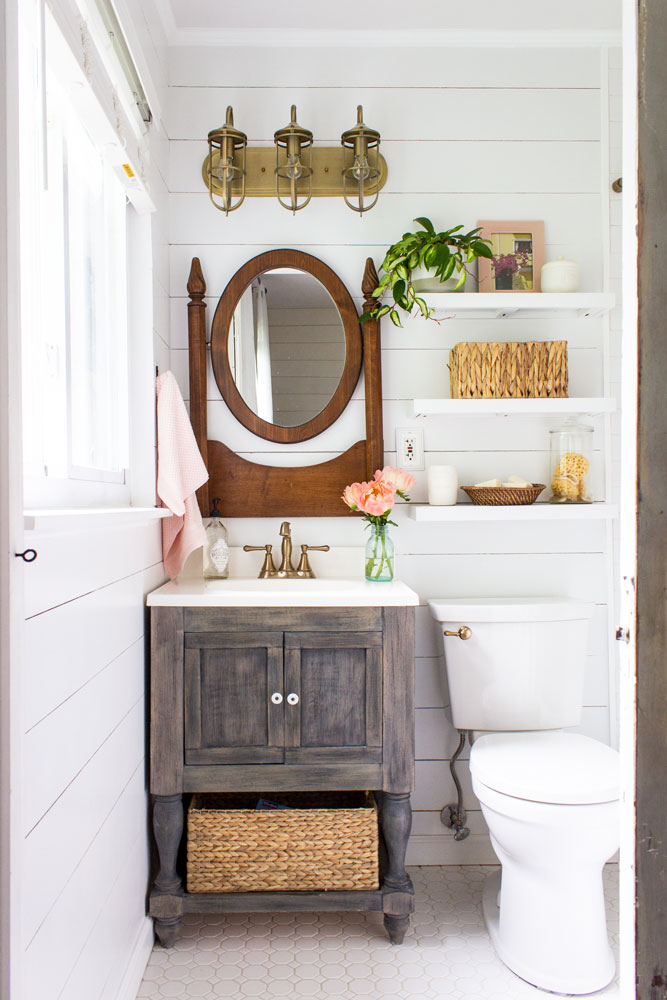
After installing new polystyrene crown moulding and trim around the tile, I decided I needed to paint the walls a cooler shade of white (they were BM Simply White before, which was a little too yellow). We also installed a new toilet (one that had a more square tank and was taller) with the new lever, deep cleaned the floor grout, and lastly, gave the shelves some fresh styling from what it was before.
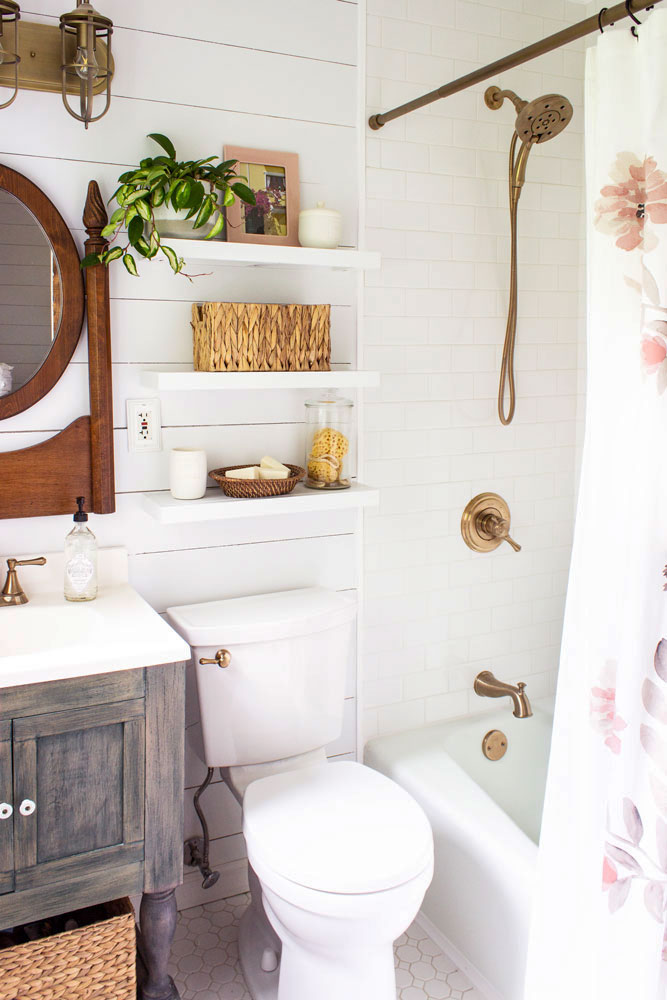
I LOVE my tiny bathroom now! In case you were wondering dimensions, the bathroom is 8’x5′.
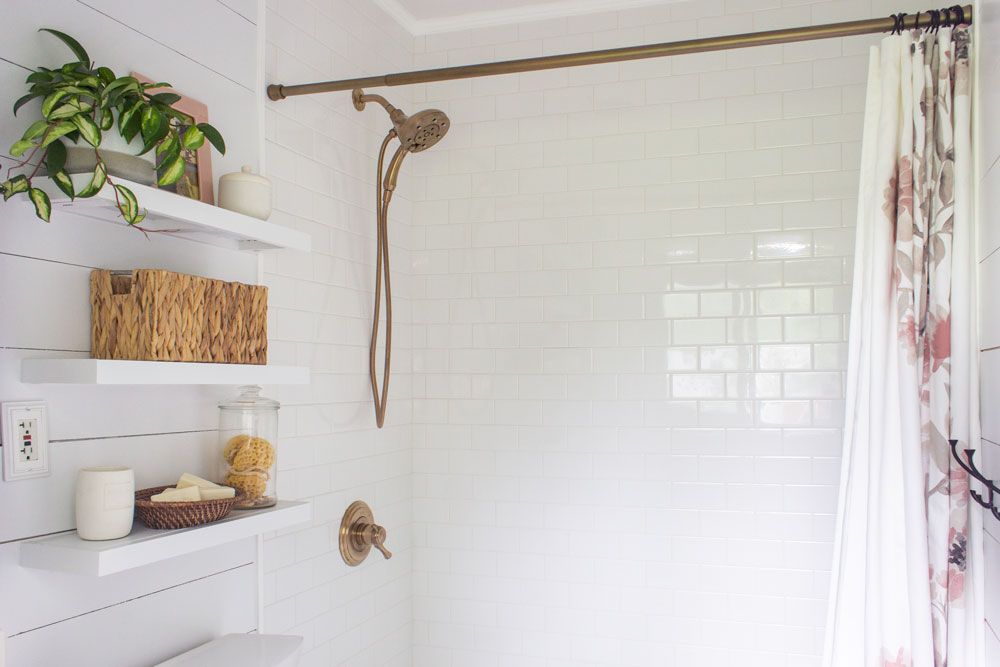
I personally think that tile should ALWAYS go all the way to the ceiling in a shower surround. It makes the ceilings look taller and gives everything a more ‘completed’ look.
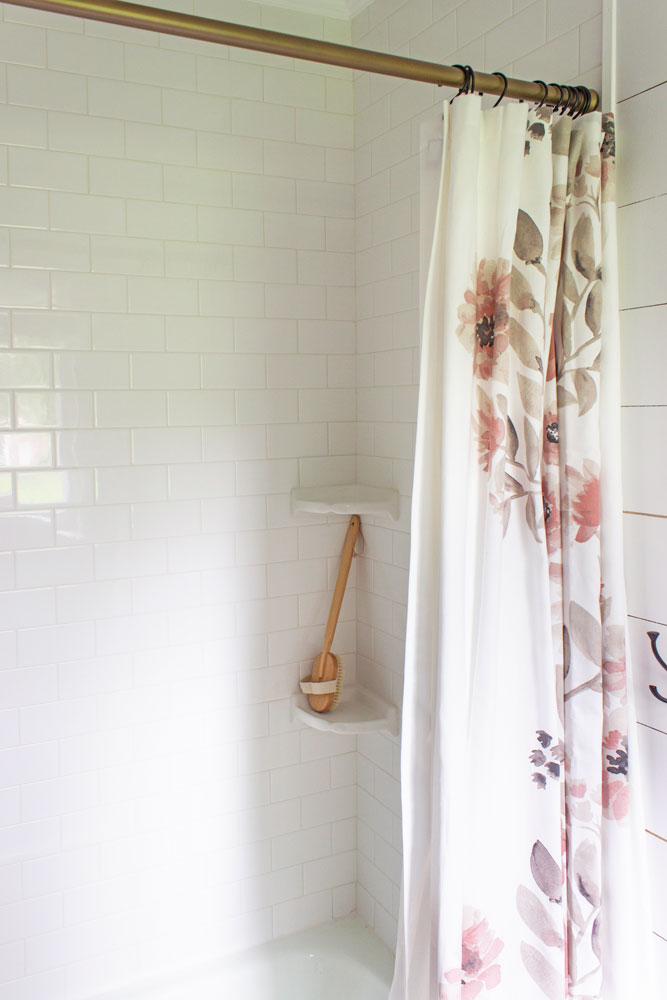
I’m not a fan of those built-in nooks in showers (breeding ground for mold and grime if you ask me), so I added these two little corner shelves. A pain to install (you have to plan and install them as you do the tile), but it was worth it. No more shampoo bottles on the tub edges!
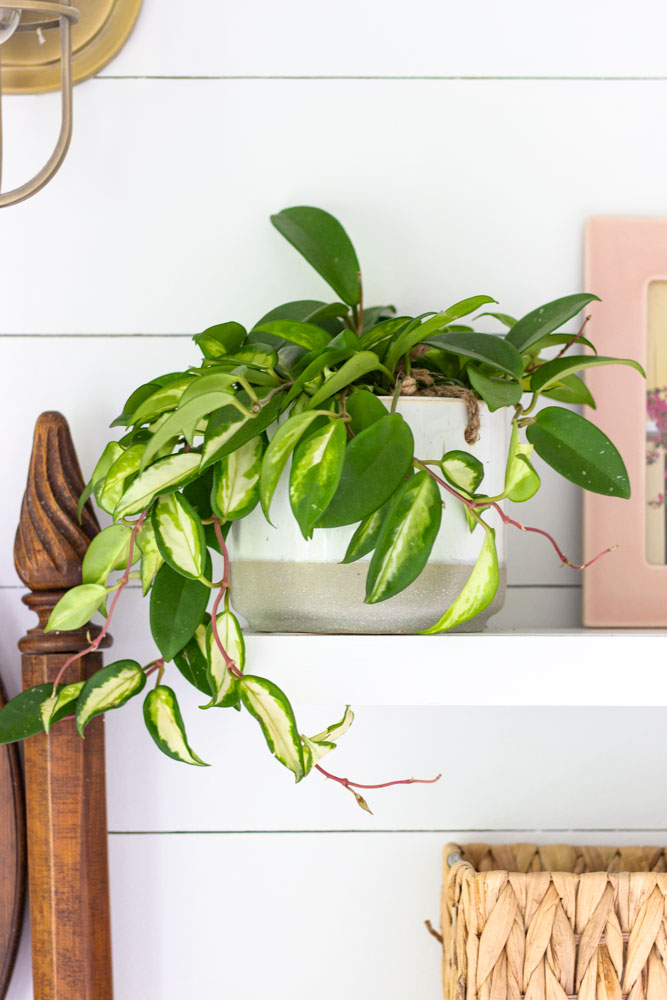
I mentioned I re-styled the shelves using what I had, and I opted for a simpler approach. Less baskets and canisters than before, and I added a pretty plant from Home Depot and a pink frame to coordinate with the shower curtain.
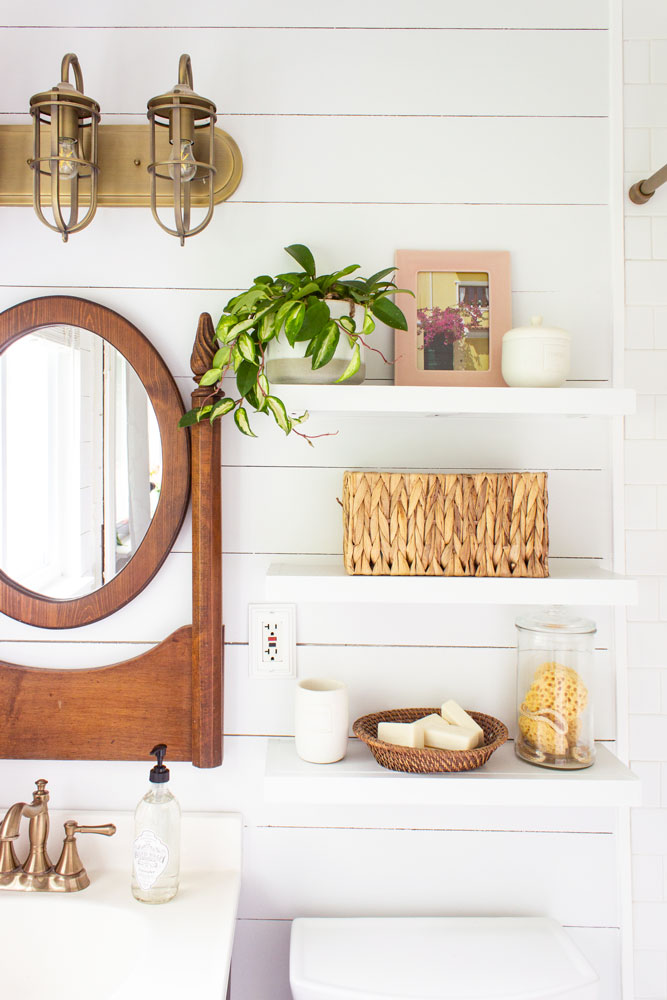
Isn’t it fun how the branches of this plant are pink? I’m not sure what type it is, so if you know comment and let me know!
Finding a shower curtain rod that matched wasn’t easy. In fact, without ordering online there was nothing gold available locally. So I bought a black one and spray painted it using Rust-Oleum Metallic Satin Bronze. It was a perfect match! The shower curtain was from Target and adds a pretty feminine touch.
I also added a little hook by the sink to hold a hand-towel. The mirror is vintage, and the floating shelves and vanity were both things I built 4 years ago. Build plans for the vanity are HERE (including how I achieved that gray finish), and the floating shelf tutorial is HERE.
We plan on replacing the vanity counter (it is much more yellow in person) with some leftover HanStone Quartz we have, and getting an under-mount sink, but it didn’t make the cut for this time around. We plan on gutting our kid’s bathroom later this year, so we will probably do it around the same time.

Small spaces definitely have their challenges, but I love the style and function we crammed in this little room!
A big thanks to Delta Faucet for helping make my vision for this bathroom a reality. Now I’m ready to have the baby! T-minus 4 days! Baby girl will be here on the 14th of May!
What is your favorite part? Let me know if you have any questions!
I absolutely love this mirror!!! Where did you find it?
It’s vintage— from an old dresser.
It’s lovely!! Your mixture of wood and brushed brass really compliment one another.
As someone who has a niche in one bathroom and a corner shelf in another, as long as you regularly clean your bathroom, they’re both sanitary! May 14th is my youngest child’s birthday. Good luck!
Totally agree with your comment on how tile in the shower should go all the way up to the ceiling!!!
Absolutely love the brushed brass details! Well done on the transformation. Carolina at Ironmongery Experts.
I have a bathroom – or two that needs renovating. Thank you for this post, it has given me some things to consider for the smaller of the two bathrooms. I will probably need to take it in steps as you did. Bath last, sink, floor, paint mirror, lights first.
Pinned and following!
Love it. I’m redoing the grown up kids bathroom with some of the same colors. Where did you find the light fixture? Beautiful!
Love the look! Where did you get the shower curtain rod?
I got it at Home Depot and sprayed it gold.
Well done! I’m renovating our bathroom too and also going with the simple white tiles and Cassidy fixtures in CB. The like look is so versatile and classic.
Question for you…what white color did you end up choosing for your walls and what brand toilet did you get?